4 Managing Workspace Elements
This chapter includes the following sections:
For information about the client profile and processor workspace elements, see the following chapters:
4.1 Introduction to Workspaces and Their Elements
A workspace represents a complete Capture environment, containing metadata, configuration profiles, and physical data for a particular environment. Workspace managers can add, edit, copy, and delete workspaces.
Table 4-1 lists and describes the shareable Capture elements workspace managers work with in a selected workspace.
Table 4-1 Capture Elements to Manage in the Workspace
| Capture Elements | How You Manage Them | Refer To |
|---|---|---|
|
Workspace users |
Grant previously created Capture users or groups workspace manager or viewer access level to the selected Capture workspace. |
|
|
Metadata fields |
Create fields that client users or Capture processors populate with values for Capture documents. Configure how metadata fields are completed, such as choice lists or database lookups. Use metadata fields throughout the workspace. |
|
|
User defined choice lists |
Configure a metadata field to display a drop-down list of choices. With this type of choice list, you maintain the list of choices. Use choice lists in client profiles and processor jobs. |
|
|
Database choice lists |
Configure a metadata field to display a drop-down list of choices. With this type of choice list, the choices come from a database search. Use choice lists in client profiles and processor jobs. |
|
|
Dependent choice lists |
Configure dependencies between user defined or database choice lists, where the user's choice in a parent list affects the choices displayed in a linked child list. Use dependent choice lists in client profiles. |
|
|
Database lookup profiles |
Configure links to a database. For example, configure a lookup to search a database for a matching value, then return and populate Capture metadata fields. Use database lookups in client profiles or processor jobs. |
|
|
Batch statuses |
Create statuses that users or batch processors can assign to batches. Batch statuses can be used to filter which batches are displayed or acted upon. |
|
|
Attachment types |
Define attachment types and associate them with a document profile. |
|
|
Document profiles |
For each type of document captured, specify the set of metadata fields and attachment types that apply. |
|
|
Scripts |
Import JavaScripts for customizing functionality in the client or in a Recognition or Import Processor job. |
|
|
Client profiles |
Configure settings to be used by client users when they scan, import, and index documents in the Capture client. |
|
|
Import Processor jobs |
Configure automated importing of documents from email, a monitored folder, or a list file. |
|
|
Document Conversion jobs |
Configure automated conversion of non-image documents/attachments to image format and optionally merge documents. |
|
|
Recognition Processor jobs |
Configure automated bar code detection, document organization, and indexing of documents. |
|
|
Commit profiles |
Configure how batches are output to a commit folder or content repository. |
4.2 Managing Workspaces
Below are some important points about managing workspaces:
-
Adding a workspace creates an entirely new Capture environment, in which you define elements such as metadata, profiles, and processor jobs to support the processing of batches created within the workspace.
-
You can also copy a workspace, which creates a new workspace with a different name based on the copied workspace's contents, but contains none of its batches or data. All configurations defined in the source workspace are included in the copy, including metadata fields, attachment types, document profiles, client profiles, database lookups, choice lists, and processor jobs.
Note:
Login credentials, such as an email account login defined in an email Import Processor job or a WebCenter Content Server login defined in a WebCenter Content commit profile, are not copied into the new workspace.
-
Editing a workspace refers to renaming it or changing its optional description; information about editing the selected workspace's elements is included throughout this chapter.
Note:
You need to restart the Capture client to see the updates performed in the workspace console.
This section covers the following topics:
Figure 4-1 Workspaces Pane for Managing Workspaces

Description of "Figure 4-1 Workspaces Pane for Managing Workspaces"
4.2.2 Deleting a Workspace
Deleting a workspace permanently removes all of its batch data and configurations, including metadata, profiles, and processor jobs.
Caution:
Ensure that no batches are being processed before deleting a workspace. Deleting a workspace with batches in process could be harmful.
To delete a workspace:
- In the workspaces pane, select a workspace to delete and click the Delete button.
- When prompted, click Yes to confirm the deletion.
4.3 Managing Workspace Security
As described in About Workspace Console Access, a workspace manager with access to a workspace can grant or remove other managers' or viewers' access to it on the Security tab. Managers and viewers must already have access to the workspace console itself, as described in About Capture Administrator and User Roles.
This section covers the following sections:
Figure 4-2 Security Tab Displays Workspace Managers and Viewers With Workspace Access
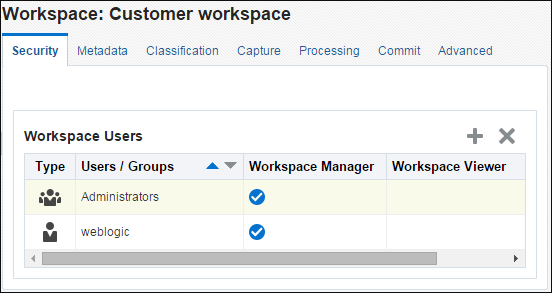
Description of "Figure 4-2 Security Tab Displays Workspace Managers and Viewers With Workspace Access"
4.3.1 Granting Workspace Access to Workspace Managers and Viewers
To grant workspace access to another manager or a workspace viewer:
Figure 4-3 Granting Workspace Access to a Group or User Assigned a Capture Role
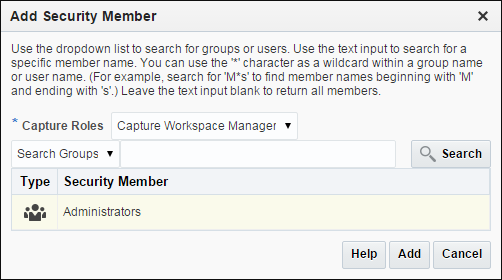
Description of "Figure 4-3 Granting Workspace Access to a Group or User Assigned a Capture Role"
4.3.2 Removing Workspace Access From a Workspace Manager or Viewer
Removing workspace access means that the manager or viewer can still access the workspace console, but the selected workspace is no longer available and visible to the manager or viewer.
Note:
You cannot remove your own workspace access. Each workspace must have at least one workspace manager with access.
To remove a manager's or viewer's workspace access:
- Click the Security tab in a selected workspace.
- In the Workspace Users table, select the manager or viewer whose access you want to remove.
- Click the table's Delete button. When prompted, confirm the deletion.
4.4 Managing Metadata Fields
An integral part of creating a workspace is defining its metadata fields. Client users enter values in these fields while indexing documents, and batch processors assign values to these fields during processing. Typically, users later search for documents in a content management system using these fields.
You can configure metadata fields in a variety of ways. Metadata fields can be required, which means they must be completed to allow a document to be successfully committed. Metadata values can also be auto populated, derived from bar codes read by the Recognition Processor, selected from choice lists, populated by a JavaScript, or selected from a database lookup.
Figure 4-4 Metadata Fields Defined for a Workspace
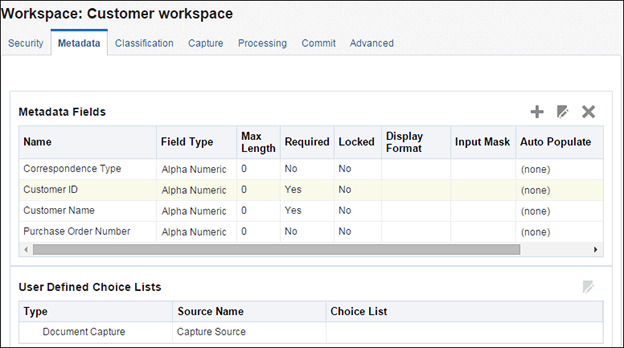
Description of "Figure 4-4 Metadata Fields Defined for a Workspace"
This section describes the following topics:
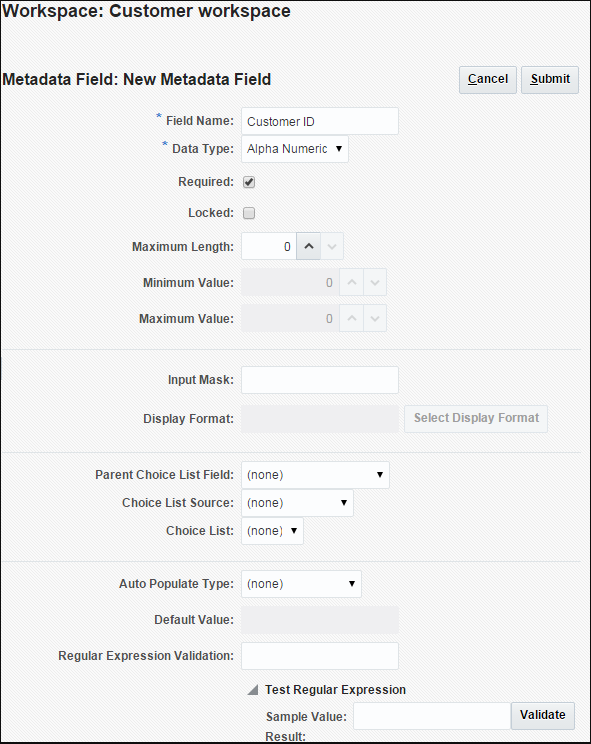
4.4.1 Adding or Editing a Metadata Field
After adding a metadata field, you can use it throughout the workspace. Editing a metadata field changes it wherever it is used.
To add or edit a metadata field:
4.4.2 Deleting a Metadata Field
Deleting a metadata field permanently removes it from the workspace. If you delete a metadata field that is in use in a client profile or a batch processor, errors may occur at different stages of batch processing. Ensure that the field is not mapped to metadata fields in a commit profile.
To delete a metadata field from a selected workspace:
4.4.3 Configuring a Metadata Field's Input Mask
An input mask is a filter that controls what users can enter into a metadata field. For example, a mask might allow users to enter numbers but not alphabetic characters. If the user enters a character that does not conform to the mask, the application does not accept it.
To set up an input mask that controls what users can enter into a metadata field:
Table 4-2 Alphanumeric Input Mask Characters
| Mask Character | Description |
|---|---|
|
# |
Requires a number to be entered. |
|
' (single quote) |
Escape character, used to escape any of the special formatting characters. |
|
U |
Accepts any letter, and converts it to uppercase. |
|
L |
Accepts any letter, and converts it to lowercase. |
|
A |
Accepts any letter or number. |
|
? |
Accepts any letter. |
|
* |
Accepts any character. |
|
H |
Accepts any hexadecimal character (0-9, a-f, or A-F). |
Table 4-3 Alphanumeric Input Mask Examples
| Input Mask | Description | Example Format |
|---|---|---|
|
###-##-#### |
Social Security Number |
123-45-6789 |
|
UU |
State |
AZ |
Table 4-4 lists numeric and float input masks.
Table 4-4 Numeric and Float Input Mask Characters
| Mask Character | Description |
|---|---|
|
0 |
Requires a digit to be entered. |
|
# |
Requires a digit to be entered. Zero shows as absent. |
|
. |
Include as a decimal separator or monetary decimal separator. |
|
- |
Include as a minus sign. |
|
, |
Include as a grouping separator. |
|
; |
Include to separate positive and negative subpatterns. |
Note:
A DecimalFormat pattern contains a positive and negative subpattern; for example, "#,##0.00;(#,##0.00)". Each subpattern has a prefix, numeric part, and suffix. The negative subpattern is optional; if absent, then the positive subpattern prefixed with the localized minus sign ('-' in most locales) is used as the negative subpattern. That is, "0.00" alone is equivalent to "0.00;-0.00". If there is an explicit negative subpattern, it serves only to specify the negative prefix and suffix; the number of digits, minimal digits, and other characteristics are all the same as the positive pattern. That means that "#,##0.0#;(#)" produces precisely the same behavior as "#,##0.0#;(#,##0.0#)".
To allow the user to enter decimal values, you must create a format that forces at least one decimal (#.0#).For client users to change a number's sign, they must enter the number first, then press the + or the - key.
Table 4-5 Numeric and Float Input Mask Examples
| Input Mask | Description | Example Format |
|---|---|---|
|
#,###.0## |
Decimal Value |
1,234.567 |
|
#,##0.00 |
Currency |
2,500.00 |
4.4.4 Configuring a Metadata Field's Display Format
A display format provides a way to ensure that data entered by users displays in a certain format.
When the user leaves a metadata field with a display format defined, Capture changes the data display, if needed, to match the specified display format. For example, you might format a date field to display a standard date format. The metadata value Capture saves is not changed.
To set up a display format that changes metadata value display:
Table 4-6 Input Formats
| Input Format | Data Type | Description |
|---|---|---|
|
Currency |
Float |
Number formatted using the system locale's currency. |
|
General Date |
Date |
A medium date followed by a medium time. Date display is determined by the system locale settings. |
|
Short Date |
Date |
Date using the system's short date format. Date display is determined by the system locale settings. |
|
Medium Date |
Date |
Date using the system's medium date format. Date display is determined by the system locale settings. |
|
Long Date |
Date |
Date using the system's long date format. Date display is determined by the system locale settings. |
|
Short Time |
Date |
Time using the 24-hour format; for example, 17:45. |
|
Medium Time |
Date |
Time in 12-hour format using hours and minutes and the AM/PM designator. |
|
Long Time |
Date |
Time using the system's long time format; includes hours, minutes, seconds. |
|
General Number |
Numeric, Float |
Number with no grouping separator (for example, 7500). |
|
Fixed Number |
Numeric, Float |
At least one digit to the left and two digits to the right of the decimal separator (for example, 7500.16). |
|
Standard Number |
Numeric, Float |
Number with grouping separator, at least one digit to the left and two digits to the right of the decimal separator (for example, 7,500.16). |
|
Date formats |
Date |
Select from one of the following date formats:
|
4.4.5 Setting Metadata Fields to Auto Populate
You can configure metadata fields to automatically fill (populate) with certain values. For example, you might want to automatically populate a date field with a batch's scan date instead of having users enter it. Or, you might provide a default value for a field that users can change if needed.
To configure a metadata field to auto populate:
4.4.6 Configuring Regular Expression Validation
A regular expression ensures that data entered matches a certain format. For example, to match a value of a, b, or c, you would enter:
[abc]
Regular expressions in metadata fields apply only to alphanumeric type fields. For more information, refer to documentation relating to using and formatting regular expressions, such as the following:
http://docs.oracle.com/javase/tutorial/essential/regex/
To configure and test a regular expression:
- Add or edit a metadata field as described in Adding or Editing a Metadata Field.
- On the Metadata field screen, enter an expression in the Regular Expression field.
- Test the regular expression. Enter a sample value in the Sample Value field and click Validate. A result of
ValidorInvaliddisplays next to the Results read-only field. - Click Submit to save the metadata field's settings.
- Use and test the metadata field's regular expression by using the client to test data entry into the field.
4.5 Managing User Defined Choice Lists
A choice list provides users with values from which to choose. Use choice lists to standardize specific metadata field values or speed up indexing and prevent data entry errors. You create choice lists on the Metadata tab, then select them in a metadata field or processor job. This allows you to use the same choice list in multiple Capture areas.
You can create these types of choice lists:
-
User-Defined Choice Lists. Use this type to enter and maintain values in the Capture database.
Note:
You can import choice list values into the Capture database from a text file as well as export choice list values to a text file.
-
Database Choice Lists. Use this type to display choice list values dynamically retrieved from an external database. See Managing Database Choice Lists.
Figure 4-5 User Defined Choice List with Correspondence Choices
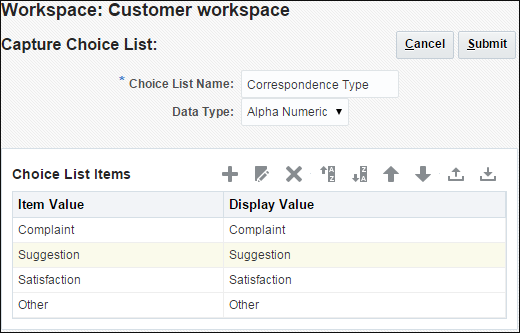
Description of "Figure 4-5 User Defined Choice List with Correspondence Choices"
This section covers the following topics:
4.5.1 Adding or Editing a User Defined Choice List
Follow these steps to configure a user defined choice list for use in Capture. User defined choice lists are stored within the Capture database.
For example, you might create a choice list to allow users to select a customer correspondence type of Complaint, Satisfaction, Suggestion, or Other.
-
Click the workspace's Metadata tab.
-
Under User Defined Choice Lists, select Document Capture in the table and click the Edit button.
-
On the Choice List Type screen, click the Add button to add a choice list, or edit one by selecting it and clicking the Edit button.
-
On the Capture Choice List screen, enter a name in the Choice List Name field (for example,
Correspondence Type). Select a type in the Data Type field (Alpha Numeric, Numeric, Date, or Float).Note:
To display the choice list's values in a metadata field, the choice list must have the same data type as the metadata field.
-
In the Choice List Items table, click the Add button to add a choice list item.
-
In the Choice List Item Properties window, enter a choice list value in the Item Value field.
To display one value to users but commit another, enter a different value in the item's Display Value field. To display the same value to users, click OK without entering a value in the Display Value field. Repeat steps 5 and 6 to add additional choice items.
For information about importing or exporting choice list items, see Importing Values From a Text File Into a Capture Choice List or Exporting Capture Choice List Values to a Text File.
-
Using the up and down or sorting ascending and descending arrow buttons, order choice list items as you want them displayed in the choice list.
-
Click Submit.
The new choice list is displayed in the Defined Choice Lists table. Click Close.
-
Use the choice list in Capture. See Using User Defined Choice Lists in Capture.
To use the choice list in a metadata field:
-
Add or edit a metadata field, as described in Adding or Editing a Metadata Field.
-
On the Metadata Field screen, select Capture Source in the Choice List Source field.
-
In the Choice List field, select the choice list you created.
-
Select the Locked field, if needed. In this case, locking the metadata field restricts users to selecting an item from the choice list.
-
4.5.2 Importing Values From a Text File Into a Capture Choice List
Follow these steps to import values from a text file into a user defined choice list. Capture imports UTF-8 text files where each choice list item record is delimited with a CR (carriage return)/LF (line feed). Each record line within the text file is imported as a choice list item. To import different values for the Item Value and Display Value, a TAB character must be used to separate the values within an import record line.
-
Add or edit a user defined choice list as described in Adding or Editing a User Defined Choice List.
-
On the workspace's Metadata tab, select Document Capture in the User Defined Choice Lists table and click the Edit button.
-
In the Defined Choice Lists table, click the Add or Edit button to add or edit a choice list.
-
-
In the Choice List Items table, click the Import button.
-
In the Import Choice List Items window, click the Browse button, locate the file to import, and click Open.
-
Select the Check for duplicates field to check for and eliminate duplicate values.
Note:
Importing large choice lists takes longer when this option is selected.
-
Click Process.
Capture imports the choice list items and displays items added and errors encountered in the Import Status area.
-
Click Close.
4.5.3 Exporting Capture Choice List Values to a Text File
Follow these steps to export values from a user defined choice list to a text file. Capture writes a selected choice list's values to a delimited text file.
-
Edit a user defined choice list as described in Adding or Editing a User Defined Choice List.
-
On the workspace's Metadata tab, select Document Capture in the User Defined Choice Lists table and click the Edit button.
-
In the Defined Choice Lists table, select a choice list and click the Edit button.
-
-
On the Capture Choice List screen, click the Export button. A message displays asking if you want to open or save the
export.txtfile. Choose save options.The text file is written to the specified location.
4.5.4 Deleting a User Defined Choice List or Items
Deleting a choice list makes it unavailable in any client profile or processor in which it is used.
- To delete a choice list, select it in the Defined Choice Lists table and click the Delete button. Confirm the deletion.
- To delete a choice list item, select the choice list in the Defined Choice Lists table and click the Edit button. In the Choice List Items table, select an item and click the Delete button. Confirm the deletion. Click Submit.
4.5.5 Using User Defined Choice Lists in Capture
After creating one or more user defined choice lists, you can then:
-
Use them in Capture profiles or batch processor jobs, as listed in Table 4-8.
-
Define dependencies between them, as described in Managing Dependent Choice Lists.
Table 4-8 User Defined Choice List Use in Capture
| Capture Component | Choice List Type | How Used |
|---|---|---|
|
Client profiles |
Choice List Dependent Choice List |
Use choice lists in metadata fields. See Adding or Editing a Metadata Field. Create dependent choice lists, where a selection in the parent field determines the values displayed in the child choice list field. Create a dependency, then select it in a client profile (see Adding or Editing a Dependent Choice List). |
|
Recognition Processor |
Choice List |
Assign a bar code value that matches a choice list value to a metadata field. See Adding, Editing, or Deleting Bar Code Definitions. |
|
Content Server commit profile |
Choice List |
Dynamically assign a type, security and/or account based on a choice list metadata field value. See Based on User's Choice List Selections. |
4.6 Managing Database Choice Lists
A choice list provides users with values from which to choose. Use choice lists to standardize specific metadata field values or speed up indexing and prevent data entry errors. You create choice lists on the Metadata tab, then select them in a profile or processor job. This allows you to use the same choice list in multiple Capture areas. Database choice lists will retrieve all records from the configured database table/view. For example, you would not want to configure a database choice list with thousands of records because it may cause noticeable delays in the client. Instead, consider using a database lookup profile instead.
You can create these types of choice lists:
-
User Defined Choice Lists. Use this type to enter and maintain values in Capture. See Managing User Defined Choice Lists.
-
Database Choice Lists. Use this type to display choice list values dynamically retrieved from an external database. This is useful when choice list values are subject to change, since a database choice list displays current values from a database table.
Figure 4-6 Database Choice List for Product Family List
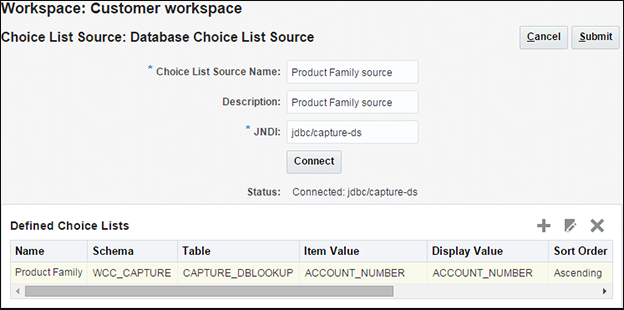
Description of "Figure 4-6 Database Choice List for Product Family List"
This section covers the following topics:
4.6.1 Adding or Editing a Database Choice List
Follow these steps to configure a database choice list. Database choice lists provide choices from a linked database table or view.
To configure a database choice list, you need a data source, which is typically configured by a system administrator. You first connect to a data source and then identify how you want the database's values used. See Understanding JDBC Data Sources in Administering JDBC Data Sources for Oracle WebLogic Server.
To add or edit a database choice list:
-
Click the workspace's Metadata tab.
-
In the Database Choice Lists table, select Database and click the Edit button.
-
On the Choice List Type screen, click the Add button in the Choice List Sources table to add a source. To edit a source, select one in the table and click the Edit button.
-
On the Choice List Source screen, enter a name for the source in the Choice List Name field (for example,
Product source). -
In the JNDI field, enter the data source to connect to, and click Connect.
After Capture connects to the data source, it updates the Status field below the Connect button. Use the Defined Choice Lists table to add or edit a choice list that uses the source.
-
Click the Add button in the Defined Choice Lists table.
-
In the Database Choice List Properties window, enter a name in the Choice List Name field.
-
In the Schema and Table fields, identify the schema and table from the data source to use for the choice list.
-
In the Item Value field, identify the table column whose data will display in the choice list. In the Display Value field, enter an alternate value to display to users in the choice list; this value is often the same as the item value.
-
In the Sort Order field, specify whether the data should display in ascending order, descending order, or no order and click OK.
The choice list displays in the Defined Choice Lists table.
-
Click Submit.
You return to the Choice List Sources screen, with the new source displayed. You can create additional choice lists for the data source you specified or create choice lists for other data sources.
-
Use the choice list in Capture. See Using Database Choice Lists in Capture.
To use the choice list in a metadata field:
-
Add or edit a metadata field, as described in Adding or Editing a Metadata Field.
-
On the Metadata Field screen, select the source you created in the Choice List Source field.
-
In the Choice List field, select the choice list you created.
-
Select the Locked field, if needed. In this case, locking the metadata field restricts users to selecting an item from the choice list.
-
4.6.2 Deleting Database Choice List Sources and Choice Lists
Follow these guidelines:
-
Deleting a choice list source makes it no longer available for creating choice lists and deletes all choice lists that use it.
-
Deleting a choice list makes it unavailable in any client profile or processor in which it is used.
To delete a database choice list source:
-
On the workspace's Metadata tab, select the top database entry in the Database Choice Lists table and click the Edit button. The list of sources displays.
-
In the Choice List Sources table, select a source and click the Delete button. Confirm the deletion.
-
Click Close.
To delete a database choice list:
- On the workspace's Metadata tab, select the choice list to delete in the Database Choice Lists table. (The choice list name displays in the Choice List column.) Click the Edit button.
- In the Defined Choice Lists table, select a choice list and click the Delete button. Confirm the deletion.
- Click Submit.
4.6.3 Using Database Choice Lists in Capture
After creating one or more database choice lists, you can then:
-
Use them in client profiles or batch processor jobs. See Table 4-9.
-
Define dependencies between them, as described in Managing Dependent Choice Lists.
Table 4-9 Database Choice List Use in Capture
| Capture Component | Choice List Type | Function |
|---|---|---|
|
Client profiles |
Choice List Dependent Choice List |
Use choice lists (user defined and database) in metadata fields. Create dependent choice list metadata fields, where a selection in the parent field determines the values displayed in the child choice list field. |
|
Recognition Processor |
Choice List |
Assign a bar code value that matches a choice list value to a metadata field. |
|
Content commit profiles |
Choice List |
Dynamically assign a type, security and/or account based on a choice list metadata field value. |
4.7 Managing Dependent Choice Lists
In a choice list dependency, a parent field is linked to two or more child choice lists, one of which is displayed after the user makes a selection in the parent field.
You create the dependent choice list and its associated choice lists on the Metadata tab, then select the dependent choice list in a client profile, as described in Adding or Editing a Dependent Choice List.
Important Points About Choice List Dependencies
-
You can create choice list dependencies between Capture user defined choice lists, database choice lists, or between choice list types.
-
Create all choice lists you plan to link before creating a choice list dependency. At a minimum, you need a parent choice list, and two or more child choice lists.
-
Each item in a child list can be related to multiple parent items. For example, Supplies could be a child item to Household and Automotive subproducts.
-
You can create multi-level dependencies (for example, great grandparent, grandparent, parent, and child choice lists).
-
Only one choice list dependency may be assigned to a client profile. Multiple parent/child dependencies must be defined within a single Dependent Choice List definition.
This section covers the following topics:
4.7.1 Adding or Editing a Dependent Choice List
Follow these steps to create a parent/child dependency between choice lists.
-
On the Metadata tab, create the choice lists. See Managing User Defined Choice Lists to create user defined choice lists or Managing Database Choice Lists to create database choice lists.
You need at least three, including one to serve as the parent choice list and two or more child choice lists.
For example:
Parent or Child Choice List Name Choices Parent
Products
-
Automotive
-
Household
Child
Automotive Subproducts
-
Cars
-
Motorcycles
Child
Household Subproducts
-
Bathroom
-
Kitchen
-
-
On the Metadata tab, create the metadata fields to contain the choice lists (Adding or Editing a Metadata Field).
In our example, we created a
Productsfield to serve as the parent field and a Subproducts field to serve as the child.-
On the Metadata Field screen for the parent field, choose a source in the Choice List Source field. In the Choice List field, select the choice list you created as the parent in step 1. In our example, we chose
Productsas the choice list. -
On the Metadata Field screen for the child field, choose the parent metadata field in the Parent Choice List Field. In our example, we chose
Productsas the parent metadata field. -
To prevent users from typing in an entry instead of selecting a choice from the list, select the Locked field and submit your changes.
-
-
On the Classification tab, create a document profile that uses the metadata fields you created in step 2 (Adding or Editing a Document Profile).
In our example, we created a document profile called
Productsthat contained theProductsandSubproductsmetadata fields. -
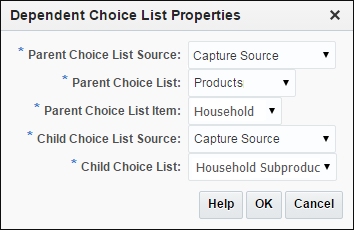
On the Metadata tab, create the dependent choice list.
-
Click the Add button in the Dependent Choice Lists table. On the Dependent Choice List screen, enter a name for the dependency, such as
Product/subproduct dependency. -
In the Defined Dependent Choice Lists table, click the Add button. Complete fields for the first dependent choice, by identifying fields for a parent choice list item (
Household) and the child list that displays when the user selects it (Household Subproducts):-
Parent Choice List Source:
Capture Source -
Parent Choice List:
Products -
Parent Choice List Item:
Household -
Child Choice List Source:
Capture Source -
Child Choice List:
Household Subproducts
-
-
Click the Add button and complete fields for the second dependent choice, identifying another parent choice list item (
Automotive) and the child list that displays when the user selects it (Automotive Subproducts). -
Click OK.
-
-
Click Submit.
-
On the Capture tab, add or edit a client profile that uses the document profile and choice list dependency you created (Adding, Editing, or Copying a Client Profile).
-
On the General Settings train stop, select a profile type of 2 - Capture and Index or 3 - Index Only. Enter a name and batch prefix.
-
On the Document Indexing Settings train stop, select the dependency you created in the Dependent Choice List field. Select the document profile you created in the Document Profiles field.
-
On the Security train stop, grant a Capture user login access to the client profile.
-
Click Submit to save the client profile.
-
-
Test the choice list dependency in the client.
-
Sign in to the client.
-
Select the client profile you created and capture a batch.
-
Expand the batch and select a document.
-
In the metadata pane, try out the choice list dependency.
-
4.7.2 Deleting Dependent Choice Lists
Deleting a choice list dependency means it is no longer available for use in a client profile. Its associated choice lists and metadata fields are not affected.
To delete a dependent choice list:
- On the Metadata tab, select the dependency to delete in the Dependent Choice Lists table, and click the Delete button.
- When prompted, click Yes to confirm the deletion.
4.8 Managing Database Lookups
A database lookup searches an external database for a specified value (specified by a client user or a batch processor) and populates metadata fields from a matching database record. For example, you might configure a database lookup that searches a database for a matching customer ID, then returns the matching record's full customer name and address.
Database lookups can eliminate data entry of certain fields and ensure data integrity resulting in improved efficiency and data entry quality. When used in a client profile, as shown in Figure 4-7, a user enters a value in a metadata field and clicks the Database Lookup button in the client window's document pane. Capture searches the specified database field for a matching value, and if found, automatically populates other specified metadata fields.
You configure database lookups for the workspace, then select them when configuring client profiles or processor jobs. See these guidelines:
-
If a single matching record is found in the database, the fields are automatically populated, unless the client profile's Always Display Records field is selected. If Capture finds multiple values that match, it displays them in a results list from which the user chooses.
-
Capture provides flexibility in database searching. For example, you can configure multiple metadata fields for database lookups, providing the user with multiple means of matching a database record. In addition, you can map metadata fields to different tables within a database.
Figure 4-7 Database Lookup in Use in the Client
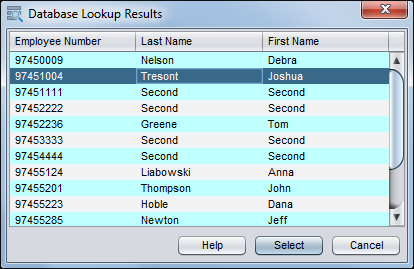
Description of "Figure 4-7 Database Lookup in Use in the Client"
This section covers the following topics:
4.8.1 Adding or Editing a Database Lookup
To configure a database lookup, you need a data source, which is typically configured by a system administrator. You first connect to a data source and then identify how to search for matching values and values to return. See Understanding JDBC Data Sources in Administering JDBC Data Sources for Oracle WebLogic Server.
To configure a database lookup:
-
In a selected workspace, create the metadata field on which to configure the database lookup. Also create any metadata fields that the database lookup will populate. See Managing Metadata Fields.
For example, you might create a database lookup that searches a
Customer IDfield and from a matching database record, returns and populates customer name and address fields. -
On the Metadata tab, in the Database Lookup Profiles table, click the Add button. To edit a lookup, select one and click the Edit button.
-
Select settings on the General Setting train stop.
-
Enter a name in the Database Lookup Name field.
-
In the JNDI Name field, enter the name of a data source to connect to, and click Connect. The status changes to Connected, followed by the source name.
-
-
On the Search Fields train stop, use the Search Field Definitions table to define search fields that link a Capture metadata field to a database field.
Note:
Capture metadata fields must have a data type that is compatible with the data type of the database fields whose values will be searched.
-
Click the Add button or select a search field definition and click the Edit button. To delete a definition, select it and click the Delete button, and when prompted, confirm the deletion.
-
In the Search Field Settings window, complete the fields.
-
In the Capture Field option, select the Capture metadata field on which to activate the database lookup.
-
For the database field, select its schema and table, then select the database field to search in the Database Field.
-
Use the remaining fields to specify search and sort options as needed. By default, database lookups perform a 'like' search (for example, value%) unless the Perform exact search option is selected in the Search Option field.
Figure 4-8 Configuring a Database Lookup's Search Fields
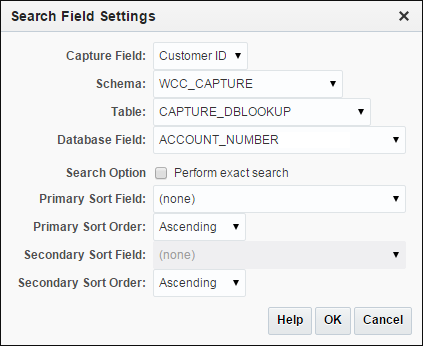
Description of "Figure 4-8 Configuring a Database Lookup's Search Fields" -
-
Repeat steps a and b to optionally set up additional search fields.
-
-
On the Return Fields train stop, identify the database values to return from the database. You must specify return fields for each search field you defined in step 4.
-
In the Return Field Definitions table, choose a field in the Search Field option adjacent to the buttons, and click the Add button.
-
In the Return Field Settings window, select the Capture Field to populate from the list of metadata fields for the workspace.
-
In the Database Field, select the field to return from the list of fields in the specified table.
-
Repeat steps a through c to add additional return fields.
-
In the Return Field Definitions table, use the up and down arrow buttons to order the field columns in the results list that appears in the client.
Figure 4-9 Configuring a Database Lookup's Return Fields
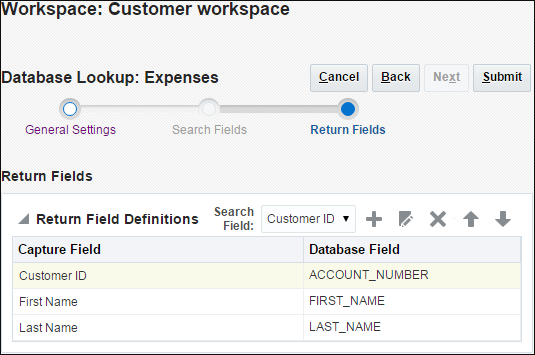
Description of "Figure 4-9 Configuring a Database Lookup's Return Fields" -
-
Click Submit to save the database lookup profile.
-
Use the database lookup in a client profile or processor job. See Using Database Lookups in Capture.
To use the lookup in a client profile:
-
Add or edit a client profile, as described in Managing Client Profiles. On the General Settings train stop, select a profile type of 2 - Capture and Index or 3 - Index Only.
-
On the Document Indexing Settings train stop, select the lookup in the Database Lookup Profile field.
-
On the Security train stop, grant a Capture user access to the client profile.
-
Click Submit to save the client profile.
-
In the client, test the lookup by clicking the metadata field on which the lookup was configured; this enables the Database Lookup button in the document pane. Enter a value to search for and click the Database Lookup button.
-
4.8.2 Deleting a Database Lookup or its Search or Return Fields
Deleting a database lookup makes it no longer available in client profiles or processor jobs if in use.
Follow these steps to delete a database lookup profile.
4.8.3 Using Database Lookups in Capture
After creating one or more database lookups, you can then use them as listed in Table 4-10.
Table 4-10 Database Lookup Use in Capture Components
| Capture Component | Function |
|---|---|
|
Client |
Search a database for a matching record and if found, populate metadata fields with values from the database record. |
|
Import Processor |
After importing images, search a database field for matching metadata values and populate metadata fields from the database table. See Assigning Metadata Values from a Database Lookup During Import. |
|
Recognition Processor |
Search a database using a bar code value and populate metadata fields using values returned from it. See Configuring Database Lookups in Recognition Processing Jobs. |
4.9 Managing Batch Statuses
The batch status feature provides a standardized method of assigning statuses to batches. On the Classification tab, you create a list of possible statuses for the workspace, which can be used in various ways in Capture.
This section covers the following topics:
Figure 4-10 Defining Batch Statuses for the Workspace
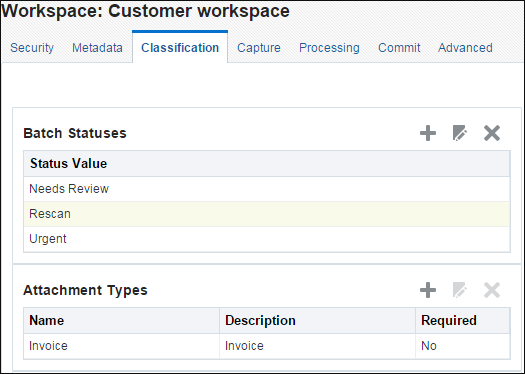
Description of "Figure 4-10 Defining Batch Statuses for the Workspace"
4.9.1 Adding or Editing a Batch Status
Adding a status to a workspace makes it available for assigning to batches in profiles or processor jobs and to users for assigning when working with batches.
To add or edit a batch status:
4.9.2 Deleting a Batch Status
Deleting a batch status makes it unavailable to assign in client profiles and processors and for users to assign to batches.
To delete a batch status:
4.9.3 Using Batch Statuses in Capture
Below are ways you can use batch statuses in a workspace.
-
In a client profile, you can assign a default status that gets assigned to batches when they are created. See Introduction to Client Profiles.
-
Client users can change a batch status, selecting from possible statuses listed, or search for batches based on their status.
-
Some Capture batch processors can change batch status after successful or failed processing.
-
Batch status can be output as metadata upon commit.
4.10 Managing Attachment Types
An attachment is an image or non-image file that is associated with a primary document. An attachment type indicates the type of attachment.
On the Classification tab, you create a list of possible attachment types which can be used in various ways in Capture. The attachment types feature provides a standardized way of assigning attachment types to document profiles. The client users can view attachments, change an attachment type, create attachments, and modify image attachments.
This section covers the following topics:
4.10.2 Deleting an Attachment Type
To delete an attachment type:
4.10.3 Using Attachment Types in Capture
-
Attachment types can be assigned to document profiles. When creating or editing a document profile, you can optionally select attachment types that may be used for documents that are classified to the document profile.
If a document is assigned to the default document profile, then all the attachment types defined in the respective workspace are available for the document.
-
Client users can view attachments, change an attachment type, create attachments, and modify image attachments. The option to change the attachment type is not available if the client profile is of 1 - Capture Only profile type.
-
When importing attachments during list file importing, you need to specify the attachment type in the attachment definition within the list file.
-
When converting non-image attachments to image format using the Document Conversion Processor, you can restrict processing of attachments to specific attachment types. And, when merging documents, you can specify to include only source document’s attachments that match the document profile’s attachment types of the target document.
-
When configuring hierarchical separator page definitions in a Recognition Processor job, you can define a separator page to indicate that the document is an attachment by setting the Attachment Type field.
-
When configuring recognition processing, you can specify to include only attachments that match the document profile’s attachment types.
4.11 Managing Document Profiles
A document profile specifies the set of metadata fields, from those configured in the workspace, to use to index a specific type of document. For example, for a workspace configured for capturing Correspondence, Purchase Order, and Customer Agreement documents, you would likely create a document profile for each of these document types, and each would contain a different set of metadata fields. If users will scan batches that contain multiple document types, select each document profile in the client profile that may apply, so that indexing users can choose the document profile that corresponds to the document and index it accordingly.
A document profile also specifies the set of attachment types that are available for documents classified to the document profile.
When specifying document profiles for use by a client profile, you can select one or more document profiles, all profiles, or the Default value. The default document profile contains all metadata fields and attachment types defined for the workspace, and is useful for troubleshooting purposes.
This section covers the following topics:
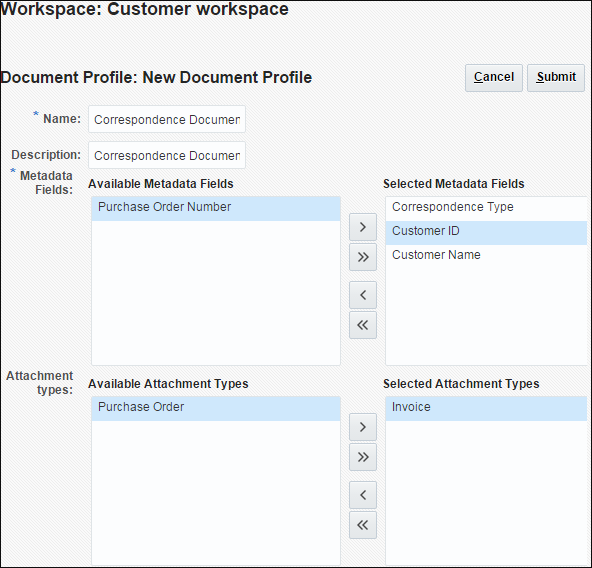
4.11.1 Adding or Editing a Document Profile
To add or edit a document profile:
-
In a selected workspace, click the Classification tab.
-
In the Document Profiles table, click the Add button.
To edit a profile, select one and click the Edit button.
-
Complete fields on the Document Profile screen.
-
Enter a name for the document profile in the Name field.
-
Enter a description for the document profile in the Description field.
-
In the Metadata Fields list, select the fields to include in the profile, and move them using the arrow buttons. Use the up and down arrow buttons to order the metadata fields in the order in which an indexing user will read and index documents.
-
In the Attachment types list, select the attachment types to include in the profile, and move them using the arrow buttons. Use the up and down arrow buttons to order the attachment types in the order in which a user will read attachment types.
-
-
Click Submit.
4.11.2 Deleting a Document Profile
Deleting a document profile makes it no longer available for use. For example, client users no longer see a deleted document profile in the metadata pane.
To delete a document profile:
4.11.3 Using Document Profiles in Capture
After creating a document profile for each document type to be indexed, you can select them in Capture areas where metadata fields are assigned, as listed in Table 4-11.
Table 4-11 Document Profile Use in Capture Components
| Capture Component | Function |
|---|---|
|
Client profile |
Select one or more document profiles on the Document Indexing Settings train stop to allow users to select a document profile, complete its metadata fields, and modify an attachment type. See Configuring Document Profiles in Client Profiles. |
|
Import Processor |
Select the document profile to use to index imported documents. See Configuring Metadata Assignment During Import. |
|
Recognition Processor |
Select the document profile to use to index recognized documents. You can even dynamically determine the document profile. See Specifying a Static or Dynamically Determined Document Profile. |
|
Commit profile |
Restrict the documents that the commit profile processes by selecting one or more document profiles. When the commit profile runs, Capture only commits documents assigned the selected document profiles. See Restricting a Commit Profile Based on Document Profile. |
4.12 Managing Capture Scripts
Capture scripts are JavaScripts that enable you to customize Capture functionality in the following components:
-
Capture client
-
Recognition Processor
-
Import Processor
-
Document Conversion Processor
-
Commit Processor
Typically, a Java developer writes one or more scripts. See Introduction to Developing Scripts with Oracle WebCenter Enterprise Capture in Developing Scripts for Oracle WebCenter Enterprise Capture. A workspace manager imports the scripts on the workspace's Advanced tab, then selects the script in a client profile, Import Processor job, Document Conversion Processor job, Recognition Processor job, or commit profile.
Figure 4-12 JavaScripts Imported for Use in Client Profiles or Processor Jobs
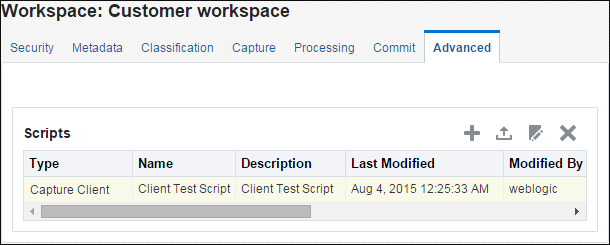
Description of "Figure 4-12 JavaScripts Imported for Use in Client Profiles or Processor Jobs"
This section covers the following topics
4.12.2 Exporting a Script
If needed, follow these steps to export a script in the Scripts table. For example, you might do this to verify or modify the script's behavior.
- In a selected workspace, click the Advanced tab.
- In the Scripts table, select a script to export, and click the Export Selected Script button.
- From the open/save options that display, save the script file. The selected script is saved as a text (.txt) file.
4.12.3 Removing a Script
Removing a script from the Scripts table makes it unavailable for assigning to a client profile, commit profile, or processor job. Before removing a script, ensure that it is not being used by a client profile, commit profile, or job. If you remove a script that is currently assigned to a client profile, import job, document conversion job, recognition job, or commit profile, errors may result.
To remove a script:
4.12.4 Using Scripts in a Client Profile
To use one or more scripts in a client profile:
-
On the Advanced tab, import the script as described in Importing or Changing a Script, selecting Capture Client in the Type field.
-
Click the Capture tab and add or edit a client profile as described in Adding, Editing, or Copying a Client Profile.
-
On the client profile's Extension Profiles train stop, add, edit, delete, or order client scripts in the Extension Profiles table.
-
To add a script, click the Add button. In the Extension Profile Setting window, enter a description, choose Capture Java Script Extension in the Extension Type field, and select the script. Repeat to include additional scripts.
-
Use the up and down arrow buttons to reorder selected scripts. When a client profile is used, scripts are executed in the order shown in this table.
-
Click Submit to save the client profile.
-
-
In the client, test the client profile script's functionality.
4.12.5 Using a Script in a Recognition Processor Job
To use a script in a recognition job:
- On the Advanced tab, import the script as described in Importing or Changing a Script, selecting Recognition Processor in the Type field.
- Click the Processing tab and add or edit a Recognition Processor job as described in Adding, Copying, or Editing a Recognition Job.
- On the recognition job's General Settings train stop, select the recognition script in the Script field. Click Submit to save the recognition job.
- Run the processor job to test the script's functionality.
4.12.6 Using a Script in an Import Processor Job
To use a script in an Import Processor job:
- On the Advanced tab, import the script as described in Importing or Changing a Script, selecting Import Processor in the Type field.
- Click the Capture tab and add or edit an Import Processor job as described in Adding, Copying, or Editing an Import Processor Job.
- On the import job's General Settings train stop, select the import script in the Script field. Click Submit to save the import job.
- Run the processor job to test the script's functionality.
4.12.7 Using a Script in a Document Conversion Processor Job
To use a script in a document conversion job:
- On the Advanced tab, import the script as described in Importing or Changing a Script, selecting Document Converter Processor in the Type field.
- Click the Processing tab and add or edit a Document Conversion Processor job as described in Adding, Copying, or Editing a Document Conversion Processor Job.
- On the document conversion job's Document Selection train stop, select the document conversion script in the Script field. Click Submit to save the document conversion job.
- Run the processor job to test the script's functionality.
4.12.8 Using a Script in a Commit Profile
To use a script in a commit profile:
- On the Advanced tab, import the script as described in Importing or Changing a Script, selecting Commit Processor in the Type field.
- Click the Commit tab and add or edit a commit profile as described in Adding, Copying, or Editing a Commit Profile.
- On the commit profile's General Settings train stop, select the Commit Processor script in the Script field. Click Submit to save the commit profile.
- Commit a batch to test the script's functionality.
