34 Working with Converted Content
This chapter covers the following topics:
34.1 Viewing Content Information
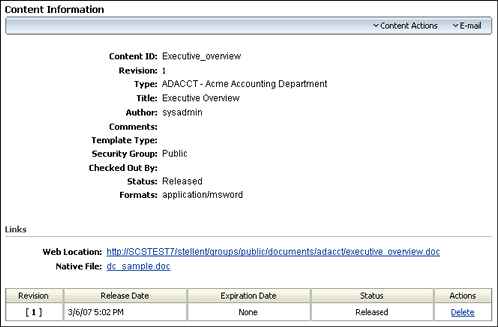
Every content item checked into the Content Server has its own content information page, which can be used to view and verify the metadata information about the content item, such as the content ID, title, author, and other metadata (see Figure 34-1). You will frequently visit the content information page of your source documents in order to specify your template selection rule criteria.
The Info icon on the search results page is used to access the content information page of a content item, where you can view the metadata for the content item. Use this page to view and verify information about a specific content item. For example, you can identify the release date of a file or the user login of the author.
Figure 34-1 Content Information Page

This page shows a lot of information about the content item, including:
-
Values for all the metadata fields that were completed when the file was checked into the Content Server
-
The author's name (user login)
-
The file status indicating where the file is in its life cycle
-
The file format, which is the native application that the file was created with. The file format is expressed as the MIME content type.
-
The current web location, which is an active link that points to the web-viewable rendition (for example, PDF) of the checked-in content item, if such a rendition was generated. This URL uniquely refers to the web-viewable rendition of the content item's latest revision.
-
A native file link, which you can use to get a copy of the content item in its native format (that is, the one it was originally created in). If you click the link, you can open the file in its native application (if you have it installed on your computer) or you can save it to your local hard drive. You can also right-click the link and save the file locally. This enables you to make a copy of the file for reuse. You can then check it back into the Content Server as a new revision.
-
The complete revision history. See an example in Figure 34-2.
Note:
The content information can be displayed for any revision of the content item by clicking the revision link that is displayed in the Revision column of the Revision History section. The currently displayed content item is enclosed in square brackets: [].
Figure 34-2 Revision History of Content Item

The content information page has other functions in addition to viewing a file's metadata, status, and revision history. The available options depend on your assigned privileges and the Content Server configuration, and may include any of the following:
| Action | Definition |
|---|---|
|
Check Out |
Enables you to check out a file for edit and later check it in with the same content ID and the revision number incremented by one (if you are a contributor). |
|
Undo Check Out |
Cancels the check-out of the content item. Your name will no longer appear next to "Checked out by: on the content information page. You can only undo a check-out of a content item that you checked out if you have the "admin" role or have administrator permissions for the security group that the content item belongs to. |
|
Check In |
Checks in a new revision of a content item currently checked out. |
|
Update |
Enables you to change the metadata fields for a content item already checked into the Content Server. For example, you can use Update to correct a misspelled word in the title field or select the correct content type if you initially entered it incorrectly. |
|
Check In Similar |
Enables you to check in another content item with the same metadata of the content item you have just checked in. |
|
Send link by email |
Opens your email program with a new message that contains a link to the URL (web address) of the web-viewable file. |
|
Subscribe |
Enables you to tag a content item so that you are automatically notified by email about any changes to it (that is, if a new revision is checked in). If the software does not know your email address, you are prompted to enter it. |
|
Unsubscribe |
Enables you to cancel your subscription to the content item (that is, no longer be notified of new revisions). |
|
Create Shortcut |
Enables you to create a shortcut to the content item in the Content Server and store the shortcut in a folder under Browse Content. |
|
Delete Revision |
Enables you to remove a revision of a file from the system. To delete a revision, you must have delete permission for the security group the file belongs to. |
|
Revision Number |
Displays the content information for the specified revision. |
To access the content information page of a content item, complete the following steps:
-
Search for the content item.
The search results page is displayed.
-
Click the Info icon (Figure 34-3) that corresponds to the file for which you want to see the content information.
Figure 34-3 Info Icon
The content information page is displayed.
Note:
For more information on searching for content, see Using Oracle WebCenter Content.
34.2 Viewing a Converted File
Dynamic Converter provides a solution to the problem of requiring a client workstation to have native applications installed (such as Microsoft Word, Excel, or other applications) in order to open source documents created with those applications. It does this by creating a web-viewable version of the source document on demand and on the fly.
The web-viewable version of the source document can be seen by clicking an HTML link on these Content Server pages:
34.2.1 Search Results Page
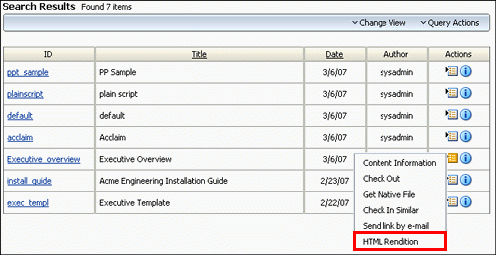
You can use the extensive search Element to find content items. You can search by metadata and/or perform a full-text search (depending on the Content Server setup). The results of a search are shown on a search results page. If a content item in the list is of a file type that is supported and enabled for HTML conversion, then an HTML Rendition link is included in the actions popup menu. You can use this link to view an HTML rendition of the content item (see Figure 34-4).
Figure 34-4 Html Rendition Link on Search Results Page

When you click the HTML Rendition link, the file is converted and displayed using the rules and templates specified on the Template Selection Rules page.
34.2.2 Content Information Page
Every content item checked into Content Server has its own content information page, which shows the metadata information of the content item, such as the content ID, title, author, and other metadata.
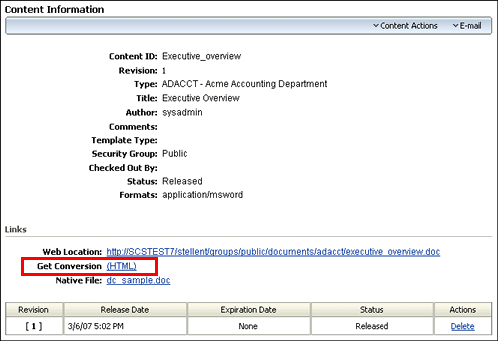
If the content item is of a file type that is supported and enabled for HTML conversion by Dynamic Converter, then the content information page will display an (HTML) link beside the text "Get Conversion." You can use this link to view an HTML rendition of the content item (see Figure 34-5).
Figure 34-5 Html Link on Content Information Page

When you click the (HTML) link, the file is converted and displayed using the rules and templates specified on the Template Selection Rules page.
Subscription and Workflow Notifications
You can also open the content information page using the View Info link in the e‐mail messages that you receive when you subscribe to a content item stored in the Content Server (see Figure 34-6).
Figure 34-6 View Info Link in Subscription Email Notification Message

This same link is available in workflow notification messages, which eliminates the need for content reviewers to have the native application used to create the source file.
34.3 Previewing a Document Before Check‐In
Content contributors can preview the HTML rendition of a document before checking it into the Content Server. This enables them to see if there are problems with the document or the template associated with the document, and notify the site webmaster or developer. Problems can then be resolved before more users or customers view the converted content. Both the content authors and the site developers gain from the ability to preview documents this way.
The dynamic contributor preview is displayed as an (HTML) button on Content Server's content check‐in page (see Figure 34-7).
Figure 34-7 Html Preview Button on Content Check-In Screen
Once a document has been selected and all metadata assigned to the document, click the preview button to see how the document will appear as a web page. The resulting screen displays a Complete Check In link in the left frame and the converted document in the right frame (see Figure 34-8).
Figure 34-8 Dynamic Conversion Preview

If you are satisfied with the HTML rendition of the document, you can click Complete Check In to check the document into the Content Server (at which time you are brought to the check-in confirmation screen). Click the Back button in your web browser to cancel the process and return to the content check-in screen.
If you check in a document using metadata that has no template associated with it, a blank Classic HTML Conversion template is assigned. This template contains no special formatting instructions, other than to convert your document into a web page.
Tip:
As a site administrator, you can also preview how a content item will appear with a particular template using the Change Preview button in the Template Editor.