Defining the Filter Expression for Views in View Designer

Columns that you added for filtering in Defining the View Layout are automatically added to the Filter Expression area of the Define Filters tab in View Designer.

Whether you are creating a new view or editing an existing view, you can add more filter columns, and further define and refine filters on all columns.

To define or edit the filter expression for a view created in View Designer:

  1. Complete the steps in Defining the View Layout, selecting the Define Filters tab.

    The columns that you added for filtering should be displayed on the Define Filters tab.

  2. Optional: Add more columns to the Filter Expression area of the Define Filters tab.
  3. Select a column in Filter Expression.
  4. Select a corresponding filter operator from the drop-down list next to the column name.

    The operator list from which you can choose is populated based on the type of column that you selected.

    Guidelines for choosing an operator are described in Filter Operators.

  5. Specify a filter value in the last column by clicking Browse button in Filter tab of View Designer and making a selection in the Value Selector.

    For example, here is a set of filters based on the Sample Sales database:


    Filters defined for the D1 Office, D2 Department, and 1-Revenue columns from the Sample Sales database

    The filters that you define are summarized in the Filter Summary pane. For example, for the filters defined in this step, the summary looks like this:


    Summary of the filters defined in the Filter Expression area of the Define Filters tab

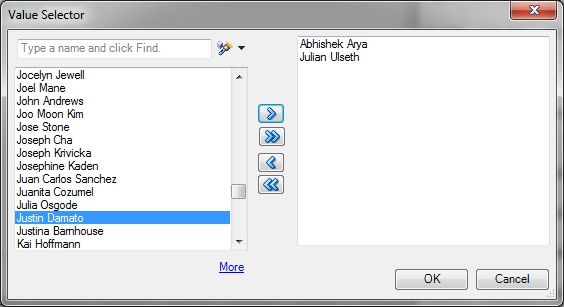
    In some cases, the data to choose from can be exceedingly long. To accommodate loading large amounts of data in the Value Selector, Oracle Smart View for Office presents values in groups. Scroll and make selections from the first group shown, then click More to view and make selections from the next group. Continue clicking More until you have viewed and made selections from the entire data list. Figure 19-20 shows an example.

    Figure 19-20 Value Selector Showing “More” for Large Amounts of Data


    Value Selector showing “More” button for loading large amounts of data in smaller groups
  6. Optional: If required, click the logical operator button in Filter Expression and make a selection to change the operator:
    • AND

    • OR

    The default logical operator is AND.

    Changing the logical operator on one line of the filter expression automatically changes the operator for all lines in the expression so that the operator is the same for all lines.

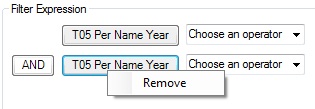
  7. Optional: To remove a line from the filter expression, right-click the column button in the line, and then select Remove, as shown in Figure 19-21.

    Figure 19-21 Remove Option that is Displayed When Right-clicking a Column in a Filter Expression


    Remove Option that is Displayed when Right-clicking a Column in a Filter Expression
  8. When you are finished defining filters, click OK to insert the view into Excel.