While creating a view object with the View Object Wizard, use the Parent dialog to select an existing view object to extend. This panel is organized in a tree structure. To select a view object, click the view object name and click OK.
Just as view objects use SQL queries to work with filtered subsets of attributes and business logic in entity objects, extended view objects work with the attributes and business logic in extended entity objects. The extended view object provides the means of access to the new attributes, new definitions and validations on existing attributes, and business logic that you have added to the extended entity object.
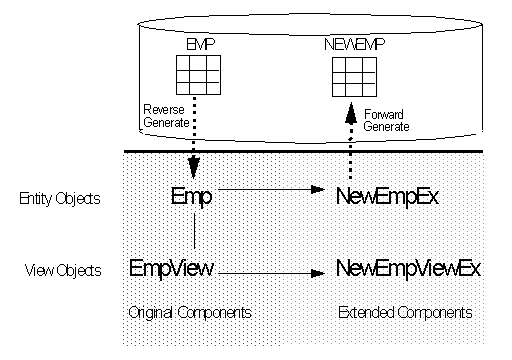
Figure 1 illustrates the relationship between the original components, the extended components, and the database tables. The original components usually belong to an existing application. The extended components represent customizations of the original components--they have been specialized to make the application more "site-specific" or to fit a different set of business requirements.
For example, assume that a vendor delivers a package of components which includes the Emp entity object and EmpView view object. The developers at the company that purchased the package decide to customize the package components to fit their business requirements. The developers begin by extending the Emp entity object to add additional attributes and business logic. They then generate the database table to provide the datasource for the extended Entity (for more information on customizing an entity object and generating a datasource for it, see Extending entity objects).
Figure 1: Relationship Between Original and Extended Components and Tables
To access the new, as well as the existing attributes and business logic in the extended entity object NewEmpEx, the developers choose to extend EmpView, the view object that uses Emp. The extended view object initially copies a SQL query from its parent, which references the original entity object, Emp. To make the extended view object reference the extended entity object, certain requirements have to be met:
the attributes in the original entity object must be mapped to attributes in the extended Entity.
the definitions of the usages of the attributes in the original entity object must be overridden with the usages in the extended Entity.
the view object attributes that you want to work with must appear in the extended view object query SELECT list. The list must also include the new attributes that were added to the extended Entity.
the SQL query must reference the appropriate datasource; that is, the table associated with the extended entity object.
(optional) make the necessary changes to the SQL query's FROM or WHERE clauses to get just the slice of data you need. You also have the option of creating an arbitrary SQL statement of any length or complexity using Expert Mode.
the sequence and datatypes of attributes in the SELECT list must match the sequence and datatypes expected by the application that will use the query results.
If your original view object contains methods that you want to export to the client, they are inherited by the extended view object. You do not need to make any changes to the method code. If you substitute the extended view object throughout the application and deploy it to the middle tier, your client code will be able to use the method using the existing interface.
There are situations where it is entirely valid not to extend the view object and instead, create a new view object directly from the extended entity object. This is illustrated in Figure 2. You can use this approach when your new view object does not require any of the functionality defined by the original view object or application. These view objects are especially useful when you are building new UIs or JSPs that need only a particular view of the data, and do not have any dependencies on the original application.
Figure 2: Creating a View Object Directly From an Extended entity object
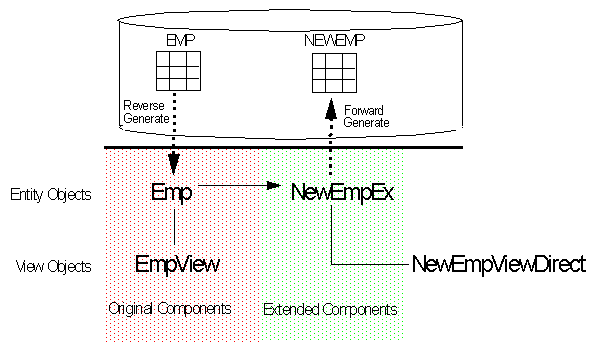
For example, assume that you created an extended entity object NewEmpEx where you simply added the extra attributes PensionPlan and CurrentWithholding. If you want to build a UI or JSP that uses only the data represented by PensionPlan and CurrentWithholding, it is not necessary to extend the original view object. Instead, you can create a view object that uses only these attributes in its SELECT list. The only restrictions on the view object's query is that it must identify the correct datasource and the SELECT list must contain the Primary Key.
In general, creating a view object directly from the extended Entity is appropriate under these conditions:
you do not intend to use the new view object for substitution (the framework requires that the substituted view object must be an inherited child of the original view object).
the extended view object does not require any of the functionality provided by the original view object. For example, there is no custom Java code written on the original view object.
To use the new view object as a part of the delivered application, you do not need the source code for the original Application Module. Instead, you can extend the original Application Module and add the view object to its Data Model.
The topic Extending entity objects describes how you can extend the entity object Emp with NewEmpEx, which contains the same attributes as Emp plus an additional YearsofService attribute. The topic then described how to forward generate the NEWEMPEX table in the database from the NewEmpEx entity object. This topic continues the example by describing how to extend the EmpView view object with a View that corresponds to the extended entity object NewEmpEx.
Right-click the package that will hold the customized view object and select Create View Object. The View Object Wizard opens.
In the Name panel, enter the name of the new View (NewEmpViewEx) in the Name field. To offer you greater flexibility, note that in this panel, the Name, Package, Extends View, and Schema Object fields are editable.
Click the Browse button next to the Extends View field to open the Parent dialog. Use the Parent dialog box to select the view object from which NewEmpViewEx will be extended. Typically, you will be extending a view object from the package of original components. In this case, select EmpView, then click OK. Note, it is implied that the base view object is in a package in the project. Click Next to proceed to the entity objects panel.
In the entity objects panel, the Available list box will display the entity objects available in the original package of components and in the package of extended components. The Selected list box will display the entity object that the base view object references (in this case, the base view object is EmpView and the entity object it references is Emp). You can override the definition of the Emp entity object with the extended Entity NewEmpEx as follows:
Select NewEmp in the Available list box and select Emp in the Selected list box
Click the right shuttle button. An alert box will open and display the message: "The entity usage Emp will be updated from the entity Emp to the entity NewEmpEx which extends it."
Click OK.
The definition of the original entity object Emp will be overridden with the definition of the extended entity object NewEmpEx.
Alternatively, you can move NewEmpEx from the Available list box to the selected list box without first selecting Emp in the selected list box. In this case the selected list box displays both Emp and newEmp, and NewEmpViewEx is based on both entities; the attributes inherited from EmpView are based on Emp, and the new attributes are based on NewEmpEx. This means that NewEmpViewEx will query and update data in two tables: EMP and NEWEMP.
In the Attributes panel, notice in the Available list box that the extended view object has available to it all of the extended entity object's attributes. The attributes in the Selected list box should include all of the attributes that you want to be available to the extended view object's query. Use the shuttle buttons to include the attributes you need in the Selected list box. In this example, select the YearsofService attribute and shuttle it to the Available list box. Click Next to proceed to the Attribute Settings panel.
Click New to create a new attribute for the extended view object. Click Next to proceed to the Attribute Settings panel.
Use the Attribute Settings panel to change the storage and update properties for the view object attributes you selected in the Attributes panel. Click Next to proceed to the Query panel.
In the Query panel, enter the view object query. For an extended view object, the query must satisfy the following conditions:
Correctly identify the table from which the extended entity object will be reading the data. Typically, this is the table for the extended Entity; NewEmpEx in this case.
The new attributes and the original attributes must be in the SELECT statement.
The sequence and datatypes of attributes in the SELECT list must match the sequence and datatypes expected by the application that will use the query results.
|
Tip: |
When you are creating the query for your extended view object, it is suggested that you first enable Non-Expert mode in the Query panel, and examine the default query that JDeveloper Design-Time builds for you. The query built by the Design-Time in non-Expert mode is guaranteed to be correct. Then, enable Expert Mode and modify the query without changing the SELECT list. |
For more information on editing an extended view object query, see Editing an Extended View Object's SQL Query.
For the current example, the following SELECT statement would satisfy all three conditions:
SELECT Emp.YEARSOFSERVICE FROM NEWEMPEX EMP
So would this statement:
SELECT Emp.EMPNO, Emp.ENAME, Emp.JOB, Emp.MGR, Emp.HIREDATE, Emp.SAL, Emp.COMM, Emp.DEPTNO, Emp.YEARSOFSERVICE FROM NEWEMPEX EMP
Click Next to proceed to the Attribute Mappings panel.
The Attribute Mappings panel gives you the opportunity to re-map query columns to object attributes if you deleted, added, or switched positions of columns in your Expert Mode SQL statement. To change the mapping, click an attribute in the right side of the grid. A dropdown list lets you select another attribute to map to the query column. You can also remove the mapping for a particular query column. Query columns that are not mapped cannot be updated. When you are finished with this panel, click Next.
In the Java panel, select the options that let you generate classes (that is, *Impl classes) for the extended view object and (optionally) the View Rows. After the framework creates these classes, you can edit them to customize the extended view object's behavior.
Click Next, then Finish. The view object wizard generates the .java, .xml, and (optionally) the View Row .java files for the extended view object and adds their names to the Navigation pane.
Before you finish creating your extended view object, you will probably have to manually edit its SQL query. This will be true especially if you have added new attributes or changed a datasource. You can consider the original view object's query to be a reasonable starting point to begin your edits. When you create your extended object, the view object wizard's Query panel will provide you with the original query depending on whether the original view object query was created with Expert Mode enabled or disabled.
Like any attribute or property setting, the Expert Mode status of a view object can be inherited by the extended object. For example, if the original view object was created with Expert Mode disabled, then the view object wizard for the extended object will open with Expert Mode disabled. Similarly, if the original view object was created in Expert Mode, then the Query panel for the extended object will open in Expert Mode.
You can immediately determine if a view object's query was constructed in Expert Mode by examining its .xml file and looking for the value of the CustomQuery variable in the ViewObject tag. For example:
<ViewObject
    Name="DeptVExpertEx"
    Extends="package28.DeptViewExpert"
    BindingStyle="Oracle"
    CustomQuery="true"  <-- indicates Expert Mode is enabled
A value of true indicates that the view object's query was created in Expert Mode. False indicates non-Expert Mode.
If the original view object was created in non-Expert Mode (that is, with the Expert Mode check box cleared), then the view object wizard for the extended object will open with Expert Mode disabled. In this case, the Query Statement area of the Query panel will display the default SQL query in a read-only list box. To edit the query, select the Expert Mode check box. The read-only list box will immediately change to an editable box. You can edit the existing query or delete it and paste in a query from another source.
If the original view object was created in Expert Mode, then the Query panel for the extended object will open in Expert Mode. In this case, the Query Statement area of the Query panel will display an empty, editable list box. Again, the SQL query from the original view object is a reasonable starting point for your edits. You can copy the query from the original view object's .xml file and paste it in the panel. The query appears in the ViewObject section of the file, between the SQLQuery tags. For example:
<SQLQuery><![CDATA[
SELECT Dept.DEPTNO, Dept.DNAME, Dept.LOC   <-- SQL query
FROM DEPT Dept
   ]]></SQLQuery>
You can edit the query after pasting it into the panel. As an alternative to working from the original query, you can:
manually enter your own query.
OR
copy and paste a different query from another source.
The NewEmpViewEx view object is created by extending the functionality of the EmpView view object without any source code modification. JDeveloper creates a .java and a .xml file for NewEmpViewEx which can be seamlessly integrated into the packaged application. The NewEmpViewEx view object can now be used at runtime, however, you might want to add some additional features, such as a calculated attribute, to its .java file. You can then substitute it for all instances of EmpView in the original application. For information on how to substitute NewEmpViewEx for all instances of EmpView in your application, see Substituting Business Components.
The following is a code sample of NewEmpViewEx.xml, which was constructed in non-Expert Mode. Notice that NewEmpViewEx.xml contains a SQL query based on the attributes of the extended entity object it references. The file includes definitions of only new attributes or attributes from the original view object that were overridden.
The code for view objects that are constructed in non-Expert Mode differs from that created in Expert Mode. These differences are described in the discussion section that follows the code sample.
1   <?xml version="1.0" encoding='WINDOWS-1252'?>
2   <!DOCTYPE ViewObject SYSTEM "jbo_03_01.dtd">
3   <ViewObject
4     Name="NewEmpViewEx"
5     Extends="package27.EmpView"
6     SelectList="Emp.EMPNO, Emp.ENAME, Emp.JOB, Emp.MGR, Emp.HIREDATE, Emp.SAL,
                  Emp.COMM, Emp.DEPTNO, Emp.SERVICEINYEAR"
7     FromList="NEWEMPEX Emp"
8     BindingStyle="Oracle"
9     CustomQuery="false"
10     ComponentClass="Extender.NewEmpViewExImpl" >
11     <DesignTime>
12     <Attr Name="_codeGenFlag" Value="20" />
13     </DesignTime>
14     <EntityUsage
15     Name="Emp"
16     Entity="Extender.NewEmpEx" >
17     <DesignTime>
18     <Attr Name="_ReadOnly" Value="false" />
19     <Attr Name="_EntireObjectTable" Value="false" />
20     <Attr Name="_queryClause" Value="false" />
21     </DesignTime>
22     </EntityUsage>
23     <ViewAttribute
24     Name="Hiredate"
25     EntityAttrName="Hiredate"
26     EntityUsage="Emp"
27     AliasName="HIREDATE" >
28     <DesignTime>
29     <Attr Name="_OverrideAttr" Value="true" />
30     <Attr Name="_DisplaySize" Value="0" />
31    </DesignTime>
32     </ViewAttribute>
   ...
// definitions of the other view object attributes
...
     </DesignTime>
     </ViewAttribute>
   </ViewObject>
Lines 4-9: The Name and Extends fields identify the name of the extended view object (NewEmpViewEx) and the name of the original view object which it extends (package27.EmpView). The SelectList field displays names of the attributes that will participate in the query. By default, the SELECT list includes all of the view object attributes. The FromList provides an alias for the name of the table given in the SelectList field, and identifies the correct datasource on which the query should operate. Since the query was constructed in non-Expert Mode, the value of CustomQuery is "false".
If the view object query is constructed in Expert Mode, the SelectList and FromList fields are replaced with a SQLQuery field that displays the arbitrary SQL statement, and the value of CustomQuery is set to "true". The following is a snippet of the code the framework provides for a view object constructed with an Expert Mode query.
   ...
   CustomQuery="true"
   ComponentClass="Extender.NewEmpViewExImpl" >
   <SQLQuery><![CDATA[
      Select * from NEWEMPEX Emp
   ]]></SQLQuery>
   ...
Line 10: The ComponentClass field identifies the name of the implementation file (that is, the *Impl file) for the extended view object.
Lines 15, 16: The Name and Entity fields identify the name of the original entity object (Emp) and the name of the extended Entity (Extender.NewEmpEx) which this extended view object references.
Line 23: The definitions of the view object attributes are placed within individual ViewAttribute tags. Only new attributes and overridden attributes from the original view object are included in the extended view object's XML file.