|
Oracle® Application Server 10g Forms and Reports Services Upgrade Guide
10g (9.0.4) for UNIX Part No. B13547-01 |
|
|
|
|
|
Oracle® Application Server 10g Forms and Reports Services Upgrade Guide
10g (9.0.4) for UNIX Part No. B13547-01 |
|
|
|
|
This chapter describes the Forms and Reports Services upgrade process, and explains how to use the OracleAS Upgrade Assistant to perform the majority of the Oracle Application Server Forms Services upgrade. The following topics are discussed:
Section 1.1, "The Forms and Reports Services Upgrade Process"
Section 1.2, "Stopping OracleAS Instances"
Section 1.3, "Using the OracleAS Upgrade Assistant"
This section provides a complete overview of the Forms and Reports upgrade process, and the prerequisite conditions for upgrading. The processing performed by the OracleAS Upgrade Assistant for each component is also summarized, with references to any manual tasks you may need to perform after the OracleAS Upgrade Assistant has finished processing.
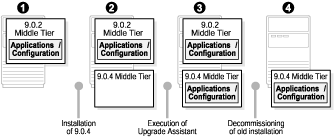
The Forms and Reports Services upgrade process is illustrated in Figure 1–1. The middle tier upgrade consists of the following steps:
The Release 2 (9.0.2) Unified Messaging or Business Intelligence and Forms installation resides on its computer, containing applications and configuration data.
A 10g (9.0.4) middle tier installation of the Forms and Reports Services installation type is installed into a new Oracle home on the same computer.
The OracleAS Upgrade Assistant, a tool installed with OracleAS that automates most Forms and Reports Services upgrade tasks, is executed. It copies the applications and configuration data from the source middle tier installation to the 10g (9.0.4) installation. Manual tasks may be necessary to complete the upgrade of some configurations.
(Optional) The source installation is decommissioned.
Before you perform any upgrade tasks, you must ensure that the installations you are working with comprise a supported upgrade path, and that all necessary conditions are in effect in the installations.
|
Note: When upgrading from an installation of Oracle iAS 9.0.2 BI and Forms, and if this installation has Single Sign-On enabled, the OHS configure file 'httpd.conf' will have the following:include "/private/iasupgd/bifM21j/Apache/Apache/conf/mod_osso.conf"
After upgrading to the Forms and Reports Services install type, this include statement will still exist. Since the Forms and Reports Services install type does not have SSO, you can safely comment out this line in httpd.conf. |
Table 1-1 shows the releases, installation types, and topologies of the upgrade paths supported for the Forms and Reports Services upgrade.
Table 1-1 Forms and Reports Services Upgrade Paths
| Source Oracle Home | Destination Oracle Home |
|---|---|
| Oracle9iAS Release 2 (9.0.2) Business Intelligence and Forms that uses an Infrastructure | OracleAS 10g (9.0.4) Forms and Reports Services |
| Oracle9iAS Release 2 (9.0.2) Business Intelligence and Forms that does not use an Infrastructure | OracleAS 10g (9.0.4) Forms and Reports Services |
| Oracle9iAS Release 2 (9.0.2) Unified Messaging that uses an Infrastructure | OracleAS 10g (9.0.4) Forms and Reports Services |
| Oracle9iAS Release 2 (9.0.2) Unified Messaging that does not use an Infrastructure | OracleAS 10g (9.0.4) Forms and Reports Services |
The OracleAS 10g (9.0.4) Forms and Reports Services installation must adhere to the following requirements:
The Oracle Application Server 10g (9.0.4) Forms and Reports Services must be on the same computer as the Oracle9iAS Release 2 (9.0.2) product.
The Oracle Application Server 10g (9.0.4) Forms and Reports Services must be installed by the same operating system user that installed the Oracle9iAS Release 2 (9.0.2) product.
The Oracle Application Server 10g (9.0.4) Forms and Reports Services must be in a separate Oracle home from the Oracle9iAS Release 2 (9.0.2) product.
Only components that are configured in both the source and the destination Oracle homes will be upgraded.
Table 1-2 describes all automated and manual processing performed in the Forms and Reports Services upgrade.
Table 1-2 Components Upgraded by the OracleAS Upgrade Assistant (in processing order) and Possible Manual Upgrade Tasks
| Component | The OracleAS Upgrade Assistant... | Manual Tasks |
|---|---|---|
| Oracle Process Management and Notification
|
|
None required. |
| Oracle Application Server Containers for J2EE
|
|
Section 3.1, "Completing the Oracle Application Server Containers for J2EE (OC4J) Upgrade"
|
|
|
|
|
| Oracle HTTP Server
|
|
Section 3.2, "Completing the Oracle HTTP Server Upgrade"
|
| Oracle Application Server Web Cache
|
|
Section 3.3, "Completing the OracleAS Web Cache Upgrade"
|
| mod_plsql |
|
None required. |
| Oracle Enterprise Manager
|
|
Section 3.5.2, "Integrating OracleAS Reports Services with Oracle Enterprise Manager"
|
| Oracle Application Server Forms Services
|
|
Section 3.4, "Completing the Oracle Application Server Forms Services Upgrade"
|
| Oracle Application Server Reports Services
|
|
Section 3.5, "Completing the Oracle Application Server Reports Services Upgrade"
|
Stop all processes in the source and destination Oracle homes with these commands shown below.
In the source Oracle home:
Stop the Oracle Enterprise Manager Application Server Control:
<source_MT_OH>/bin/emctl stop
Stop OPMN and processes managed by it with this command:
<source_MT_OH>/opmn/bin/opmnctl stopall
Stop OracleAS Web Cache with this command:
<source_MT_OH>/bin/webcachectl stop
Stop all other running processes in the source Oracle home.
In the destination Oracle home:
Stop the Oracle Enterprise Manager Application Server Control with this command:
<destination_MT_OH>/bin/emctl stop iasconsole
Stop OPMN and processes managed by it with this command:
<destination_MT_OH>/opmn/bin/opmnctl stopall
Stop all other running processes in the destination middle tier Oracle home.
This section provides instructions for using the graphical user interface or the command-line version to perform an upgrade, and describes properties you can configure to specify logging behaviors for the OracleAS Upgrade Assistant. These topics are included:
Section 1.3.1, "Specifying Logging Behaviors for the OracleAS Upgrade Assistant"
Section 1.3.4, "Performing an Upgrade with the OracleAS Upgrade Assistant (Command-line Version) "
You can configure the logging behavior of the OracleAS Upgrade Assistant by setting properties in the <destination_MT_OH>/upgrade/iasua.properties file. The logging properties and their uses are:
log.level — Use this property to specify the level of logging for the OracleAS Upgrade Assistant and all component plug-ins. For example, log.level=NOTIFICATION would set the logging level for all components upgraded by the OracleAS Upgrade Assistant to NOTIFICATION.
<plug-in name>.log.level — Use this property to specify the level of logging for a specific component plug-in, used to override the log.level property for a given component upgrade. For example, OC4J.log.level=TRACE would set the logging level for the Oracle Application Server Containers for J2EE upgrade to TRACE, even if the log level for the OracleAS Upgrade Assistant was set to NOTIFICATION.
log.append — Use this property to specify whether to append log entries to the existing log file or create a new log file. For example, log.append=TRUE would append log entries to the existing log file. (TRUE is the default.)
|
Note: Property names are case sensitive. Property values are case insensitive. |
Table 1-3 Logging Properties for the OracleAS Upgrade Assistant
| Property Name | Description | Valid Values |
|---|---|---|
| log.level | Level of logging for the OracleAS Upgrade Assistant and all component plug-ins | WARNING
NOTIFICATION ERROR TRACE DEBUG OFF INTERNAL_ERROR |
| <plug-in name>.log.level | Level of logging for a specific component plug-in, used to override the log.level property for a given component upgrade. | OPMN
OHS Web Cache OC4J modplsql Oracle Enterprise Manager Forms Reports |
| log.append | Specifies whether to append log entries to the existing log file or create a new log file. | TRUE
FALSE |
The Oracle Universal Installer creates an inventory file, /var/opt/oracle/oraInst.loc, (or etc/orainst.loc on Linux and AIX) when it installs Oracle products. This file contains the location (full path) of the Universal Installer inventory directory, and the group name of the user who installed it. The OracleAS Upgrade Assistant populates its source Oracle home drop-down list with the information from this directory, the default inventory. Additional inventories are sometimes created after installation for the purpose of managing Oracle homes independently (thereby circumventing the Oracle Universal Installer features that track all Oracle homes in a single inventory).
If there are multiple inventory location files on the computer on which you are performing an upgrade, and you want to be able to select a non-default inventory location, you must start the OracleAS Upgrade Assistant with the -invptrloc argument, specifying the inventory location file(s) for the Oracle homes involved in the upgrade. The syntax for starting the OracleAS Upgrade Assistant for multiple inventory locations is provided below.
iasua.sh [[-invptrloc <Oracle Universal Installer inventory pointer file>]...]
iasua.sh -sourcehome <9.0.2 Oracle home path> [[-invptrloc <Oracle Universal Installer inventory pointer file>]...] [-verbose] [-noprompt]
This section provides step-by step instructions for using the OracleAS Upgrade Assistant GUI version to perform an upgrade.
Start the OracleAS Upgrade Assistant with the command:
<destination_MT_OH>/upgrade/iasua.sh
|
Note: Use the-invptrloc argument, described in Section 1.3.2, "Starting the OracleAS Upgrade Assistant To Use Multiple Oracle Universal Installer Inventory Locations" if there are multiple inventories involved in the upgrade.
|
The Welcome screen appears. Click Next.
The Oracle Homes screen appears. The Source Oracle Home drop-down list contains the names of Release 2 (9.0.2) and Release 2 (9.0.3) Oracle homes found in the inventory of Oracle products on the current computer. The destination Oracle home is the 10g (9.0.4) Oracle home in which the OracleAS Upgrade Assistant is running.
Select the source Oracle home from the drop-down list. Then click Next.
The Pre-Upgrade Requirements screen appears. Ensure that all requirements are fulfilled, and check the box for each. The Next button is active only when all boxes are checked.
Click Next. The Examining Components dialog box appears. The OracleAS Upgrade Assistant examines each component in the source Oracle home to determine whether it needs to be upgraded. The Status column for each component contains one of the following:
Table 1-4 OracleAS Upgrade Assistant Component Examination Status
| Status | Meaning |
|---|---|
| in progress... | The OracleAS Upgrade Assistant is examining the component’s upgrade items. |
| pending... | The component will be examined when the OracleAS Upgrade Assistant finishes examining the current component. |
| succeeded | All of the component’s upgrade items are valid for upgrade. |
| failed | The component has upgrade items that are missing or did not meet upgrade criteria. The OracleAS Upgrade Assistant cannot upgrade the component. |
If one or more components failed, the Examination Failure Warning dialog box appears. Continue with Step 7.
If all components succeeded, the Summary screen appears. Continue with Step 8.
Do one of the following:
Remedy all conditions that caused the examination to fail, using the instructions in Section 2.1, "Resolving Errors". Then, select the Retry option and click OK.
Select the Continue with an incomplete upgrade option and click OK.
Select the Specify a different source Oracle home option, click OK, then return to Step 3.
Select the Cancel the upgrade process option and click OK. The OracleAS Upgrade Assistant stops.
If the examination was successful, or you chose to continue with an incomplete upgrade, the Summary screen appears.
The OracleAS Upgrade Assistant Summary screen appears. You can scroll to view the components, clicking the plus symbol (+) to expand a component’s upgrade items. Review the components, then click Finish.
|
Note: The Summary screen is the last screen before upgrade processing begins. Before you click Finish, verify that the choices on previous screens are correct and the upgrade items listed are ready to upgrade. |
The Upgrading screen appears. The Status column for each component contains one of the following:
Table 1-5 OracleAS Upgrade Assistant Upgrading Status
| Status | Meaning |
|---|---|
| in progress... | The OracleAS Upgrade Assistant is upgrading the component’s upgrade items. |
| pending... | The component will be upgraded when the OracleAS Upgrade Assistant finishes upgrading the current component. |
| succeeded | The component was upgraded successfully. |
| failed | The OracleAS Upgrade Assistant could not upgrade the component. |
After the upgrade completes, the Upgrade Failed or Upgrade Succeeded screen appears. Do one of the following.
Click OK to close the Upgrade Failure screen and remedy the conditions that prevented the components from being upgraded. Start the OracleAS Upgrade Assistant again.
Click OK to close the Upgrade Succeeded screen.
The Upgrade Succeeded screen specifies the location of the upgrade log file and lists the post-upgrade tasks to be performed for various components.
This section explains how to start and use the OracleAS Upgrade Assistant command-line version to perform an upgrade.
|
Note: The OracleAS Upgrade Assistant examines components differently in the command-line version and the GUI version.If the examination of a component fails in the command line version, then the upgrade is not performed. If the examination of a component fails in the GUI version, the following choices are provided: retry, continue with an incomplete upgrade, specify another Oracle home, or cancel the upgrade. |
Start the OracleAS Upgrade Assistant with the command:
<destination_MT_OH>/upgrade/iasua.sh -sourcehome <source_MT_OH>
|
Note: Use the-invptrloc argument, described in Section 1.3.2, "Starting the OracleAS Upgrade Assistant To Use Multiple Oracle Universal Installer Inventory Locations" if there are multiple inventories involved in the upgrade.
|
A prompt appears listing all the pre-upgrade requirements and asking you to verify that they have been met.
Validating Oracle homes
Validating component plug-ins
Initializing component plug-ins
Pre-upgrade requirements:
The destination Oracle home has not been modified since it was installed
The source and destination OracleAS instances are not runningThe source and destination Oracle Enterprise Manager processes are not running
Verify that each of the pre-upgrade requirements above have been met.
Have the pre-upgrade requirements been met?[No]Yes
Ensure that all the listed requirements are met. Then answer the prompt [Y] Yes to continue.
Messages similar to the following appear (The messages vary according to components found in the Oracle home):
Examining component "Oracle Process Manager and Notification Server (OPMN)"
Examining component "Oracle Application Server Containers for J2EE (OC4J)"
Examining component "Oracle HTTP Server"
Examining component "OracleAS Web Cache"
Examining component "Oracle mod_plsql"
Examining component "Oracle Enterprise Manager"
Examining component "OracleAS Forms Services"
Examining component "OracleAS Reports Services"
Upgrading component "Oracle Process Manager and Notification Server (OPMN)"
Upgrading component "Oracle Application Server Containers for J2EE (OC4J)"
Upgrading component "Oracle HTTP Server"
Upgrading component "OracleAS Web Cache"
Upgrading component "Oracle mod_plsql"
Upgrading component "Oracle Enterprise Manager"
The command completed successfully
If any error messages are displayed in Step 2, correct the errors as explained in Section 2.1, "Resolving Errors". Then restart the Upgrade Assistant and perform the upgrade process again.