|
Oracle® Application Server Enterprise Deployment Guide
10g Release 2 (10.1.2) for Windows or UNIX Part No. B13998-01 |
|
 Previous |
 Next |
|
Oracle® Application Server Enterprise Deployment Guide
10g Release 2 (10.1.2) for Windows or UNIX Part No. B13998-01 |
|
 Previous |
 Next |
This chapter provides instructions for creating the Data and Identity Management tiers, distributing the components into the DMZs shown in the Enterprise Deployment architecture depicted in Figure 1-1, "Enterprise Deployment Architecture for myJ2EECompany.com" and Figure 1-2, "Enterprise Deployment Architecture for myPortalCompany.com".
The Security Infrastructures for myJ2EECompany and myPortalCompany differ in one aspect: the myJ2EECompany architecture does not have an Identity Management tier as part of its Security Infrastructure. Consequently, you do not perform the steps in Section 2.5, "Installing the Identity Management Tier Components for myPortalCompany.com" when creating the myJ2EECompany architecture.
Before you perform the tasks in this chapter, a two-node Real Application Clusters (RAC) database must be installed. In this chapter, the server names for the database hosts are INFRADBHOST1 and INFRADBHOST2.
This chapter contains the following topics:
Section 2.2, "Installing the Oracle Internet Directory Instances in the Data Tier"
Section 2.3, "Configuring the Virtual Server to Use the Load Balancing Router"
Section 2.4, "Testing the Data Tier Components"
Section 2.5, "Installing the Identity Management Tier Components for myPortalCompany.com"
Section 2.6, "Testing the Identity Management Tier Components"
You must install the OracleAS Metadata Repository before you install components into the Security DMZ. Oracle Application Server provides a tool, the Oracle Application Server Metadata Repository Creation Assistant, to create the OracleAS Metadata Repository in an existing database.
The OracleAS Metadata Repository Creation Assistant is available on the OracleAS Metadata Repository Creation Assistant CD-ROM or the Oracle Application Server DVD-ROM. You install the OracleAS Metadata Repository Creation Assistant in its own, separate Oracle home.
To install the OracleAS Metadata Repository, you must perform these steps:
Install the OracleAS Metadata Repository Creation Assistant, following the steps in Section 2.1.1.
Ensure that the database meets the requirements specified in the "Database Requirements" section of the Oracle Application Server Metadata Repository Creation Assistant User's Guide. You can find this guide in the Oracle Application Server platform documentation library for the platform and version you are using. In addition, ensure that:
The database computer has at least 512 MB of swap space available for execution of the OracleAS Metadata Repository Creation Assistant
There are no dependencies of any kind related to the ultrasearch directory in the database's Oracle home. The OracleAS Metadata Repository Creation Assistant replaces this directory with a new version, renaming the existing version of the directory to ultrasearch_timestamp.
Execute the OracleAS Metadata Repository Creation Assistant, following the steps in Section 2.1.2 or Section 2.1.3.
To install into a database using raw devices, follow the steps in Section 2.1.2, "Installing the Metadata Repository in a Database Using Raw Devices".
To install into a database using Oracle Cluster File System, follow the steps in Section 2.1.3, "Installing the Metadata Repository in an Oracle Cluster File System (OCFS)".
Perform the post-installation step described in Section 2.1.4.
Follow these steps to install the OracleAS Metadata Repository Creation Assistant into its own Oracle home:
Insert the OracleAS Metadata Repository Creation Assistant CD-ROM or the Oracle Application Server DVD-ROM.
|
Note: If your computer does not mount CD-ROMs or DVD-ROMs automatically, you must set the mount point manually. |
Start the installer, using the method corresponding to the installation media:
(CD-ROM)
On UNIX, issue this command: runInstaller
On Windows, double-click setup.exe
(DVD-ROM) Navigate to the repca_utilities directory and do one of the following:
On UNIX, issue this command: runInstaller
On Windows, double-click setup.exe
The Welcome screen appears.
Click Next.
The Specify File Locations screen appears.
In the Name field, specify a name for the OracleAS Metadata Repository Creation Assistant Oracle home. The Oracle home name must contain only alphanumeric characters and the underscore character, and be 128 characters or fewer.
In the Destination field, enter the full path to a new Oracle home in which to install the OracleAS Metadata Repository Creation Assistant, and click Next.
The Launch Repository Creation Assistant screen appears.
Select No and click Next.
The Summary screen appears.
Click Install.
The Configuration Assistants screen appears, executing the OracleAS Metadata Repository Creation Assistant, and indicating "In Progress".
When the OracleAS Metadata Repository Creation Assistant is no longer running, exit the OracleAS Metadata Repository Creation Assistant.
The End of Installation screen appears.
Click Exit, and then confirm your choice to exit.
Follow these steps to install the Metadata Repository into an existing two-node Real Application Clusters (RAC) database using raw devices:
Create raw devices for the OracleAS Metadata Repository, using the values in Section B.2, "Tablespace Mapping to Raw Devices Sample File".
|
Tip: The command to create tablespaces is specific to the volume manager used. For example, the command to create a tablespace in VERITAS Volume Manager isvxassist.
|
Create a file to map the tablespaces to the raw devices. Each line in the file has the format:
tablespace name=raw device file path
You can use the sample file shown in Example B-1, "Tablespace to Raw Device Mapping (Sample File)", replacing the file paths with the paths on your system. Append a 1 to the tablespace names, as shown in the sample file.
|
Note: Creating the sample file is not mandatory; you can enter the tablespace values into the Specify Tablespace Information screen during execution of the OracleAS Metadata Repository Creation Assistant. |
Populate the DBCA_RAW_CONFIG environment variable with the full path and filename of the tablespace mapping file.
Ensure that the database and listener are running.
Ensure that the NLS_LANG environment variable is not set to a non-English locale, or is set to american_america.us7ascii, with one of the following commands:
UNIX:
unsetenv NLS_LANG
setenv NLS_LANG american_america.us7ascii
Windows:
set NLS_LANG=
set NLS_LANG=american_america.us7ascii
|
Note: If you need to, you can set NLS_LANG to its original value after executing the OracleAS Metadata Repository Creation Assistant. |
Start the OracleAS Metadata Repository Creation Assistant from the OracleAS Metadata Repository Creation Assistant Oracle home with this command:
runRepca
The Welcome screen appears.
Click Next.
The Specify Oracle Home screen appears.
In the Oracle Home field, specify the full path of the database Oracle home.
In the Log File Directory field, specify the full path of the directory on the current computer in which you want the OracleAS Metadata Repository Creation Assistant to write its log files. Ensure correct input for the Log File Directory on this screen, as you will not be able to change it after you have proceeded beyond this screen.
Click Next.
The Select Operation screen appears.
Select Load and click Next.
The Specify Database Connection screen appears.
Enter the SYS user name and password and the host and port information. For example:
infradbhost1.mycompany.com:1521,infradbhost2.mycompany.com:1521
Click Next.
The Specify Storage Options screen appears.
Select Regular or Cluster File System.
The Specify Tablespace Information screen appears, displaying the values from the file specified by the DBCA_RAW_CONFIG environment variable.
Correct the values, if necessary, and click Next.
The Warning: Check Disk Space dialog appears if your SYSTEM and UNDO tablespaces are set to autoextend.
Check the disk space as specified in the dialog and click OK.
The Loading Repository screen appears. The tablespaces and schemas are created and populated.
The Success screen appears.
Click OK.
The OracleAS Metadata Repository Creation Assistant exits.
If the installation was unsuccessful, or you need more information, see the Oracle Application Server Metadata Repository Creation Assistant User's Guide.
Follow these steps to install the Metadata Repository into an existing two-node Real Application Clusters (RAC) database using an OCFS file system:
Ensure that the database and listener are running.
Start the OracleAS Metadata Repository Creation Assistant from the OracleAS Metadata Repository Creation Assistant Oracle home with this command:
runRepca
The Welcome screen appears.
Click Next.
The Specify Oracle Home screen appears.
In the Oracle Home field, specify the full path of the database Oracle home.
In the Log File Directory field, specify the full path of the directory on the current computer in which you want the OracleAS Metadata Repository Creation Assistant to write its log files. Ensure correct input for the Log File Directory on this screen, as you will not be able to change it after you have proceeded beyond this screen.
Click Next.
The Select Operation screen appears.
Select Load and click Next.
The Specify Database Connection screen appears.
Enter the SYS user password, select the Real Application Clusters Database option, and enter the host and port information. For example:
infradbhost1.mycompany.com:1521,infradbhost2.mycompany.com:1521
Enter the service name.
Click Next.
The Specify Storage Options screen appears.
Select Regular or Cluster File System.
The Specify Tablespace Information screen appears.
Select a directory option (Use Same Directory for All Tablespaces or Use Individual Directories for Each Tablespace) and complete the remaining fields. When specifying a directory, ensure that it is an existing, writeable directory with sufficient free space. Click Next.
The Warning: Check Disk Space dialog appears if your SYSTEM and UNDO tablespaces are set to autoextend.
Check the disk space as specified in the dialog and click OK.
The Loading Repository screen appears. The tablespaces and schemas are created and populated.
The Success screen appears.
Click OK.
The OracleAS Metadata Repository Creation Assistant exits.
If the installation was unsuccessful, or you need more information, see the Oracle Application Server Metadata Repository Creation Assistant User's Guide.
After you install the OracleAS Metadata Repository into the database, you must update the sqlnet.ora file, as follows:
Edit the ORACLE_HOME/network/admin/sqlnet.ora file to configure SQL*Net settings to make the ORASSO_PS schema accessible. Add LDAP to the NAMES.DIRECTORY_PATH entry as follows:
NAMES.DIRECTORY_PATH= (LDAP, TNSNAMES, ONAMES, HOSTNAME)
Without LDAP in this entry, errors will occur in OracleAS Portal when using the OracleAS Single Sign-On administration portlet.
Follow these steps to install the Oracle Internet Directory components (OIDHOST1 and OIDHOST2) into the data tier with the Metadata Repository. The procedures are very similar, but the selections in the configuration options screen differ.
The OracleAS Metadata Repository must be running before you perform this task. Follow these steps to install Oracle Internet Directory on OIDHOST1:
Ensure that the system, patch, kernel and other requirements are met. These are listed in the Oracle Application Server Quick Installation and Upgrade Guide in the the Oracle Application Server platform documentation library for the platform and version you are using.
Ensure that ports 389 and 636 are not in use by any service on the computer. For detailed instructions, see the Oracle Application Server Installation Guide, Requirements chapter, section titled "Checking if a Port is in Use", in the documentation library for the platform you are using.
Copy the staticport.ini file from the Disk1/stage/Response directory to the Oracle home directory.
Edit the staticport.ini file to assign the following custom ports:
Oracle Internet Directory port = 389
Oracle Internet Directory (SSL) port = 636
|
Note: See Section B.3, "Using the Static Ports Feature with Oracle Universal Installer" for more information. |
Start the Oracle Universal Installer as follows:
On UNIX, issue this command: runInstaller
On Windows, double-click setup.exe
The Welcome screen appears.
Click Next.
On UNIX systems, the Specify Inventory Directory and Credentials screen appears.
Specify the directory you want to be the orainventory directory and the operating system group that has permission to write to it.
Click Next.
On UNIX systems, a dialog appears, prompting you to run the oraInstRoot.sh script.
Open a window and run the script, following the prompts in the window.
Return to the Oracle Universal Installer screen and click Next.
The Specify File Locations screen appears with default locations for:
The product files for the installation (Source)
The name and path to an Oracle home (Destination)
|
Note: Ensure that the Oracle home directory path for OIDHOST1 is the same as the path to the Oracle home location of OIDHOST2. For example, if the path to the Oracle home on OIDHOST1 is:
then the path to the Oracle home on OIDHOST2 must be:
|
Specify the Destination Name and Path, if different from the default, and click Next.
The Select a Product to Install screen appears.
Figure 2-1 Oracle Universal Installer Select a Product to Install Screen
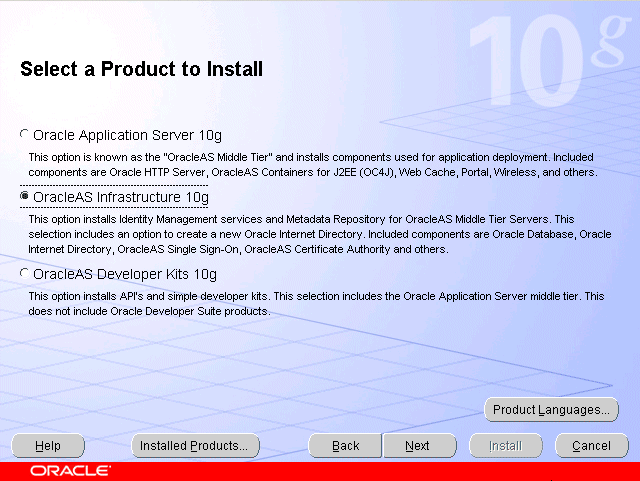
Select OracleAS Infrastructure 10g, as shown in Figure 2-1, and click Next.
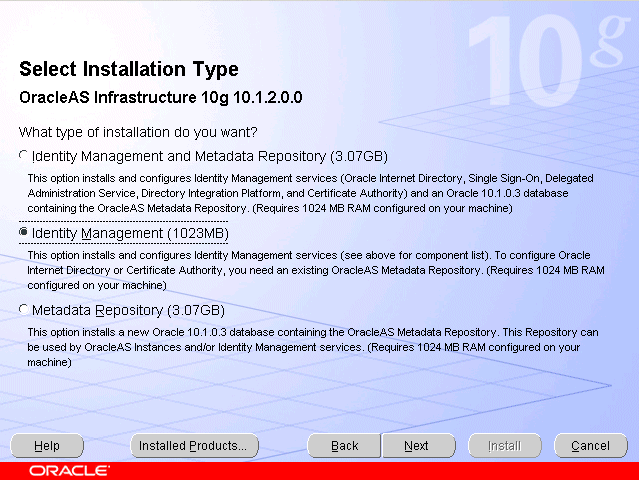
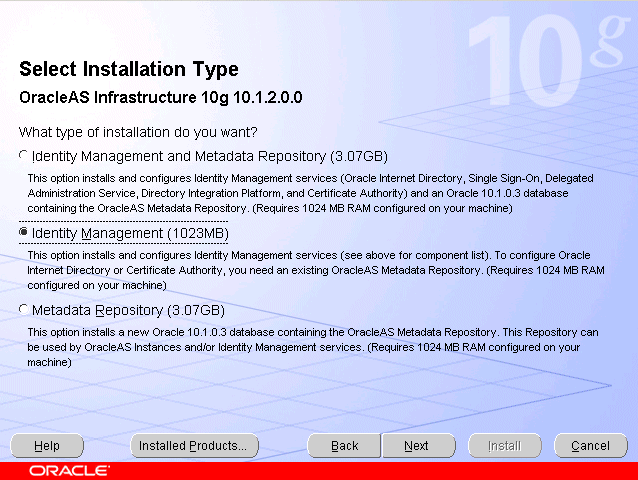
The Select Installation Type screen appears.
Select Identity Management, as shown in Figure 2-2, and click Next.
Figure 2-2 Oracle Universal Installer Select Installation Type Screen
The Product-Specific Prerequisite Checks screen appears.
Click Next.
The Confirm Pre-Installation Requirements screen appears.
Ensure that the requirements are met, check the box for each, and click Next.
The Select Configuration Options screen appears.
Figure 2-3 Oracle Universal Installer Select Configuration Options Screen
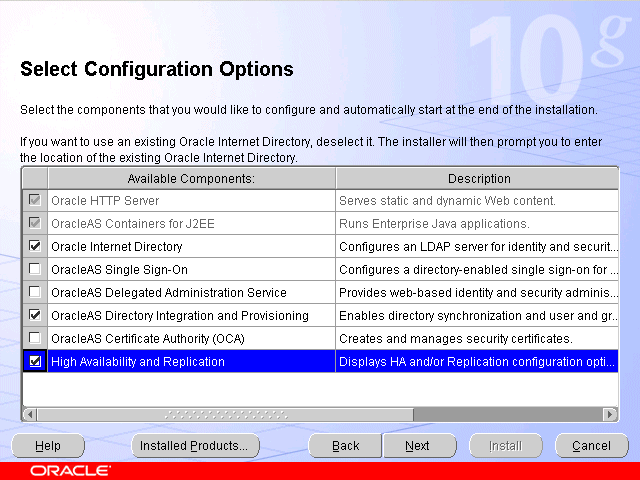
Select Oracle Internet Directory, OracleAS Directory Integration and Provisioning, and High Availability and Replication, as shown in Figure 2-3, and click Next.
The Specify Port Configuration Options screen appears.
Figure 2-4 Oracle Universal Installer Specify Port Configuration Options Screen
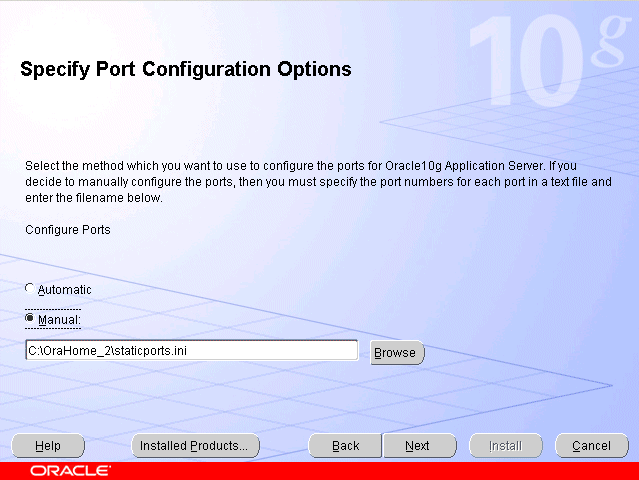
Select Manual, as shown in Figure 2-4, and click Next.
The Specify Repository screen appears.
Provide the DBA login and computer information as shown in Figure 2-5 and click Next.
Figure 2-5 Oracle Universal Installer Specify Repository Screen
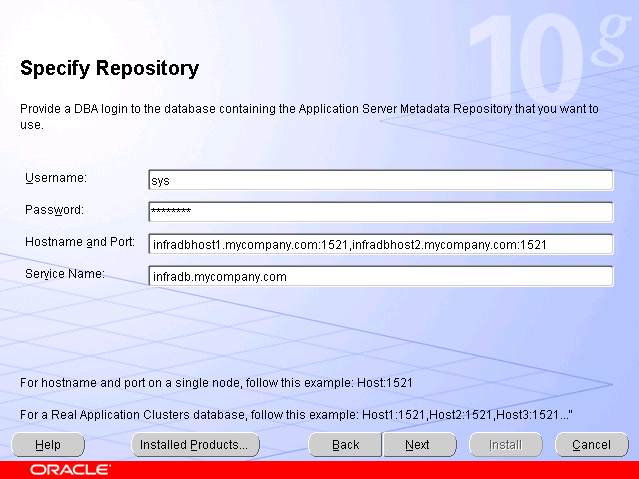
The Select High Availability or Replication Option screen appears.
Select OracleAS Cluster (Identity Management), as shown in Figure 2-6, and click Next.
Figure 2-6 Oracle Universal Installer Select High Availability or Replication Option Screen
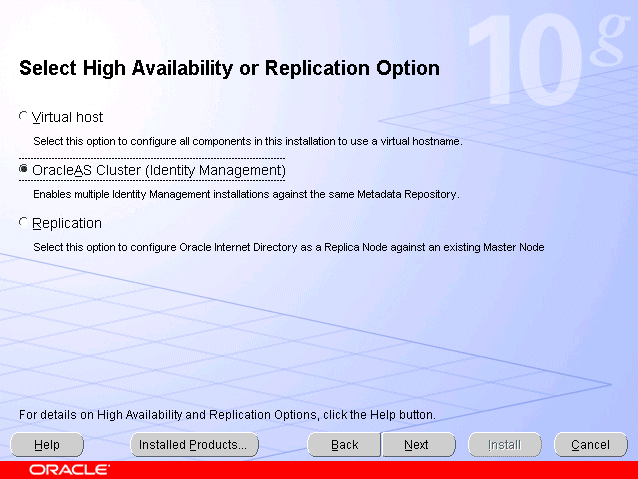
The Specify Namespace in Internet Directory screen appears.
Figure 2-7 Oracle Universal Installer Specify Namespace in Internet Directory
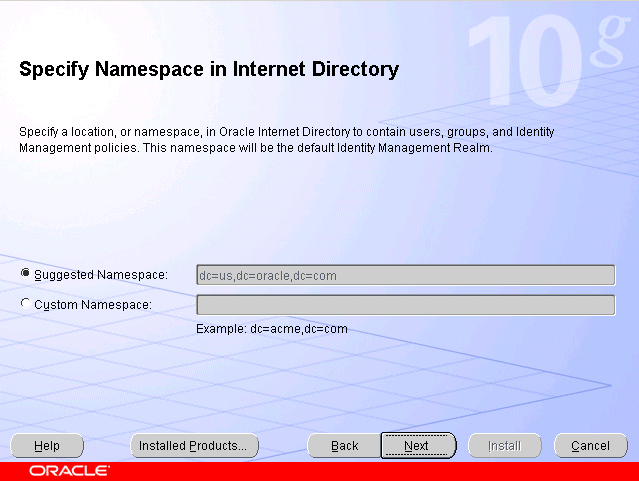
Click Next to specify the default Suggested Namespace shown in Figure 2-7, or enter values for the Custom Namespace and click Next.
The Specify Instance Name and ias_admin Password screen appears.
Specify the instance name and password and click Next.
The Summary screen appears.
Review the selections to ensure that they are correct (if they are not, click Back to modify selections on previous screens), and click Install.
The Install screen appears with a progress bar. On UNIX systems, a dialog opens prompting you to run the root.sh script.
Open a window and run the script.
The Configuration Assistants screen appears. Multiple configuration assistants are launched in succession; this process can be lengthy. When it completes, the End of Installation screen appears.
Click Exit, and then confirm your choice to exit.
The OracleAS Metadata Repository and the first Oracle Internet Directory must be running before you perform this task. Follow these steps to install Oracle Internet Directory on OIDHOST2:
Ensure that the system, patch, kernel and other requirements are met. These are listed in the Oracle Application Server Quick Installation and Upgrade Guide in the the Oracle Application Server platform documentation library for the platform and version you are using.
Ensure that ports 389 and 636 are not in use by any service on the computer. For detailed instructions, see the Oracle Application Server Installation Guide, Requirements chapter, section titled "Checking if a Port is in Use", in the documentation library for the platform you are using.
Copy the staticport.ini file from the Disk1/stage/Response directory to the Oracle home directory.
Edit the staticport.ini file and uncomment, and update these entries:
Oracle Internet Directory port = 389
Oracle Internet Directory (SSL) port = 636
|
Note: See Section B.3, "Using the Static Ports Feature with Oracle Universal Installer" for more information. |
Start the Oracle Universal Installer as follows:
On UNIX, issue this command: runInstaller
On Windows, double-click setup.exe
The Welcome screen appears.
Click Next.
On UNIX systems, the Specify Inventory Directory and Credentials screen appears.
Specify the directory you want to be the orainventory directory and the operating system group that has permission to write to it.
Click Next.
On UNIX systems, a dialog appears, prompting you to run the oraInstRoot.sh script.
Open a window and run the script, following the prompts in the window.
Return to the Oracle Universal Installer screen and click Next.
The Specify File Locations screen appears with default locations for:
The product files for the installation (Source)
The name and path to an Oracle home (Destination)
|
Note: Ensure that the Oracle home directory path for OIDHOST1 is the same as the path to the Oracle home location of OIDHOST2. For example, if the path to the Oracle home on OIDHOST1 is:
then the path to the Oracle home on OIDHOST2 must be:
|
Specify the Destination Name and Path, if different from the default, and click Next.
The Select a Product to Install screen appears.
Figure 2-8 Oracle Universal Installer Select a Product to Install Screen
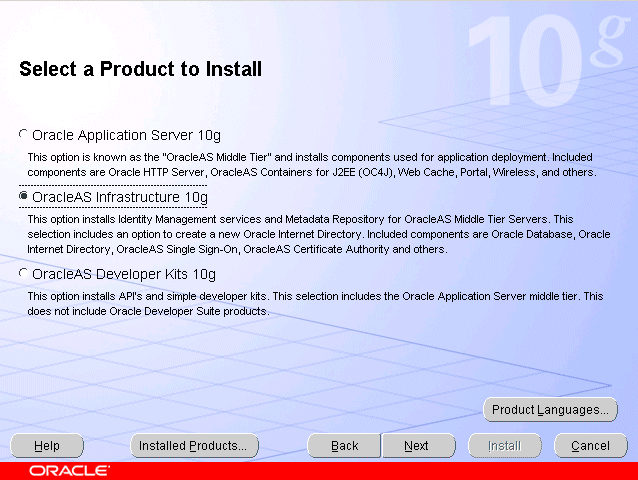
Select OracleAS Infrastructure 10g, as shown in Figure 2-8, and click Next.
The Select Installation Type screen appears.
Select Identity Management, as shown in Figure 2-9, and click Next.
Figure 2-9 Oracle Universal Installer Select Installation Type Screen
The Product-specific Prerequisite Checks screen appears.
Click Next.
The Confirm Pre-Installation Requirements screen appears.
Ensure that the requirements are met, check the box for each, and click Next.
The Select Configuration Options screen appears.
Figure 2-10 Oracle Universal Installer Select Configuration Options Screen
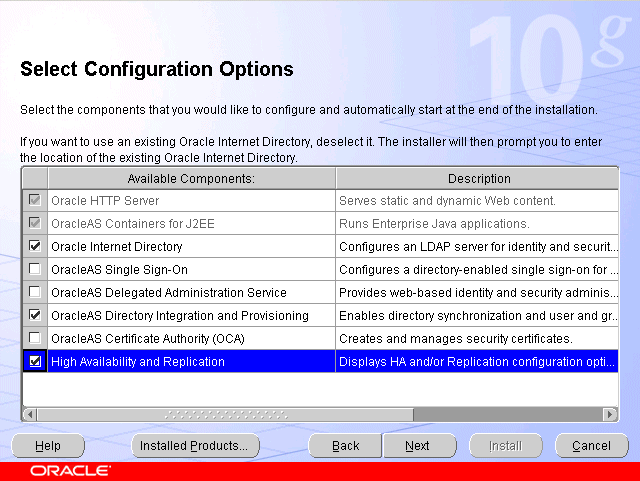
Select Oracle Internet Directory, OracleAS Directory Integration and Provisioning, and High Availability and Replication, as shown in Figure 2-10, and click Next.
The Specify Port Configuration Options screen appears.
Figure 2-11 Oracle Universal Installer Specify Port Configuration Options Screen
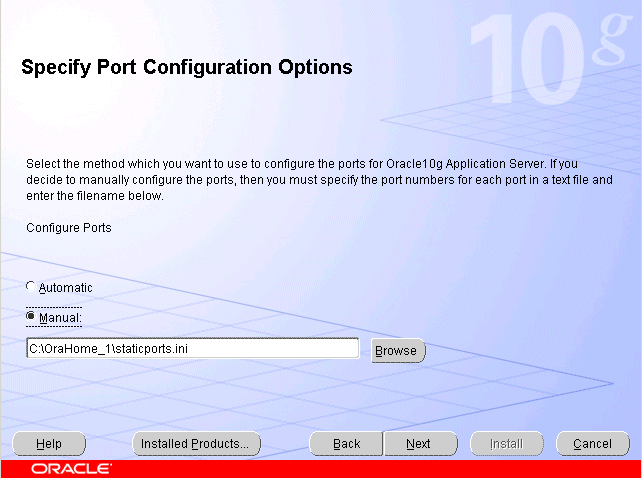
Select Manual, as shown in Figure 2-11, and click Next.
The Specify Repository screen appears.
Provide the DBA login and computer information as shown in Figure 2-12 and click Next.
Figure 2-12 Oracle Universal Installer Specify Repository Screen

A dialog opens, prompting you to synchronize the system time of the primary Oracle Internet Directory computer and the system time on the computer on which you are installing.
Synchronize the system time on the computers and click OK.
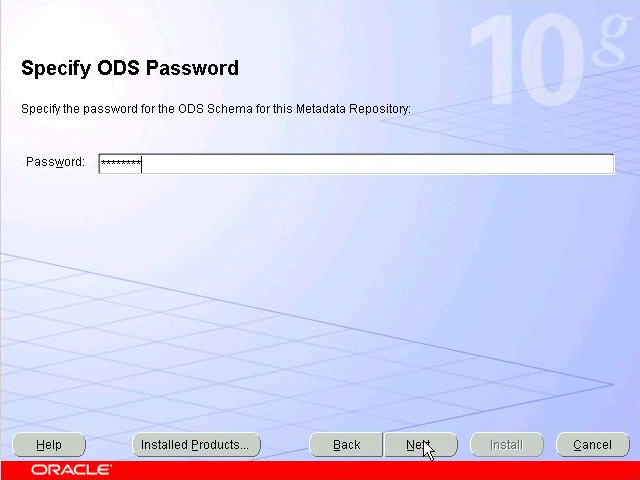
The Specify ODS Password screen appears.
Specify the ODS password (by default, the ias_admin password) as shown in Figure 2-13 and click Next.
Figure 2-13 Oracle Universal Installer Specify ODS Password Screen
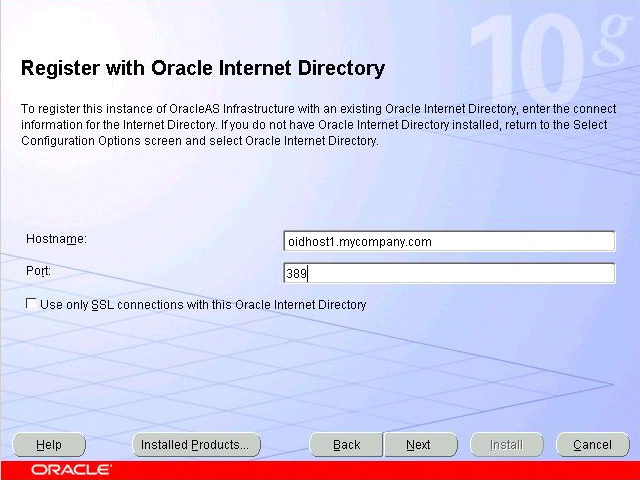
The Register with Oracle Internet Directory screen appears.
Specify the host name and port, as shown in Figure 2-14, and click Next.
Figure 2-14 Oracle Universal Installer Register with Oracle Internet Directory Screen
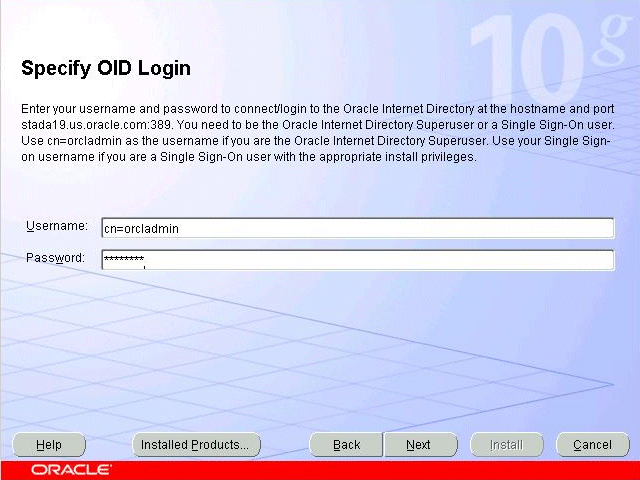
The Specify OID Login screen appears.
Specify the user name and password, as shown in Figure 2-15, and click Next.
Figure 2-15 Oracle Universal Installer Specify OID Login Screen
The Specify Instance Name and ias_admin Password screen appears.
Specify the instance name and password and click Next.
The Summary screen appears.
Review the selections to ensure that they are correct (if they are not, click Back to modify selections on previous screens), and click Install.
The Install screen appears with a progress bar. On UNIX systems, a dialog opens prompting you to run the root.sh script.
Open a window and run the script.
The Configuration Assistants screen appears. Multiple configuration assistants are launched in succession; this process can be lengthy. When it completes, the End of Installation screen appears.
Click Exit, and then confirm your choice to exit.
You must configure the Load Balancing Router to perform these functions:
Balance the requests received on ports 389 and 636 to oidhost1.mycompany.com and oidhost2.mycompany.com on ports 389 and 636.
Monitor the heartbeat of the OID processes on both computers. If an OID process stops on one of the computers, the Load Balancing Router must route the LDAP traffic to the surviving computer.
Perform these steps to test the Data Tier components:
Ensure that you can connect to each Oracle Internet Directory instance and the Load Balancing Router, using this command:
ldapbind -p 389 -h OIDHOST1
ldapbind -p 389 -h OIDHOST2
ldapbind -p 389 -h oid.mycompany.com
Start the oidadmin tool on each Oracle Internet Directory instance in ORACLE_HOME/bin with this command:
oidadmin
The Data Tier configuration is now as shown in Figure 2-16.
If you are creating a Security Infrastructure for the myPortalCompany configuration shown in Figure 1-2, "Enterprise Deployment Architecture for myPortalCompany.com", you must configure Identity Management components. Do not perform the steps in this section if you are configuring myJ2EECompany.
Follow these steps to install the Identity Management components (IDMHOST1 and IDMHOST2) into the Web tier on APPHOST1, after the Data Tier is complete.
|
Note: You must configure the Load Balancing Router (login.mycompany.com) shown in Figure 2-33, "Identity Management Tier Configuration"for persistent HTTP sessions. |
Follow these steps to install Identity Management on IDMHOST1:
Ensure that the system, patch, kernel and other requirements are met. These are listed in the Oracle Application Server Quick Installation and Upgrade Guide in the the Oracle Application Server platform documentation library for the platform and version you are using.
Copy the staticport.ini file from the Disk1/stage/Response directory to the Oracle home directory.
Edit the staticport.ini file and uncomment these entries:
Oracle HTTP Server port = 7777
Oracle HTTP Server Listen port = 7777
Application Server Control port = 1810
|
Note: See Section B.3, "Using the Static Ports Feature with Oracle Universal Installer" for more information. |
Start the Oracle Universal Installer as follows:
On UNIX, issue this command: runInstaller
On Windows, double-click setup.exe
The Welcome screen appears.
Click Next.
On UNIX systems, the Specify Inventory Directory and Credentials screen appears.
Specify the directory you want to be the orainventory directory and the operating system group that has permission to write to it.
Click Next.
On UNIX systems, a dialog appears, prompting you to run the oraInstRoot.sh script.
Open a window and run the script, following the prompts in the window.
Return to the Oracle Universal Installer screen and click Next.
The Specify File Locations screen appears with default locations for:
The product files for the installation (Source)
The name and path to an Oracle home (Destination)
|
Note: Ensure that the Oracle home directory path for IDMHOST1 is the same as the path to the Oracle home location of IDMHOST2. For example, if the path to the Oracle home on IDMHOST1 is:
then the path to the Oracle home on IDMHOST2 must be:
|
Specify the Destination Name and Path, if different from the default, and click Next.
The Select a Product to Install screen appears.
Figure 2-17 Oracle Universal Installer Select a Product to Install Screen
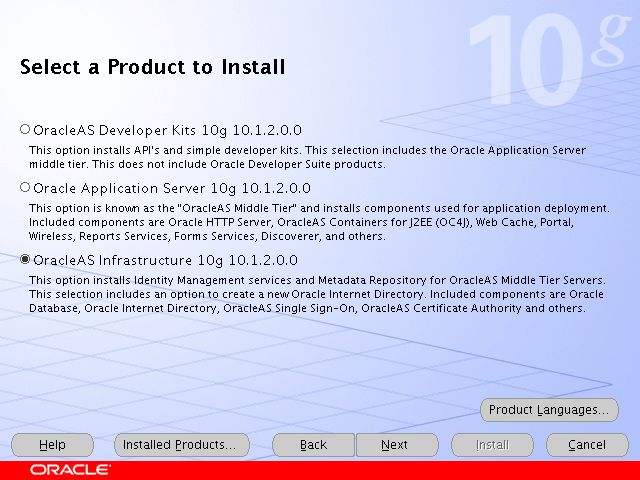
Select OracleAS Infrastructure 10g, as shown in Figure 2-17, and click Next.
The Select Installation Type screen appears.
Figure 2-18 Oracle Universal Installer Select Installation Type Screen

Select Identity Management, as shown in Figure 2-18, and click Next.
The Confirm Pre-Installation Requirements screen appears.
Ensure that the requirements are met and click Next.
The Select Configuration Options screen appears.
Figure 2-19 Oracle Universal Installer Select Configuration Options Screen
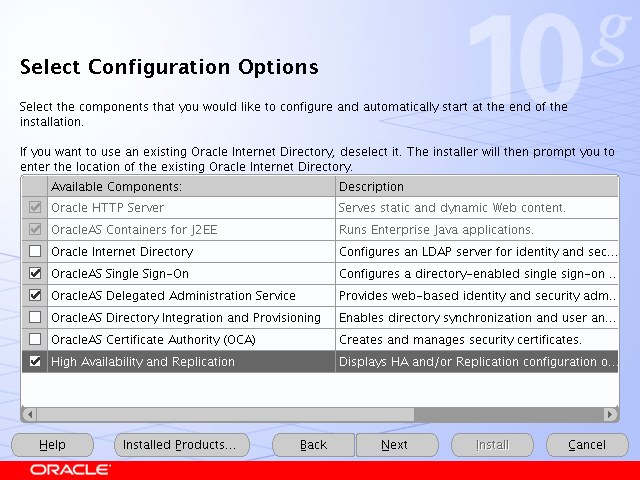
Select OracleAS Single Sign-On, Oracle Delegated Administration Services, and High Availability and Replication, as shown in Figure 2-19.
Click Next.
The Select High Availability Option screen appears.
Figure 2-20 Oracle Universal Installer Select High Availability Option Screen
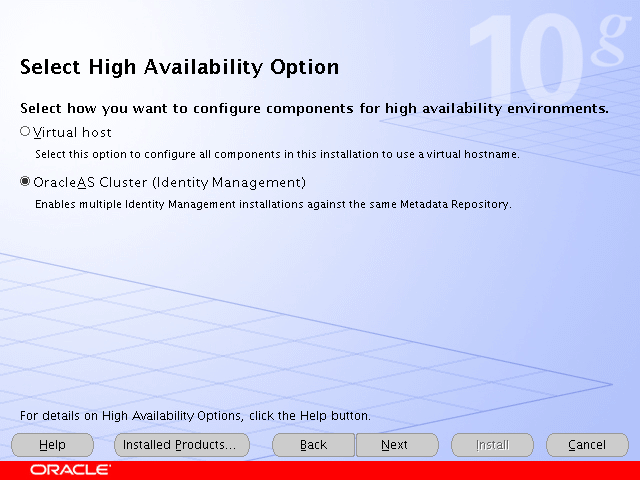
Select OracleAS Cluster (Identity Management), as shown in Figure 2-20, and click Next.
The Create or Join an OracleAS Cluster (Identity Management) screen appears.
Figure 2-21 Oracle Universal Installer Create or Join an OracleAS Cluster (Identity Management) Screen
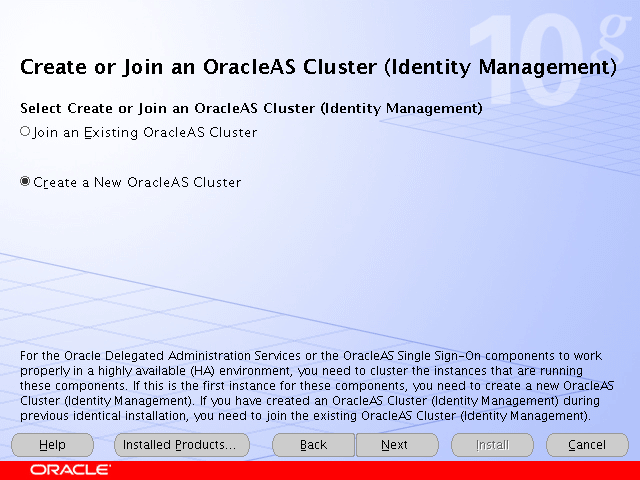
Select Create a New OracleAS Cluster, as shown in Figure 2-21, and click Next.
The Specify New OracleAS Cluster Name screen appears.
Figure 2-22 Oracle Universal Installer Specify New OracleAS Cluster Name Screen
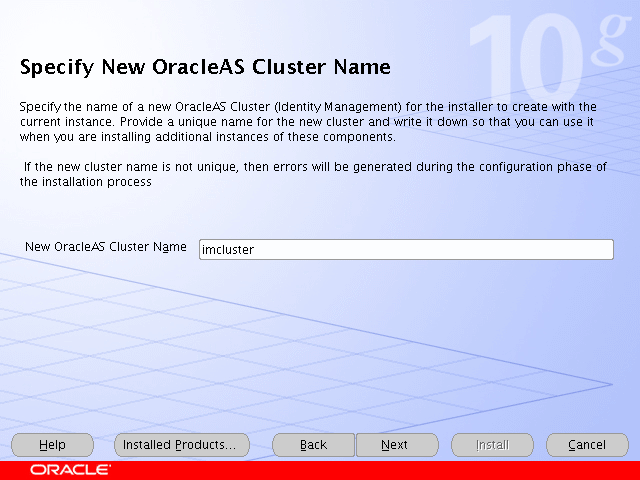
Complete the New OracleAS Cluster Name field with a name for the cluster, as shown in Figure 2-22, and click Next.
|
Note: Write down the cluster name. You will need to provide it in subsequent installations of instances that will join the cluster. |
The Specify LDAP Virtual Host and Ports screen appears.
Figure 2-23 Oracle Universal Installer Specify LDAP Virtual Host and Ports Screen
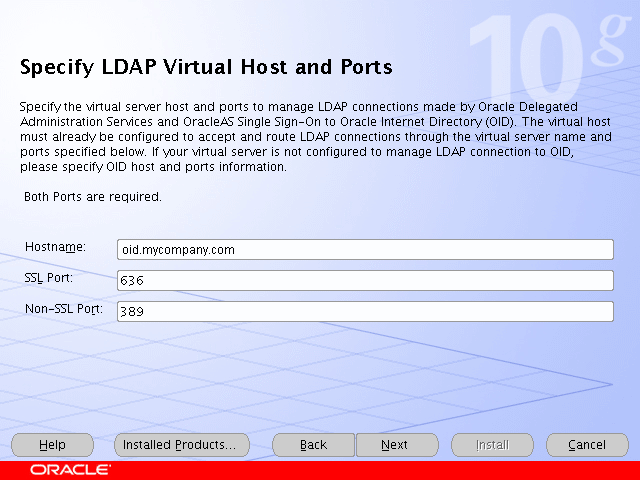
Enter the name of the Load Balancing Router, the SSL port, and the non-SSL port, as shown in Figure 2-23.
Click Next.
The Specify OID Login screen appears.
Complete the fields and click Next.
The Specify HTTP Load Balancer and Listen Ports screen appears.
Figure 2-24 Oracle Universal Installer Specify HTTP Load Balancer Host and Listen Ports Screen
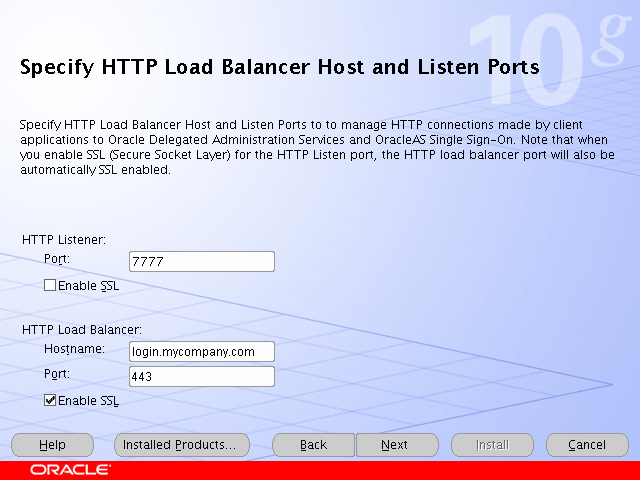
Enter the listen port of the HTTP Server and the host name and port of the HTTP Load Balancer, enabling the SSL option for the load balancer, as shown in Figure 2-24.
Click Next.
The Specify Instance Name and ias_admin Password screen appears.
Specify the instance name and password and click Next.
The Summary screen appears.
Review the selections to ensure that they are correct (if they are not, click Back to modify selections on previous screens), and click Install.
The Install screen appears with a progress bar. On UNIX systems, a dialog opens prompting you to run the root.sh script.
Open a window and run the script.
The Configuration Assistants screen appears. Multiple configuration assistants are launched in succession; this process can be lengthy. When it completes, the End of Installation screen appears.
Click Exit, and then confirm your choice to exit.
Follow these steps to test the first Identity Management installation with the Oracle Internet Directory:
Stop all components on OIDHOST1, using this command:
ORACLE_HOME/opmn/bin/opmnctl stopall
Ensure that all components on OIDHOST2 are running:
ORACLE_HOME/opmn/bin/opmnctl status
Access the following URLs:
https://login.mycompany.com/pls/orasso
https://login.mycompany.com/oiddas
Follow these steps to install Identity Management on IDMHOST2:
Ensure that the system, patch, kernel and other requirements are met. These are listed in the Oracle Application Server Quick Installation and Upgrade Guide in the the Oracle Application Server platform documentation library for the platform and version you are using.
Copy the staticport.ini file from the Disk1/stage/Response directory to the Oracle home directory.
Edit the staticport.ini file and uncomment these entries:
Oracle HTTP Server port = 7777
Oracle HTTP Server Listen port = 7777
Application Server Control port = 1810
|
Note: See Section B.3, "Using the Static Ports Feature with Oracle Universal Installer" for more information. |
Start the Oracle Universal Installer as follows:
On UNIX, issue this command: runInstaller
On Windows, double-click setup.exe
The Welcome screen appears.
Click Next.
On UNIX systems, the Specify Inventory Directory and Credentials screen appears.
Specify the directory you want to be the orainventory directory and the operating system group that has permission to write to it.
Click Next.
On UNIX systems, a dialog appears, prompting you to run the oraInstRoot.sh script.
Open a window and run the script, following the prompts in the window.
Return to the Oracle Universal Installer screen and click Next.
The Specify File Locations screen appears with default locations for:
The product files for the installation (Source)
The name and path to an Oracle home (Destination)
|
Note: Ensure that the Oracle home directory path for IDMHOST1 is the same as the path to the Oracle home location of IDMHOST2. For example, if the path to the Oracle home on IDMHOST1 is:
then the path to the Oracle home on IDMHOST2 must be:
|
Specify the Destination Name and Path, if different from the default, and click Next.
The Select a Product to Install screen appears.
Figure 2-25 Oracle Universal Installer Select a Product to Install Screen

Select OracleAS Infrastructure 10g, as shown in Figure 2-25, and click Next.
The Select Installation Type screen appears.
Figure 2-26 Oracle Universal Installer Select Installation Type Screen

Select Identity Management as shown in Figure 2-26, and click Next.
The Confirm Pre-Installation Requirements screen appears.
Ensure that the requirements are met and click Next.
The Select Configuration Options screen appears.
Figure 2-27 Oracle Universal Installer Select Configuration Options Screen

Select OracleAS Single Sign-On, Oracle Delegated Administration Services, and High Availability and Replication, as shown in Figure 2-27.
Click Next.
The Select High Availability Option screen appears.
Figure 2-28 Oracle Universal Installer Select High Availability Option Screen

Select OracleAS Cluster (Identity Management), as shown in Figure 2-28, and click Next.
The Create or Join an OracleAS Cluster (Identity Management) screen appears.
Figure 2-29 Oracle Universal Installer Create or Join an OracleAS Cluster (Identity Management) Screen
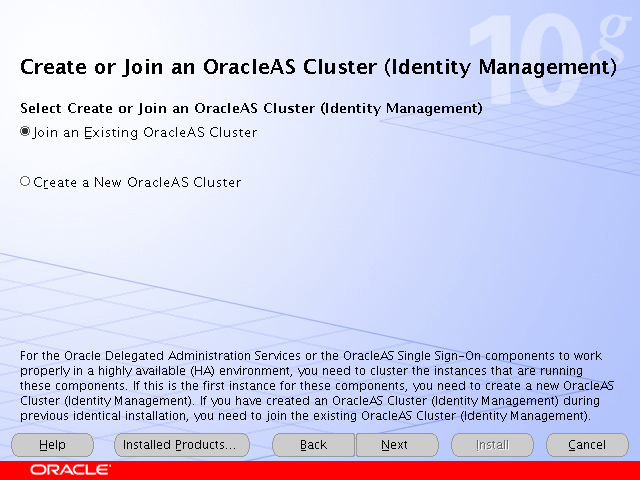
Select Join an Existing OracleAS Cluster, as shown in Figure 2-21, and click Next.
The Specify Existing OracleAS Cluster Name screen appears.
Figure 2-30 Oracle Universal Installer Specify Existing OracleAS Cluster Name Screen
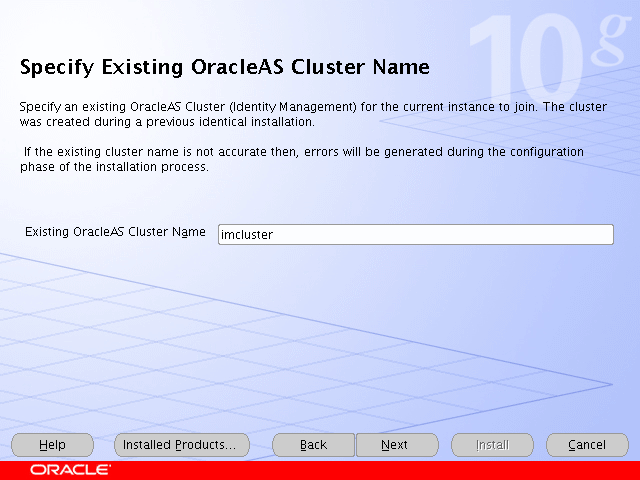
Complete the Existing OracleAS Cluster Name field with the name you provided for the cluster when installing the first instance, as shown in Figure 2-22, and click Next.
The Specify LDAP Virtual Host and Ports screen appears.
Figure 2-31 Oracle Universal Installer Specify LDAP Virtual Host and Ports Screen

Enter the name of the Load Balancing Router, the SSL port, and the non-SSL port, as shown in Figure 2-23.
Click Next.
The Specify OID Login screen appears.
Complete the fields and click Next.
The Specify HTTP Load Balancer and Listen Ports screen appears.
Figure 2-32 Oracle Universal Installer Specify HTTP Load Balancer Host and Listen Ports Screen

Enter the listen port of the HTTP Server and the host name and port of the HTTP Load Balancer, enabling the SSL option for the load balancer, as shown in Figure 2-32.
Click Next.
The Specify Instance Name and ias_admin Password screen appears.
Specify the instance name and password and click Next.
The Summary screen appears.
Review the selections to ensure that they are correct (if they are not, click Back to modify selections on previous screens), and click Install.
The Install screen appears with a progress bar. On UNIX systems, a dialog opens prompting you to run the root.sh script.
Open a window and run the script.
The Configuration Assistants screen appears. Multiple configuration assistants are launched in succession; this process can be lengthy. When it completes, the End of Installation screen appears.
Click Exit, and then confirm your choice to exit.
The Identity Management configuration is now as shown in Figure 2-33.
After both Identity Management configurations are complete, test the configurations as follows:
Stop all components on APPHOST1, using this command:
ORACLE_HOME/opmn/bin/opmnctl stopall
Ensure that all components on APPHOST2 are running, using this command:
ORACLE_HOME/opmn/bin/opmnctl status
Access the following URLs from two browsers:
https://login.mycompany.com/pls/orasso
https://login.mycompany.com/oiddas
Start all components from APPHOST1, using this command:
ORACLE_HOME/opmn/bin/opmnctl startall
Stop all components on APPHOST2, using this command:
ORACLE_HOME/opmn/bin/opmnctl stopall
Ensure that the login session is still valid for the orasso and oiddas logins.