|
Oracle® Application Server Application Developer's Guide
10g Release 2 (10.1.2) Part No. B14000-01 |
|
 Previous |
 Next |
|
Oracle® Application Server Application Developer's Guide
10g Release 2 (10.1.2) Part No. B14000-01 |
|
 Previous |
 Next |
Business partners and other clients can access an application's business logic if you expose the business logic as Web Services. These clients include non-Web-based clients, such as standalone Java applications, as well as Web-based clients, such as JSPs.
When you expose the business logic of an application as a Web Service, you specify the methods and their parameters that clients can call. Developers of client applications download the client-side proxy classes ("proxy stubs") for the exposed methods and also the WSDL file, which specifies the names and parameters of the methods. The developers then call the methods provided in the proxy classes to interact seamlessly with the remote Web Service. The proxy classes manage all of the remote interactions with the Web Service, including the marshalling and umarshalling of the Java objects to and from SOAP, and the sending and receiving of the SOAP messages to and from the exposed Web Service location.
This chapter describes how to enable Web Services for the second sample application. It also describes how to write a JSP client application to access the Web Services. The JSP client is part of a different application; the JSP simulates what an external business partner can do to use the exposed Web Services.
Contents of this chapter:
The second sample application's business logic that we want to expose as Web Services is contained in the EmployeeBenefitManager stateless session EJB. Web Services clients can invoke methods listed in its remote interface.
Recall that the EmployeeBenefitManager stateless session bean provides the business logic of the sample application. The session bean follows the session facade design pattern, and it uses other EJB components to fulfill its tasks.
The steps to enable Web Services in the sample application are:
Check that the data types for the parameters and the return values are valid for Web Services.
Create a JAR file containing the class files and the deployment descriptors (ejb-jar.xml and orion-ejb-jar.xml).
This is a typical JAR file for J2EE applications; it is not different from a typical JAR file because of Web Services.
Create a configuration file to provide input for the Web Services Assembly tool, which you will run in the next step.
The configuration file provides information such as the location of the JAR file, the URL where Web Services clients can access the exposed methods of the sample application, and the name of the EJB that provides the business logic that you want to expose as a Web Service.
Optionally, you can also provide an additional Java interface object that acts as a marker to identify which methods in the EJB should be exposed in the Web Service. If this is not provided, the Web Services Assembly tool exposes each method in the remote interface of the EJB. The example in this application exposes each method of the session bean, so it does not need to provide the additional Java interface object.
|
See Also: Oracle Application Server Web Services Developer's Guide for more details on the Java interface object. |
Run the Web Services Assembly tool (WebServicesAssembler.jar) to create an EAR file.
Deploy the EAR file.
Test the exposed methods.
The configuration file ws-assemble.xml for the second sample application contains the following lines:
<web-service>
  <display-name>Employee Benefit Manager Web Service</display-name>
  <destination-path>build/empbft-ws.ear</destination-path>
  <temporary-directory>.</temporary-directory>
  <context>/employeebenefitmanager</context>

  <stateless-session-ejb-service>
    <path>build/empbft/empbft-ejb.jar</path>
    <uri>/Service</uri>
    <ejb-name>EmployeeBenefitManager</ejb-name>
  </stateless-session-ejb-service>
</web-service>
In this case, the file omits the wsdl-gen element so that the Web Services Assembly tool does not generate a WSDL file to include in the EAR file. During runtime, when a client requests the WSDL, the OracleAS Web Services runtime generates the WSDL for the client.
Table 11-1 describes the elements in the configuration file. For a complete description of all elements.
Table 11-1 Elements in the Configuration File For the Web Services Assembly Tool
| Element | Description |
|---|---|
web-service
|
This is the top-level element for the configuration file. |
display-name
|
The Web Services Assembly tool uses this value for the display-name element in the application.xml file.
|
destination-path
|
This element specifies the name and location of the EAR file generated by the Web Services Assembly tool. |
temporary-directory
|
This element specifies the directory where the Web Services Assembly tool can store its temporary files. |
context
|
The Web Services Assembly tool uses this value for the context-root element in the application.xml file.
This element specifies the first part of the URL that clients use to download information about the application's Web Services. The second part of the URL is provided by the |
stateless-session-ejb-service
|
This is the parent element for a stateless session bean that is providing Web Services. |
path
|
This element specifies the JAR file that contains the stateless session bean. |
uri
|
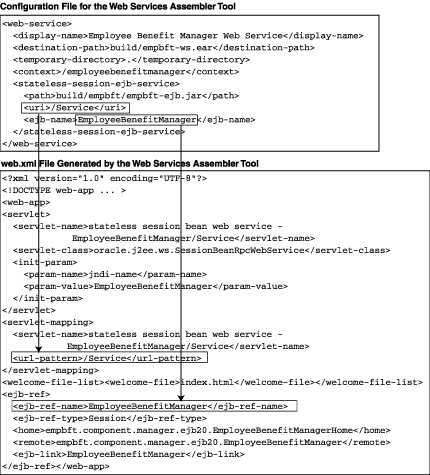
The Web Services Assembly tool copies this value to the url-pattern element in the web.xml file.
This element provides the second part of the URL that clients use to download information about the application's Web Services. This first part of the URL is provided by the |
ejb-name
|
This element specifies the name of the stateless session bean. |
The command for running the Web Services Assembly tool is:
prompt> java -jar $ORACLE_HOME/webservices/lib/WebServicesAssembler.jar -config ws-assemble.xml
The Web Services Assembly tool does the following:
Generates Web Service client-side proxy classes for the exposed business logic.
Sets up an endpoint URL (taken from the uri element) for the Web Service.
You use this URL to access the home page for the Web Service. Developers of client applications also use this URL, with query strings appended, to download the WSDL file and the proxy classes for the Web Service.
Generates a home page for the Web Services provided by the EJB. The home page contains links where you can test the exposed Web Services.
Generates the application.xml file for the EAR file.
The Web Services Assembly tool populates this file with values from the context and display-name elements. It also puts the name of the JAR file specified in the path element to the ejb element in the application.xml file.
Generates the web.xml file for the WAR file.
The Web Services Assembly tool gets the endpoint URL for the Web Service from the uri element in the configuration file and puts it in the web.xml file.
Generates an EAR file for the application.
Table 11-2 describes the contents of the EAR file. The file contains three main files: empbft-ejb.jar, empbft-ws_web.war, and application.xml.
Table 11-2 Files in the Generated EAR File
| File | Description |
|---|---|
empbft-ejb.jar
|
Contains the class files for the EJB, and two XML files that provide information about the EJB. |
empbft-ws_web.war
|
Contains the index.html file, which is returned if you access the application using the URL specified in the application.xml file.
The WAR file also contains the |
application.xml
|
Lists the files that are in the EAR file, and the context root URL for the application. |
Figure 11-3 shows the contents of the EAR file.
Figure 11-1 How the Web Services Assembly Tool Generates the application.xml File
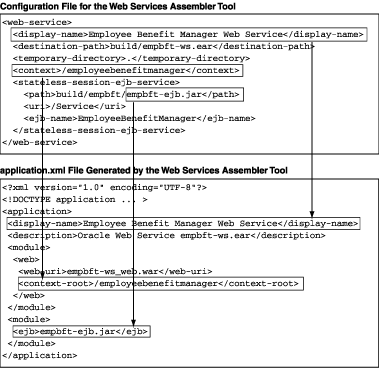
Figure 11-2 How the Web Services Assembly Tool Generates the web.xml File
After the Web Services Assembly tool has generated an EAR file, you can deploy the application. The following command deploys the application using the dcmctl command.
prompt> cd $ORACLE_HOME/dcm/bin
prompt> ./dcmctl deployApplication -file /home/joe/build/empbft-ws.ear -a empbft
You can test the Web Services from the home page:
Invoke the home page for the Web Service.
The configuration file created in "Create the Configuration File for the Web Services Assembly Tool" specifies the URL for the home page. The URL is the combined values of the context and uri elements. In this case, the value for context is /employeebenefitmanager, and the value for uri is /Service, and thus the URL for the servlet is: /employeebenefitmanager/Service.
Figure 11-4 shows the home page:
Click a method. This displays a page where you can enter parameter values for the method.
Enter values for the method's parameters, if any.
Figure 11-5 shows the parameter page for the listBenefitsOfEmployee method. This method requires one parameter: the employee ID. For this method, replace the "long value" text with the actual employee ID value (for example, 188).
Click Invoke on the parameter page to invoke the method.
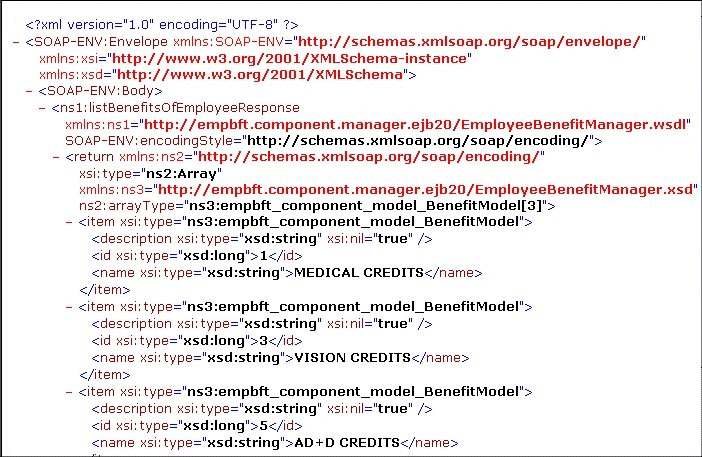
Figure 11-6 shows the XML returned for the listBenefitsOfEmployee method.
The home page, which is essentially a tool for testing and troubleshooting Web Services, displays the raw XML data. When a client invokes the method, the request goes through proxy classes, which parse the XML data and return only what the method returned. The client does not have to parse the raw XML data.
Figure 11-6 Return Value for the listBenefitsOfEmployee Method
What Happens When You Click Invoke
Figure 11-7 shows what happens when you click Invoke.
When you click Invoke, the browser sends an HTTP request to the home page, which is implemented as a servlet. The request contains information on which method to invoke and parameter values for the method, as necessary.
The home page servlet creates an XML document containing the information and sends it as a SOAP message to the OracleAS Web Services servlet.
The OracleAS Web Services servlet reads the XML document and creates a Java object to invoke the method.
The Java object invokes the method on the specified EJB.
The EJB returns the results to the Java object.
The Java object returns the results to the OracleAS Web Services servlet.
The OracleAS Web Services servlet creates an XML document and inserts the results into the document. It then sends the XML document to the home page servlet.
The home page servlet returns the XML document to the client.
After you have tested the exposed methods in your application, you can allow other developers to access the exposed methods through Web Services. This section describes a client application that invokes the methods provided by the EmployeeBenefitManager class in the second sample application.
The sample client uses the MVC design pattern, which is described in Chapter 2, "Designing the Application". MVC separates the model (which handles the business logic) from the view (which determines how the data is displayed). The controller directs requests to the proper classes.
The part of the sample client that invokes the Web Services is the model. Classes that make up the model are called handler classes because they handle the business logic processing of requests.
The handler classes invoke the Web Services using generated proxy classes, which are statically bound to the host and application providing the Web Services.
Web Services Clients that Invoke Web Services Dynamically
Instead of creating clients that use the proxy classes, you can create clients that invoke Web Services dynamically. You can even generate your own client from scratch using the WSDL file.
Other Ways of Designing a Web Services Client
The sample client described in this section is a standard J2EE application. As such, it follows the guidelines for J2EE applications. The only difference is that the client application contains the generated proxy classes in its WAR file.
Web Services also allow for other types of clients, such as JSPs and standalone Java applications. If you have such client applications, then you would follow the guidelines for these types of applications.
Clients can run on the same machine as the application, or on a different machine, or even on a machine that is on a different network.
To develop a client using the generated proxy classes:
Download the proxy classes (placed in a zip file) for the EmployeeBenefitManager bean from the host where you deployed the sample application created in Section 11.1, "Enabling Web Services in the Second Sample Application".
The URL to download the proxy classes is:
http://<hostname>:<port>/employeebenefitmanager/Service?proxy_jar
Add the ZIP file to your classpath.
Download the WSDL file, which describes the exposed methods and the parameters required by the methods.
The URL to download the WSDL is:
http://<hostname>:<port>/employeebenefitmanager/Service?WSDL
Create handler classes to invoke methods in the proxy classes.
Create a WAR file that contains the JSP files, the MVC classes, and the downloaded proxy classes. For a Web application, place the proxy classes in the WEB-INF/lib directory of the WAR file.
Create an EAR file that contains the WAR file and the application.xml file.
Deploy the EAR file.
Figure 11-8 shows how the files for the Web Services client are organized.
Figure 11-8 Directory Structure for the Web Services Client
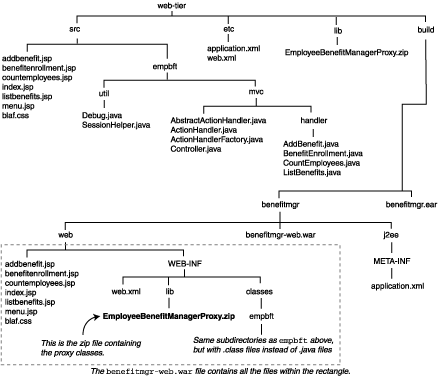
The Web Services client uses the MVC design pattern described in Chapter 2, "Designing the Application". This is how the client responds to a request:
A servlet in the Web Services client handles the request initially. It checks the query string of the request to determine which class should handle the request.
Handler classes that handle the requests have a method called performAction. The servlet invokes this method in the classes.
To invoke a method in the proxy stub, a class does the following:
Get an instance of the proxy stub, EmployeeBenefitManagerProxy in this case. If an instance does not already exist, create one:
EmployeeBenefitManagerProxy proxy = new EmployeeBenefitManagerProxy();
In the Web Services client, the SessionHelper class instantiates and maintains the proxy class for the duration of the session.
Invoke methods on the proxy class, which will in turn invoke corresponding methods on the remote Web Service. For example:
Object[] model = proxy.listBenefits();
In the Web Services client, the handler class stores results of the method as an attribute in the request. The handler class then forwards the request to a JSP, which retrieves the JavaBean objects associated with the attribute from the forwarded request and displays the data on a page.
When you invoke the client, you see the following screens:
Invoke the client. The URL for the client is:
http://host:port/benefitmgr
Replace host with the name of the host where you deployed the client application. Replace port with the port number at which the Oracle HTTP Server is listening.
Figure 11-9 shows the first page of the client.
Click an item just below the title to invoke a method via Web Services.
If a method does not require any parameters, the client invokes the method via the proxy class. The proxy class packages the request into proper XML format and sends it to the host. The flow is the same as when you tested the Web Services application.
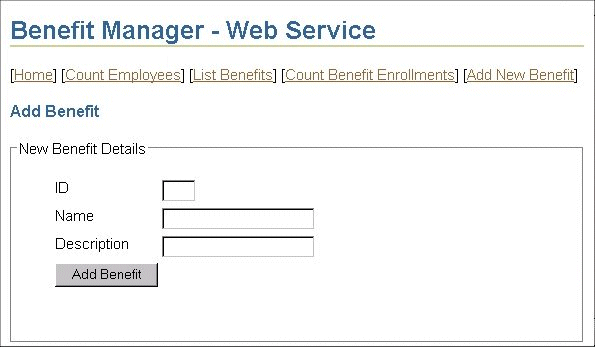
If a method requires parameters, the client displays a page where you can enter values for the parameters. For example, if you click the "Add New Benefit" option, the client displays the following page.
When you enter the data and click the submit button, the proxy class then dispatches your request.
Figure 11-10 Parameter Page for Add New Benefit
