| Oracle® Application Server Portal Developer's Guide 10g Release 2 (10.1.4) B14135-03 |
|
 Previous |
 Next |
| Oracle® Application Server Portal Developer's Guide 10g Release 2 (10.1.4) B14135-03 |
|
 Previous |
 Next |
This chapter explains how to create Java portlets based on the Java Portlet Specification (JSR 168) or the Oracle Application Server Portal Developer Kit-Java (PDK-Java) using the Portal Extension for Oracle JDeveloper. This chapter includes the following sections:

The source code for many of the examples referenced in this chapter is available as part of PDK-Java. You can download PDK-Java from the OracleAS Portal Developer Kit (PDK) page on OTN:
http://www.oracle.com/technology/products/ias/portal/pdk.html
When you unzip PDK-Java, you will find the examples in:
../pdk/jpdk/v2/src/oracle/portal/sample/v2/devguide
You can find the JavaDoc reference for PDK-Java in:
../pdk/jpdk/v2/apidoc
|
Note: Throughout this chapter, you will see references to ORACLE_HOME. ORACLE_HOME represents the full path of the Oracle home, and is used in cases where it is easy to determine which Oracle home is referenced. The following conventions are used in procedures where it is necessary to distinguish between the middle tier, OracleAS Infrastructure, or Oracle Application Server Metadata Repository Oracle home:
|
When you write your portlets in Java for either the Java Portlet Specification (JPS) or PDK-Java, you should follow the best practices described in this section.
Show mode exhibits the runtime portlet functionality seen by users. JPS offers some modes not offered by OracleAS Portal and vice versa. If you are coding portlets to JPS, you can declare custom portlet modes that map to the extra modes offered by OracleAS Portal.
An OracleAS Portal portlet may have the following Show modes, each with its own visualization and behavior. JPS portlets can define custom portlet modes in portlet.xml. Defining custom modes is especially useful if the portlet must interoperate with portal implementations from other vendors.
A portlet uses Shared Screen mode (known as View mode in JPS) to appear on a page with other portlets. This is the mode most people think about when they envision a portlet. Portlets are rendered inside HTML table cells when in Shared Screen mode. This means a portlet can display any content that can be rendered within a table cell, including, among other technologies, HTML, plug-ins, and Java applets. The actual size of the table cell is variable depending on user settings, the browser width, and the amount and style of content in the portlet. When developing portlets, remember that your portlet will share a page with others and you cannot completely control its dimensions and placement.
Plain HTML is the most basic way to render portlets and provides a great deal of flexibility to portlet developers. You can use almost any standard HTML paradigm, such as links, forms, images, tables, as long as it can display within an HTML table cell. Improperly written HTML may appear inconsistently across different browsers and, in the worst case, could cause parts of your page not to appear at all. Ensure that you adhere to the following rules:
Use standard HTML. The official HTML specification is available from the W3C (more information available at: http://www.w3.org/MarkUp/).
Avoid unterminated and extraneous tags. The behavior of pages with improperly terminated tags is unpredictable because it depends on what the browser chooses to do. Tools like weblint (http://www.weblint.org/) and HTML Tidy (http://www.w3.org/People/Raggett/tidy/) can help detect and fix hanging and unnecessary tags.
Avoid elements that cannot be rendered properly in an HTML table cell. Some constructs cannot be used simply because they do not display correctly in a table cell. Frames, for example, do not appear when inserted in a table.
Keep portlet content concise. Do not try to take full screen content and expose it through a small portlet. You will only end up with portlet content too small or cramped for smaller monitors. Full screen content is best viewed in Full Screen mode of OracleAS Portal.
Do not create fixed-width HTML tables in portlets. You have no way to tell how wide a column your portlet will have on a user's page. If your portlet requires more room than given, it might overlap with another portlet in certain browsers.
Avoid long, unbroken lines of text. The result is similar to what happens with wide fixed-width tables. Your portlet might overlap other portlets in certain browsers.
Check behavior when resizing the page. Test your portlet's behavior when the browser window is resized to ensure that it works in different browser window sizes.
Check behavior when the default browser font changes. People may choose whatever font size they wish and they can change it at any time. Your portlet should handle these situations gracefully.
The HTML you use also impacts the perceived performance of your site. Users judge performance based on how long it takes for them to see the page they requested, and browsers require time to interpret and display HTML. Given that, you should avoid the following:
Deeply nested tables: Deeply nested tables slow performance dramatically in some older browser versions. OracleAS Portal draws several levels of tables to render portlets. If your portlets use tables within tables, your users may have to wait quite a while for those pages to render.
Lengthy, complex HTML: Portlets share a page with other portlets. Thus, portlet generation times can significantly effect the overall performance of the page. If portlets must render complex HTML or wait for external resources, such as third party applications, it can greatly slow the rendering of the page.
The fonts and colors of every portlet on a page should match the style settings chosen by the user. To accomplish this goal, these style selections are embedded automatically using a Cascading Style Sheet (CSS) on each OracleAS Portal page. The portlets access these settings for their fonts and colors, either directly or using the API.
While different browsers have implemented varying levels of the full CSS specification, OracleAS Portal uses a very basic subset of this specification to allow for consistent fonts and colors. CSS implementation levels should not affect the consistency of your pages across browsers. Follow these guidelines for using CSS:
Use CSS instead of hard coding. Hard coding fonts and colors is extremely dangerous. If you hard code fonts and colors, your portlet may look out of place when the user changes the page style settings. Since you have no way of knowing the user's font and color preference choices, you might also choose to hard code a font color that turns out to be the same as the user's chosen background color, in which case your portlet appears to be invisible to that user.
Use the CSS APIs to format your text. The stylesheet definition is available at the top of OracleAS Portal pages, but you should not call it directly. Instead, use the APIs provided to format your text appropriately. This method ensures that your portlets work even if the stylesheet changes in the future.
Avoid using CSS for absolute positioning. Since users can personalize their portal pages, you cannot guarantee that your portlet can appear in a particular spot.
A portlet uses Edit mode to allow users to personalize the behavior of the portlet. Edit mode provides a list of settings that the user can change. These settings may include the title, type of content, formatting, amount of information, defaults for form elements, and anything that affects the appearance or content of the portlet.
Portal users typically access a portlet's Edit mode by clicking Personalize on the portlet banner. When you click Personalize, a new page appears in the same browser window. The portlet typically creates a Web page representing a dialog box to choose the portlet's settings. After applying the settings, users automatically return to the original page.
The following guidelines should govern what you expose to users in Edit mode:
Allow users to personalize the title of the portlet. The same portlet may be added to the same portal page several times. Allowing the user to personalize the title helps alleviate confusion.
If using caching, invalidate the content. If personalizations cause a change in portlet display or content, you must ensure that the portlet content is regenerated and not returned from the cache. Otherwise, the user may see incorrect content.
Do not use Edit mode as an administrative tool. Edit mode is meant to give users a way of changing the behavior of their portlets. If you need to change provider settings or do other administrative tasks, you should create secured portlets specifically for those tasks.
Only show mobile options when applicable. The portlet can interrogate whether an OracleAS Portal instance is enabled for mobile devices. If the instance is not mobile-enabled, then you need not show any mobile-specific options. Furthermore, if the page might serve both mobile and desktop users, you should consider delineating between mobile options and desktop options. Refer to Section 6.1.3.6, "Tailor Personalization Pages" for additional tips.
For consistency and user convenience, Edit mode should implement the following buttons in the following order:
OK saves the user personalizations and redirects the browser back to the calling portal page.
Apply saves the user personalizations and reloads the current page.
Cancel redirects the browser to the calling portal page without saving changes. Cancel differs from Reset to Defaults in that it leaves the current settings alone.
When you show the forms used to change personalization settings, you should default the values such that the user does not have to constantly re-enter settings. When rendering the personalization values, use the following sequence to provide consistent behavior:
User preference: Query and display this user's personalizations, if available.
Instance defaults: If no user personalizations are found, query and display system defaults for the portlet instance. These are set in Edit Defaults mode and apply only to this portlet instance.
Portlet defaults: If no system default personalizations are found, display general portlet defaults, which may be blank. General portlet defaults are sometimes hard coded into the portlet but should be overridden if either of the two previous conditions apply.
This logic enables the personalizations to be presented in a predictable way, consistent with the other portlets in the portal. PDK-Java makes this type of logic easy to implement.
A portlet uses the Edit Defaults mode to allow page designers to personalize the default behavior of a particular portlet instance. Edit Defaults mode provides a list of settings that the page designer can change. These settings may include the title, type of content, formatting, amount of information, defaults for form elements, and anything that affects the appearance or content of the portlet.
These default personalization settings can change the appearance and content of that individual portlet for all users. Because Edit Defaults mode defines the system level defaults for what a portlet displays and how it displays it, this mode should not be used as an administrative tool or for managing other portlets.
Page designers access Edit Defaults mode, when editing a page, by clicking the Edit Defaults icon just above the portlet banner.
When users click the Edit Defaults icon, a new page appears in the same browser window. The portlet typically creates a Web page representing a dialog box to personalize the portlet instance settings. After applying the settings, users are automatically returned to the original page.
The following guidelines should govern what you expose to page designers in Edit Defaults mode:
If using caching, invalidate the cache. If personalizations cause a change in portlet display or content, you must ensure that the portlet content is regenerated and not returned from the cache. Otherwise, the user may see incorrect content.
Do not use Edit Defaults mode as an administrative tool. Edit Defaults mode gives users a way of changing the behavior of their portlets. If you need to change provider settings or do other administrative tasks, you should create secured portlets specifically for those tasks.
Only show mobile options when applicable. The portlet can interrogate whether an OracleAS Portal instance is enabled for mobile devices. If the instance is not mobile-enabled, then you need not show any mobile-specific options. Furthermore, if the page might serve both mobile and desktop users, you should consider delineating between mobile options and desktop options. Refer to Section 6.1.3.6, "Tailor Personalization Pages" for additional tips.
For consistency and user convenience, Edit Defaults mode should implement the following buttons in the following order:
OK saves the user personalizations and redirects the browser back to the calling portal page.
Apply saves the user personalizations and reloads the current page.
Cancel redirects the browser to the calling portal page without saving changes. Cancel differs from Revert to Defaults in that is leaves the current settings alone.
When you show the forms used to change personalization settings, you should default the values so that the page designer does not have to constantly re-enter settings. When rendering personalization values, use the following sequence to provide consistent behavior:
Instance preferences: Query and display system defaults for the portlet instance.
Portlet defaults: If no system default personalizations are found, display general portlet defaults, which may be blank. General portlet defaults are sometimes hard coded into the portlet but should be overridden by system defaults.
This logic enables the personalizations to be presented in a predictable way, consistent with the other portlets in the portal.
A portlet uses Preview mode to show the user how the portlet looks before adding it to a page. Preview mode visually represents what the portlet can do.
Portal users typically access a portlet's Preview mode by clicking its Preview icon from the Add Portlet page. A window then displays the preview of the chosen portlet. The user has the option to add that portlet to the page. Portal administrators may access Preview mode from the Portlet Repository.
Note that the portal does not draw the portlet banner when rendering the portlet in this mode.
Guidelines for Preview Mode
The following guidelines should govern what you expose to users in Preview mode:
Provide an idea of what the portlet does. Preview mode should generate enough content for the user to get an idea of the actual content and functionality of the portlet.
Keep your portlet previews small. The amount of data produced in this mode should not exceed a few lines of HTML or a screen shot. Preview mode appears in a small area, and exceeding the window's size looks unprofessional and forces users to scroll.
Do not use live hyperlinks. Links may not behave as expected when rendered on the Add Portlet page or the Portlet Repository. Hyperlinks can be simulated using the underline font.
Do not use active form buttons. Forms may not behave as you expect them to when rendered on the Add Portlet page or the Portlet Repository. If you decide to render form elements, do not link them to anything.
Portlets use Full Screen mode to provide a larger version of the portlet for displaying additional details. Full Screen mode lets a portlet have the entire window to itself.
For example, if a portlet displays expense information, it could show a summary of the top ten spenders in Shared Screen mode and the spending totals for everyone in Full Screen mode. Portlets can also provide a shortcut to Web applications. If a portlet provided an interface to submitting receipts for expenses in Shared Screen mode, it could link to the entire expense application from Full Screen mode.
Portal users access a portlet's Full Screen mode by clicking the title of the portlet.
Technically, JPS portlets do not have Full Screen mode. However, you can implement the equivalent of Full Screen mode for a JPS portlet with View mode (Shared Screen mode) and a maximized state for the window.
A portlet uses Help mode to display information about the functionality of the portlet and how to use it. The user should be able to find useful information about the portlet, its content, and its capabilities with this mode.
Portal users access a portlet's Help mode by clicking Help in the portlet header.
Guidelines for Help Mode
The following guidelines should govern what you expose to users in Help mode:
Describe how to use the portlet. Users may not know all the features your portlet provides just from its interface. Describe the features and how to get the most out of them.
Users should be able to see what version of the portlet is currently running, its publication and copyright information, and how to contact the author. Portlets that require registration may link to Web-based applications or contact information from this mode, as well.
Portal users access a portlet's About mode by clicking About on the portlet header. A new page appears in the same browser window. The portlet can either generate the content for this new page or take the user to an existing page or application.
Guidelines for About Mode
The following guidelines should govern what you expose to users in About mode:
Display relevant copyright, version, and author information. Users want to know what portlet they are using and where they can get more information. The about page may become important when supporting your portlets.
A portlet uses Link mode to render a link to itself that displays on a mobile page. When the user clicks the link, the portlet is called in Show mode. The portlet then renders itself in the mobile View/Shared Screen mode.
For JPS portlets that declare support of the Oracle Mobile XML content type, OracleAS Portal renders the link in one of the following two ways:
Call the portlet's View mode with the MINIMIZED window state, if the portlet declares support for it.
Otherwise, render a link using the portlet's title.
Guidelines for Link Mode
The following guidelines should govern what you expose to users in Link mode:
Limit content. The purpose of Link mode is to render a link without extraneous material. Link mode should simply render the short title and possibly some relevant summary information (usually just a word or two).
In some ways, navigation between different sections or pages of a single portlet is identical to navigation between standard Web pages. Users can submit forms and click links. In the case of typical, simple Web pages, both of these actions involve sending a message directly to the server responsible for rendering the new content, which is then returned to the client. In the case of portlets, which comprise only part of a page, the form submission or link rendered within the portlet does not directly target the portlet. It passes information to the portlet through the portal. If a link or form within a portlet does not refer back to the portal, then following that link takes the user away from the Portal, which is not typically the desired behavior.
The portlet developer does not need to know the detailed mechanics of how the parameters of a form or link get passed around between the user, portal, and portlet. However, they must understand that they cannot write links in a portlet the same way they do for typical, simple Web pages.
A portlet may render links of the following four classes:
Intraportlet links require the portlet to be aware of the address of OracleAS Portal because they actually refer to it in some way.
Portal links, like intraportlet links, must be aware of the address of OracleAS Portal for the same reason.
External links make no reference to OracleAS Portal and behave in portlets as they would do in a normal Web page.
Internal/Resource links, like external links, also make no reference to OracleAS Portal.
Figure 6-1 contains a summary of these link types. The arrows indicate how the links reference the resources to which they logically refer.
Intraportlet links go to different sections or pages within a given portlet. Strictly speaking, they refer to the OracleAS Portal page containing the portlet, but they contain parameters that cause the portlet to render a different section or page within that OracleAS Portal page when it is requested by the user.
As a direct consequence, a portlet cannot expect to render links to different sections or pages of itself using relative links or absolute links based on its own server context. Intraportlet link are useful for intraportlet navigation, either as links or form submission targets.
Portal links refer to significant pages within OracleAS Portal, such as the user's home page.
External links refer neither to the portlet (through an OracleAS Portal page) nor to any part of the portal. If selected, these links take the user away from the OracleAS Portal, for example, www.oracle.com.
Internal/Resource links refer to internal (to the portlet) resources. Sometimes they are exclusively used internally during portlet rendering, for example as a server side include. On other occasions, they may be used externally to reference portlet resources like images. In this latter case, you can use the PDK-Java constructResourceURL method in the UrlUtils class to retrieve images from behind a firewall through resource proxy. For example, lottery.jsp of the lottery sample, which is available with PDK-Java, contains resource proxy requests for images.
<%@ page contentType="text/html;charset=UTF-8" %>
<%@ page session="false" import="oracle.portal.provider.v2.render.*" %>
<%@ page import="oracle.portal.provider.v2.render.http.HttpPortletRendererUtil" %>
<%@ page import="oracle.portal.provider.v2.url.UrlUtils" %>
<%@ page import="oracle.portal.sample.v2.devguide.lottery.*" %>
<%
  LottoPicker picker = new LottoPicker();
  picker.setIdentity(request.getRemoteAddr() ); %>
<% PortletRenderRequest portletRequest = (PortletRenderRequest)
request.getAttribute("oracle.portal.PortletRenderRequest"); %>
<% String name = portletRequest.getUser().getName(); %>
<P class="PortletHeading1" ALIGN="CENTER">Hi <%= name %>, Your Specially
  Picked</P><P ALIGN="CENTER"><IMG SRC="<%= UrlUtils.constructResourceURL(portletRequest,
  HttpPortletRendererUtil.absoluteLink(request, "images/winningnumbers.gif")) %>"
  WIDTH="450" HEIGHT="69" ALIGN="BOTTOM" BORDER="0"></P>
<P>
<P ALIGN="CENTER">
<TABLE ALIGN="CENTER" BORDER="0" CELLPADDING="0" CELLSPACING="0">
<TR>
<%
     int [] picks = picker.getPicks();
     for (int i = 0; i < picks.length; i++) {
%>
             <TD>
    <IMG SRC="<%= UrlUtils.constructResourceURL(portletRequest,
      HttpPortletRendererUtil.absoluteLink(request, "images/ball" + picks[i])) %>
      .gif" WIDTH="68" HEIGHT="76" ALIGN="BOTTOM" BORDER="0">
     </TD>
<%
     }
These calls cause the Parallel Page Engine to make the request to the resource and return it to the browser. For session-based providers, any cookies returned from the original initSession call to the provider are sent with the request back to the provider to maintain the right session context.
OracleAS Portal is capable of rendering its pages for both HTML and non-HTML (mobile) devices. When rendering for a mobile device, OracleAS Portal requires portlets to generate content in a universal markup language called OracleAS Wireless XML.
Many portlets, known as desktop portlets, generate only HTML responses and as such can only render themselves in standard HTML browsers. Some portlets, known as mobile portlets, generate only OracleAS Wireless XML responses. These portlets can render themselves on any device, including standard HTML browsers. Many portlets, though, take a hybrid approach that renders either HTML or OracleAS Wireless XML depending on the environment. These hybrid portlets can render themselves on any device, but they render best on standard HTML browsers. Although OracleAS Wireless XML is sufficient for HTML responses, it is not as expressive as HTML. Since portlets running in both a desktop and mobile environment are typically accessed using the desktop, developers commonly choose to create hybrid portlets that can provide the best possible rendition in the desktop environment.
When building mobile portlets, you should adhere to the following guidelines:
For information on how to build mobile-enabled portlets, refer to Section 7.2.9, "Enhancing Portlets for Mobile Devices".
To properly manage portlets, OracleAS Portal must know the set of content types a portlet generates. OracleAS Portal uses this information in the following ways:
To restrict the Portlet Repository view in the Add Portlet dialog. Only those portlets capable of being rendered on the targeted page will appear in the Add Portlet dialog. For example, when a user invokes the Add Portlet dialog from a mobile design page, only portlets that indicate they can generate OracleAS Wireless XML responses are displayed.
To display an icon in the Portlet Repository view in the Add Portlet dialog that identifies portlets capable of being rendered on many devices. For example, when a user invokes the Add Portlet dialog from a standard design page, those portlets that are mobile capable are listed with the mobile-enabled icon (Figure 6-2) to indicate they will also render on mobile devices.
To display only those portlets registered with the capability of generating OracleAS Wireless XML when rendering a standard page on a mobile device.
To include only those portlets registered with the capability of generating OracleAS Wireless XML when creating a new mobile page based on an existing standard page.
The small screen size of the typical mobile device limits the number of characters it can display in a single line without scrolling. Portlet titles, which appear as the menu item label when OracleAS Portal renders the mobile page in a menu structure, are often too long for mobile displays. Hence, you can define a short title for your portlet. The short title replaces the standard title where display space is limited.
The standard portlet title represents the default portlet instance name when rendered in the header of a portlet on a standard page. The portlet's short title represents the default portlet instance name when rendered as a menu item in a mobile page. Just as we recommend that portlets support personalizing the standard title, we also recommend that your portlets support personalizing the short title. This functionality enables the page designer or end user to give the instance a meaningful name.
When OracleAS Portal renders a standard page to the desktop, it assembles portlets on the page in the tabular layout defined by the page designer. Thus, OracleAS Portal aggregates the content of many portlets on a single page. Because of their small displays, mobile devices cannot effectively display the content of multiple portlets on a single page. Instead, the page's portlets appear as links (menu items). Users view portlet content by navigating the menu one portlet at a time. The menu item links typically use the portlet's short name. Since well behaved portlets allow personalization of the short name and the portlet manages its own personalization data, the portlet must participate in rendering the menu item link. To enable this functionality, you can implement the Link mode for portlets. In response to a request to render a portlet in Link mode, a portlet generates a link to itself in the appropriate content type. For example, if the render requests HTML, the portlet returns an anchor tag. If the render requests OracleAS Wireless XML, the portlet returns a SimpleHref tag.
All requests, whether from mobile devices or the desktop, pass general device information. For example, one passed attribute identifies the device class, such as pcbrowser, pdabrowser, or microbrowser (cell phones). A portlet developer may use this attribute to adjust the response's layout or quantity of data.
A single portlet instance must maintain a single set of user personalizations spanning all devices, mobile and desktop. Therefore, the same personalization page appears even if the instance is shared between a standard and mobile page, and some fields apply only to one environment, desktop or mobile. In this situation, the portlet should identify these fields that pertain to only one environment. For example, a portlet might display a mobile-only section on its personalization page. Furthermore, because the mobile capability is configurable, a portlet could remove mobile-only references from its personalization page when it detects that the mobile functionality is disabled.
Organizations engaged in enterprise portal projects have found application integration to be a major issue. Until now, users developed portlets using proprietary APIs for a single portal platform and often faced a shortage of available portlets from a particular portal vendor. All this changes with the introduction of the following standards:
Web Services for Remote Portlets (WSRP)
Java Portlet Specification (JPS)Foot 1 based on JSR 168
These two standards enable the development of portlets that interoperate with different portal products, and therefore widen the availability of portlets within an organization. This wider availability can, in turn, dramatically increase an organization's productivity when building enterprise portals.
WSRP is a Web services standard that enables the plug-and-play of visual, user-facing Web services with portals or other intermediary Web applications. Being a standard, WSRP enables interoperability between a standards-enabled container and any WSRP portal. WSRP defines the following:
Web Services Definition Language (WSDL) interface for the invocation of WSRP services
Markup fragment rules for markup emitted by WSRP services
The method to publish, find, and bind WSRP services and metadata
JPS is a specification that defines a set of APIs to enable interoperability between portlets and portals, addressing the areas of aggregation, personalization, presentation, and security. JPS defines container services which provide the following:
A portlet API for coding portlet functionality
The URL-rewriting mechanism for creating user interaction within a portlet container
The security and personalization of portlets
Oracle actively participates in the WSRP committee and is also a member of the expert group for JPS.
|
Note: .HTML forms can be submitted using either theget or post method, but the WSRP standard only requires the consumer (portal) to use the post method. Support of the get method is optional according to the standard. Since portal consumers are not required to support the get method, we highly recommended that you use the post method when developing your portlets. |
The Relationship Between WSRP and JPS
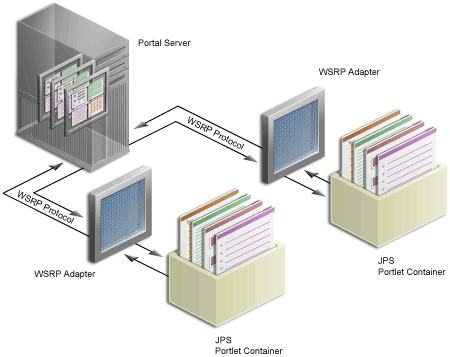
WSRP is a communication protocol between portal servers and portlet containers, while JPS describes the Java Portlet API for building portlets. Combining these standards enables developers to integrate their applications from any internal or external source as portlets with WSRP portals. Building portal pages becomes as simple as selecting portlets from the OracleAS Portal repository. Figure 6-3 shows the architecture of the WSRP specification.
|
Note: Figure 6-3 illustrates the use of JPS portlets with WSRP, but it should be noted that WSRP can also work with non-JPS portlets. |
Figure 6-3 WSRP Specification Architecture
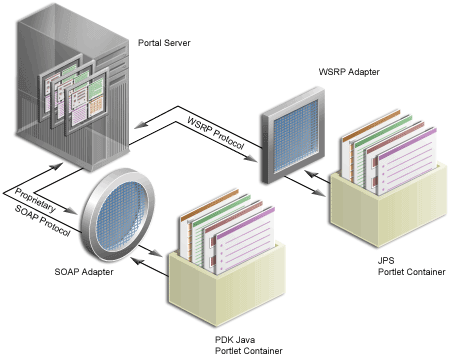
Since OracleAS Portal's existing architecture is so similar to the one specified by the WSRP committee, OracleAS Portal is able to support communication between our portal and both the new Java Portlet APIs as well as our existing APIs (PDK-Java). Figure 6-4 shows the architecture of the WSRP portal. Notice that the JPS-compliant portlet container uses the WSRP protocol for communication and the PDK-Java portlet container uses Oracle's proprietary SOAP protocol for communication.
Figure 6-4 OracleAS Portal's WSRP Architecture
You can run JPS portlets from any number of configurations, each with its own set of requirements. This section describes the configuration steps for two of the more common scenarios for JPS portlets:

Before you start the procedures in this section, you need to download the latest Java Portlet Container from OTN and unzip the contents to a local directory on the system you plan to configure for WSRP deployment. You can find the Java Portlet Container, as well as information regarding the most recent patches, on the PDK Download page on OTN:
http://www.oracle.com/technology/products/ias/portal/pdk.html
When you install the Oracle Application Server, you may or may not have chosen the Portal and Wireless option and the configuration steps you must follow vary between these cases:
In order to deploy your JPS portlets to the Oracle Application Server with the Portal and Wireless option, you need to first perform the following steps:
Create a new OC4J instance into which you can deploy your JPS portlets:
Log in to the Application Server Control Console for the Oracle Application Server middle tier instance to which you wish to deploy JPS portlets.
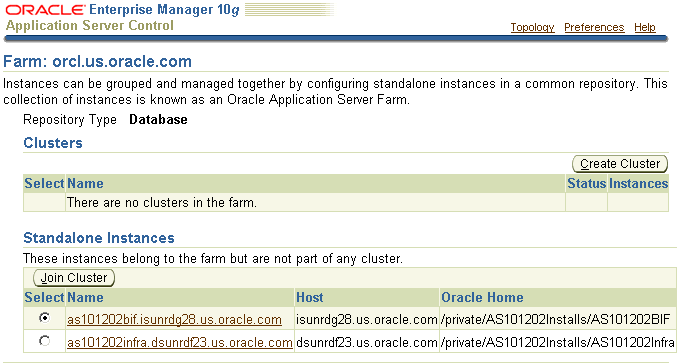
The Application Server Control Console most likely displays multiple instances that you can manage (see Figure 6-5). Click the Oracle Application Server middle tier instance to which you plan to deploy JPS portlets.
Figure 6-5 Application Server Control Console Main Page
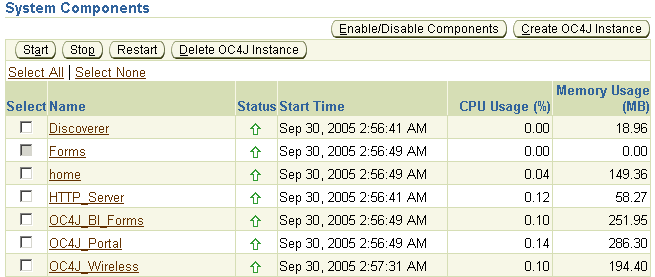
Under System Components (see Figure 6-6), click Create OC4J Instance.
Figure 6-6 System Components in Application Server Control Console
Enter the name of the instance and click Create. For example, you might name the instance wsrp. Note that it may take a few seconds for the instance to be created.
A confirmation message appears indicating that the instance was created. Note that the instance is not started upon creation and it should not be started until you have completed the other configuration steps that follow.
Click OK to return to the Home tab.
Copy wsrp-install.jar from your portlet container directory (where you unzipped the Java Portlet Container) to a location named for the OC4J instance. For example:
MID_TIER_ORACLE_HOME/j2ee/wsrp
In this example, the OC4J instance was named wsrp.
Run the auto-installer from your directory:
cd MID_TIER_ORACLE_HOME/j2ee/wsrp
MID_TIER_ORACLE_HOME/jdk/bin/java -jar wsrp-install.jar
This installation utility installs the portlet container and makes the necessary configuration changes for the container to run.
Start the OC4J instance from the Application Server Control Console:
From the System Components area, select the component (for example, wsrp).
Click Start.
You should now test your WSRP configuration to confirm it is working correctly. You can use OracleAS Portal's sample WSRP producer, wsrp-sample.ear, for this purpose.
Return to the Application Server Control Console for the Oracle Application Server middle tier instance you configured for JPS portlets.
Click the Oracle Application Server middle tier instance to which you plan to deploy JPS portlets.
Click the OC4J container you created earlier, wsrp.
Click the Applications tab (see Figure 6-7).
Figure 6-7 Applications Tab of OC4J Container
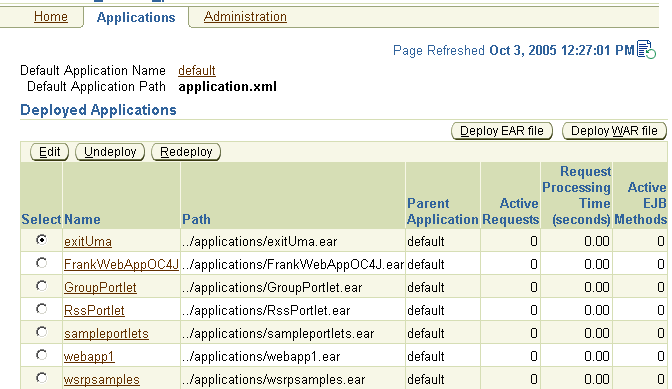
Click Deploy EAR file.
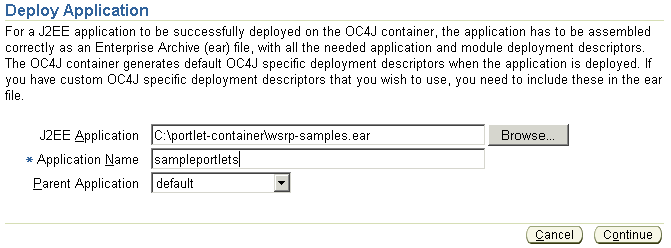
Fill out the Deploy Application page (see Figure 6-8) as described in Table 6-1.
Table 6-1 Deployment Settings for EAR File, Portal and Wireless
| Setting | Value |
|---|---|
|
J2EE Application |
PORTLET_CONTAINER/wsrp-samples.ear
where |
|
Application Name |
sampleportlets |
|
Parent Application |
default |
Figure 6-8 Deployment Settings Page for EAR File
Click Continue.
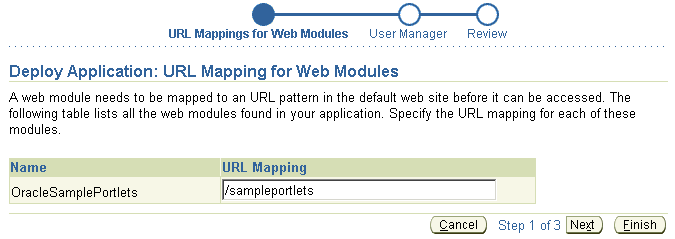
On the URL Mapping for Web Modules page (see Figure 6-9), change /portletapp to /sampleportlets.
Figure 6-9 URL Mapping for Web Modules Page
You do not need to make any changes on the subsequent pages of the wizard, so click Finish.
The Review page should now appear (Figure 6-10). Carefully check the settings to ensure that they are correct.
Click Deploy. This displays the Confirmation page, as shown in Figure 6-11.
Click OK to dismiss the confirmation page.
Now that you have deployed the sample EAR file, you need to test its WSDL URL by entering it into a browser. The WSDL URL is of the form:
http://host:port/sampleportlets/portlets?WSDL
You should see a page similar to the one shown in Figure 6-12.
Using the WSDL URL, register the sample producer as you would any other producer by following the instructions in Section 6.4.2.4, "Registering and Viewing Your Portlet". Further test the configuration by adding some of the sample portlets to a page and displaying the page. If the registration fails for any reason or you cannot add portlets to a page, then please refer to the troubleshooting information in Section B.2, "Diagnosing Java Portlet Problems".
Once the sample producer registers successfully, you are ready to begin building your own portlets as described in Section 6.4.2, "Building JPS-compliant Portlets".
In some cases, you may choose to install the Oracle Application Server without the Portal and Wireless option. For example, you might instead choose the J2EE and Web Cache, or Business Intelligence and Forms option. If you did choose something other than Portal and Wireless, you must perform the following steps to prepare for deploying JPS portlets:
Create a new OC4J instance into which you can deploy your JPS portlets:
Log in to the Application Server Control Console for the Oracle Application Server middle tier instance to which you wish to deploy JPS portlets.
The Application Server Control Console most likely displays multiple instances that you can manage (see Figure 6-5). Click the instance to which you plan to deploy JPS portlets.
Under System Components (see Figure 6-6), click Create OC4J Instance.
Enter the name of the instance and click Create. For example, you might name the instance wsrp. Note that it may take a few seconds for the instance to be created.
A confirmation message appears indicating that the instance was created. Note that the instance is not started upon creation and it should not be started until you have completed the remainder of the configuration steps.
Click OK to return to the Home tab.
Copy wsrp-install.jar from your portlet container directory to a location named for the OC4J instance. For example:
MID_TIER_ORACLE_HOME/j2ee/wsrp
In this example, the OC4J instance was named wsrp.
Run the auto-installer from your directory:
cd MID_TIER_ORACLE_HOME/j2ee/wsrp
MID_TIER_ORACLE_HOME/jdk/bin/java -jar wsrp-install.jar
This installation utility installs the portlet container and makes the necessary configuration changes for the container to run.
JPS portlets store their registration and preference information in a database. For a non-Portal and Wireless installation, you must create a database schema with the relevant tables to store this information. You can use the Oracle Application Server infrastructure database or any other Oracle database for this purpose. To create this store, you must first connect to the database as a user with SYSDBA privileges:
sqlplus "sys/<sys_password>@<service_name> AS SYSDBA"
To create the preference store, run the ptlwsrp_data.sql script using the following command. You will find ptlwsrp_data.sql in the root directory where you unzipped the portlet container.
|
Note: ptlwsrp_data.sql creates a database user named portlet_prefs with a password of portlet_prefs, and populates the schema with the required database objects. |
@ptlwsrp_data portlet_prefs portal
where portlet_prefs is the name of a user account that stores the data and portal is the name of a default table space to use for that account.
Return to the Application Server Control Console. Log in again if necessary and navigate back to the Home tab for the instance to which you plan to deploy JPS portlets (see Figure 6-6).
Click the component (for example, wsrp).
Click the Administration tab (see Figure 6-13).
Figure 6-13 Administration Tab for the WSRP Container

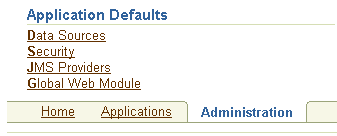
Under Application Defaults (see Figure 6-14), click Data Sources.
Figure 6-14 Application Defaults on Administration Tab
Click Create on the Data Sources page (see Figure 6-15).
Fill out the fields on the Create Data Source page as shown in Table 6-2.
Table 6-2 Create Data Source Settings
| Setting | Value |
|---|---|
|
Name |
OracleDS |
|
Data Source Class |
com.evermind.sql.DriverManagerDataSource |
|
JDBC URL |
For example: jdbc:oracle:thin:@(description=(address=(host=myhost.mydomain.com) (protocol=tcp)(port=1521))(connect_data=(service_name=myservice.mydomain.com))) |
|
JDBC Driver |
oracle.jdbc.driver.OracleDriver |
|
Username |
portlet_prefs
You need to fill in the appropriate user account name for your system. |
|
Password |
portlet_prefs
You need to fill in the password for the appropriate user account for your system |
|
Location |
jdbc/emulatedPortletPrefs |
|
Transactional (XA) Location |
jdbc/xa/portletPrefs |
|
EJB Location |
jdbc/portletPrefs |
Click Create.
Click Yes when prompted to restart the OC4J instance.
You should now test your WSRP configuration to confirm it is working correctly. You can use OracleAS Portal's sample WSRP producer, wsrp-sample.ear, for this purpose.
Return to the Application Server Control Console for the Oracle Application Server middle tier instance to which you wish to deploy JPS portlets.
Click the Oracle Application Server middle tier instance to which you plan to deploy JPS portlets.
Click the OC4J container you created earlier, wsrp.
Click the Applications tab (see Figure 6-7).
Click Deploy EAR file.
Fill out the Deploy Application page (see Figure 6-8) as described in Table 6-3.
Click Continue.
On the URL Mapping for Web Modules page (see Figure 6-9), change /portletapp to /sampleportlets.
You do not need to make any changes on the subsequent pages of the wizard, so click Finish
The Review page should now appear (Figure 6-10). Carefully check the settings to ensure that they are correct.
Click Deploy.
Click OK to dismiss the confirmation page.
Now that you have deployed the sample EAR file, you need to test its WSDL URL by entering it into a browser. The WSDL URL is of the form:
http://host:port/sampleportlets/portlets?WSDL
You should see a page similar to the one shown in Figure 6-12.
Using the WSDL URL, register the sample producer as you would any other producer by following the instructions in Section 6.4.2.4, "Registering and Viewing Your Portlet". Further test the configuration by adding some of the sample portlets to a page and displaying the page. If the registration fails for any reason or you cannot add portlets to a page, then please refer to the troubleshooting information in Section B.2, "Diagnosing Java Portlet Problems".
Once the sample producer registers successfully, you are ready to begin building your own portlets as described in Section 6.4.2, "Building JPS-compliant Portlets".
In order to deploy your JPS portlets to OC4J standalone, you need to first perform the following steps:
If you do not already have OC4J standalone, download it from OTN and install it. You can obtain the download from:
http://www.oracle.com/technology/software/products/ias/htdocs/utilsoft.html
If you already have a running OC4J standalone instance, you can skip this step.
Stop the OC4J standalone instance with the following command line:
java -jar admin.jar ormi://localhost admin $admin_password -shutdown
Copy wsrp-install.jar from your portlet container directory to:
OC4J_HOME/j2ee/home
Run the auto-installer from your directory:
cd OC4J_HOME/j2ee/home
java -jar wsrp-install.jar
This installation utility installs the portlet container and makes the necessary configuration changes for the container to run.
JPS portlets store their registration and preference information in a database. For an OC4J standalone installation, you must create a database schema with the relevant tables to store this information. You can use the Oracle Application Server infrastructure database or any other Oracle database for this purpose. To create this store, you must first connect to the database as a user with SYSDBA privileges:
sqlplus "sys/<sys_password>@<service_name> AS SYSDBA"
To create the preference store, run the ptlwsrp_data.sql script using the following command. You will find ptlwsrp_data.sql in the root directory where you unzipped the portlet container.
|
Note: ptlwsrp_data.sql creates a database user named portlet_prefs with a password of portlet_prefs, and populates the schema with the required database objects. |
@ptlwsrp_data portlet_prefs portal
where portlet_prefs is the name of a user account that stores the data and portal is the name of a default table space to use for that account.
Edit the file data-sources.xml located in OC4J_HOME/j2ee/home/config, where OC4J_HOME is the location in which you unzipped OC4J. Add a new data-source entry that maps the connection details for the preference store schema to a JDBC data source with an ejb-location of jdbc/portletPrefs. For example:
<data-source
        class="com.evermind.sql.DriverManagerDataSource"
        name="OracleDS"
        location="jdbc/emulatedPortletPrefs"
        xa-location="jdbc/xa/portletPrefs"
        ejb-location="jdbc/portletPrefs"
        connection-driver="oracle.jdbc.driver.OracleDriver"
        username="portlet_prefs"
        password="portlet_prefs"
        url="jdbc:oracle:thin:@(description=(address=
            (host=myhost.domain.com)(protocol=tcp)
            (port=1521))(connect_data=(
            service_name=myservice.mydomain.com)))"
/>
Note that the values for username, password, and url are just examples. You will need to use the appropriate values for your system.
Start the OC4J instance with one of the following command lines to ensure that it is working properly:
On Windows:
start java -jar oc4j.jar
On UNIX:
java -jar oc4j.jar &
You should now test your WSRP configuration to confirm it is working correctly. You can use OracleAS Portal's sample WSRP producer, wsrp-sample.ear, for this purpose. Before proceeding, you need to deploy the sample portlets EAR file. Use sampleportlets as the context root of the Web application.
Refer to Section 1.6, "Deploying Applications" of the Oracle Application Server Containers for J2EE Standalone User's Guide for complete information about how to deploy an EAR file.
Once you have deployed the sample EAR file, you need to test its WSDL URL by entering it into a browser. The WSDL URL is of the form:
http://host:port/sampleportlets/portlets?WSDL
You should see a page similar to the one shown in Figure 6-12.
Using the WSDL URL, register the sample producer as you would any other producer by following the instructions in Section 6.4.2.4, "Registering and Viewing Your Portlet". Further test the configuration by adding some of the sample portlets to a page and displaying the page. If the registration fails for any reason or you cannot add portlets to a page, then please refer to the troubleshooting information in Section B.2, "Diagnosing Java Portlet Problems".
Once the sample producer registers successfully, you are ready to begin building your own portlets as described in Section 6.4.2, "Building JPS-compliant Portlets".
Using a convenient download from OTN, you can add extensions to Oracle JDeveloper for building portlets. To use this extension, perform the steps in the following procedures:
This section assumes the following:
You are familiar with portlet terminology such as portlet Show modes. Refer to Chapter 1, "Understanding Portlets" and Section 6.1, "Guidelines for Creating Java Portlets".
You have configured your Oracle Application Server to run JPS portlets in one of the configurations described in Section 6.3, "Configuring Your Application Server to Run JPS-Compliant Portlets".
You are already familiar with Oracle JDeveloper and know how to build and deploy Java components using it. You can download Oracle JDeveloper from OTN. Visit the Oracle JDeveloper page on OTN:
http://www.oracle.com/technology/products/jdev/index.html
The OracleAS Portal Developer Kit (PDK) provides you with the necessary libraries to install an extension for Oracle JDeveloper that dramatically increases your flexibility and productivity when developing portlets. This extension includes two wizards, one for building PDK-Java portlets and one for building JPS-compliant portlets. Both wizards guide you through the steps of creating the portlet skeleton and all you need do then is implement your own business logic.
To obtain the extension:
Visit the PDK Download page on OTN:
http://www.oracle.com/technology/products/ias/portal/pdk.html
Under Portal Extension for JDeveloper, click Portal Extension for Oracle JDeveloper to download the extension.
Click Portal Extension for Oracle JDeveloper Installation Guide for installation instructions.
Once you have successfully installed the Portlet Wizard for Java, you can begin your interoperability portlet development quickly and easily with Oracle JDeveloper:
Creating a Portlet: Use the wizard to create your basic portlet code and the necessary configuration files for the framework.
Adding Portlet Logic: Extend the example code with your own business logic.
Deploying Your Portlet to an Application Server: Use Oracle JDeveloper to deploy your application to your application server.
Registering and Viewing Your Portlet: Register and view your portlet with OracleAS Portal.
This section walks you through the Portlet Wizard. You can choose which portlet Show modes you want to implement and the implementation method (JSP, HTTP servlet, Java class, or HTML). The wizard then creates a simple sample implementation for each of the selected modes.
After you open Oracle JDeveloper, click the workspace where you want to create this project. If you do not have a workspace, you can create one as follows:
Right-click the Applications node in the Application Navigator and choose New.
Choose Workspace from the Items list in the New Gallery dialog box.
Click OK.
Enter a Workspace Name and Directory Name, and clear Add a New Empty Project in the Create Workspace dialog box.
Click OK.
Right-click the name of the workspace in the Application Navigator and choose New Project.
Click Empty Project in the Items list in the New Gallery dialog box.
Click OK.
Enter the Project Name and Directory Name in the Create Project dialog box.
Click OK.
Right-click your project and select New.
In the Categories list, expand the Web Tier category and click Portlets.
|
Note: If you cannot find Portlets, refer to Section 6.4.1, "Installing the Portal Extension for Oracle JDeveloper" to ensure that you have installed the extension correctly. |
In the Items list, click Java Portlet. This displays the New Gallery dialog box, as shown in Figure 6-16.
|
Note: Clicking Java Portlet will open the Portlet Wizard for creating JPS-compliant portlets. Clicking Oracle PDK Java Portlet will open the Portlet Wizard for creating PDK-Java portlets. |
If you are on the Welcome page (see Figure 6-17) of the wizard, click Next.
On the General Portlet Properties page, enter the values as described in Table 6-4 and shown in Figure 6-18.
Table 6-4 General Portlet Properties Values
| Property | Value |
|---|---|
|
Class |
Enter the name of the class the wizard will create. The field is primed with a default class name that you may accept or change. |
|
Package |
Browse the packages in the project and select the one in which the class will reside. If you do not select a package, the wizard uses the default package of the project. |
|
Default Language |
Select the default language that your portlet will support. The wizard uses English by default. |
|
Customizable |
Select whether to allow end users to personalize your portlet. The wizard enables personalization by default. For the purposes of this example, accept the default. |
Figure 6-18 General Portlet Properties Page
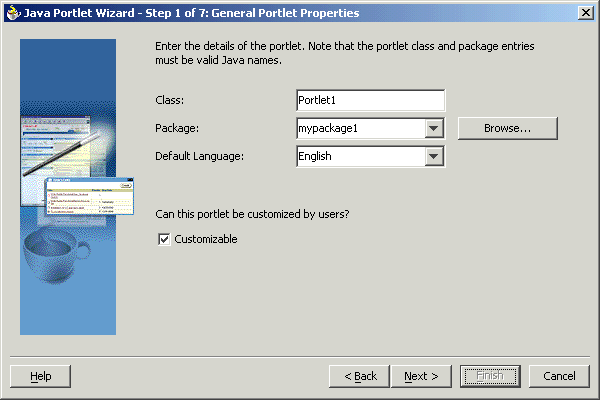
Click Next.
|
Note: Finish is not enabled until after the second step of the wizard has been completed. |
On the Name and Attribution page, enter the values as described in Table 6-5 and shown in Figure 6-19.
Table 6-5 Name and Attribution Values
| Property | Value |
|---|---|
|
Display Name (required) |
Enter the name that will be displayed in the OracleAS Portal catalog or repository. Enter |
|
Portlet Title (required) |
Enter the title that will appear on the portlet header (on a portal page). Enter |
|
Short Title |
Enter the title that will appear on the portlet header for mobile devices. Enter |
|
Description |
Enter a description of your portlet. Enter |
|
Keywords |
Enter keywords to help users find the portlet in the portal. Enter |
Click Next to continue specifying the portlet's properties or click Finish. If you click Finish at this point, the wizard chooses the default values for all remaining settings.
On the Content Types and Portlet Modes page shown in Figure 6-20, select the content types for your portlet and map the portlet modes to an implementation. By default, your portlet will display text/html as the content type, and a portlet mode of View. If Customizable was selected on the General Portlet Properties page, edit also appears as a portlet mode for text/html.
Figure 6-20 Content Types and Portlet Modes Page
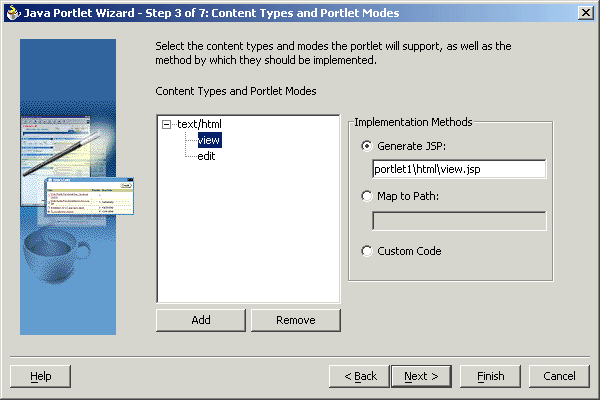
If you need to add content types other than text/html, click text/html and then click Add. For the purposes of this example, you do not need to add any other content types.
If you need to add additional portlet modes, click an existing portlet mode (for example, view) and click Add. The list of available portlet modes displays, as shown in Figure 6-21, and you can add portlet modes by moving the desired portlet modes from the Available Modes list to the Selected Modes list. For this example, you do not need to select any other portlet modes. When you are finished with the Portlet Modes dialog box, click OK.
Once you have added all of the desired portlet modes, you need to choose the function to be performed for each mode. For each portlet mode, click the portlet mode and select a radio button on the right. For the purposes of this example, choose Generate JSP for both the edit and view portlet modes, and leave the default path and file name of the generated JSP. For more information on portlet modes, refer to Section 6.1, "Guidelines for Creating Java Portlets".
|
Note: The Generate JSP and Custom Code implementation methods generate code for you in the specified location. The Map to Path implementation method routes the request through to an existing Web resource that you need to create separately |
Click Next.
Because you selected Customizable on the General Portlet Properties page earlier in the wizard, the Customization Preferences page, shown in Figure 6-22, now displays, and you can declare preferences for your portlet. If you had not selected Customizable earlier, then this page would have been skipped. On the Customization Preferences page, you specify a preference name, default value, and whether the preference value should be translated:
Figure 6-22 Customization Preferences Page
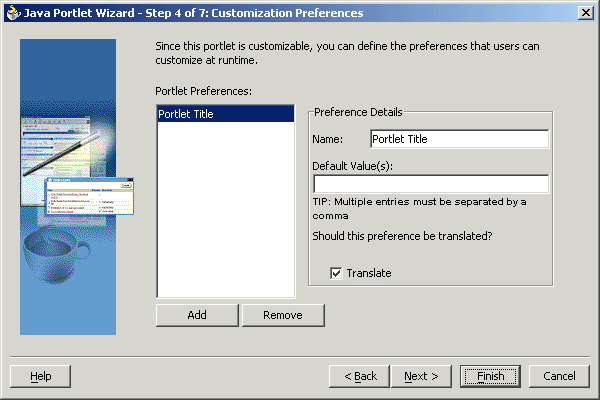
To add a preference, click Add and fill in the Add New Preference dialog box, show in Figure 6-23, (Name, Default Value(s), and whether it should be translated). For this example, you do not need to add any preferences.
|
Note: The Name is always translated, but there is not always a need to translate the Default Value. For example, if the value is an integer, no translation is needed |
Figure 6-23 Add New Preference Dialog Box
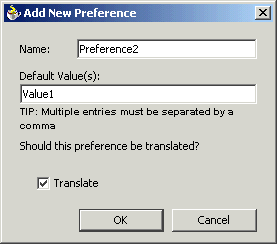
To delete a preference, choose it in the Portlet Preferences list and click Remove. For this example, you do not need to delete any preferences.
Click Next.
On the Security Roles page, shown in Figure 6-24, you can add security roles to your portlet. The wizard has no predefined security roles. It parses the web.xml for security roles and enables them to be referenced by your portlet. You will not need to do anything for this step as a new project has no security roles defined. You can manually create the security roles according to JPS later.
Click Next.
On the Caching page, you specify whether to enable caching of your portlet by default. The portlet itself may choose to cache content for any given response. The settings on this page apply only when the portlet itself does not specify a caching condition for a response. For this example, fill out this page as described in the following steps and shown in Figure 6-25:
Click Cache Portlet.
Click Cache Content Expires After.
Accept the default duration of the cached copy (60 seconds).
|
Note: If you do not want any default caching for this portlet, choose Do Not Cache By Default. In this case, the wizard actually sets a cache duration of 0 seconds. As stated earlier, this cache setting only comes into play when the portlet itself does not specify a caching condition for a response.If you choose no caching here and you later decide that you want default caching for the portlet, you can easily go back and change the cache duration value in the |
Click Next.
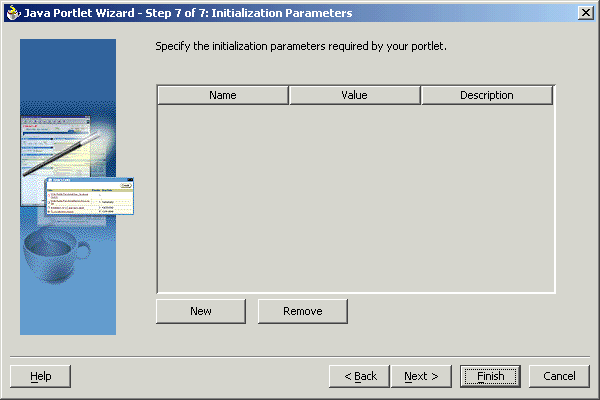
On the Initialization Parameters page, shown in Figure 6-26, you can add any required initialization parameters for the portlet. Initialization parameters provide the Web application developer, who decides what goes into the .war file, an alternative to JNDI variables for configuring the behavior of all of the different components of the Web application (for example, servlets and portlets) in a compatible way. For more information on initialization parameters, refer to the Java Portlet Specification. For this example, no initialization parameters are needed.
Figure 6-26 Initialization Parameters Page
Click Next.
Click Finish to generate the files for your portlet. In this case, the following files should be generated for your project node in the Application Navigator (see Figure 6-27):
Generated code for each View mode, assuming that you selected Generate JSP on the Content Types and Portlet Modes page. If you selected Custom Code instead, that code will reside in the portlet's Java class.
Two Java classes
portlet.xml
web.xml
After you create the default implementation, you can extend the sample code with your own business logic to implement the desired functionality and features. Refer to the JavaDoc or JPS for more information on adding functionality and features. For this example, you do not need to perform this step and can proceed directly to the deployment procedure.
After you finish the wizard and successfully generate your portlet, you are ready to deploy it to an application server. Because you chose to create a JPS-compliant portlet, you can deploy it using the wizard for any vendor's JPS-compliant container. The following sections describe how to deploy a JPS-compliant portlet to Oracle's WSRP container running on Oracle Application Server Containers for J2EE:
Before you deploy your WAR file, you must establish a connection to whatever application server you are using.
Connecting to OC4J in the Oracle Application Server
To establish a connection to OC4J in the Oracle Application Server:
In Oracle JDeveloper, open the project you created in the previous sections when you built a portlet.
In the navigator, click the Connections tab.
Right-click the Connections node and choose New Application Server Connection. Complete the wizard that displays as follows:
If the Welcome page appears, click Next. If you do not want the Welcome page to appear in future, select Skip this Page Next Time.
Enter a meaningful name for the connection, for example, PDKStandardsOC4JAS, and choose Oracle Application Server 10g as the connection type.
Click Next.
Enter the Application Server Control Console administrator's user name (for example, ias_admin) and password for the relevant middle tier.
Click Next.
Enter the information in Table 6-6.
Table 6-6 Settings for New OC4J Oracle Application Server Connection
| Setting | Value |
|---|---|
|
Enterprise Manager OC4J Host Name |
The host name for the Application Server Control Console as specified in |
|
Enterprise Manager OC4J HTTP Port |
The port number for the Application Server Control Console as specified in |
|
Remote Server's Oracle Home Directory |
The Oracle Application Server home directory. |
|
OC4J Instance Name (optional) |
The name you gave to the OC4J instance (for example, home or OC4J_Portal. |
Click Next.
Enter the RMI details for the EJB client connection (server URL, username, and password). All of these values are configured in the Application Server Control Console. Note that you only need to fill out this page of the wizard if you are using EJBs in your application. Otherwise, you can skip this step.
Verify the connection details by clicking Test Connection. A success message should appear if everything is correct. If the test fails, you may need to revise your connection information.
Click Finish.
Connecting to OC4J Standalone
To establish a connection to your OC4J standalone, perform the following steps:
In Oracle JDeveloper, open the project you created in the previous sections when you built a portlet.
In the navigator, click the Connections tab.
Right-click the Connections node and choose New Application Server Connection. Complete the wizard that displays as follows:
If the Welcome page appears, click Next. If you do not want the Welcome page to appear in future, select Skip this Page Next Time.
Enter a meaningful name for the connection, for example, PDKStandardsOC4J, and choose Standalone OC4J as the connection type.
Click Next.
Enter the administrator's user name and password. This password was set during the installation of the PDK Standards OC4J.
Click Next.
Enter the information in Table 6-7.
Table 6-7 Settings for New OC4J Standalone Connection
| Setting | Value |
|---|---|
|
URL |
Enter the full RMI URL for this setting. For example:
The RMI port number may be found in:
|
|
Target Web Site |
Enter the name of the target Web site containing your deployed J2EE application files. For this example, you can accept the default value, |
|
Local Directory Where |
Enter the path to the local
|
Click Next.
Verify the connection details by clicking Test Connection. A success message should appear if everything is correct. If the test fails, you may need to revise your connection information.
Click Finish.
To create and deploy a WAR file, perform the following steps:
Go to the Application Navigator.
In your current project, right-click web.xml and choose Create WAR Deployment Profile.
In the Save Deployment Profile dialog box, change the name to something meaningful (for example, jsrportlet1.deploy).
Click OK.
In the Deployment Profile Properties dialog box, perform the following steps:
Click Specify J2EE Web Context Root and enter my-portlet in the adjacent field.
Click OK.
Right-click the deployment profile (for example, jsrportlet1.deploy) and choose Deploy to > the application server connection (for example, PDKStandardsOC4J).
When the Deployment Finished message displays in the Deployment Log at the bottom of Oracle JDeveloper, verify that no errors occurred.
If you are using an OC4J standalone instance, you can take the URL provided in the log (for example, http://myserver.com:8888/my-portletFoot 2 ) and append /portlets?WSDL to construct the URL you use to register your JPS-compliant portlet with OracleAS Portal. For example:
http://myserver.com:8888/my-portlet/portlets?WSDL
|
Note: In some cases, you may get a message in the log stating that Oracle JDeveloper was unable to determine the HTTP port number of the remote server. Typically, you can determine the port number yourself by looking at the URL that takes you to your Oracle Application Server Containers for J2EE home page (for example,http://myserver.com:8888). |
If you are using OC4J in the Oracle Application Server, you must construct the registration URL yourself as follows:
http://host:port/context-root/portlets?WSDL
where host is the server to which your producer has been deployed.
port is the OracleAS Web Cache HTTP Listener port from the Ports tab of the Application Server Control Console main page.
context-root is the Web Application's Context Root, which is found in the WAR Deployment Profile Properties under General.
You should now register your producer and view your portlet. Refer to Section 6.4.2.4, "Registering and Viewing Your Portlet".
When you redeploy your portlets to the portlet container, all existing sessions between the producer and all of its consumers are lost. If a consumer tries to reuse an existing producer session, it may receive an error message the first time it tries to contact the producer after redeployment.
Error: Could not get markup. The cookie or session is invalid or there is a runtime exception.
To reestablish the producer's session, refresh the portal page. You won't see this error message if you are re-accessing the portlet from a new browser session because it automatically establishes a new producer session.
After you've created and deployed the provider and its portlet(s), you must register the provider with OracleAS Portal. Registering your provider gives OracleAS Portal the information it needs to locate and communicate with your provider. After you register a provider, the provider and its portlets become available in the Portlet Repository. They are also listed in the OracleAS Portal Navigator.
|
Note: When you build portlets and providers with built-in tools, such as the Portlet Builder, OracleAS Portal automatically registers the provider for you. Once you've created your portlet, it automatically displays in the Portlet Repository. OracleAS Portal also offers built-in portlets that are contained in a preconfigured provider. For example, OmniPortlet and Web Clipping are portlets that you can use out of the box, and are already registered with OracleAS Portal. You can view these portlets in the Add Portlets list. However, if you build the portlets and providers programmatically, you must then register these providers to make them available to the portal user. |
To register providers for your standards-based portlets, do the following:
Open OracleAS Portal and log in. Note that to register your provider, you need to have Manage or Edit privileges on providers. If you do not have these privileges, you need to request them from your administrator.
If you are not already on the Portal Builder page, click Builder in the upper right corner.
Click the Administer tab.
Click the Portlets subtab.
In the Remote Providers portlet, click Register a Provider.
On the Register Provider page, shown in Figure 6-28, enter the values as described in Table 6-8.
Table 6-8 Register Provider Page Values
| Setting | Value |
|---|---|
|
Name |
|
|
Display Name |
|
|
Timeout |
|
|
Timeout Message |
|
|
Implementation Style |
|
|
Note: If a provider is unavailable for some reason, it can slow down the rendering of pages that contain portlets from that provider. By default, OracleAS Portal waits until all portlets are returned before completing the page assembly. To avoid delays, you can set a time limit using the Page Assembly Timeout on the Main tab of the page properties. If OracleAS Portal cannot retrieve the portlet from the provider within the specified timeout period, it will render the page without the portlet. If, at a later time, the provider becomes available, OracleAS Portal refreshes the page, adding the missing portlets. In this way, page rendering is never halted due to the unavailability of a particular provider. For more information on the Page Assembly Timeout, refer to the Oracle Application Server Portal User's Guide. |
Click Next.
On the Define Connection page, shown in Figure 6-29, enter the WSDL URL for your provider in the WSDL URL field. This URL is the one that you created in step 8 of Section 6.4.2.3.2, "Deploying the WAR File". For example:
http://myserver.com:8888/my-portlet/portlets?WSDL
Click Next.
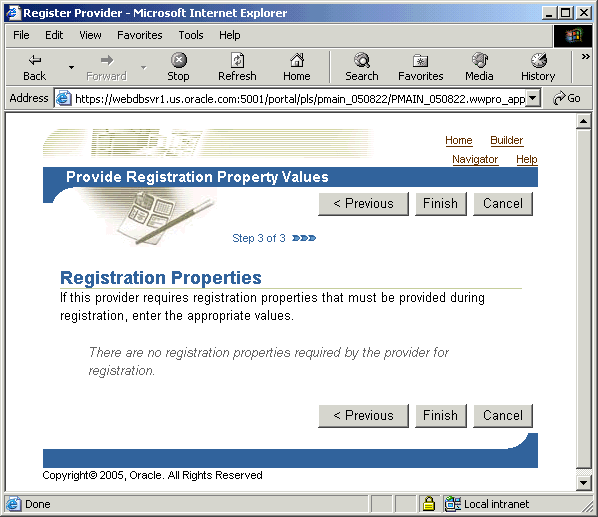
On the Portal Registration Property Values page, shown in Figure 6-30, you fill in any registration properties required by the provider. If there are none, you can proceed to the next step.
Figure 6-30 Provider Registration Property Values Page
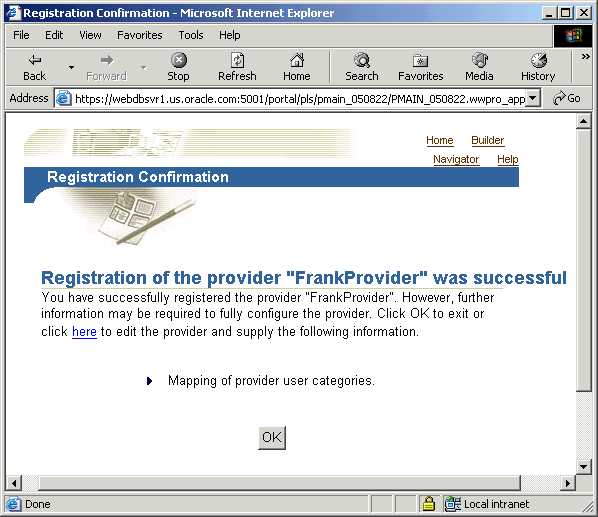
Click Finish. You should see a Registration Confirmation page similar to the one in Figure 6-31.
Figure 6-31 Registration Confirmation Page
Adding Your Portlet
Your portlet should now be available for adding to pages like any other portlet in the Portlet Repository. To add your portlet to a page, follow the instructions in the Oracle Application Server Portal User's Guide.
PDK-Java gives you a framework to simplify the development of Java portlets by providing commonly required utilities and allowing you to leverage existing development skills and application components such as JSPs, servlets, and static HTML pages. PDK-Java also enables you to create portlets without having to deal directly with the complexity of communications between OracleAS Portal and providers.
The PDK-Java framework is divided into the following areas:
The Provider Adapter insulates the developer from the HTTP syntax defined by OracleAS Portal for communication with Web providers. It translates the information passed between OracleAS Portal and your Java Web provider. Without an adapter, your provider would not only manage portlets, but it would also have to communicate this information directly to OracleAS Portal in the expected language. The adapter eliminates the need for your Web provider to understand the portal language and vice-versa.
The Provider Interface defines the APIs (functions) required by your Java implementation to integrate with the Provider Adapter. The Provider Adapter receives messages from the portal, translates them into calls to the Provider Interface, and translates the provider's response into a format that the portal can understand. The Provider Interface contains a set of Java classes that define the methods your provider needs to implement and, in many cases, provides a standard implementation. Some of the primary classes are as follows:
ProviderDefinition (oracle.portal.provider.v2.ProviderDefinition)
ProviderInstance (oracle.portal.provider.v2.ProviderInstance)
PortletDefinition (oracle.portal.provider.v2.PortletDefinition)
PortletInstance (oracle.portal.provider.v2.PortletInstance)
ParameterDefinition (oracle.portal.provider.v2.ParameterDefinition)
EventDefinition (oracle.portal.provider.v2.EventDefinition)
The Provider Runtime provides a base implementation that follows the specification of the Provider Interface. The Provider Runtime includes a set of default classes that implement each one of the Provider Interfaces and lets you leverage the rendering, personalization, and security frameworks provided with PDK-Java. These classes and the associated frameworks simplify the development of a provider by implementing common functions for OracleAS Portal requests and providing a declarative mechanism for configuring the provider. Using the Provider Runtime, you can focus your development efforts on the portlets themselves rather than the infrastructure needed to communicate with the portal. If the standard behavior of the Provider Runtime does not meet your requirements, you can easily extend or override specific behaviors. Some of the primary classes are as follows:
DefaultProviderDefinition (oracle.portal.provider.v2.DefaultProviderDefinition)
DefaultProviderInstance (oracle.portal.provider.v2.DefaultProviderInstance)
DefaultPortletDefinition (oracle.portal.provider.v2.DefaultPortletDefinition)
DefaultPortletInstance (oracle.portal.provider.v2.DefaultPortletInstance)
PortletRenderer (oracle.portal.provider.v2.render.PortletRenderer)
PortletPersonalizationManager (oracle.portal.provider.v2.personalize.PortletPersonalizationManager)
PortletSecurityManager (oracle.portal.provider.v1.http.DefaultSecurityManager)
The Provider Utilities provide methods for simplifying the rendering of portlets. The utilities include methods for constructing valid links (hrefs), rendering the portlet's container (including the header), rendering HTML forms that work within a portal page, and supporting portlet caching.
Using a convenient download from OTN, you can add extensions to Oracle JDeveloper for building portlets. To use this extension, perform the steps in the following procedures:
This section assumes the following:
You are familiar with portlet terminology such as portlet Show modes. Refer to Chapter 1, "Understanding Portlets" and Section 6.1, "Guidelines for Creating Java Portlets".
You are already familiar with Oracle JDeveloper and know how to build and deploy Java components using it. You can download Oracle JDeveloper from OTN. Visit the Oracle JDeveloper page on OTN:
http://www.oracle.com/technology/products/jdev/index.html
For instructions on how to install the Portal Extension for Oracle JDeveloper, refer to Section 6.4.1, "Installing the Portal Extension for Oracle JDeveloper".
Once you have successfully installed the Portal Extension for Oracle JDeveloper, you can begin your portlet development quickly and easily with Oracle JDeveloper:
Creating a Portlet and Provider: Use the Portlet Wizard to create your basic portlet code and the necessary configuration files for the provider framework.
Adding Portlet Logic: Extend the example code with your own business logic.
Validating Your Portlet and Provider: Using the built-in J2EE server of Oracle JDeveloper, you can validate the configuration of your provider and its portlets.
Deploying to an Application Server: Use Oracle JDeveloper to deploy your application to your application server.
Registering and Viewing Your Portlet: Register and view your portlet with your local OracleAS Portal instance.
This section walks you through the Portlet Wizard. You can choose which portlet Show modes you want to implement and the implementation method (JSP, HTTP servlet, Java class, or HTML). The wizard then creates a simple sample implementation for each of the selected modes.
After you open Oracle JDeveloper, click the workspace where you want to create this project. If you do not have a workspace, you can create one as follows:
Right-click the Applications node in the Application Navigator and choose New.
Choose Workspace from the Items list in the New Gallery dialog box.
Click OK.
Enter a Workspace Name and Directory Name, and clear Add a New Empty Project in the Create Workspace dialog box.
Click OK.
Right-click the name of the workspace in the Application Navigator and choose New Project.
Click Empty Project in the Items list in the New Gallery dialog box.
Click OK.
Enter the Project Name and Directory Name in the Create Project dialog box.
Click OK.
Right-click your project and select New.
In the Categories list, expand the Web Tier category and click Portlets.
|
Note: If you cannot find Portlets, refer to Section 6.4.1, "Installing the Portal Extension for Oracle JDeveloper" to ensure that you have installed the extension correctly. |
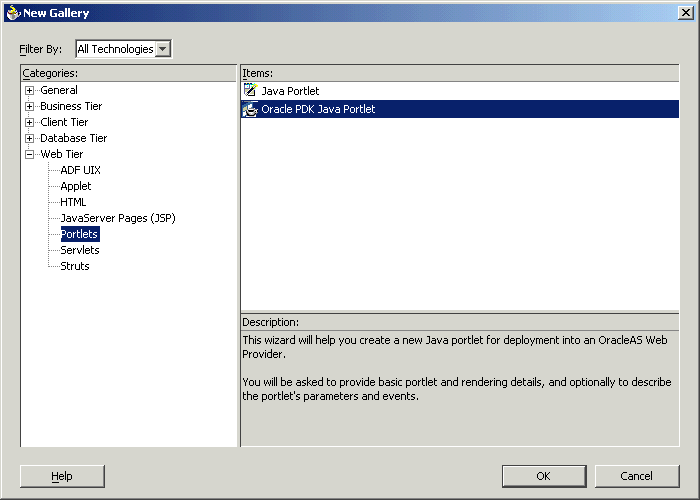
In the Items list, click Oracle PDK Java Portlet as shown in Figure 6-32.
|
Note: Clicking Java Portlet will open the Portlet Wizard for creating JPS-compliant portlets. Clicking Oracle PDK Java Portlet will open the Portlet Wizard for creating PDK-Java portlets. |
Figure 6-32 New Gallery Dialog Box for Oracle PDK Java Portlet
Click OK. The Portlet Wizard displays.
If you are on the Welcome page of the wizard (see Figure 6-33), click Next.
On the Portlet Description page, shown in Figure 6-34, enter the names, description, and timeout settings. For this example, you can accept the default values on this page.
Click Next.
The next few pages of the wizard enable you to define the portlet modes for this portlet. The Show Modes page, shown in Figure 6-35, enables you to choose the implementation style for the Show page and whether you want to implement Show details page:
Show page is selected by default. Choose an Implementation style from the list. For the purposes of this example, choose JSP. Enter the File name for the JSP to be generated by the Portlet Wizard. For this example, you may accept the default file name.
If your portlet requires a details page, select Show details page and enter the Implementation style and File name as appropriate. In this example, you do not need Show details.
Click Next.
On the Customize Modes page, shown in Figure 6-36, Edit page should already be selected. For this example, choose an Implementation style of JSP and accept the default File name.
Select Edit Defaults page and, for this example, choose an Implementation style of JSP and accept the default File name.
Click Next.
On the Additional Modes page, shown in Figure 6-37, nothing is selected by default. For this example, select Help page, choose an Implementation style of JSP, and accept the default File name.
Select About page, choose an Implementation style of JSP, and accept the default File name.
Click Next.
On the Public Portlet Parameters page, shown in Figure 6-38, click Add.
Enter the values as described in Table 6-9 and shown in Figure 6-38.
Table 6-9 Public Portlet Parameter
| Name | Display Name | Description |
|---|---|---|
MyParam |
My Portlet Parameter |
This parameter displays a value. |
Figure 6-38 Public Portlet Parameters Page
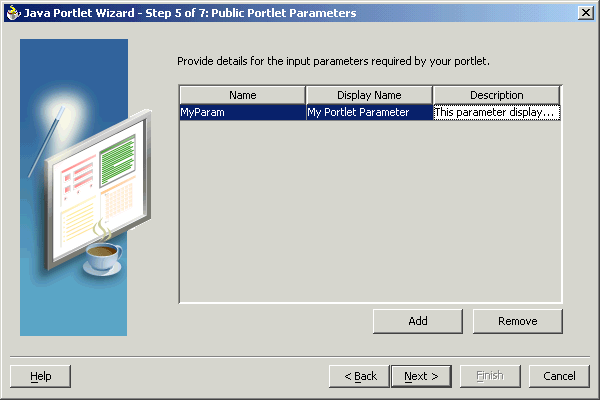
Click Next.
On the Public Portlet Events page, shown in Figure 6-39, you can map parameters to events. For this example, leave this page empty and click Next.
On the Provider Description page, shown in Figure 6-40, enter MyJPWProvider as the Provider name. Ensure that all of the check boxes are selected.
Click Finish to generate the files for your portlet. In this case, the following files should be generated for your project in the Application Navigator (see Figure 6-41):
Files for each portlet mode you selected.
provider.xml
web.xml
index.jsp
_default.properties
myjpwprovider.properties
All these files are required to deploy and run the portlet successfully, except for index.jsp, which is used by Oracle JDeveloper for testing purposes.
After you create the default implementation, you can extend the sample code with your business logic to implement the desired functionality and features. For this example, you do not need to perform this step and can proceed directly to the testing and registration procedures.
After you have built your portlet, you need to check the configuration to ensure that the portlet and its provider operate correctly.
|
Note: This procedure is for testing purposes only. After this procedure, you still need to register your provider as described in Section 6.6.2.5, "Registering and Viewing Your Portlet". For development and production, you should always deploy your portlet to an application server as described in Section 6.6.2.4, "Deploying to an Application Server". |
In Oracle JDeveloper, open the project you created in the previous sections.
Find the index.jsp file for your portlet in the Navigator, right-click it, choose Run. Your browser should open with a page similar to the one shown in Figure 6-42.
Figure 6-42 Portlet Application Test Page
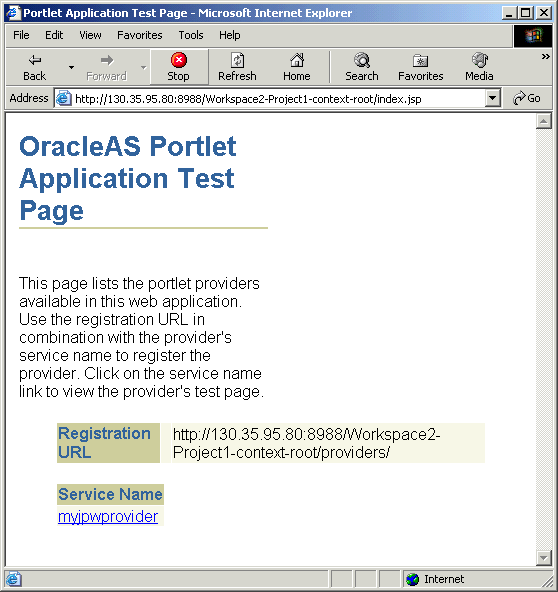
Click the link underneath Service Name. Your browser should open with a page similar to the one shown in Figure 6-43. Note that you need the URL from this page to register your provider, which is the next task.
After you finish the wizard and successfully generate your portlet, you are ready to deploy it to an application server, Oracle Application Server Containers for J2EE. The following sections describe how to deploy a portlet to Oracle Application Server Containers for J2EE:
To establish a connection to your application server, perform the following steps:
|
Note: The steps that follow describe the procedure for deploying to a standalone instance of Oracle Application Server Containers for J2EE. For information about deploying to a full Oracle Application Server instance, please refer to the Oracle JDeveloper online Help system. |
If it is not still open, start Oracle JDeveloper and open the project you created in Section 6.6.2.1, "Creating a Portlet and Provider".
In the Navigator, right-click Connections and choose New Application Server Connection. Complete the wizard as follows:
If the Welcome page appears, click Next. If you do not want the Welcome page to appear in future, be sure to select Skip this Page Next Time.
Enter a meaningful name for the connection, for example, PDKJavaOC4J, and choose Standalone OC4J as the connection type.
Click Next.
Enter the administrator's user name and password. This password was set during the installation of the Oracle Application Server Containers for J2EE.
Click Next.
Enter the information in Table 6-10.
Table 6-10 Settings for New Application Server Connection
| Setting | Value |
|---|---|
|
URL |
Enter the full RMI URL for this setting. For example:
The RMI port number may be found in:
|
|
Target Web Site |
Enter the name of the target Web site containing your deployed J2EE application files. For the purposes of this example, you can accept the default value, |
|
Local Directory Where |
Enter the path to the local
|
Click Next.
Verify the connection details by clicking Test Connection. A success message should display if everything is correct. If the test fails, you may need to revise your connection information.
Click Finish.
To create and deploy a WAR file, perform the following steps:
Right-click your portlet project and choose New.
In the New dialog box, under Categories, choose General > Deployment Profiles and, under Items, choose WAR File.
In the Create Deployment Profile dialog box, change the name to something meaningful (for example, myj2eeportlet1.deploy).
Click OK.
In the Profile Settings dialog box, perform the following steps:
Click Specify J2EE Web Context Root and enter myj2eeportlet1.
In the pane on the left, choose File Groups > WEB-INF/lib > Contributors.
Select Portlet Development.
Click OK.
Choose File > Save All.
Right-click the deployment profile (for example, myj2eeportlet1.deploy) and choose Deploy to > the application server connection (for example, PDKJavaOC4J).
Await the Deployment Finished message in the Deployment Log at the bottom of Oracle JDeveloper and verify that no errors occurred.
Take the URL provided in the Deployment Log (for example, http://myserver.com:8888/myj2eeportlet1) and append /providers to construct the URL you use to test and register your J2EE portlet with OracleAS Portal. For example:
http://myserver.com:8888/myj2eeportlet1/providers
|
Note: In some cases, you may get a message in the log stating that Oracle JDeveloper was unable to determine the HTTP port number of the remote server. Typically, you can determine the port number yourself by looking at the URL that takes you to your Oracle Application Server Containers for J2EE home page (for example,http://myserver.com:8888). |
Enter the URL you constructed in the preceding step in your browser. You should see a page similar to the one in Figure 6-44.
Figure 6-44 PDK - Java Test Page for Portlets
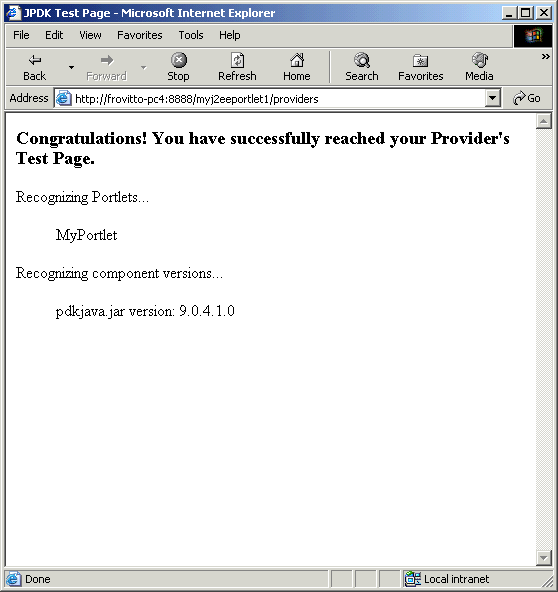
After you've created and deployed the provider and its portlet(s), you must register the provider with OracleAS Portal. Registering your provider gives OracleAS Portal the information it needs to locate and communicate with your provider. After you register a provider, the provider and its portlets become available in the Portlet Repository. They are also listed in the OracleAS Portal Navigator.
|
Note: When you build portlets and providers with built-in tools, such as the Portlet Builder, OracleAS Portal automatically registers the provider for you. Once you've created your portlet, it automatically displays in the Portlet Repository. OracleAS Portal also offers built-in portlets that are contained in a preconfigured provider. For example, OmniPortlet and Web Clipping are portlets that you can use out of the box, and are already registered with OracleAS Portal. You can view these portlets in the Add Portlets list. However, if you build the portlets and providers programmatically, you must then register these providers in order to make them available to the portal user. |
This following steps describe how to register your provider and add your portlet to pages:
Open OracleAS Portal and log in. Note that to register your provider, you need to have Manage or Edit privileges on providers. If you do not have these privileges, you need to request them from your administrator.
If you are not already on the Builder page, click Builder in the upper right corner.
Click the Administer tab.
Click the Portlets sub tab.
In the Remote Providers portlet, click Register a Provider.
On the Provider Information page, shown in Figure 6-45, enter the values as described in Table 6-11.
Click Next.
On the Define Connection page, shown in Figure 6-46, enter the URL for your provider in the URL field. This URL is the one that you noted at the end of Section 6.6.2.4.2, "Deploying the WAR File". For example:
http://myserver.com:8888/myj2eeportlet1/providers
|
Note: PDK-Java enables you to deploy multiple providers under a single adapter servlet. The providers are identified by the Service ID field. When you deploy a new provider, you must assign a service identifier to the provider and use that service identifier when creating your provider WAR file. The service identifier is used to look up a file calledservice_id.properties, which defines the characteristics of the provider, such as whether to display its test page.
For more information about service identifiers, refer to Section D.1.2, "Service Identifiers". |
Click Finish. You should see a Registration Confirmation page similar to the one in Figure 6-47.
Figure 6-47 Registration Confirmation Page
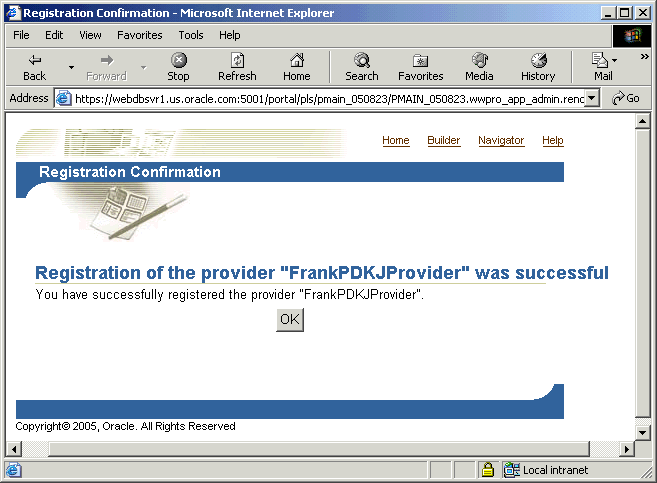
Your portlet should now be available for adding to pages just as any other portlet in the Portlet Repository.
Adding Your Portlet
Your portlet should now be available for adding to pages like any other portlet in the Portlet Repository. To add your portlet to a page, follow the instructions in the Oracle Application Server Portal User's Guide.
Footnote Legend
Footnote 1: The Java Portlet Specification 1.0 arose from Java Specification Request 168 and the JSR168 Expert Group.