| Oracle® Email Migration Tool Guide, Release 2 (9.0.4) Part Number B10723-01 |
|


|
View PDF |
| Oracle® Email Migration Tool Guide, Release 2 (9.0.4) Part Number B10723-01 |
|
|
View PDF |
This chapter provides information about migration tasks.
This chapter contains these topics:
|
Note: At least one instance of Oracle Collaboration Suite, with the Oracle Email component, and Oracle Internet Directory must be installed on the target system prior to installing the Migration Tool. |
This section contains the following topics:
You must configure the DNS entry prior to beginning the migration process so that the target Oracle Email server is visible to the rest of the internet.
The source IMAP servers should be suitably configured for a potentially large number of IMAP connections for concurrently migrating users. This includes database configuration for the source and target systems, if required.
The IMAP connection requirements are one connection for each concurrent user on the source IMAP server and three connections for each concurrent user on the target IMAP server.
To deploy message sharing in JMA-based migrations, you must configure the IMAP server as follows:
Use the Oracle Enterprise Manager administrator pages to add the value MigrationHeader=Message-ID to the Process Flag IMAP server process parameter.
Restart the IMAP server prior to running the Migration Tool.
If you are performing an IMAP-based migration, verify that both the source and target IMAP servers are configured on port 143.
If you are performing an MBOX-based migration, verify that the target IMAP server only is configured on port 143.
|
Note: If a port other than 143 is being used, you must configure theesmigration.config file. |
|
See Also:
|
The Migration Tool can be run on both Windows NT and UNIX platforms.
|
Notes:
|
To install the Migration Tool:
Unzip the esmigration.zip file located on the Oracle Collaboration Suite Clients CD-ROM.
For UNIX operating systems, navigate to the ORACLE_HOME/oes /migration directory and enter the following:
unzip esmigration.zip
For Windows NT operating systems, use WinZip to unzip and extract all files from the esmigration.zip file located in the ORACLE_HOME\oes \migration directory.
For either operating system, the following files and directories are created where you unzip the esmigration.zip file: doc, help, log, files, bin, images, sql, config, lib, and mesg.
Set up the JREHOME environment variable to point to the Java Runtime Environment (JRE) 1.3.1 (or higher) directory.
Set up the variable either in the environment, or in the migrate.cmd (Windows) or migrate.sh (UNIX) files.
To set up JREHOME on UNIX operating systems, do the following:
For C-Shell, enter the following:
setenv JREHOME directory_containing_JDK
For Korn-Shell, enter the following:
set JREHOME=/directory_containing_JDK
export JREHOME
To set up JREHOME on Windows NT operating systems, use a MS-DOS prompt to enter the following command:
set JREHOME=C:\directory_containing_JDK
Once the Migration Tool is installed, you must choose and set up the appropriate plug-in for your source e-mail system.
To start the Migration Tool on UNIX operating systems, run the migrate.sh script, located in the Migration Tool bin directory, by entering the following commands:
cd bin
./migrate.sh
To start the Migration Tool on Windows NT operating systems, double-click the migrate.cmd file, located in the Migration Tool bin directory, or enter the following commands:
C:\> cd bin
C:\> .\migrate.cmd
|
Note: If you are migrating from a Lotus Notes source system, edit themigrate.cmd file to include the directory in which Lotus Notes is installed in the path, or set the path using a Windows DOS prompt, as follows:
set PATH=directory_where_Lotus_Notes_is_installed;%PATH% |
The Migration Repository Login screen displays, shown in Figure 3-1.
Multiple instances of the Migration Tool can be started if a situation warrants the use of multiple instances, as is the case in the following situations:
You can use multiple instances of the Migration Tool to migrate more users concurrently to a single mailstore
You can use multiple instances of the Migration Tool to connect to many mailstores in a multi-mailstore setup
|
Notes:
|
The Migration Tool creates a repository under the es_mail user schema on the Oracle Email database. If a repository already exists, the Migration Tool reuses it.
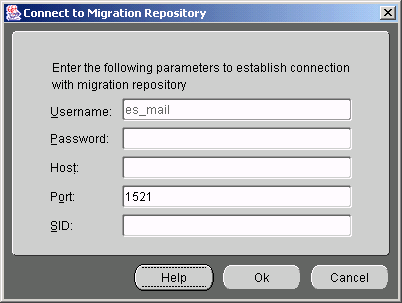
Specify the following information to log in to the migration repository:
|
Note: The Username field cannot be edited. |
Password: The default password for the es_mail user is es.
Host: Enter the host name of the system on which Oracle Collaboration Suite is installed.
Port: The default port number on which the Oracle Net Services listener is running is 1521. Enter a different port number, if required.
SID: Enter the SID where Oracle Collaboration Suite is installed.
Click OK. If this is the first time you are connecting to the migration repository, the Migration Tool prompts you to create a new instance.
Click OK to display the Migration Setup Wizard Welcome screen.
The Migration Setup Wizard collects details about the source and target domains; information for setting specific migration options; and notification of successful migration.
The following Migration Setup Wizard steps are described in this section:
|
Note: All of the following steps are not required. The number of required steps is determined by choices made in "Step 1: Specifying Mail System Objects". |
Click Next to display the Mail System Objects screen, shown in Figure 3-2.
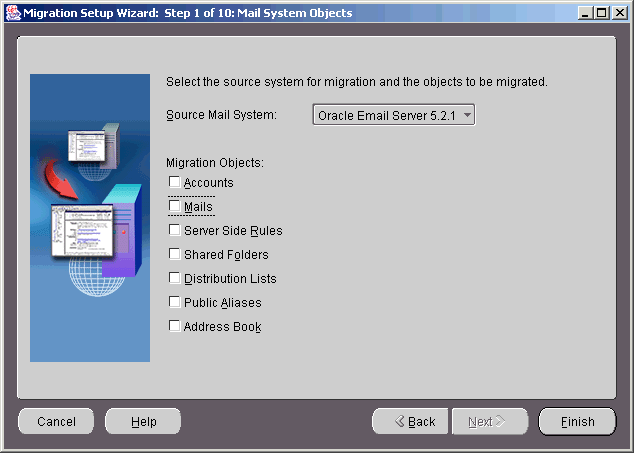
Specify the following information in the Mail System Objects screen:
Select the source e-mail system from the Source Mail System drop-down list
|
See Also: Table 2-1, "Source E-mail System and Migration Tasks Supported" for a list of source e-mail system choices |
Select each of the objects you want to migrate. Do not select an object if:
It does not exist on the source e-mail server
You do not want to migrate the object
After you finish entering the information, click Next to display the Source System Information screen specific to the selection you made from the Source Mail System drop-down list.
This section contains information for configuring the various source e-mail system plug-ins.
|
See Also:
|
This section contains the following topics:
Enter the Oracle eMail Server system information in the Source System Information screen, shown in Figure 3-3.
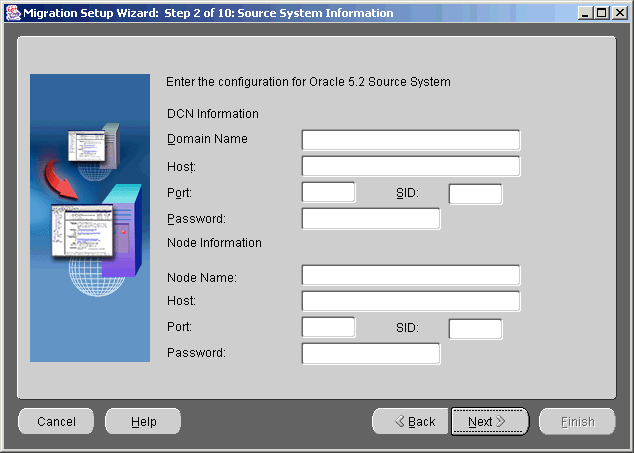
Specify the following in the DCN Information section of the Source System Information screen:
Domain Name: Enter the domain for the domain configuration node (DCN) of the Oracle eMail Server
Host: Enter the host name of the Oracle eMail Server DCN
Port: Enter the port of the Oracle eMail Server DCN
SID: Enter the SID of the Oracle eMail Server DCN
Password: Enter the oo account password for the DCN
Specify the following in the Node Information section of the Source System Information screen:
Node Name: Enter the name of the node on which Oracle eMail Server is running
Host: Enter the name of the node host
Port: Enter the port number on which the node listens
SID: Enter the SID of the node
Password: Enter the password for the node
Click Next to display the Account Migration Options screen, shown in Figure 3-8.
Enter the Microsoft Exchange system information in the Source System Information screen, shown in Figure 3-4.
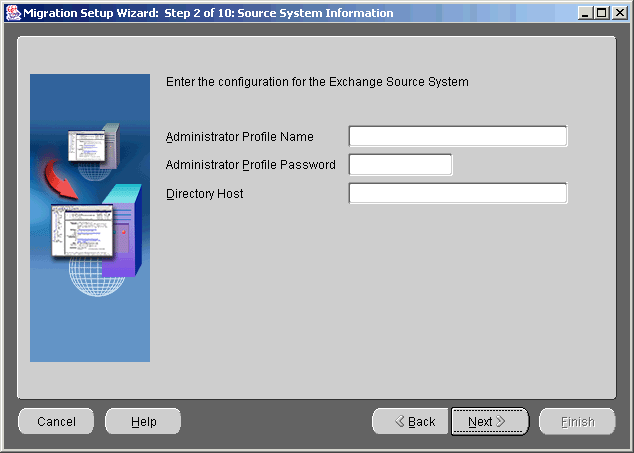
Administrator Profile Name: Enter the name of the administrator profile you created
Administrator Profile Password: Enter the password of the administrator profile you created
Directory Host: Enter the host name of the machine on which the Microsoft Exchange directory is running
Click Next to display the Account Migration Options screen, shown in Figure 3-8.
Enter the Lotus Notes system information in the Source System Information screen, shown in Figure 3-5
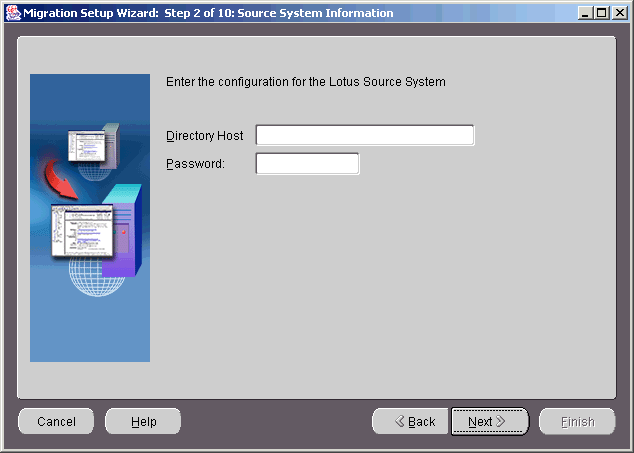
Directory Host: Enter the host name of the machine on which the Lotus Notes directory is running
Password: Enter the password of the Lotus Notes administrator's key file (user.id)
To further configure the Lotus Notes plug-in, do the following:
Move nesmtld.dll from the ORACLE_HOME/oes/migration/bin directory into the directory where Lotus Notes is installed.
The key file (user.id) of the administrator (who also has permission to access and read all user's mail files) must be available in the Data directory of the Lotus Notes installation.
The KeyFileName entry in the notes.ini file (located in the directory where Lotus Notes is installed) must contain the file name of the administrator's key file.
Edit the notes.ini file in the directory where Lotus Notes is installed and add the following line to the end of the file:
EXTMGR_ADDINS=ESMTLD
Click Next to display the Account Migration Options screen, shown in Figure 3-8.
Enter the Novell GroupWise system information in the Source System Information screen, shown in Figure 3-6.
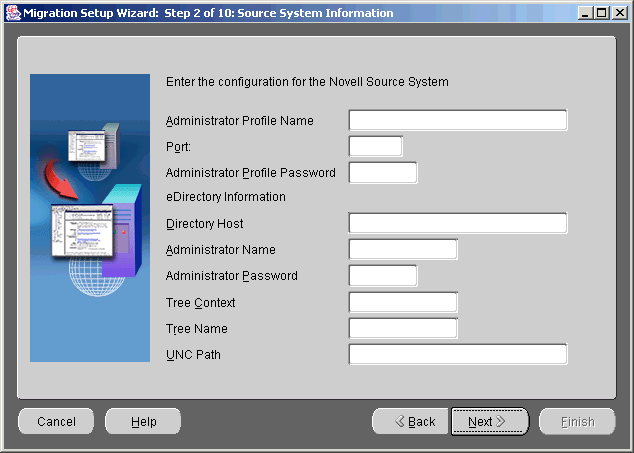
Administrator Profile Name: Enter the name of the administrator profile
Port: Enter the TCP/IP port of the GroupWise installation
Administrator Profile Password: Enter the password of the administrator profile
Directory Host: Enter the name of the host on which the GroupWise server is running
Administrator Name: Enter the name of the Novell eDirectory administrator
Administrator Password: Enter the password of the Novell eDirectory administrator
Tree Context: Enter the GroupWise eDirectory tree context
Tree Name: Name of the Novell eDirectory tree
UNC Path: Path to the shared location of wpdomain.db on the GroupWise server
Click Next to display the Account Migration Options screen, shown in Figure 3-8.
Enter the Samsung Contact system information in Source System Information screen, shown in Figure 3-7.
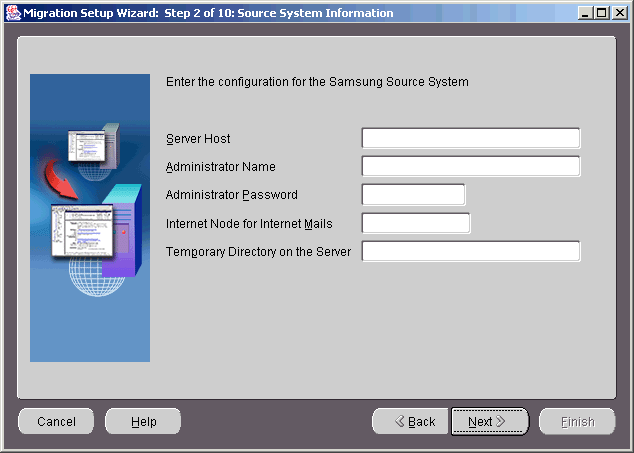
Server Host: Enter the host name of the machine on which the Samsung Contact server resides
Administrator Name: Enter the name of the administrator of the Samsung Contact server
Administrator Password: Enter the password of the administrator of the Samsung Contact server
Internet Node for Internet Mails: Enter the name of the node configured for the Internet Mail Gateway
Temporary Directory on the Server: Enter the path to a temporary directory on the Samsung Contact server with read and write privileges
Click Next to display the Account Migration Options screen, shown in Figure 3-8.
This section describes further configuring the Migration Tool to improve performance, in addition to information for anyone who wants to run a plug-in from the command line.
|
Note: Advanced configuration should be done by advaced users, only. Under normal circumstances theesmigration.config file does not need editing. |
This section contains the following topics:
By editing parameters located in the esmigration.config file in the ORACLE_HOME/oes/migration/config directory, you can do the following:
Specify the minimum and maximum number of connections in a pool created by each instance of the Migration Tool
Specify a particular instance of the Migration Tool by name
Specify the source IMAP server port (if different from 143)
Specify the number of concurrent users to migrate
Following are instructions for configuring Migration Tool parameters:
Every instance of the Migration Tool creates a pool of connections to the database. You can specify the minimum and maximum numbers of connections by editing the following parameters:
oracle.mail.migration.util.dbcache.min=1
oracle.mail.migration.util.dbcache.max=2
The values shown are default values.
|
Notes:
|
By default, the Migration Tool makes IMAP connections through port 143. If either the source or target IMAP server is set to a port other than 143, you can change it by editing the following parameters:
mail.imap.port.source=port_number
mail.imap.port.target=port_number
You can specify the number of users migrating concurrently by editing the following line:
oracle.mail.migration.migrate.num_of_threads=number_of_users
|
See Also: "Reconfiguring Heap Size" to ensure that you have a large enough heap to accomodate the number of users you specify |
Once the parameters are configured, you can start the Migration Tool by entering the following command:
or
C:\migration\bin\> migrate (on Windows NT)
The Migration Repository screen displays, shown in Figure 3-1.
This section contains command line instructions for configuring the following plug-ins:
Edit the following parameters in the esmigration.config file:
oracle.mail.migration.plugin.msex.profile_admin=name_of_profile_with_adminstrator_privileges

oracle.mail.migration.plugin.msex.profile_password=password_of_profile_with_adminstrator_privileges

oracle.mail.migration.plugin.msex.directory_host=name_of_host_where_Microsoft_Exchange_Directory_is_running
Edit the following parameters in the esmigration.config file:
oracle.mail.migration.plugin.lotus.directory_host=host_name_where_Lotus_Domino_directory_server_is_running

oracle.mail.migration.plugin.lotus.userid_password=password_of_administrator's_key_file
Edit the following parameters in the esmigration.config file:
oracle.mail.migration.plugin.grpwise.profile_admin=GroupWise_administrator
oracle.mail.migration.plugin.grpwise.port=server_port_on_which_GroupWise_poa_is_running
oracle.mail.migration.plugin.grpwise.profile_password=GroupWise_administratror_password
oracle.mail.migration.plugin.grpwise.directory_host=hostname_where_GroupWise_server_is_running
oracle.mail.migration.plugin.grpwise.nds_admin=Novell_eDirectory_admin_name
oracle.mail.migration.plugin.grpwise.nds_tree=Novell_eDirectory_tree_name
oracle.mail.migration.plugin.grpwise.nds_password=Novell_eDirectory_admin_password
oracle.mail.migration.plugin.grpwise.nds_uncpath=shared_location_of_wpdomain.db_on_GroupWise_server
|
Note: The uniform naming convention (UNC) path points to the location ofwpdomain.db on the GroupWise server that holds the data of the GroupWise system. Use the directory structure where wpdomain.db resides. If this file resides on the same system on which the plug-in is run, there is no need to share the directory. If it resides on a remote system, the directory in which the file exists must be shared (preferably through drive mapping). |
|
See Also: Novell GroupWise documentation for instructions regarding how to start the GroupWise server |
Edit the following parameters in the esmigration.config file:
oracle.mail.migration.plugin.samsung.server_host=hostname_where_Samsung_Contact_server_is_running
oracle.mail.migration.plugin.samsung.admin_name=name_of_user_with_admin_privileges
|
Note: Theadmin_name must be in the OR (Originator Recipient) Name format with Personal Name and Organizational Units, as follows: John Smith/newyork,sales,collab,imteam |
oracle.mail.migration.plugin.samsung.admin_password=password_of_admin_user
oracle.mail.migration.plugin.samsung.inet_node=name_of_mail_node_used_for_configuring_the_Internet_Mail_Gateway_using_omconfux_command
|
Note: For example, if you enteromconfux -m unix,mime, the inet_node entry is unix,mime. |
oracle.mail.migration.plugin.samsung.temp_dir=name_of_a_directory_on_Samsung_Contact_server_system
|
Note: Thetemp directory must have read and write privileges because the plug-in uses it to write and read temporary files. |
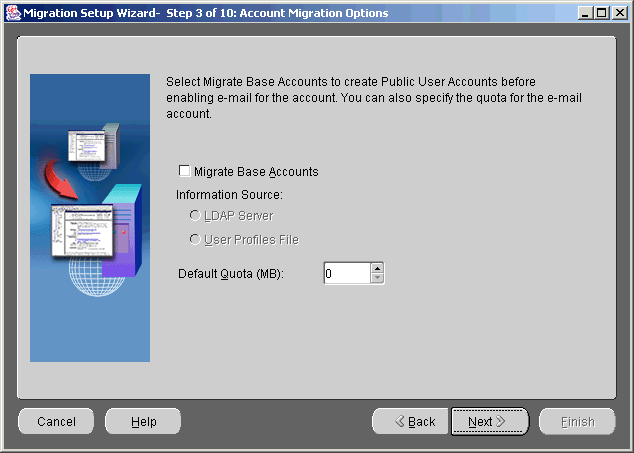
Specify the following information in the Account Migration Options screen:
Migrate Base Accounts: Select to create public user accounts before enabling e-mail for the account
|
Note: If Oracle Collaboration Suite is already installed with Oracle Files configured and populated with users, deselect Migrate Base Accounts. |
In the Information Source section, choose as your information source either LDAP Server or User Profiles File
Specify User Quota (in MB) by entering a number in the adjacent field, or by using the arrows to select a number
When you finish entering the information, click Next to display the Mail Migration Options screen, shown in Figure 3-9.
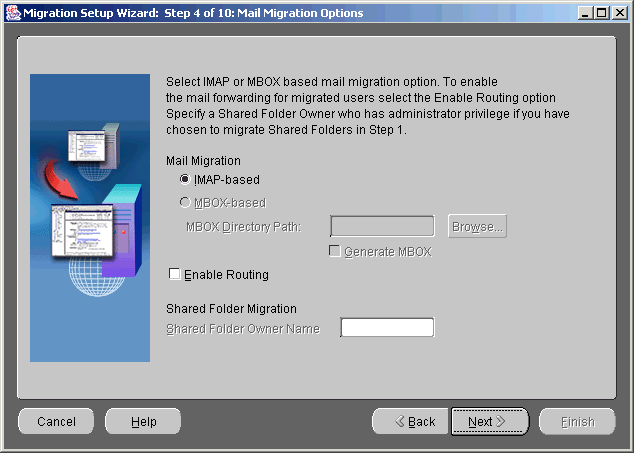
Specify the following information in the Mail Migration Options screen:
In the Mail Migration section, select whether you want to perform an IMAP-based or MBOX-based migration
|
Note: The Oracle eMail Server 5.2 plug-in packaged with this release of the Migration Tool does not generate MBOX files. |
IMAP-based: If your source e-mail system supports IMAP, the Migration Tool extracts the message information from the source e-mail system and places it directly into the target e-mail system
MBOX-based: If your source e-mail system does not support IMAP, as is the case with Microsoft Exchange 5.0, choose this option. Select Generate MBOX and use the Browse button to specify the MBOX Directory Path to where the MBOX files will be created.
Do not select Generate MBOX if you are running the Migration Tool again, after an initial run. The files will already exist and need not be generated again.
If you do not select Generate MBOX on an initial run of the Migration Tool, you must provide the MBOX files in the MBOX directory location to the plug-in using the command-line interface.
No extraction of files will occur if Generate MBOX is not selected.
The Generate MBOX feature is useful for extracting MBOX files from a source system, moving them to an intermediate store, and loading them into the target Oracle Email server.
|
Notes:
|
|
See Also: "Viewing Log Files" for information on viewing the logs associated with MBOX file generation |
Select Enable Routing to enable routing of mail to the new user accounts
|
Notes: If your source e-mail system is Microsoft Exchange and you select Enable Routing, a rule is created on the Microsoft Exchange server during each user migration to forward a copy of all future messages to the target e-mail system. |
In the Shared Folder Migration section, enter the folder owner's target e-mail address
When you finish entering the information, click Next to display the Notification screen, shown in Figure 3-10.

Notifications are e-mail messages that inform users about migration events.
Select either New Account Details, Migration Report, or both.
|
Note: If you choose to run a two-phase migration, do not select either New Account Details or Migration Report. Click Next to proceed to "Step 6: Specifying Source LDAP Server Parameters ". |
When New Account Details is selected, after the account for the user is created on the target e-mail server, an e-mail is sent to the user's old e-mail account notifying the user of their new user name, password, and IMAP and SMTP host names.
|
Note: Select only New Account Details when you are using the Migration Tool to create accounts but not migrating any data. |
When Migration Report is selected, you can choose include a verification report when you send a notification to either the user's target account, the administrator, or both, notifying them that the migration is complete and that the user can begin using the new account.
|
Note: Select only Migration Report if you are not creating accounts with the Migration Tool. |
If you choose to send a migration report to the administrator, enter the administrator's user ID on Oracle Collaboration Suite in the Administrator Email Address field.
Click Customize Notification to add header and footer notes to the notification.
When you finish entering the information, click Next to display the Source LDAP Service screen, shown in Figure 3-11.
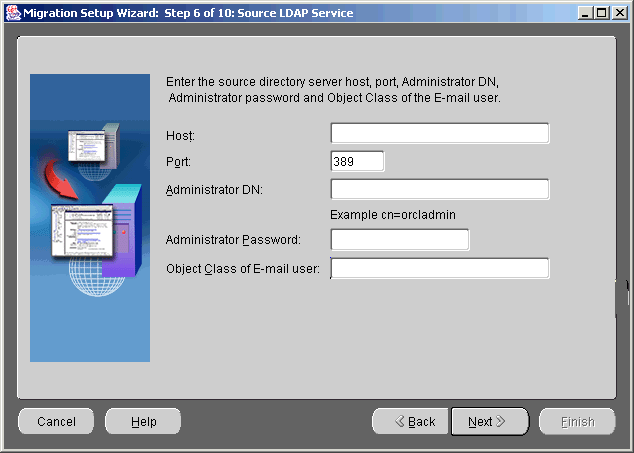
Specify the following source LDAP server information in the Source LDAP Service screen:
Host: Enter the host name of the machine on which the source directory server is running
Port: Enter the port number on which the source directory server is listening
The default port number for LDAP is 389. Update the port number if your port number is different.
|
Note: If you are migrating from Microsoft Exchange, Active Directory may be running on port 389, in which case you must use the Microsoft Exchange Administrator to bind the LDAP protocol to another port, such as 390. |
Administrator DN: Enter the directory manager distinguished name
Administrator Password: Enter the directory manager password
Leave the Administrator DN and the Administrator Password fields empty if the source LDAP server supports anonymous login.
Object Class of E-mail User: Enter the object class that identifies the schema of an e-mail user on the source LDAP server
When you finish entering the information, click Next to display the Target LDAP Service screen, shown in Figure 3-12.
Figure 3-12 Target LDAP Service Screen

Specify the following target Oracle Internet Directory information in the Target LDAP Service screen:
Host: Enter the host name of the machine on which the Oracle Internet Directory server is running
Port: Enter the port number on which the Oracle Internet Directory server is listening
The default port number for LDAP is 389. Update the port number if your port number is different.
Administrator DN: Enter the directory manager distinguished name
Administrator Password: Enter the directory manager password
When you finish entering the information, click Next to display the LDAP Schema Mapping screen shown in Figure 3-13.
|
Note: If you did not select Accounts in "Step 1: Specifying Mail System Objects", or you selected Accounts but did not select Migrate Base Accounts in "Step 3: Specifying Account Migration Options", the Username Generation screen, shown in Figure 3-15, displays after you click Next. The Username Generation screen also displays if you selected Migrate Base Accounts and User Profiles File in "Step 3: Specifying Account Migration Options". |
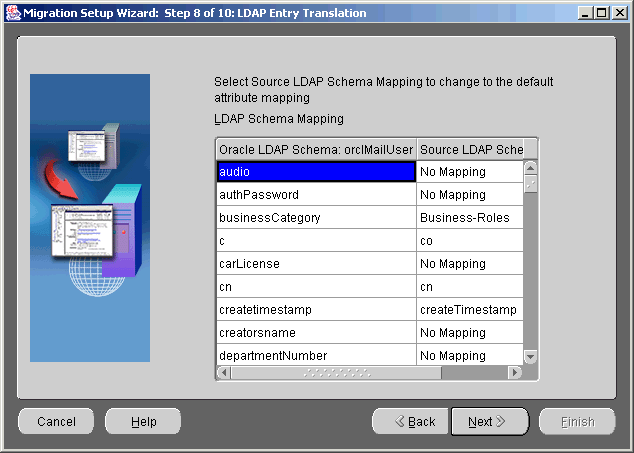
On Oracle Email, an e-mail account is described by the orclperson object class. The object class attributes cn (common name) and sn (last name) must map to source directory attributes.
Mandatory Attributes: Click the source attribute on the right to display a drop-down list of mapping choices and select the mapping that you want to update the source attribute.
Non-Mandatory Attributes: Attributes that are not mandatory on the target Oracle Internet Directory have the option No Mapping displayed in the right column. Click the attribute to display a drop-down list of attribute choices to which to map if you want to map a non-mandatory attribute.
|
Note: You need only map these attributes once, because the Migration Tool saves the values for the subsequent batches. |
When you finish entering the information, click Next to display the Mail Services screen, shown in Figure 3-14.
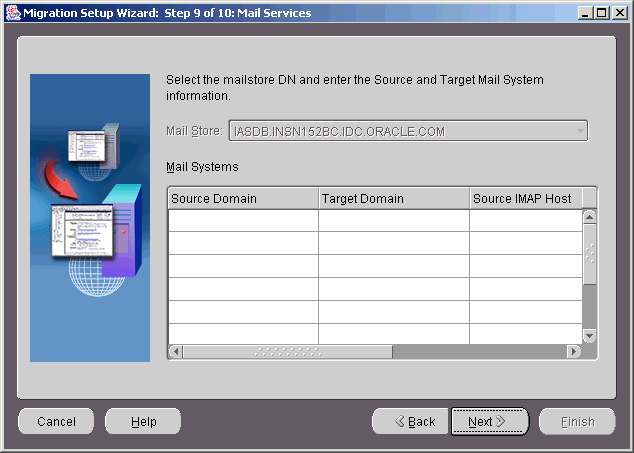
Specify the following source and target mail system information in the Mail Services screen:
Choose the distinguished name (DN) of the target mail store from the Mail Store drop-down list,
In the Mail Systems section, enter the following:
|
Note: Depending on your selections in the previous steps, the following text boxes are enabled on an as-needed basis. |
Source Domain: Enter the source e-mail domain name
Target Domain: Enter the target e-mail domain name to which the source domain maps
The data that belongs to a source domain is created on the target domain to which this source domain is mapped. For example, all objects belonging to both us.oracle.com and uk.oracle.com are created under oracle.com.
Source IMAP Host: Enter the source IMAP host name (if you selected the MBOX based migration option in the previous step, this field does not appear)
Target IMAP Host: Enter the target IMAP host name
Source LDAP DN: Enter the LDAP DN for users on the source domain. If you have more than one domain, enter the LDAP DNs for all the domains. The Migration Tool looks for source account entries under the DN of the LDAP. Each domain has a separate DN.
|
See Also: Your LDAP server documentation for information about DN representation |
Target LDAP DN: Enter the LDAP DN as the DN of the Base Subscriber tree for Oracle Collaboration Suite users in Oracle Internet Directory.
For example, if the DNS domain of your server is us.oracle.com, the typical format is cn=Users,dc=us,dc=oracle,dc=com. This domain must correspond exactly to the configuration of your Oracle Collaboration Suite installation.
The Migration Tool creates base account entries under the DN of the LDAP entry. Each domain has a separate DN.
Target SMTP Host: Enter the SMTP host of the target domain that listens for e-mail
|
Note: The Target SMTP Host field will only be active when you choose to send out migration notifications or have the Migration Tool create routing rules. |
When you finish entering the information, click Next to display the User Name Generation screen, shown in Figure 3-15.
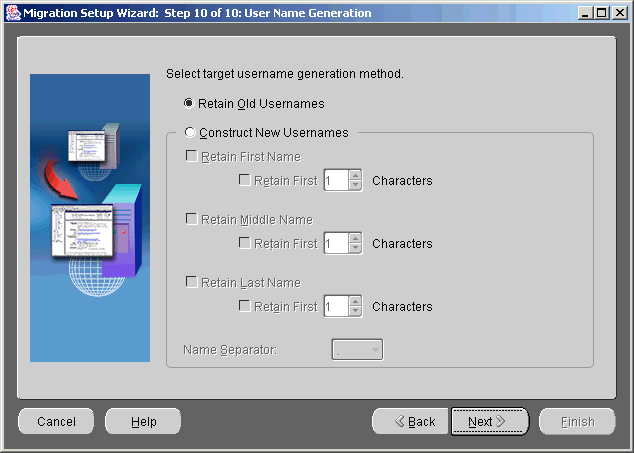
To generate new account user names, select one of the following:
Retain Old Usernames: Specifies that the target user names remain the same as the source user names
Construct New Usernames: Specifies that the Migration Tool generates the target user names
If you choose to have the Migration Tool construct new user names, you must also supply the rules for user name generation in the Construct New Usernames section.
When supplying rules for new user name construction, you can choose to retain the first, middle, or last names, or any combination of the three. Select the appropriate box to retain any of the three names.
You can also retain only part of a name by choosing the number of characters you want to retain. Specify the number of characters you want to use in the Characters field adjacent to each name.You must also choose a separator character. To select a separator character, click the Name Separator drop-down list.
|
Notes:
|
When you finish entering the information, click Next. The Summary screen displays. Click Finish to quit the Migration Setup Wizard and display the Oracle Email Migration Tool screen.
If the Migration Tool detects any duplicate target user names (also called name conflicts) when creating accounts in the target Oracle Internet Directory, it logs an error and does not create the duplicate account.Duplicate target user name errors (name conflict errors) can only be avoided if user name generation rules are chosen so that unique target user names are generated.To resolve name conflicts, perform the following steps:
Manually create the user with a unique name in Oracle Email.
Choose Edit > User Details to edit the information for that user.
Update the user's status to Migrate User Data.
When all accounts have been successfully created, proceed to creating batches and migrating user data.
To migrate account information from the source directory server to Oracle Email, do the following:
Choose Extract > Users from the Migration Tool menu bar to generate users.xml.
|
Note: If you selected User Profiles File from the Account Migration Options screen, choose Extract> User Profiles to generate the user_profiles.ldif file. |
|
See Also:
|
View the text.log file located in the ORACLE_HOME/oes/migration/log /migration/process_number directory. Any errors that occur during account migration are logged in the text.log file as administrator error messages.
Choose File > Load Users from the Migration Tool menu bar to load users.xml into the repository.
If you selected Accounts in "Step 1: Specifying Mail System Objects", choose Migrate > Create Users on Oracle from the Migration Tool menu bar to create user accounts in the target Oracle Internet Directory.
View the text.log file located in the ORACLE_HOME/oes/migration/log /migration/process_number directory. Any errors that occur during account migration are logged in the text.log file as administrator error messages.
If account migration for a specific user fails, you can modify the user's details and attempt to re-migrate the batch after editing.
To modify user details, do the following:
Choose Edit > User Details from the Migration Tool menu bar. The Edit Users screen displays, shown in Figure 3-17.
|
Note: You can also select a user from the directory tree, chooseEdit > User Details, and proceed with modifying the user's details. |
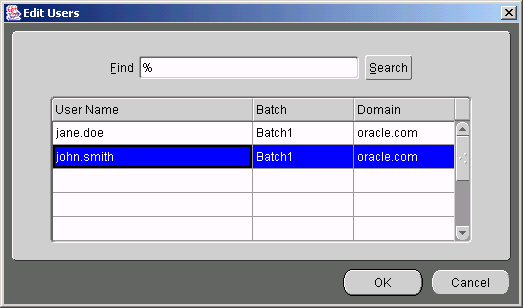
Enter a source user name in the Find field and click Search to display all users in the repository matching the search criteria.
Use % as a wildcard to assist in your search.
Select the row containing the user you want to edit from the displayed list and click OK. The left hand pane of the Migration Tool screen expands with that user selected.
Click User Details on the Migration Tool screen to display the Modify User Details screen shown in Figure 3-17.
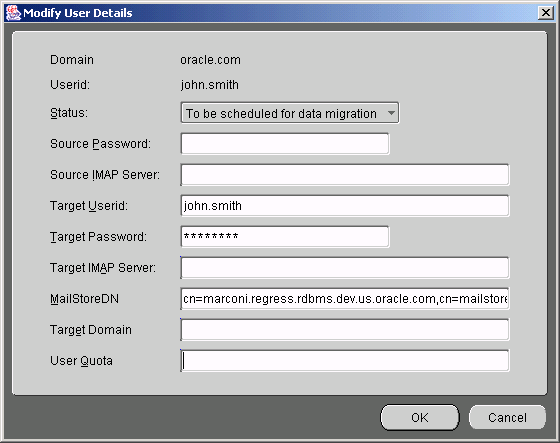
Edit the field entries.
|
Note: Fields are populated according to what is stored in the migration repository during the preceding steps. Changes made on this screen are reflected back to the repository. |
Update the migration status by choosing from the list of choices in the Status drop-down list.
Click OK.
If you chose to migrate shared folders, choose Extract > Shared Folders from the Migration Tool menu bar to generate the shared_folders.ldif file in the files directory.
If you chose to migrate public aliases, choose Extract > Public Aliases from the Migration Tool menu bar to generate the public_aliases.ldif file in the files directory.
If you chose to migrate distribution lists, choose Extract > Distribution Lists from the Migration Tool menu bar to generate the
distribution_lists.ldif file in the files directory.
View the text.log file located in the ORACLE_HOME/oes/migration/log /migration/process_number directory. Any errors that occur during mail system object extraction are logged in the text.log file as administrator error messages.
Prior to migrating shared folders, ensure that the following tasks are complete:
All user accounts have been migrated
You have generated the shared folders file
|
See Also: "Task 5: Extracting Mail System Objects from the Source System" to generate the shared folder file |
To migrate shared folders, do the following:
Choose Migrate > Migrate Shared Folders from the Migration Tool menu bar to create the shared folders on the target e-mail server. The Shared Folder Migration Status screen displays.
When 100% displays, indicating the migration is complete, click OK.
View the text.log file located in the ORACLE_HOME/oes/migration/log /migration/process_number directory. Any errors that occur during shared folder migration are logged in the text.log file as administrator error messages.
To cancel migration of shared folders, click Cancel on the status dialog that displays when you start to migrate mail objects.
|
Note: If you cancel migration of shared folders, rollback does not occur and you can safely restart migration. The e-mail objects that were created before you canceled migration are not re-created when migration is recommenced. Migration continues from the point where it was canceled. |
Prior to migrating public aliases, ensure that the following tasks are complete:
All user accounts have been migrated
You have generated the public aliases file
|
See Also: "Task 5: Extracting Mail System Objects from the Source System" to generate the public aliases file |
To migrate public aliases, do the following:
Choose Migrate > Migrate Public Aliases from the Migration Tool menu bar to create the public aliases on the target e-mail server. The Public Alias Migration Status screen displays.
When 100% displays, indicating the migration is complete, click OK.
View the text.log file located in the ORACLE_HOME/oes/migration/log /migration/process_number directory. Any errors that occur during public aliases migration are logged in the text.log file as administrator error messages.
To cancel migration of public aliases, click Cancel on the status dialog that displays when you start to migrate mail objects.
|
Note: If you cancel migration of public aliases, rollback does not occur and you can safely restart migration. The e-mail objects that were created before you canceled migration are not re-created when migration is recommenced. Migration continues from the point where it was canceled. |
Prior to migrating distribution lists, ensure that the following tasks are complete:
All user accounts have been migrated
You have generated the distribution lists file
|
See Also: "Task 5: Extracting Mail System Objects from the Source System" to generate the distribution lists file |
There are two phases to distribution list migration:
All distribution lists are created
The distribution lists are populated with users
The status bar displays immediately, and shows progress when distribution lists are being populated with users. For example, when the status bar shows that 50% of the distribution lists have been migrated, it means all of the distribution lists have been created and 50% of the distribution lists have been populated with users.
To migrate distribution lists, do the following:
Choose Migrate > Migrate Distribution Lists from the Migration Tool menu bar to create the distribution lists on the target e-mail server. The Distribution List Migration Status screen displays.
When 100% displays, indicating the migration is complete, click OK.
View the text.log file located in the ORACLE_HOME/oes/migration/log /migration/process_number directory. Any errors that occur during distribution list migration are logged in the text.log file as administrator error messages.
To cancel migration of distribution lists, click Cancel on the status dialog that displays when you start to migrate mail objects.
|
Note: If you cancel migration of distribution lists, rollback does not occur and you can safely restart migration. The e-mail objects that were created before you canceled migration will not be re-created when migration is recommenced. Migration continues from the point where it was canceled. |
|
Note: WebMail Address Book migration is available only for Oracle eMail Server to Oracle Email migrations. This migration can only be run for users using the Oracle eMail Server 5.2.1 WebMail client. |
The Migration Tool can migrate the private address books created by users using their Oracle eMail Server 5.2.1 WebMail client. Migration of the WebMail address book of each user involves migrating both the private aliases and private distribution lists that users have.
Prior to migrating address books, ensure that all user accounts have been migrated.
To migrate WebMail address books, do the following:
Choose Migrate > Migrate Address Book from the Migration Tool menu bar. The Address Book Migration Status screen displays.
When 100% displays, indicating the migration is complete, click OK.
View the text.log file located in the ORACLE_HOME/oes/migration/log /migration/process_number directory. Any errors that occur during address book migration are logged in the text.log file as administrator error messages.
To cancel migration of address books, click Cancel on the status dialog that displays when you start to migrate address books.
|
Note: If you cancel migration of address books, rollback does not occur and you can safely restart migration. The address book objects that were created before you canceled migration are not re-created when migration is recommenced. Migration continues from the point where it was canceled. |
This section contains the following topics:
Prior to migrating data you must create and schedule batches for migration.
Using the Migration Tool, you can create a batch either by designating the number of users for each batch or by creating a custom batch.
Batch creation is done on a domain basis.
To create a batch by domain, do the following:
Expand the Migration Instance node on the directory tree on the left side of the Migration Tool screen.
Select the appropriate domain.
Choose File > Create Batch. The Create screen displays, as shown in Figure 3-18.
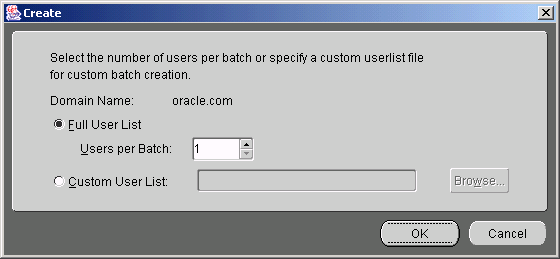
Create batches using one of the following methods:
Select Full User List and enter or use the arrows to select the number of Users per Batch in the adjacent field. For example, if you have 100 users and specify 5 users in each batch, 20 batches are created.
Select Custom User List to create a custom batch.
Prepare a file containing the users formatted according to the following example:
<userlist>
<user sourceimapuserid="test1" targetimapuserid="Test2" />
</userlist>
Enter the path to the custom batch file in the adjacent field or use the Browse button to locate the file.
After you create the batches, you can view them by expanding the domain node on the Migration Tool screen to display all the batches in the domain.
To schedule batches for user e-mail migration, expand the domain node to view the batches, as shown in Figure 2-4, "Migration Tool Screen with Batch Information Displayed".
To schedule a start time for batch migration, do the following:
Select a batch from the directory tree in the Migration Tool screen.
Click Schedule to display the Schedule Start Time screen shown in Figure 3-19.
Figure 3-19 Schedule Start Time Screen
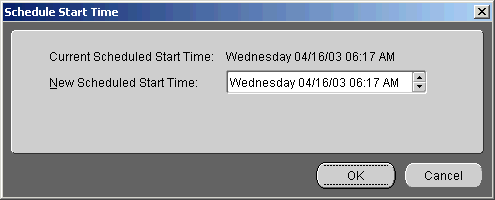
In the New Scheduled Start Time field, edit the day, date, and time by selecting one element in the string and using the Up and Down arrows to scroll through and select values.
|
Note: You can schedule multiple batches to migrate in parallel by scheduling them to start at the same time. |
Click OK.
To start data migration, choose Migrate > Migrate User Data from the Migration Tool menu bar.
Migration begins at the time you selected while scheduling batches. If you start migration at a time later than that which you scheduled, migration begins instantly.
To cancel migration, choose Migrate > Cancel Migration from the Migration Tool menu bar.
View the text.log file located in the ORACLE_HOME/oes/migration/log /migration/process_number directory. Any errors that occur during data migration are logged in the text.log file.
|
Note: If a single user in a batch fails, the batch is marked as failed. To reschedule the batch for migration, select the failed batch from the Migration Tool screen, edit the Scheduled Start Time field, and click OK. Once a batch is rescheduled, the users that failed are reverted to the pending state and the batch is picked up again for data migration when the scheduled migration time occurs. Only users that have failed to migrate are migrated. Users that have been successfully migrated are not re-migrated. |
Because the migration of user accounts and messages involves transferring large amounts of data and is, therefore, time consuming, users must be transferred from the old system to the new in the least possible amount of time.
The Migration Tool provides a two-phase migration option to achieve these conflicting goals that transfers messages from the old system to the new Oracle Email.
This section contains the following topics:
All users' messages from the source system are written into the target Oracle Email system. User accounts, however, are not actually populated with messages, nor are their folders created. In this phase all the message bodies are transferred into the Oracle Email system. This is typically done in the background over several days while users continue to use their old accounts.
To start pre-migration, do the following:
Ensure that user accounts have been created on the target Oracle Email system.
Ensure that message routing has been disabled.
Choose Migrate > Pre-Migrate User Data from the Migration Tool menu bar.
In the second phase, the Migration Tool takes advantage of the message sharing capability of Oracle Email to quickly populate users' folders with the messages that were transferred in the first phase.
This phase typically involves only minimal housekeeping updates to the e-mail store and folder creation, and can be done over a weekend. During the second phase, the following operations are performed:
Any new messages that users receive between the first and second phases are transferred to the target user account
Any messages that users delete in the interim do not appear in the target users' accounts
Any new folders that users create in the interim are transferred to the target users' account
Any folders that users have deleted in the interim do not appear in the target users' account
Follow the procedures for migrating data in this section to perform the second phase of the migration.
|
Notes:
|
Any changes you make take effect after you cancel and restart the migration.
You cannot modify migration parameters during the migration.
|
Note: If two or more instances of the Migration Tool are running against the same repository, all instances except one must be shut down before modifications to the migration parameters can proceed. |
To modify migration parameters, do the following:
Choose Edit > Migration Parameters from the Migration Tool menu bar. The Modify Migration Parameters screen displays, as shown in Figure 3-20.
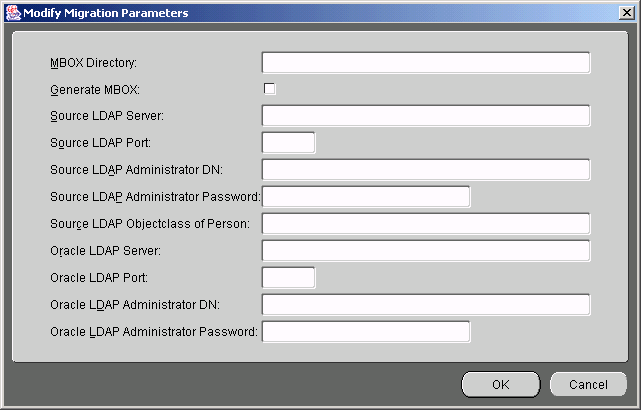
Modify the parameters.
|
Note: Values for these parameters were originally entered in "Step 4: Specifying Mail Migration Options", "Step 6: Specifying Source LDAP Server Parameters ", and "Step 7: Specifying Oracle Internet Directory Server Parameters". |
Click OK.
Upon completion of migration, the administrator must perform certain post-migration tasks.
This section contains the following topics:
You must change the mail exchanger (MX) record in order to redirect e-mail to the new system.
|
Note: Routing is not implemented for Novell GroupWise and you should immediately switch to using Oracle Collaboration Suite after the MX record changes. |
You can verify the migration of individual users' accounts and data using one of several methods of comparison. This helps the administrator to verify the validity of the overall migration, and is also helpful to support personnel when users complain of discrepancies in their accounts.
|
Notes:
|
To access the Verification screen shown in Figure 3-21, choose Migrate > Verify New Accounts from the Migration Tool menu bar.
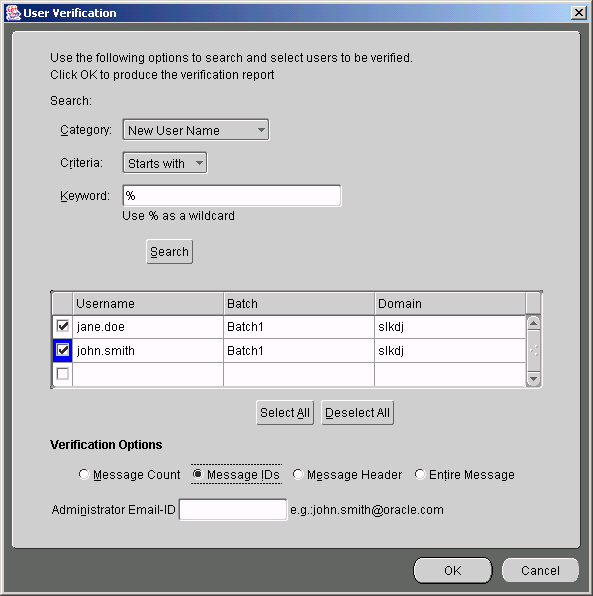
Enter the user IDs of users you want to verify in the Username field.
You can populate the Username field using the search feature. The search feature enables you to search for specific users.
Choose from the Category drop-down list either New User Name, Target Domain Name, or Batch No.
Choose from the Criteria drop-down list either Starts with, Ends with, or equals.
Enter a user name, domain, or batch number in the Keyword field. Use % as a wildcard character for partial entries.
Click Search.
The results of your search display in the Username, Batch, and Domain fields. Select the users you want to verify or click Select All to select all of the users in the returned list.
Select from one of the following verification options:
|
Note: Each option verifies that all folders in an individual user's account have been created on the target e-mail system, and compares different message information between the source and target e-mail systems. |
Message Count: Compares the message counts in the folders to verify that they match
Message IDs: Compares the SMTP message IDs to verify that they match
Message Header: Compares the message headers to verify that they match
Entire Message: Compares the message bodies of every message to verify that they match
|
Note: If you choose either the Message Header or Entire Message verification option while migration is proceeding, migration process is slowed considerably. |
Enter the address of the recipient of the verification reports in the Administrator Email ID field. Any verification errors are shown in this report.
Click OK.
The Oracle Email Migration Tool enables you to view users according to their migration status. Click Migrate > User Status to display the View User Status screen, shown in Figure 3-22.
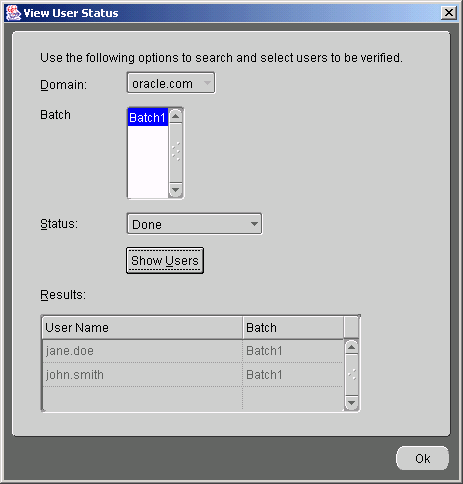
Select a domain from the Domain drop-down list.
Select a batch from the Batch list.
Select a particular status from the Status drop-down list.
Click Show Users to display a list of users whose status is that which you selected in the Results section.
Click Ok to exit the screen.
You can shut down the source mail server upon completion of migration only after you determine that you no longer need routing rules set up on the source e-mail system.
|
Note: If you have multiple Microsoft Exchange servers, you can move users from whichever machine they reside to one single machine as their data is migrated to Oracle Email. |
|
See Also: Microsoft Exchange documentation for information about moving users from one machine to another |
|
 Copyright © 1988, 2003 Oracle Corporation All Rights Reserved. |
|

