| Oracle® Enterprise Manager Administrator's Guide for Software and Server Provisioning and Patching 10g Release 5 (10.2.0.5.0) Part Number E14500-04 |
|
|
PDF · Mobi · ePub |
| Oracle® Enterprise Manager Administrator's Guide for Software and Server Provisioning and Patching 10g Release 5 (10.2.0.5.0) Part Number E14500-04 |
|
|
PDF · Mobi · ePub |
Virtualization Management (VM) involves the monitoring, administration, and maintenance of virtual servers and guest virtual machines in your enterprise. Oracle provides the customer increased value by extending Enterprise Manager Grid Control capabilities to monitor virtualized entities alongside the physical infrastructure and perform complete lifecycle management of virtual servers and software running on them.
This chapter explains how you can provision Oracle VM. In particular, this chapter covers the following:
This section helps you get started with this chapter by providing an overview of the steps involved in provisioning virtualized systems. Consider this section to be a documentation map to understand the sequence of actions you must perform to successfully provision virtualized systems. Click the reference links provided against the steps to reach the relevant sections that provide more information.
Table 10-1 Getting Started with Oracle VM Provisioning
| Step | Description | Reference Links |
|---|---|---|
 |
Understanding the Deployment Procedures Understand the Deployment Procedures offered by Enterprise Manager Grid Control for provisioning Oracle VM. |
To learn about the Deployment Procedures, see Deployment Procedures. |
 |
Knowing About The Supported Releases Know what releases are supported by the Deployment Procedure. |
To learn about the releases supported by the Deployment Procedure, see Supported Releases. |
 |
Selecting the Use Case This chapter covers a few use cases for provisioning Oracle VM. Select the use case that best matches your requirement |
|
 |
Meeting the Prerequisites Before you perform Oracle VM provisioning, you must meet the prerequisites, such as setting up of the provisioning environment, applying mandatory patches, setting up of Oracle Software Library. |
|
 |
Provisioning Provisioning guest virtual machines, cloning guest virtual machines, or live migrating guest virtual machines. |
|
 |
Configuring for High Availability Configure Oracle VM for failover support. |
To learn about high availability and fault tolerance, see High Availability and Fault Tolerance. |
Enterprise Manager Grid Control provides the following Deployment Procedures for provisioning Oracle VM:
Virtual Machine Cloning
This deployment procedure clones a guest virtual machine to one or more guest virtual machines
Virtual Machine Provisioning Using ISO
This deployment procedure creates a new guest virtual machines using an ISO image.
Virtual Machine Provisioning Using PXE
This deployment procedure creates a new guest virtual machines using Preboot Execution Environment. The new guest virtual machines will be PXE-booted and they will get provisioned via network.
Virtual Machine Provisioning Using Template
This deployment procedure creates new guest virtual machines using templates. The new virtual machines will be based on the template.
Edit Virtual Machine
This deployment procedure edits guest virtual machine configuration.
Live Migration
This deployment procedure performs live migration of a particular guest virtual machine or live migration of all guest virtual machines in a particular virtual server.
Save Virtual Machine as Template
This deployment procedure saves a guest virtual machine as template and exports the template to an external location, if provided.
Import Template
This deployment procedure imports an Oracle VM template into a server pool.
Import ISO Image
This deployment procedure imports an ISO Image into a server pool.
Create Shared Disk
This deployment procedure creates a shared disk image and registers it with the server pool.
Deployment Procedures cannot be run directly. Deployment procedures for Oracle VM provisioning run when provisioning is performed through Virtualization Central.
Following are some of the supported operating system versions for virtualization:
| Operating System | Version |
|---|---|
|
Linux |
Oracle Enterprise Linux 4 - 32-bit and 64-bit |
|
Oracle Enterprise Linux 5 - 32-bit and 64-bit |
|
|
Red Hat Enterprise Linux 3 - 32-bit and 64-bit |
|
|
Red Hat Enterprise Linux 4 - 32-bit and 64-bit |
|
|
Red Hat Enterprise Linux 5 - 32-bit and 64-bit |
|
|
Microsoft Windows |
Microsoft Windows Server 2000 |
|
Microsoft Windows Server 2003 Edition - 32-bit and 64-bit |
|
|
Microsoft Windows Vista |
|
|
Microsoft Windows XP |
Guest Virtual machines can be provisioned using Oracle VM templates, ISO images, or by PXE boot. Oracle VM templates and ISO images can be downloaded from OTN or other sources.
You can create guest virtual machines from the following three sources:
Using Oracle VM Templates
Using ISO images of Linux and Windows operating systems
PXE bootable guest virtual machines that can boot over a network
Oracle VM template or ISO binaries can be available in any of the following locations:
In the virtual server pool as a resource
In the Software Library as a software component
In a HTTP or NFS accessible external location
This section describes the following:
Importing Oracle VM Templates and ISO Binaries as Server Pool Resources
Configuring the Guest Virtual Machine for Agent and Other Software
Enterprise Manager Grid Control allows you to create guest virtual machines from Oracle VM Templates and Linux and Windows ISO images. Oracle VM templates may contain operating system and pre-installed and pre-configured Oracle software. This section explains the following:
Ensure that you meet the prerequisites described in the following sections:
To create a software component from an ISO image, do the following:
In the Software Components tab, select Components as ISO and click Create.

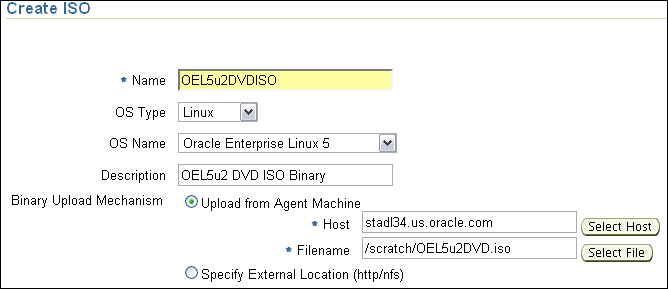
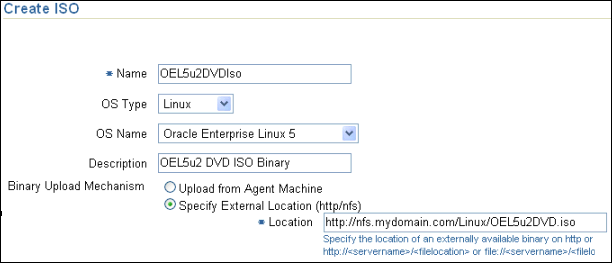
In the Create ISO page, specify the name and description of the ISO component and the operating system details.
Select the Binary Upload Mechanism option to choose the option to store the template in the Software Library or specify an external location where the binary is stored.
If you choose Upload from Agent Machine, select the host and the location of the binary. Specify the host credentials to select the file from the agent machine.
If you specify an external location for the binary, specify the HTTP or NFS location of the binary. The binary will not be stored in the Software Library. It will be directly downloaded to the server pool when this resource is imported to a server pool.
Click OK.
Navigate to the Software Components tab. The software component you have created will be displayed on this page.
To create a software component from an Oracle VM template, do the following:
In the Software Components tab, select Components as Template and click Create.

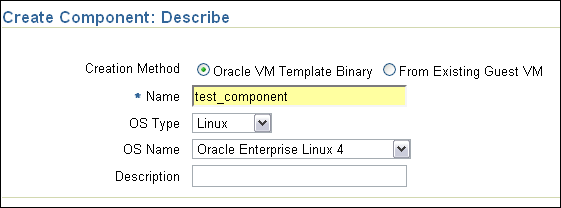
In the Create Component: Describe page, select the Creation Method as Oracle VM Template Binary. Specify the name and operating system details.
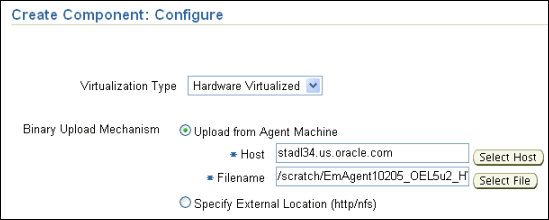
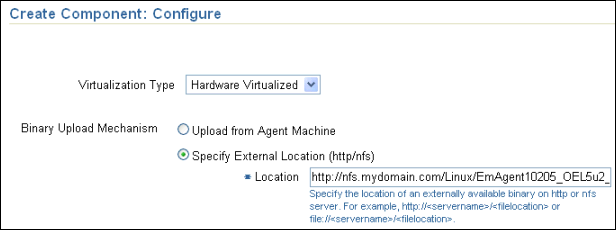
In the Create Component: Configure page, select Virtualization Type as Para Virtualized or Hardware Virtualized based on the template you are creating.
Select the Binary Upload Mechanism option to choose the option to store the template in the Software Library or specify an external location where the binary is stored.
If you choose Upload from Agent Machine, select the host and the location of the binary.
If you specify an external location for the binary, specify the HTTP or NFS location of the binary. The binary will not be stored in the Software Library. It will be directly downloaded to the server pool when this resource is imported to a pool.
In the Create Component: Review page, review the information you have provided and submit the component creation job.
Navigate to the Software Components tab. The software component you have created will be displayed on this page.
You can store your Oracle VM templates and ISO images in the following directories and add them as resources to the server pool using the Discover functionality:
/OVS/seed_pool
/OVS/<repos_guid>/seed_pool
/OVS/iso_pool
/OVS/<repos_guid>/iso_pool
<repos_guid> is the GUID of any additional storage repository that might have been added to the server pool.
To discover ISO images and Oracle VM templates, do the following:
In Virtualization Central, select the Virtual Server Pool, select Action Virtual Server Pool - Manage Virtual Server Pool and click Go.
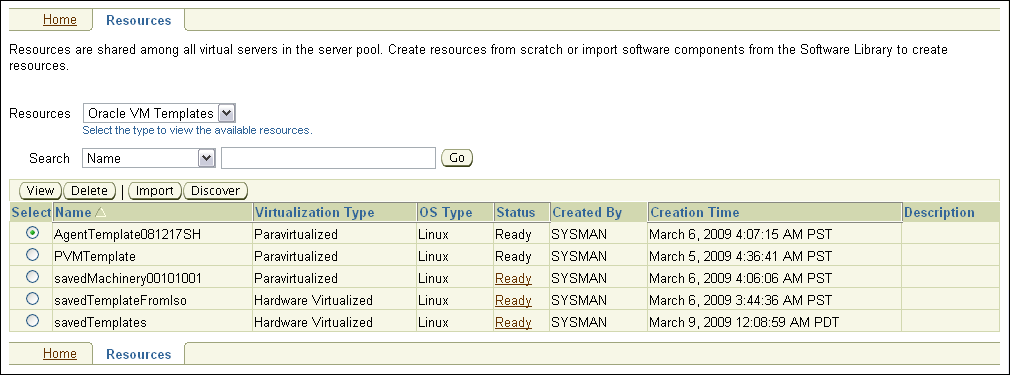
In the Oracle VM Server Pool: Resources page, select Resources as ISO Images or Oracle VM Templates and click Discover.
If you have selected Oracle VM Templates, in the Discover GVM Template page, select the undiscovered template and provide a description. Select the OS Type and Operating System details.
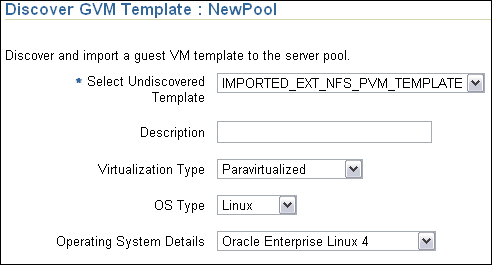
If you have selected Oracle VM Templates, in the Discover GVM Template page, select the undiscovered template and provide a description. Select the Virtualization Type, OS Type, and Operating System details. Click OK.
Navigate to the Resources page. The ISO image or Oracle VM template you have discovered will be displayed on this page.
You can also create shared disks that can be used by guest virtual machines and assign them at the time of guest virtual machine creation.
Oracle VM allows sharing of disks between multiple guest virtual machines. Create a shared disk that the guest virtual machine can access. Follow these steps:
In Virtualization Central, select the Virtual Server Pool, and select Action Virtual Server Pool - Manage Virtual Server Pool and click Go.
In the Oracle VM Server Pool: Resources page, select Resources as Shared Disks and click Create.
In the Create Shared Disk page, specify the name, size of the disk, and provide a description. Click OK.
After clicking OK, the deployment procedure to create shared disk will be submitted. The initial status will be Creating. Once the deployment procedure completes successfully, the status will be Ready. In case the deployment procedure fails, the status will be Error.
To create guest virtual machines, you can import Oracle VM Templates and ISO binaries to the server pools and use them for provisioning. This section explains the following:
Ensure that you meet the prerequisites described in the following sections:
To import a software component, do the following:
In the Software Components tab, select Components as Template or ISO depending on the component you are importing, select the component, and click Import.
In the Import Template or Import ISO Image Page, specify the name of the imported resource, add the server pools to which you want to import the component, and specify monitoring server and virtual server credentials.
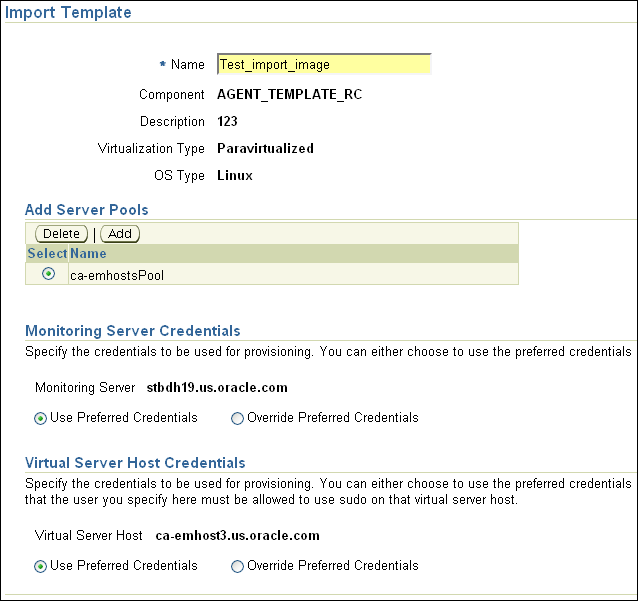
Click OK.
After importing the software component, it will appear in the Server Pool Resources page as an imported resource.
To import a software component, do the following:
In Virtualization Central, select the Server Pool, select Action as Virtual Server Pool Manage Virtual Server Pool and click Go.
In the Resources tab, select Resources as Oracle VM Templates or ISO Images depending on the component you are importing, select the component, and click Import.
In the Import Template or Import ISO Image Page, specify the name of the imported resource, select the component to be imported or specify the external location of the component, and specify monitoring server and virtual server credentials.
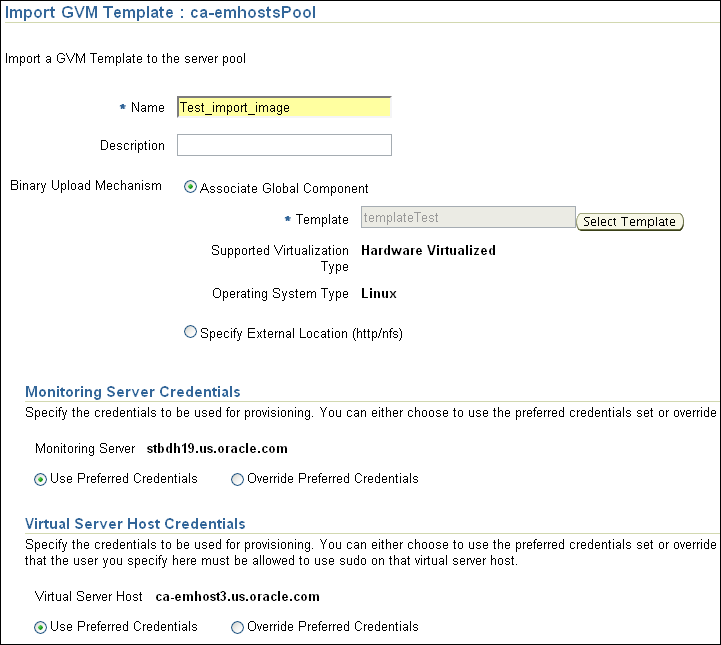
Click OK.
After importing the software component, it will appear in the Server Pool Resources page as an imported resource.
You can create guest virtual machines from software components. You can also create PXE bootable guest virtual machines with no operating system on them. This section explains the following:
The following table describes the phases involved in the provisioning operation:
Table 10-3 Phases for Provisioning Guest Virtual Machines
| Phase | Description |
|---|---|
 |
Select Server Pool Allows you to specify the number of guest virtual machines to be created, preferred servers for guest virtual machines, and select the server pool with which you want to associate the guest virtual machines. |
 |
Select Source Allows you to select the source from which you want to create the guest virtual machine. The source can be PXE Boot, Oracle VM Template, or ISO Image created earlier. The location can be Software Library Component location or an external location or location of the imported resource of the selected server pool. |
 |
Configure Allows you to configure the disk, network, agent and other details. |
 |
Schedule Allows you to specify the Schedule and Credentials for the provisioning activity. |
 |
Review Allows you to review the information you have provided for provisioning the guest virtual machine. |
Ensure that you meet the prerequisites described in the following sections:
Software component to create the guest virtual machine is available in the Software Library or any other location.
To provision a guest virtual machine using Oracle VM template, follow these steps:
Download the Oracle VM template for Linux to an external location (either HTTP or NFS location).
Import the Oracle VM template to the server pool. For steps to import templates to server pool, see Importing Oracle VM Templates and ISO Binaries as Server Pool Resources.
Use the Software Components tab in Virtualization Central to create a software component in the Software Library pointing to the template in the shared storage.
In Virtualization Central, select Action as Guest VM, Create Guest VM and click Go.
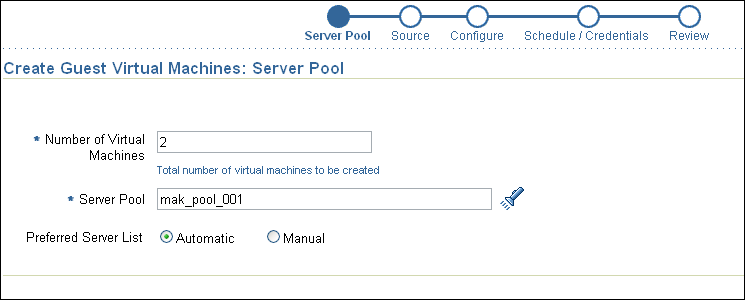
In the Create Guest Virtual Machines: Server Pool page, specify the number of guest virtual machines to be created and the server pool with which you want to associate the guest virtual machines.
'Specify the preferred virtual servers where the guest virtual machines will run. Choose Automatic to select the virtual server automatically. Click Next.
In the Create Guest Virtual Machines: Source page, select Oracle VM Template.
If the Oracle VM template is of type imported resources, select the template from the table.

If the Oracle VM template binary is not stored in the Software Library, specify the NFS or HTTP location where the Oracle VM template is stored. Specify the resource name for the binary to be imported. Specify if you want hardware virtualized or para-virtualized type.
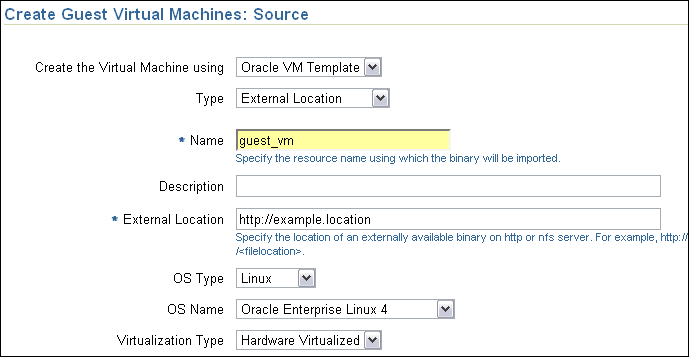
If the Oracle VM template is a software component stored in the Software Library, specify the resource name for the software component to be imported into the selected server pool and description. If the software component is not imported, it will be imported and the guest virtual machine will be created.
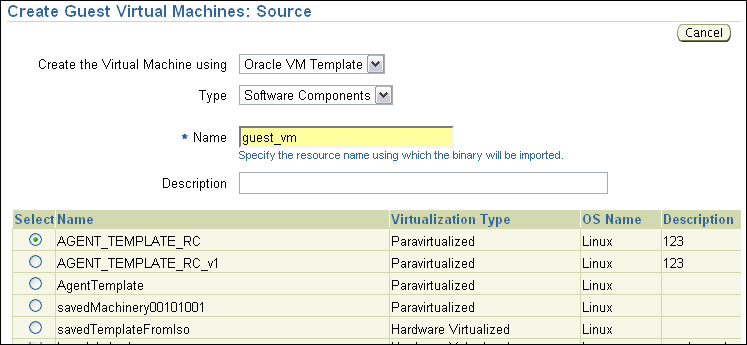
Click Next.
In the Create Guest Virtual Machines: Configure page, specify the configuration details shown in Table 10-4. The Configure Network button will be enabled only when the 'Preferred Server List' in Server Pool page is chosen as Manual. By default, the network configuration will be DHCP.
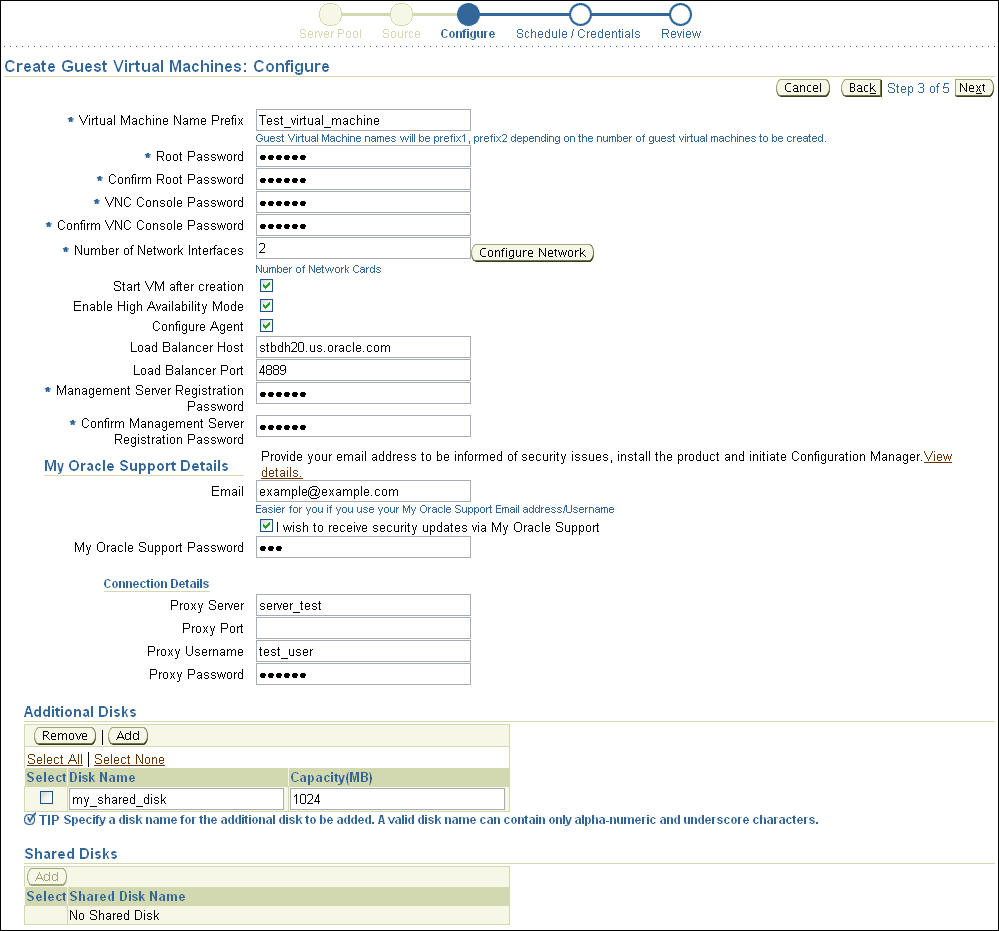
In the Create Guest Virtual Machines: Schedule/Credentials page, specify the schedule for creating the guest virtual machine and the monitoring server and virtual server host credentials.
In the Create Guest Virtual Machines: Review page, review the information you have provided and submit the job for guest virtual machine creation.
After clicking Finish, the deployment procedure to create the guest virtual machine will be submitted. The initial status of the guest virtual machine(s) being created will be Creating. The guest virtual machine will appear under the server pool. Once the guest virtual machine gets created, the status will be Halted. If the guest virtual machine is started successfully, then the status will be Running.
Table 10-4 Guest Virtual Machine Configuration Details for Oracle VM Templates
| Element | Description |
|---|---|
|
Virtual Machine Name Prefix |
This string that will be used as a prefix in the guest virtual machine name. When a guest virtual machine is created using the Enterprise Manager Grid Control Console, guest virtual machine names will be prefix1, prefix2, and so on. |
|
Number of Cores |
When creating guest virtual machine from imported template resource, specify the number of CPU cores to assign to this guest virtual machine. This will show up as virtual CPU (vCPU) configuration parameter for the guest virtual machine. |
|
Memory Size (MB) |
When creating guest virtual machine from imported template resource, specify the amount of memory to be allocated to the guest virtual machine. The physical virtual server machine should have sufficient memory to run the guest virtual machine. Otherwise, the guest virtual machine will be created, but will not be started. |
|
Root Password/Confirm Root Password |
When creating guest virtual machine from a Linux-based Oracle VM template, specify the operating system "root" password to log in to the guest virtual machine once it is up and running. |
|
VNC Console Password |
Enterprise Manager Grid Control provides a VNC console to the newly created guest virtual machine. This is the VNC password to access the VNC console. |
|
Number of Network Interfaces |
Number of virtual network interfaces this guest virtual machine should have. The minimum value is 1 and the maximum value is 8. If you have manually selected the virtual servers for the guest virtual machine creation, specify the network details by clicking Configure Network. To configure the network, specify the following values: Virtual Machine - Select the guest virtual machine you are configuring. Configuration Type - Specify the type of configuration whether dynamic or static. MAC Address - Specify the MAC address of the network interface. This is not a mandatory field. If not specified, MAC address will be automatically generated. The format of MAC address is XX:XX:XX:XX:XX:XX, where the first three octets should be 00:16:3E. Bridge - Select a network bridge from the available bridges. IP Address - Specify the IP address to be assigned to the network interface. Specify the value in /ddd.ddd.ddd.ddd/ format. Host Name - Specify the Hostname associated with the specified IP address. For example, myhost1.The hostname specified for "VIF0" will be set as host name of the machine. For remaining interfaces, the hostname entries are made to /etc/hosts file. Domain Name - Specify the domain name associated with the specified IP address. Subnet Mask - Specify the mask used to determine what subnet the specified IP address belongs to. For example, 255.255.252.0 Default Gateway - Specify the IP address of the node (or router) on the network that serves as an access point to another network. The default gateway specified for "VIF0" is set as the default gateway of the machine. DNS Server - Specify the DNS server configured with the virtual server. |
|
Enable High Availability Mode |
When creating the guest virtual machine, if the "Enable High Availability Mode" flag is selected, this guest virtual machine will participate in the High Availability functionality. If its parent virtual server fails, this guest virtual machine will be auto-restarted on another Oracle VM server. |
|
Configure Agent |
Select this option if you want to configure the agent to monitor the guest virtual machine. |
|
Load Balancer Host |
In case of multiple OMS setup, specify the load balancer host name to be used for agent configuration. By default, the agent will be configured with one of OMS hosts in a multiple OMS setup. If load balancer host is provided, then agent will be configured with the load balancer host. |
|
Load Balancer Port |
In case of multiple OMS setup, specify the load balancer port. |
|
Management Server Registration Password |
Password to register the agent. |
|
|
Specify the Email address for contact. |
|
My Oracle Support Password |
Password credentials for My Oracle Support. |
|
Proxy Server |
HTTP Proxy server used to connect to My Oracle Support. |
|
Proxy Port |
Proxy server port number |
|
Proxy User name/Proxy Password |
User name and password for the proxy server. |
|
Start VM after creation |
When creating guest virtual machine from template, specify whether the guest virtual machine should be started automatically after it is created. |
|
Additional Disks |
Every guest virtual machine is created with at least one disk. Specify additional disks and their sizes. These disks will be added to the guest virtual machine. After the guest virtual machine is created, log in to the guest virtual machine and reformat and mount the additional disks. |
|
Shared Disks |
Oracle VM allows sharing of disks between multiple guest virtual machines. You can specify multiple shared disks that the guest virtual machines can access. |
To provision a guest virtual machine using ISO image, follow these steps:
Import the ISO image to the server pool. For steps to import ISO images to server pool, see Importing Oracle VM Templates and ISO Binaries as Server Pool Resources.
Use the Software Components tab in Virtualization Central to create a software component in the Software Library pointing to the ISO image in the shared storage.
In Virtualization Central, select Action as Guest VM, Create Guest VM and click Go.
In the Create Guest Virtual Machines: Server Pool page, specify the number of guest virtual machines to be created and the server pool with which you want to associate the guest virtual machines.
You can select the virtual server for the guest virtual machine manually or allow the server pool to automatically allocate the virtual server.
Click Next.
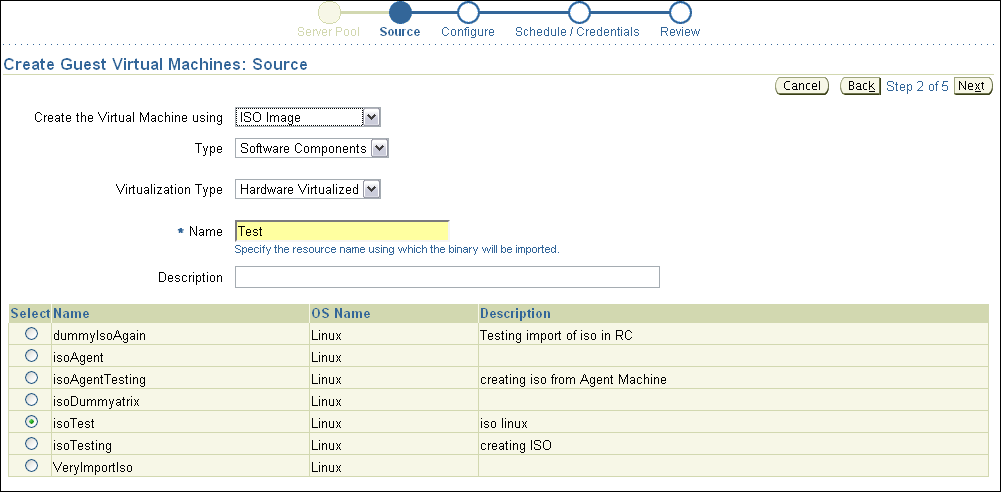
In the Create Guest Virtual Machines: Source page, specify the ISO image source from which you want to create the guest virtual machine.
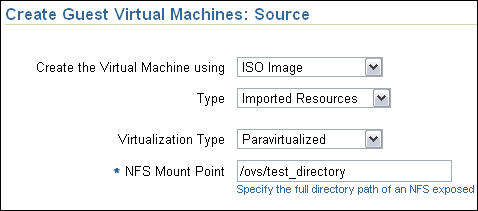
If the ISO image is an imported resource and the Virtualization type is para-virtualized, specify the NFS Mount Point, that is, the NFS location where the ISO image will be mounted.
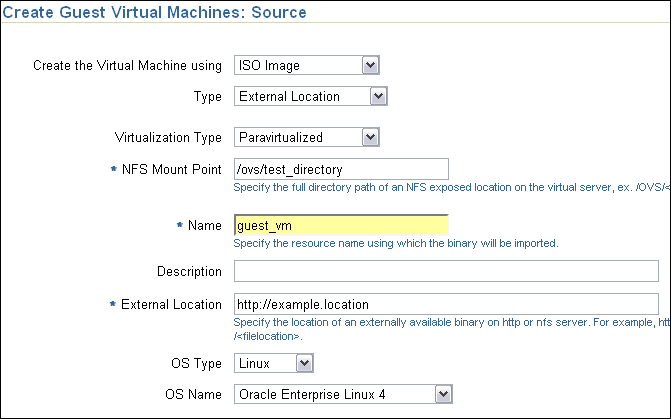
If the ISO image is not stored in the Software Library, specify the external location where the ISO image is stored. Specify the resource name using which the binary will be imported, OS name, and OS type. Specify if you want hardware virtualized or para-virtualized type.
If the ISO image is a software component stored in the Software Library, specify Name and Description and if the Virtualization type is para-virtualized, specify the NFS Mount Point also.
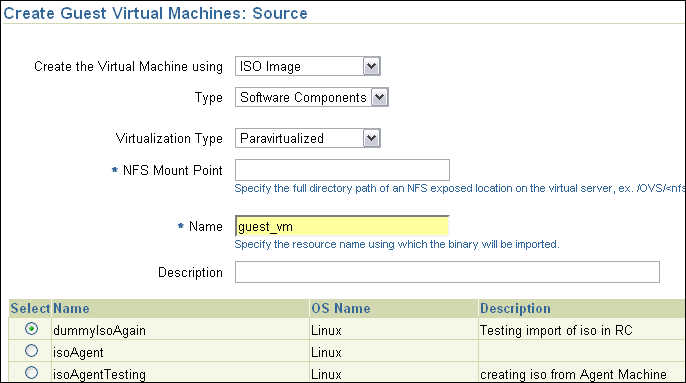
In the Create Guest Virtual Machines: Configure page, specify the configuration details shown in Table 10-5.
In the Create Guest Virtual Machines: Schedule/Credentials page, specify the schedule for creating the guest virtual machine and the monitoring server and virtual server host credentials.
In the Create Guest Virtual Machines: Review page, review the information you have provided and submit the job for guest virtual machine creation.
Clicking Finish will submit the deployment procedure to create guest virtual machine(s). The initial status of the guest virtual machine will be 'Creating'. If the creation is successful, the status will be 'Running'.
Table 10-5 Guest Virtual Machine Configuration Details for ISO Images and PXE Boot
| Element | Description |
|---|---|
|
Virtual Machine Name Prefix |
This string that will be used as a prefix in the guest virtual machine name. When a guest virtual machine is created using the Enterprise Manager Grid Control Console, guest virtual machine names will be prefix1, prefix2, and so on. |
|
Number of Cores |
The number of CPU cores to assign to this guest virtual machine. This will show up as virtual CPU (vCPU) configuration parameter for the guest virtual machine. |
|
Memory Size (MB) |
The amount of memory to be allocated to the guest virtual machine. The physical virtual server machine should have sufficient memory to run the guest virtual machine. Otherwise, the guest virtual machine will be created, but will not be started. |
|
Primary Disk Name |
For guest virtual machine provisioning using ISO image or PXE boot, there must atleast one hard disk. Specify this hard disk on which the guest virtual machine will be created. |
|
Primary Disk Size (MB) |
For ISO and PXE boot, specify the size of the hard disk in megabytes. |
|
VNC Console Password |
Enterprise Manager Grid Control provides a VNC console to the newly created guest virtual machine. This is the VNC password to access the VNC console. |
|
Number of Network Interfaces |
Number of virtual network interfaces this guest virtual machine should have. The minimum value is 1 and the maximum value is 8. |
|
Enable High Availability Mode |
When creating the guest virtual machine, if the "Enable High Availability Mode" flag is selected, this guest virtual machine will participate in the High Availability functionality. If its parent virtual server fails, this guest virtual machine will be auto-restarted on another Oracle VM server. |
|
Additional Disks |
Every guest virtual machine is created with at least one disk. Specify additional disks and their sizes. These disks will be added to the guest virtual machine. After the guest virtual machine is created, log in to the guest virtual machine and reformat and mount the additional disks. |
|
Shared Disks |
Oracle VM allows sharing of disks between multiple guest virtual machines. You can specify multiple shared disks that the guest virtual machines can access. |
To provision a guest virtual machine using PXE boot, follow these steps:
In Virtualization Central, select Action as Guest VM, Create Guest VM and click Go.
In the Create Guest Virtual Machines: Server Pool page, specify the number of guest virtual machines to be created and the server pool with which you want to associate the guest virtual machines.
You can select the virtual server for the guest virtual machine manually or allow the server pool to automatically allocate the virtual server.
Click Next.
In the Create Guest Virtual Machines: Source page, specify the PXE Boot source from which you want to create the guest virtual machine. Specify if you want hardware virtualized or para-virtualized type.
Specify the MAC addresses for the guest virtual machines:
If you want Enterprise Manager Grid Control to assign a MAC addresses for the new guest virtual machines, select Automatic.
If you want to specify MAC addresses manually, select Manual and provide the MAC addresses in the text fields. The format of MAC address is XX:XX:XX:XX:XX:XX where the first three octets are 00:13:6E.
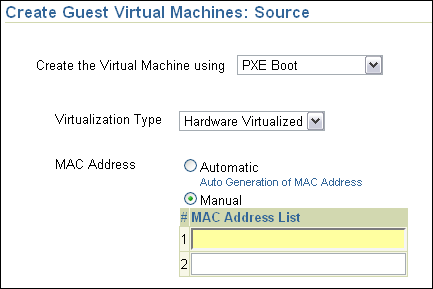
In the Create Guest Virtual Machines: Configure page, specify the configuration details shown in Table 10-5.
In the Create Guest Virtual Machines: Schedule/Credentials page, specify the schedule for creating the guest virtual machine and the monitoring server and virtual server host credentials.
In the Create Guest Virtual Machines: Review page, review the information you have provided and submit the job for guest virtual machine creation.
Clicking Finish will submit the deployment procedure to create guest virtual machine(s). The initial status of guest virtual machine will be 'Creating'. If the creation is successful, the status will be 'Running'.
To enable Enterprise Manager Grid Control to monitor your guest virtual machine, you will need to configure the agent.
Table 10-6 lists all the options available for configuring the agent when creating a guest virtual machine from Oracle VM template and the action you can take.
Table 10-6 Agent Configuration Options
| Option | Result |
|---|---|
|
Oracle VM template used for guest virtual machine creation has a Oracle Management Agent (Management Agent) - Configure Agent option is selected when creating the guest virtual machine |
The fields to specify agent configuration details are displayed in the Create Guest Virtual Machine: Configure page. The agent is configured when the guest virtual machine is started for the first time. For details about configuring the agent, see Creating Guest Virtual Machines. |
|
- Oracle VM template used for guest virtual machine creation has a Management Agent - Configure Agent option is not selected when creating the guest virtual machine |
The fields to specify agent configuration details are not displayed in the Create Guest Virtual Machine: Configure page. The agent is not configured during guest virtual machine creation. You will need to manually log in to the guest virtual machine using the VNC Console and install and configure the agent. To install and configure the agent, see Oracle Enterprise Manager Grid Control Installation Guide. |
|
- Oracle VM template used for guest virtual machine creation does not have a Management Agent - Configure Agent option is selected when creating the guest virtual machine |
Even though the Configure Agent option is selected, when creating the guest virtual machine, the agent will not be configured. You will need to manually log in to the guest virtual machine using the VNC Console and install and configure the agent. To install and configure the agent, see Oracle Enterprise Manager Grid Control Installation Guide. |
|
- Oracle VM template used for guest virtual machine creation does not have a Management Agent - Configure Agent option is not selected when creating the guest virtual machine |
When creating the guest virtual machine, the agent will not be configured. You will need to manually log in to the guest virtual machine using the VNC Console and configure the agent. To install and configure the agent, see Oracle Enterprise Manager Grid Control Installation Guide. |
The Enterprise Manager Virtualization Central page allows you to monitor Oracle VM, guest virtual machines, and manage resources. This section covers the following:
The Enterprise Manager Virtualization Central page allows you to monitor Oracle VM servers and guest virtual machines, and manage resources. Resource management includes packaging and management of various resources like ISO images, Oracle VM templates, and shared disk.
Managed resources can be imported or associated with a server pool. Resources associated with server pools can be chosen for virtualization life cycle management operations such as creating, cloning, and live migrating guest virtual machines.
Enterprise Manager Grid Control provides support for packaging and associating Oracle VM template and ISO component with server pools.
In addition, the Virtualization Central page also provides the following information:
A quick view of the status of the virtual server and guest virtual machines and basic information about them
CPU and Memory utilization of virtual servers
Information about the server pool to which the virtual servers are registered
Drilldowns to server pools, virtual servers, and guest virtual machines home pages from where you can view more information about these targets
Administrative tasks such as starting and stopping guest virtual machines
Provisioning activities such as creating virtual server pools, registering virtual servers, and creating guest virtual machines
VNC Support to access guest virtual machines
Starting from the Virtualization Central page, you can access additional details and management functions by drilling down through the user interface. In addition, the Virtualization Central page provides a list of Related Links. From these links you can perform activities such as bare metal provisioning of Oracle VM server software, customization of table columns, and deployment of Management Agent on a guest virtual machine. The following figure shows the Virtualization Central Page.
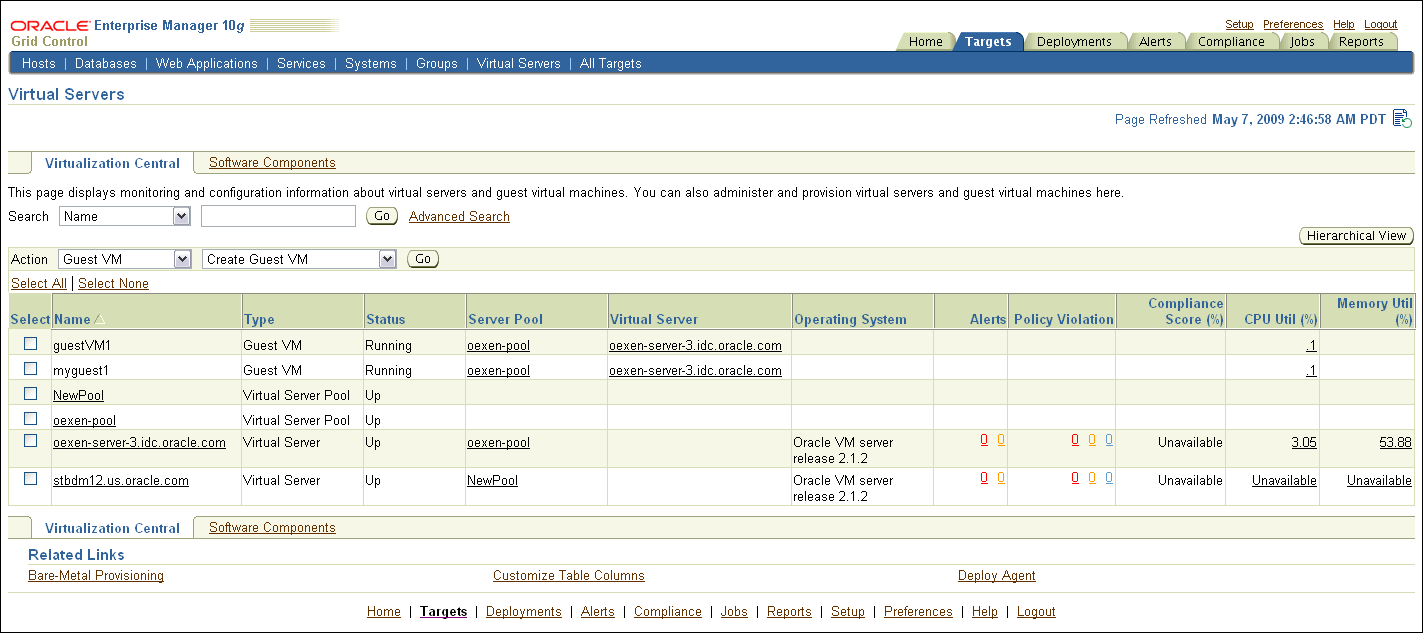
For more information about administration and monitoring of Oracle VM, see Enterprise Manager Concepts Guide available at:
http://www.oracle.com/technology/documentation/oem.html
For information about the privileges required for administrative operations, see Privileges Required for Administrative and Provisioning Operations.
Enterprise Manager Grid Control allows you to modify the virtual CPU count, allocated memory, and other configuration of the guest virtual machine.
Table 10-7 shows the editable fields for the guest virtual machine and the time when the changes will take effect.
Table 10-7 Guest Virtual Machines: Editable Fields
| Editable Field | Action for Changes to Take Effect |
|---|---|
|
Virtual Machine Name |
This field can be edited only for guest virtual machines in the Halted status. Changes will take effect when the guest virtual machine is started. |
|
Memory |
This field can be edited only for guest virtual machines in the Halted status. Changes will take effect immediately when the guest virtual machine is started. |
|
Dynamic Memory |
Dynamic memory specified should be lesser than or equal to the Memory specified. For para-virtualized guest virtual machines, changes to the memory take effect without stopping and starting the guest virtual machine. For hardware-virtualized guest virtual machines, changes to memory take effect only after stopping and starting the guest virtual machine. |
|
Virtual CPUs |
For para-virtualized guest virtual machines, number of vCPUs can be edited and changes take effect without stopping and starting the guest virtual machine. For hardware-virtualized guest virtual machines, changes to vCPUs take affect only after stopping and starting the guest virtual machine. |
|
VNC Console Password |
New password takes effect after the guest virtual machine is stopped and restarted. |
|
Enable High Availability Mode |
If High Availability was enabled during guest virtual machine creation, you can edit the guest virtual machine to enable or disable High Availability. |
|
Add/Remove Disk Storage |
Changes take place immediately. CDs cannot be attached with para-virtualized guest machines. |
|
Add/Remove Network Interface |
Changes take place immediately. The primary network interface VIF0 cannot be removed. |
|
Boot Order |
This field can be edited only for guest virtual machines in the Halted status. Requires the guest virtual machine to be stopped and restarted. Boot Order cannot be set to CD for para-virtualized guest virtual machines. |
Editing a Guest Virtual Machine
In Virtualization Central, select the Guest Virtual Machine you want to edit, and select Action Guest VM, Edit Guest VM and click Go.
In the Edit Guest Virtual Machine page, edit the values. Click Continue.
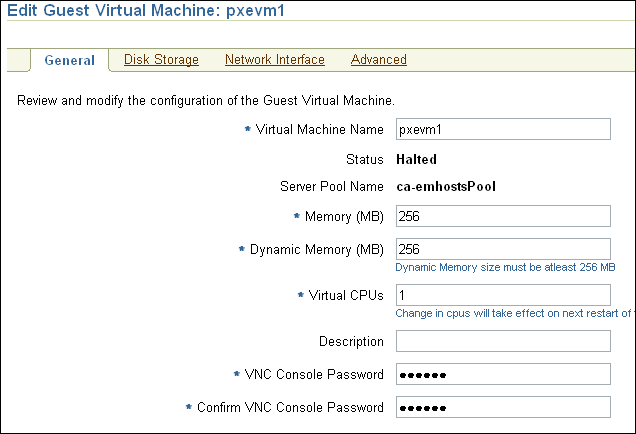
The Edit deployment procedure will be submitted. The guest virtual machine being edited will appear with the status 'Editing' in Virtualization Central. Once the deployment procedure completes successfully, the guest virtual machine status will be changed to the current state.
If you want to restrict certain guest virtual machines to run on only certain Oracle VM servers, use the Preferred server list feature. Preferred server list contains all the Oracle VM servers on which this guest virtual machine is allowed to run. If the "Automatic" option is selected when creating a guest virtual machine, Enterprise Manager Grid Control picks the Oracle VM server with maximum resources to run the guest virtual machine. When auto-restarting guest virtual machines during fail-over scenario, Enterprise Manager Grid Control picks a preferred Oracle VM server to auto-restart the guest virtual machine.
To update preferred virtual server list, follow these steps:
In Virtualization Central, select the Guest Virtual Machine for which you want to update the preferred server list, and select Action Guest VM, Update Preferred Server List and click Go.
In the Update Preferred Server List page, choose the preferred server list as manual or automatic. If you choose automatic, add the preferred virtual servers for the guest virtual machine. Click Apply.
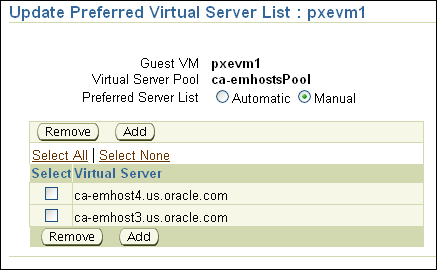
Enterprise Manager picks the preferred Oracle VM server to start the guest virtual machine.
You can log in to guest virtual machines using VNC Console.
In Virtualization Central, select the guest virtual machine you want to access and select Action Guest VM VNC Console.
The VNC Console to the guest virtual machine opens.
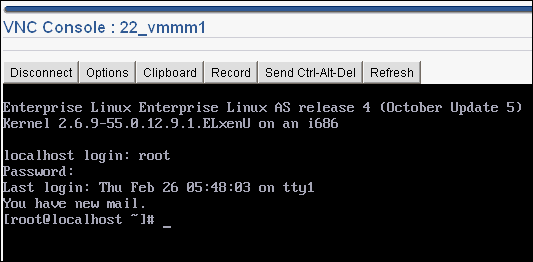
In the VNC Console, specify the VNC password.
On removing a server pool, the virtual servers associated with the server pool will be removed. This section explains the following:
Following are the prerequisites for deleting a server pool:
The virtual server pool must not have any running guest virtual machines.
No Import Resource operation must be running in the virtual server pool.
Agents running on all the virtual servers in the virtual server pool should be accessible.
Note:
If you select the Force Remove option, the validations mentioned above will not be performed.Follow these steps to delete a server pool:
In Virtualization Central, select the Server Pool, select Action Virtual Server Pool, Remove Server Pool, and click Go.
Confirm that you want to remove the server pool. You can choose Remove all working directories and/or Force Remove. Select Remove all working directories from the server pool if you want to delete all the related directories (under /OVS). If you leave this option unselected, only the server pool data is removed from the database, while the relevant directories and files of the server pool remain on the server.
If you select the Force Remove option, the virtual servers in the server pool will not be updated with the changes.
The deleted Server Pool and the associated virtual servers will not appear in Virtualization Central.
Following are the prerequisites for deleting an Oracle VM server:
The master agent of the virtual server should be connected and accessible.
There should not be any running guest virtual machines on the virtual server.
The virtual server should not be a preferred server of any guest virtual machine.
The virtual server should not be the master server. The master virtual server cannot be directly removed. To remove the master virtual server, the virtual server pool has to be deleted.
Note:
If you select the Force Remove option, the validations mentioned above will not be performed.Follow these steps to delete an Oracle VM server:
In Virtualization Central, select the Oracle VM Server, select Action Virtual Server, Deregister Virtual Server, and click Go.
Confirm that you want to deregister the virtual server. You cannot deregister the master server from a server pool.
The deleted virtual server and the associated guest virtual machines will not appear in Virtualization Central.
Follow these steps to delete a guest virtual machine:
In Virtualization Central, select the guest virtual machine, select Action Guest VM, Delete Guest VM, and click Go.
Confirm that you want to delete the guest virtual machine.
In Virtualization Central, verify that the deleted guest virtual machine does not appear.
When you delete a guest virtual machine, all the files and data associated with this guest virtual machine are removed from the virtual server and server pool.
Administrators may want to move guest virtual machines to another Oracle VM server for balancing the application workload, or during planned downtime of the Oracle VM server. Enterprise Manager Grid Control allows users to live migrate one or all guest virtual machines. Applications running in the guest virtual machines continue to be accessible during live migration. Live migration ensures high availability of guest virtual machines.
Enterprise Manager Grid Control supports the following live migration cases:
Live migrate one guest virtual machine to another virtual server
Live migrate all guest virtual machines from one virtual server to another
This section explains the following:
Live migration requires the following preconditions to be met:
The virtual servers participating in the live migration must belong to the same server pool and reside in the same subnet.
The computer make and model number of both the source computer and the destination computer must be identical.
The destination computer must have enough memory and free space.
To live migrate a guest virtual machine, do the following:
In Virtualization Central, select the guest virtual machine you want to live migrate and select Action Guest VM Live Migrate Guest VM. Ensure that the guest virtual machine is in the Running state. Click Go.
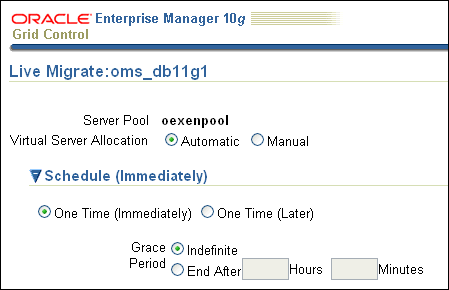
In the Live Migrate: Guest Virtual Machine page, specify the virtual server to which you want to live migrate the running guest virtual machine and also schedule the guest virtual machine live migration job to run either immediately or later. Select the virtual server allocation type as either Automatic or Manual.
If you choose Automatic, the system will pick up a suitable virtual server from the server pool for the guest virtual machine live migration.
If you choose Manual, click Add and select the virtual server from the list of virtual servers available in the server pool.
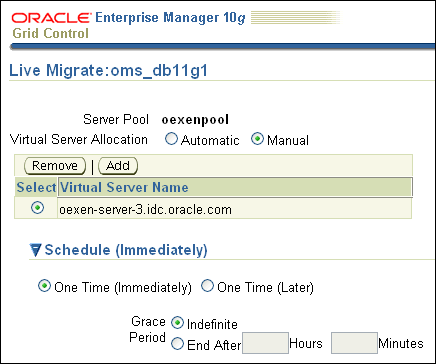
Click OK.
After performing the live migration activity, navigate to Virtualization Central. The guest virtual machines must now be displayed under the new virtual server.
To live migrate all guest virtual machines, do the following:
In Virtualization Central, select the virtual server from which you want to live migrate all guest virtual machines, and select Action Virtual Server Live Migrate All Guest VM. Ensure that it is in the Up state.
In the Live Migrate: Guest Virtual Machine page, schedule the guest virtual machine live migration job to run either immediately or later. The virtual server allocation type is Automatic.
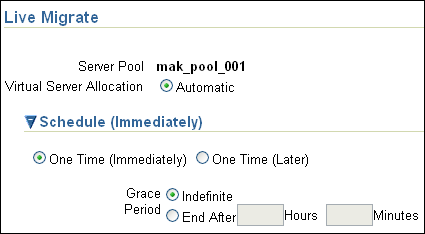
Click OK.
After performing the live migration activity, navigate to Virtualization Central. The guest virtual machines must now be displayed under the new virtual server.
Oracle VM server uses Oracle Clusterware to maintain network and storage heartbeat in a cluster of Oracle VM servers. When an Oracle VM server failure is detected, Enterprise Manager Grid Control automatically restarts the guest virtual machines that were running on the failed server on a new Oracle VM server.
This section explains how you can create a cluster and enable high availability (HA). You can create either an NFS-based cluster, or an OCFS2 cluster. In particular, this section covers the following:
To create an NFS-based cluster for HA:
On the master virtual server, start the cluster service:
# /usr/lib/ovs/ovs-cluster-configure
This script generates the /etc/ocfs2/cluster.conf file if it does not already exist, and configures and starts the o2cb service.
On the master virtual server, configure the shared storage with /usr/lib/ovs/ovs-makerepo source C description, for example.
# /usr/lib/ovs/ovs-makerepo example.com:/OVS C "cluster root"
On the master virtual server, check the cluster has been configured correctly and is running:
# /usr/lib/ovs/ovs-cluster-check --master --alter-fstab
The --master parameter should only be used on the master virtual server. The --alter-fstab parameter modifies the /etc/fstab file. A backup of the original /etc/fstab file is created in /tmp.
Log in to Oracle Enterprise Manager and create an HA-enabled server pool. See Configuring Oracle VM Servers for High Availability for steps to enable high availability on server pools.
To create an OCFS2-based cluster for HA:
On the master virtual server, format a volume to be an OCFS2 partition with the mkfs.ocfs2 utility. For example, to create an OCFS2 partition with a 4k block size, 4k cluster size, and 16 node slots:
# mkfs.ocfs2 -L mylabel -b 4K -C 4K -J size=64M -N 16 /dev/sda1
On the master virtual server, start the cluster service:
# /usr/lib/ovs/ovs-cluster-configure
This script generates the /etc/ocfs2/cluster.conf file if it does not already exist, and configures and starts the o2cb service.
On the master virtual server, configure the OCFS2 partition as shared storage with /usr/lib/ovs/ovs-makerepo source C description, for example.
# /usr/lib/ovs/ovs-makerepo /dev/sdb1 C "cluster root"
Check the cluster has been configured correctly and is running:
# /usr/lib/ovs/ovs-cluster-check --master --alter-fstab
The --master parameter should only be used on the master virtual server. The --alter-fstab parameter modifies the /etc/fstab file. A backup of the original /etc/fstab file is created in /tmp.
Log in to Oracle Enterprise Manager and create an HA-enabled server pool. See Configuring Oracle VM Servers for High Availability for steps to enable high availability on server pools.
You can set up High Availability for Oracle VM to guarantee the availability of guest virtual machines if the Oracle VM server they are running on fails or restarts. When a virtual server is restarted or shut down, the guest virtual machines running on it are either restarted on, or migrated to, another virtual server.
Enabling High Availability mode for the virtual server pool allows all the Oracle VM servers in the pool to be clustered.
To enable High Availability, you will need the following configuration:
High Availability mode should be enabled for the virtual server pool.
Clustering configuration should be done for master server and other virtual servers in the server pool.
High Availability flag must be set for the guest virtual machines.
Steps to enable High Availability
When creating a server pool, in the Create Server Pool page, select Enable for the High Availability Mode field.

When creating a guest virtual machine, in the Create Guest Virtual Machine: Configure page, select Enable High Availability Mode check box.
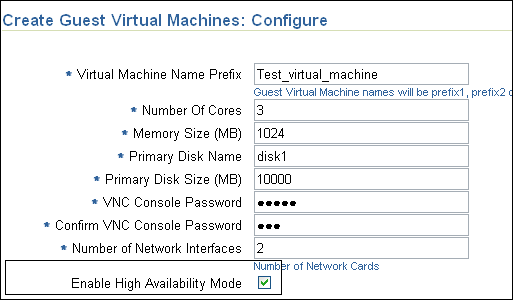
When editing a guest virtual machine, in the Edit Guest Virtual Machine page, select Enable High Availability Mode check box.
If High Availability is configured for both server pool and the guest virtual machine, if the virtual server is shutdown, the guest virtual machine will be stopped and restarted on another virtual server.
This section explains the advanced operations that can be performed in your virtualization environment. In particular, this section explains the following:
Cloning creates a copy of a guest virtual machine on the same server pool. When a guest virtual machine is cloned, the software on the source guest virtual machine is also copied onto the cloned guest virtual machine.
The following table describes the phases involved in the provisioning operation:
Table 10-8 Phases for Cloning Guest Virtual Machines
| Phase | Description |
|---|---|
 |
Select Server Pool Allows you to specify the number of guest virtual machines to be created. The new guest virtual machines will be associated with the same server pool as the guest virtual machine you are cloning. |
 |
Configure Allows you to configure the disk, network, agent and other details. |
 |
Schedule Allows you to specify the Schedule and Credentials for the provisioning activity. |
 |
Review Allows you to review the information you have provided for provisioning the guest virtual machine. |
Ensure that you meet the prerequisites described in the following sections:
Software component to create the guest virtual machine is available in the Software Library or any other location.
Guest virtual machine to be cloned must be in the Halted status.
During cloning, new guest virtual machines are created from a source guest virtual machine.
To clone a guest virtual machine, do the following:
In Virtualization Central, select the guest virtual machine you want to clone and select Action Guest VM Clone Guest VM. Ensure that it is in the Halted state. Click Go.
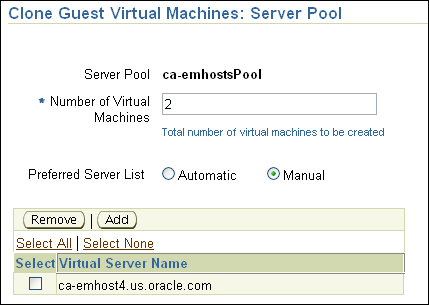
In the Clone Guest Virtual Machines: Server Pool page, specify the number of guest virtual machines to be created. The new guest virtual machines will be associated with the same server pool as the guest virtual machine you are cloning. You can also select the virtual server for the guest virtual machine manually or allow the server pool to automatically allocate the virtual server. Click Next.
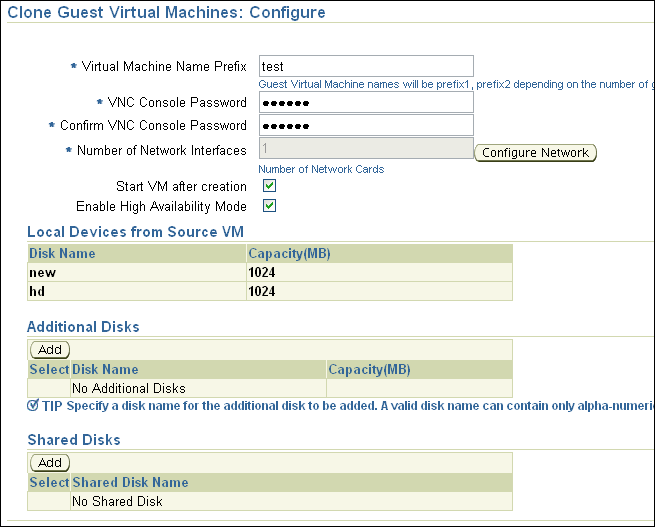
In the Clone Guest Virtual Machines: Configure page, configure the guest virtual machines by specifying the values in Table 10-9.
In the Clone Guest Virtual Machines: Schedule/Credentials page, provide a schedule for the provisioning and user credentials for the monitoring server and Virtual Server host. The credentials you specify for the Virtual Server host must have sudo privileges.
In the Clone Guest Virtual Machines: Review page, review the information you have provided and submit the job.
The cloned guest virtual machine will appear with the status Creating.. in Virtualization Central under the same server pool as the source guest virtual machine. The source guest virtual machine will appear with the status Creating.. in Virtualization Central. If you have selected the Start VM after creation option during cloning, the guest virtual machines will be started after the clone process.
Table 10-9 Clone Guest Virtual Machines
| Element | Description |
|---|---|
|
Virtual Machine Name Prefix |
Specify the prefix you want to assign to each guest virtual machine name you are creating. |
|
VNC Console Password |
Enterprise Manager Grid Control provides a VNC console to the newly created guest virtual machine. This is the VNC password to access the VNC console. |
|
Number of Network Interfaces |
Number of virtual network interfaces for this guest virtual machine will be the same as the source guest virtual machine. |
|
Start VM after creation |
Specify whether the guest virtual machine should be started automatically after it is created. |
|
Enable High Availability Mode |
When creating the guest virtual machine, if the "High Availability" flag is selected, this guest virtual machine will participate in the High Availability functionality. If its parent virtual server fails, this guest virtual machine will be auto-restarted on another Oracle VM server. |
|
Additional Disks |
Every guest virtual machine is created with at least one disk. Specify additional disks and their sizes. These disks will be added to the guest virtual machine. After the guest virtual machine is created, log in to the guest virtual machine and reformat and mount the additional disks. |
|
Shared Disks |
Oracle VM allows sharing of disks between multiple guest virtual machines. Specify a shared disk that the guest virtual machine can access. |
A guest virtual machine can be saved as a template in the Software Library or an external location and used for provisioning other guest virtual machines.
Saving a Guest Virtual Machine as a Template
In Virtualization Central, choose the guest virtual machine you want to save, select Action Guest VM, Save Guest VM as Template and click Go. Ensure that the guest virtual machine is in the Halted status.
In the Create Component: Describe page, specify the creation method as:
From Existing Guest VM to store an existing guest VM configuration details.
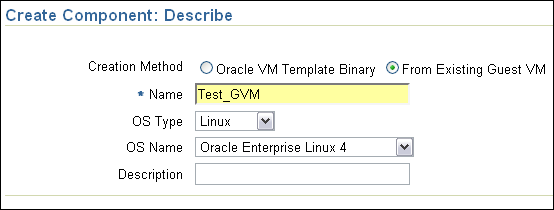
Specify the template name and OS details. Click Next.
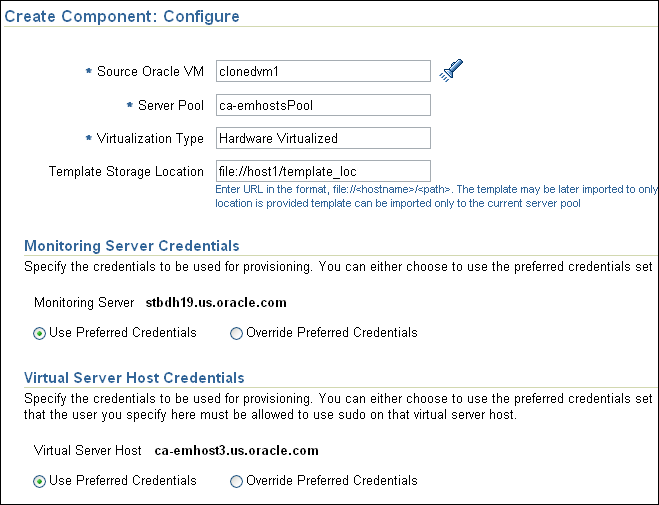
In the Create Component: Configure page, specify the external location to store the template. The template can then be imported to server pools that can access this location. Specify the monitoring server and virtual server credentials.
Click Next.
In the Create Component: Review page, review the information you have provided and click Submit.
The template will be saved in the location you specified. The template saved will be imported to the server pool to which the Halted guest virtual machine belongs, you can view the imported template in the Server Pool Resources page.
Enterprise Manager Grid Control allows you to provision Oracle VM server software on bare metal machines. For information about bare metal provisioning, see Provisioning Linux.
During bare metal provisioning of Oracle VM server, the Management Agent will not be installed. After completing bare metal provisioning, register the Oracle VM server with the server pool using the steps explained in Registering Virtual Servers.
If you are using Oracle VM Manager to manage Oracle VM servers, guest virtual machines, and resources, and want to move to Enterprise Manager to manage your Oracle VM systems, follow these steps:
Delete the virtual server from Oracle VM Manager. For information about deleting a virtual server from Oracle VM Manager, see Oracle VM Manager User's Guide available at http://download.oracle.com/docs/cd/E11081_01/doc/doc.21/e10901/toc.htm
Shutdown the virtual server.
Create virtual server pool in Enterprise Manage. For information about creating virtual server pools, see Creating Server Pools.
Register virtual servers with the server pool. For information about registering virtual servers, see Registering Virtual Servers.
Create guest virtual machines. For information about creating guest virtual machines, see Creating Guest Virtual Machines.