| Oracle TopLink Developer's Guide 10g Release 3 (10.1.3) B13593-01 |
|
 Previous |
 Next |
| Oracle TopLink Developer's Guide 10g Release 3 (10.1.3) B13593-01 |
|
 Previous |
 Next |
Using TopLink Workbench, you can manage the sessions contained by a session broker.
|
Note: Add only sessions of the same type to any given session broker. Do not mix sessions of different types within a session broker. |
To add sessions to, remove sessions from, or rename sessions in a session broker, use this procedure:
Select a session broker in the Navigator. Its properties appear in the Editor.
Click the General tab. The General tab appears.
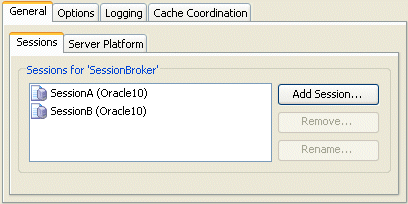
Click the Sessions subtab. The Sessions subtab appears.
Figure 82-1 General Tab, Sessions Subtab, Sessions for SessionBroker Options

To manage the sessions in this session broker, choose one of the following:
To remove a session, select the session in the Sessions tab's list and click Remove.
To rename a session, select the session in the Sessions tab's list and click Rename. The Rename dialog box appears. Enter a new name and click OK.
To add a session, click Add Session. The Sessions dialog box appears showing a list of all the sessions currently configured in the session configuration that owns this session broker.
Check the sessions in the Session dialog that you want to add to the session broker and click OK.