|
Oracle® Application Development Framework Developer's Guide
10g Release 3 (10.1.3) B25386-01 |
|
 Previous |
 Next |
|
Oracle® Application Development Framework Developer's Guide
10g Release 3 (10.1.3) B25386-01 |
|
 Previous |
 Next |
Web services allow applications to exchange data and information through defined application programming interfaces. SSL (Secure Sockets Layer) provides secure data transfer over unreliable networks, but SSL only works point to point. Once the data reaches the other end, the SSL security is removed and the data becomes accessible in its raw format. A complex web service transaction can have data multiple messages being sent to different systems, and SSL cannot provide the end-to-end security that would keep the data invulnerable to eavesdropping.
Any form of security for web services has to address the following issues:
The authenticity and integrity of data.
Data privacy and confidentiality.
Authentication and authorization.
Non-repudiation.
Denial of service attacks.
The WS-Security specification unifies multiple security technologies to make secure web services interoperable between systems and platforms. The specification can be viewed at http://docs.oasis-open.org/wss/2004/01/oasis-200401-wss-soap-message-security-1.0.pdf.
WS-Security addresses the following aspects of web services security issues:
Authentication and Authorization
The identity of the sender of the data is verified, and the security system ensures that the sender has privileges to perform the data transaction.
The type of authentication can be a basic username password pair transmitted in plain text, or trusted X509 certificate chains. SAML assertion tokens can also be used to allow the client to authenticate against the service, or allow it to participate in a federated SSO environment, where in authenticated details are be shared between domains in a vendor independent manner
Data Authenticity, Integrity and Non-Repudation
XML digital signatures, which use industry standard messages, digest algorithms to digitally sign the SOAP message.
Data Privacy
XML encryption that uses industry standard encryption algorithms to encrypt the message.
Denial of Service Attacks
Defines XML structures to time stamp the SOAP message. The server uses the time stamp to invalidate the SOAP message after a defined interval.
Throughout this section the "client" is the web service data control, which sends SOAP messages to a deployed web service. The deployed web service may be:
a web service deployed on OC4J for testing purposes.
web service running on Oracle Application Server.
A web service running anywhere in the world that is accessible through the Internet
An ADF 10.1.3 Web Services data control can be configured for message level security using either Java Key Store (JKS), or the Oracle Wallet. For information on setting up and using Oracle Wallet, see the Oracle Technology Network at www.oracle.com/technology.This section describes:
Creating a keystore using the J2SE 1.4 Keytool utility
Building a keystore private/public key pairs, which are used for encryption and signing.
How to obtain a Certificate to issue digital signatures from a root certificating authority.
How to import the Certificate into the keystore.
How to export the Certificate with the public key for encryption.
This is illustrated by creating two keystores, one to be configured on the server side, and the other on the client side (the data control side).
|
Note: The steps outlined in this section for requesting digital certificates is for test purposes only. Deployments intending to use Web Services data control with digital signatures enabled must ensure that trusted certificates are generated compliant to the security policies of the deployment environment. |
To create a public private key pair that can be used by the client for encryption and signing, at the command prompt run the following:
Example 21-1 Command to Create a Keystore
keytool -genkey -alias clientenckey -keypass clientsignkey -keyalg RSA -sigalg SHA1withRSA -keystore client.jks -storepass welcome
The keytool utility asks questions to determine the distinguished name (DN), which is a unique identifier and consists of the following components:
CN= common name. This must be a single name without spaces or special characters.
OU=organizational unit
O=organization name
L=locality name
S=state name
C=country, a two letter country code
When you accept the values at the end, a keystore file client.jks is created in the current directory. It contains a single key pair with the alias clientenckey which can be used to encrypt the SOAP requests from the data control.
Next, create a key pair for digitally signing the SOAP requests made by the data control. At the command prompt run the command again, but use clientsignkey for the alias of the signing key pair.
To list the key entries in the keystore, run the following:
Example 21-2 Command to List Key Pairs in the Keystore
keytool -list -keystore client.jks -storepass welcome
Repeat the commands to create a keystore for the server side, and use serverenckey for the encryption key pair, and serversignkey for the signing key pair.
The keytool, by default, generates a self-signed certificate, that is a certificate whose issuer is the same as the generator of the key.
If your public key is to be distributed to the outside world, to allow verification of the digital signatures you have issued, then a trusted Certificate Authority (CA) must issue a certificate vouching your identity on your public key. To do this, create a Certificate request file for the signature key pair you have created and submit the request file to a CA.
At the command prompt, run the following:
Example 21-3 Command to Create a Certificate Request File
keytool -certreq -file clientsign.csr -alias clientsignkey -keystore client.jks -keypass clientsignkey -storepass welcome
This generates a certificate request in a file called clientsign.csr for the public key aliased by clientsignkey.
When you are developing your application, you can use a CA such as Verisign to request trial certificates. Go to www.verisign.com, navigate to Free SSL Trial Certificate and create a request. You must enter the same DN information you used when you created the keystore. Verisign's certificate generation tool will ask you to paste the contents of the certificate request file generated by the keytool (in this case, clientsign.csr). Once all the information is correctly provided, the certificate will be sent to the email ID you have provided, and you have to import it into the keystore.
Open the contents of the certificate in a text editor, and save the file as clientsign.cer.
You also have to import the root certificate issued by Verisign into the keystore. The root certificate is needed to complete the certificate chain up to the issuer.
The root certificate vouches the identity of the issuer. Follow the instructions in the email you received from Verisign to access the root certificate, and paste the contents of the root certificate into a text file called root.cer.
Once you have the root.cer and clientsign.cer files created, run the following command to import the certificates into your keystore:
Example 21-4 Importing the Root Certificate
keytool -import -file root.cer -keystore client.jks -storepass welcome
Import your public key certificate next.
Example 21-5 Importing the Public Key Certificate
keytool -import -file clientsign.cer -alias clientsignkey -keypass clientsignkey -keystore client.jks -storepass welcome
Perform the same commands steps to set up the trusted certificate chain in the server keystore.
Once the certificate chains are set up, the client and sever are ready to issue digitally signed SOAP requests.
|
Note: Trusted certificates are mandatory when issuing digital signatures on the SOAP message. You cannot issue digital signatures with self-signed/untrusted certificates in your keystore. |
The server must export its public key to the client so the client can encrypt the data it sends to the server. The server can then use its corresponding private key to decrypt the data. The server's public key certificate is imported into the client keystore.
At the command prompt, run the following:
Example 21-6 Command to Export the Server's Public Key Certificate
keytool -export -file serverencpublic.cer -alias serverenckey -keystore server.jks -storepass welcome
In this example, clientencpublic.cer contains the public key certificate of the client's encryption key. To import this certificate in the server's keystore, run the following:
Example 21-7 Command to Import the Public Key Certificate
keytool -import -file serverencpublic.cer -alias serverencpublic -keystore client.jks -storepass welcome
Similarly, the client must export its public key so that it can be imported into the server's keystore.
Example 21-8 Command to Import the Public Key Certificate
keytool -import -file clientencpublic.cer -alias clientencpublic -keystore server.jks -storepass welcome
Example 21-9 Command to Import the Public Key Certificate
keytool -import -file clientencpublic.cer -alias clientencpublic -keystore server.jks -storepass welcome
The server and client keystores are now ready to be used to configure security for the web service data control.
Once you have a web services data control in a JDeveloper project, you can define security using the Data Control Security wizard.
To invoke the data control security wizard:
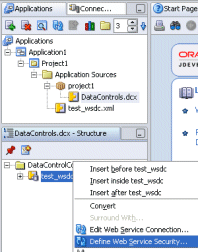
Select the web service data control in the Application Navigator.
In the Structure window, right-click the web service data control, and choose Define Web Service Security.
Consult the following sections for more information, or click F1 or Help in the wizard for detailed information about a page of the wizard.
Figure 21-1 Invoking the Data Control Security wizard

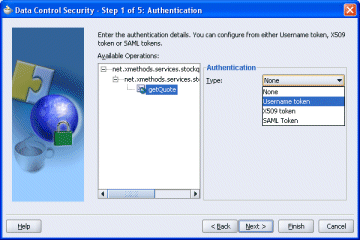
WS-Security allows for service level authentication by using either username tokens or binary tokens. In addition to these, the web service client can issue SAML assertion tokens that can be used for server side authentication, or for participation in a federated SSO environment.
Figure 21-2 Select the type of authentication

Oracle's WS-Security implementation is integrated with JAZN (JAAS) to achieve the authentication. How authentication using a certificate is done depends on the implementation and integration with the platform security system. This section discusses configuring OC4J as the server where the application is deployed.
|
Note: .When the application is deployed to Oracle Application Server, the administrator should use the security editing tool to add users to the security system, grouping them in the appropriate role and granting appropriate privileges. This example of manually editing system-jazn-data.xml is just for testing, and not recommended for working applications. |
For Username Token authentication, username/password pair must be a trusted user entry in the JAZN repository .
For X509 Token authentication, the CN (Common Name) on whom the Certificate is issued must be a trusted user in the JAZN repository.
For SAML authentication, the user must be a valid user in the JAZN repository.
To edit the JAZN repository:
Open <jdev_install>/J2EE/home/system-jazn-data.xml and enter the authentication details. For example, for X509 authentication, make an entry under the <users> section similar to: <user> <name>King</name> <display-name>OC4J Administrator</display-name> <description>OC4J Administrator</description> <credentials>{903}/LptVQLDeA5sgZFLL5TKlr/qjVFPxB42</credentials></user>
Username tokens provide basic authentication of a username/password pair. The passwords can be transmitted as plain text or digest.
|
Note: This is not the same as HTTP basic or digest authentication. The concept is similar, but it differs in that the recipient of HTTP authentication is the HTTP server, whereas for the web service data control, the username tokens are passed with the message, and the recipient is the target web service. |
Oracle's WS-Security implementation is integrated with JAZN (JAAS) to achieve the authentication. The username/password pair must be a trusted user entry in the JAZN repository.
To use username tokens for authentication:
In the Authentication page of the wizard, under Available Operations, select one or more ports or operations to apply the authentication to.
Select the authentication type as the Username Token.
Enter the remaining information required for username authentication.
An X509 certificate issued by a trusted CA is a binary security token which can be used to authenticate the client. The client sends its X509 certificate with a digital signature, which is used by the server for authentication. The X509 certificate chain associated with signature key is used for authentication.
You must have the keystore file, with the root certificate of the CA, installed on the server.
|
Note: An X509 certificate can only be configured at port level, unlike the other authentication types that can be configured at port or operation level. |
To use X509 certificate authentication:
In the Authentication page of the wizard, select the authentication type as the X509 Token.
In the Keystore page of the wizard, and specify the location of the keystore file, and enter the signature key alias and password.
SAML assertion tokens can be used to allow client to authenticate against the web service, or allow the client to participate in a federated SSO environment, where authenticated details can be shared between domains in a vendor independent manner.
|
Note: SAML Assertions will not be issued if the user identity cannot be established by JAZN. |
To use SAML authentication:
In the Authentication page of the wizard, select the authentication type as the SAML Token.
The Subject Name is the username name against which the SAML Assertions will be issued.
You can choose Confirmation method as SENDER-VOUCHES or SENDER-VOUCHES-UNSIGNED:
ISENDER-VOUCHES (default). The SAML tokens must be digitally signed. This is the preferred method to issue SAML tokens. If you choose this confirmation technique, then you must configure a keystore and enter keystore and signature key information on the Keystore page of the wizard.
SENDER-VOUCHES-UNSIGNED. The SAML tokens are transmitted without any digital signatures. If you choose this confirmation technique, then you need not configure a keystore and signature key.
You can configure digital signatures on the outgoing SOAP messages, and verify digital signatures on the incoming message from the web service your application is contacting. You can also enforce an expiration window for the digital signatures.
You can set a digital signature on the outgoing SOAP message at port or operation level in the Message Integrity page of the wizard, and verify the digital signatures from the incoming message of the web service.
To sign the SOAP request, and verify the signature of the SOAP response:
In the Message Integrity page of the wizard, select the appropriate options.
In the Keystore page of the wizard, and specify the location of the keystore file, and enter the signature key alias and password.
When you create a web service in JDeveloper, you can set security options in the Web Services Editor. These are then applied at the server side once the web service is deployed. Refer to the JDeveloper online help for complete information.
Before deploying the web service, run the editor and configure encryption and decryption details on the web service. Ensure that you have specified the client's (that is, the data control's) public key to be used for encryption.
Figure 21-4 Set Encryption and Decryption

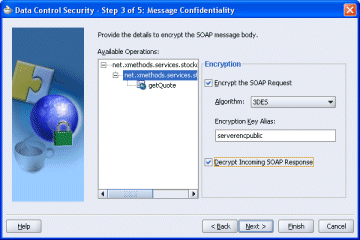
You can encrypt and outgoing SOAP message at port or operation level in the Message Confidentiality page of the wizard, and decrypt the incoming message from the web service.
To encrypt the SOAP request, and decrypt the SOAP response:
In the Message Confidentiality page of the wizard, select the appropriate options. The encryption algorithm you select must be the same as that configured on the server side when the web service was deployed.
Enter the server's public key alias to allow the data control to encrypt the key details using the server's public key. In this example, serverencpublic is the server's public key certificate that imported in the key store configuration.
If the web service uses incoming message encryption, select Decrypt Incoming SOAP Response.
In the Keystore page of the wizard, and specify the location of the keystore file, and enter the encryption key alias and password.
How to Create a Keystore described setting up keystores for the client (the web service data control) and for the server (a deployed web service). In the Configure Key Store page of the Data Control Security wizard you enter the information needed for the keystore to be used for data control security.
The final stage of configuring WS-Security for a data control based on a web service is to specify the keystore details. Enter the information to access the client keystore here, and when the wizard is finished the keys configured in the store will be available for signatures and encryption for all requests generated by the data control and all responses processed by the data control.
To set key store access information:
In the Configure Key Store page of the wizard, enter the appropriate values.