|
Oracle® Application Server Installation Guide
10g Release 3 (10.1.3) for Microsoft Windows B14438-01 |
|
 Previous |
 Next |
|
Oracle® Application Server Installation Guide
10g Release 3 (10.1.3) for Microsoft Windows B14438-01 |
|
 Previous |
 Next |
This chapter describes how to perform an advanced installation of Oracle Application Server. The following topics are covered:
During the Advanced Installation, you have four installation choices: J2EE Server and Process Management, Web Server and Process Management, Integrated Web Server, J2EE Server and Process Management, and Oracle TopLink.
The following components are installed in a J2EE Server and Process Management installation:
Oracle Containers for J2EE
This component provides a complete Java 2 Enterprise Edition (J2EE) environment for developing Java applications.
Oracle Enterprise Manager 10g Application Server Control
This component is used for Web-based management of Oracle Application Server.
Oracle Process Manager and Notification Server
The following components are installed in a Web Server and Process Management installation:
Oracle HTTP Server
This is the Web server component of Oracle Application Server.
Oracle Process Manager and Notification Server
An Integrated Web Server, J2EE Server and Process Management installation contains the components from both the J2EE Server and Process Management and Web Server and Process Management installations.
In an Oracle TopLink installation, only Oracle TopLink Foundation Library is installed.
This section describes the procedure for the advanced installation of Oracle Application Server. It contains the following topics:
Section 5.2.2, "Installing J2EE Server and Process Management"
Section 5.2.3, "Installing Web Server and Process Management"
Section 5.2.4, "Installing Integrated Web Server, J2EE Server and Process Management"
Before you begin installing Oracle Application Server, ensure that you have read both Chapter 2, "Requirements" and Chapter 3, "Things You Should Know Before Starting the Installation". These chapters contain important information with which you must be familiar before you begin the installation so you can avoid potential problems during the installation.
Table 5-1 provides a brief summary of the steps necessary to install J2EE Server and Process Management with an advanced installation.
Table 5-1 Steps for Installing J2EE Server and Process Management
|
|
Screen | Action |
|---|---|---|
|
1. |
-- |
Start Oracle Universal Installer. For more information, refer to Section 3.7, "Starting theOracle Universal Installer". |
|
2. |
Oracle Application Server 10g 10.1.3.0.0 Installation |
Specify the Oracle Home in the Installation Directory field. Select Advanced Installation Mode. Click Next. For more information, refer to Section 5.3.1, "Oracle Application Server 10g 10.1.3.0.0 Installation Screen". |
|
3. |
Select Installation Type |
Select J2EE Server and Process Management. Click Next. For more information, refer to Section 5.3.2, "Select Installation Type Screen". |
|
4. |
Specify Port Configuration Options |
Select whether you want to configure ports automatically or manually by specifying the location of a port configuration file. Click Next. For more information, refer to Section 5.3.3, "Specify Port Configuration Options Screen". |
|
5. |
Administration Instance Settings |
Select Configure this as an Administration OC4J instance if you would like to run Application Server Control on this instance. Click Next. For more information, refer to Section 5.3.4, "Administration Instance Settings". |
|
6. |
Administration Settings |
Specify the Oracle Application Server instance name and Specify the default Oracle Containers for J2EE instance name. Click Next. For more information, refer to Section 5.3.5, "Administration Settings Screen". |
|
7. |
Cluster Topology Configuration |
Select if you would like to configure this instance to be part of an Oracle Application Server cluster topology. If you select Configure this OC4J instance to be part of an Oracle Application Server cluster topology, specify the IP Address and Port, and select Access this OC4J Instance from a separate Oracle HTTP Server if you want the default web site to run in AJP protocol mode. Click Next. For more information, refer to Section 5.3.7, "Cluster Topology Configuration Screen - J2EE Server and Process Management Install Type". |
|
8. |
Summary |
Verify that the installation parameters shown on the screen are correct. Click Install. For more information, refer to Section 5.3.10, "Summary Screen". |
|
9. |
Install |
None. This screen shows the progress of the installation. For more information, refer to Section 5.3.11, "Install Screen". |
|
10. |
Configuration Assistants |
None, unless you want to stop the installation of a particular configuration assistant. For more information, refer to Section 5.3.12, "Configuration Assistants Screen". |
|
11. |
End of Installation |
None. This screen tells you whether or not your installation was successful, and provides a link to the product release notes. For more information, refer to Section 5.3.13, "End of Installation Screen". |
Table 5-2 provides a brief summary of the steps necessary to install Web Server and Process Management with an advanced installation.
Table 5-2 Steps for Installing Web Server and Process Management
|
|
Screen | Action |
|---|---|---|
|
1. |
-- |
Start Oracle Universal Installer. For more information, refer to Section 3.7, "Starting theOracle Universal Installer". |
|
2. |
Oracle Application Server 10g 10.1.3.0.0 Installation |
Specify the Oracle Home in the Installation Directory field. Select Advanced Installation Mode. Click Next. For more information, refer to Section 5.3.1, "Oracle Application Server 10g 10.1.3.0.0 Installation Screen". |
|
3. |
Select Installation Type |
Select Web Server and Process Management. Click Next. For more information, refer to Section 5.3.2, "Select Installation Type Screen". |
|
4. |
Specify Port Configuration Options |
Select whether you want to configure ports automatically or manually by specifying the location of a port configuration file. Click Next. For more information, refer to Section 5.3.3, "Specify Port Configuration Options Screen". |
|
5. |
Specify Instance Name |
Specify the Oracle Application Server instance name. Click Next. For more information, refer to Section 5.3.6, "Specify Instance Name Screen". |
|
6. |
Cluster Topology Configuration |
Select if you would like to configure this instance to be part of an Oracle Application Server cluster topology. If you select Configure this HTTP Server instance to be part of an Oracle Application Server cluster, specify the IP Address and Port. Click Next. For more information, refer to Section 5.3.8, "Cluster Topology Configuration Screen - Web Server and Process Management Install Type". |
|
7. |
Summary |
Verify that the installation parameters shown on the screen are correct. Click Install. For more information, refer to Section 5.3.10, "Summary Screen". |
|
8. |
Install |
None. This screen shows the progress of the installation. For more information, refer to Section 5.3.11, "Install Screen". |
|
9. |
Configuration Assistants |
None, unless you want to stop the installation of a particular configuration assistant. For more information, refer to Section 5.3.12, "Configuration Assistants Screen". |
|
10. |
End of Installation |
None. This screen tells you whether or not your installation was successful, and provides a link to the product release notes. For more information, refer to Section 5.3.13, "End of Installation Screen". |
Table 5-3 provides a brief summary of the steps necessary to install Integrated Web Server, J2EE Server and Process Management with an advanced installation.
Table 5-3 Steps for Installing Integrated Web Server, J2EE Server and Process Management
|
|
Screen | Action |
|---|---|---|
|
1. |
-- |
Start Oracle Universal Installer. For more information, refer to Section 3.7, "Starting theOracle Universal Installer". |
|
2. |
Oracle Application Server 10g 10.1.3.0.0 Installation |
Specify the Oracle Home in the Installation Directory field. Select Advanced Installation Mode. Click Next. For more information, refer to Section 5.3.1, "Oracle Application Server 10g 10.1.3.0.0 Installation Screen". |
|
3. |
Select Installation Type |
Select Integrated Web Server, J2EE Server and Process Management. Click Next. For more information, refer to Section 5.3.2, "Select Installation Type Screen". |
|
4. |
Specify Port Configuration Options |
Select whether you want to configure ports automatically or manually by specifying the location of a port configuration file. Click Next. For more information, refer to Section 5.3.3, "Specify Port Configuration Options Screen". |
|
5. |
Administration Instance Settings |
Select Configure this as an Administration OC4J instance if you would like to run Application Server Control on this instance. Click Next. For more information, refer to Section 5.3.4, "Administration Instance Settings". |
|
6. |
Administration Settings |
Specify the Oracle Application Server instance name and Specify the default Oracle Containers for J2EE instance name. Click Next. For more information, refer to Section 5.3.5, "Administration Settings Screen". |
|
7. |
Cluster Topology Configuration |
Select if you would like to configure this instance to be part of an Oracle Application Server cluster topology. If you select Configure this instance to be part of an Oracle Application Server cluster topology, specify the IP Address and Port. Click Next. For more information, refer to Section 5.3.9, "Cluster Topology Configuration Screen - Integrated Web Server, J2EE Server and Process Management Install Type". |
|
8. |
Summary |
Verify that the installation parameters shown on the screen are correct. Click Install. For more information, refer to Section 5.3.10, "Summary Screen". |
|
9. |
Install |
None. This screen shows the progress of the installation. For more information, refer to Section 5.3.11, "Install Screen". |
|
10 |
Configuration Assistants |
None, unless you want to stop the installation of a particular configuration assistant. For more information, refer to Section 5.3.12, "Configuration Assistants Screen". |
|
11. |
End of Installation |
None. This screen tells you whether or not your installation was successful, and provides a link to the product release notes. For more information, refer to Section 5.3.13, "End of Installation Screen". |
Table 5-4 provides a brief summary of the steps necessary to install Oracle TopLink with an advanced installation.
Table 5-4 Steps for Installing Oracle TopLink
|
|
Screen | Action |
|---|---|---|
|
1. |
-- |
Start Oracle Universal Installer. For more information, refer to Section 3.7, "Starting theOracle Universal Installer". |
|
2. |
Oracle Application Server 10g 10.1.3.0.0 Installation |
Specify the Oracle Home in the Installation Directory field. Select Advanced Installation Mode. Click Next. For more information, refer to Section 5.3.1, "Oracle Application Server 10g 10.1.3.0.0 Installation Screen". |
|
3. |
Select Installation Type |
Select Oracle TopLink. Click Next. For more information, refer to Section 5.3.2, "Select Installation Type Screen". |
|
4. |
Summary |
Verify that the installation parameters shown on the screen are correct. Click Install. For more information, refer to Section 5.3.10, "Summary Screen". |
|
5. |
Install |
None. This screen shows the progress of the installation. For more information, refer to Section 5.3.11, "Install Screen". |
|
6. |
End of Installation |
None. This screen tells you whether or not your installation was successful, and provides a link to the product release notes. For more information, refer to Section 5.3.13, "End of Installation Screen". |
This section describes the various Oracle Universal Installer (OUI) installation screens for Oracle Application Server 10g Release 3 (10.1.3). It contains the following sections:
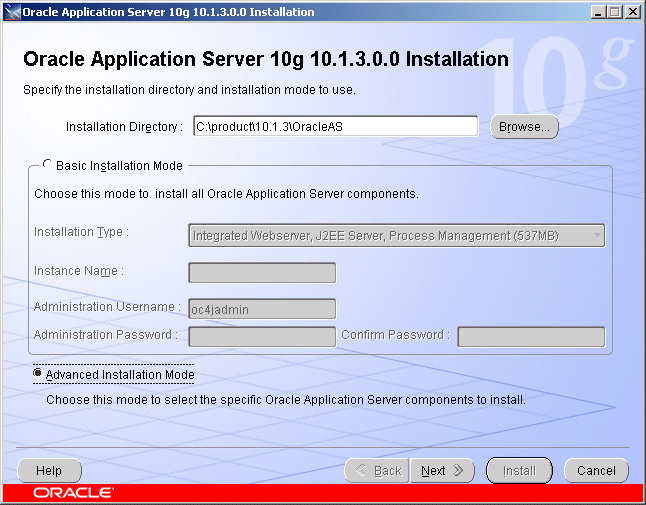
This is the first screen in the installation process. You need to specify the installation directory (or Oracle home) and whether you want to perform a basic or advanced installation.
Figure 5-1 Oracle Application Server 10g 10.1.3.0.0 Installation Screen
Installation Directory
Specify the full path of the installation directory or Oracle home. This is the directory where you want to install the software. For more information about the Oracle home, refer to Section 3.1, "Oracle Home Directory".
Select Basic or Advanced Installation Mode
In this chapter you are performing an advanced installation of Oracle Application Server, so select Advanced Installation Mode and click Next.
If you want to perform a basic installation, see Chapter 4, "Basic Installation".
After you click the Next button, the following warning appears:
Click Yes to continue with the advanced installation.
Select the product you want to install, then click Next.
Figure 5-3 Oracle Universal Installer: Select Installation Type Screen
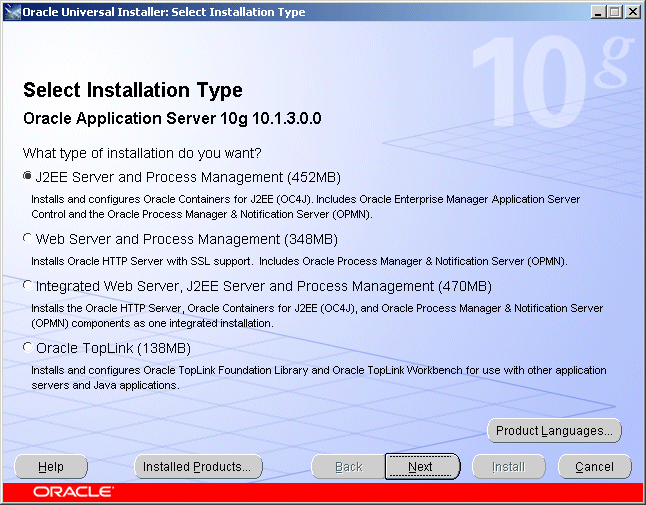
To learn what components are installed with the different installation types, see Section 5.1, "What Components Are Installed?".
Select the method in which you want to configure ports.
Figure 5-4 Oracle Universal Installer: Specify Port Configuration Options Screen
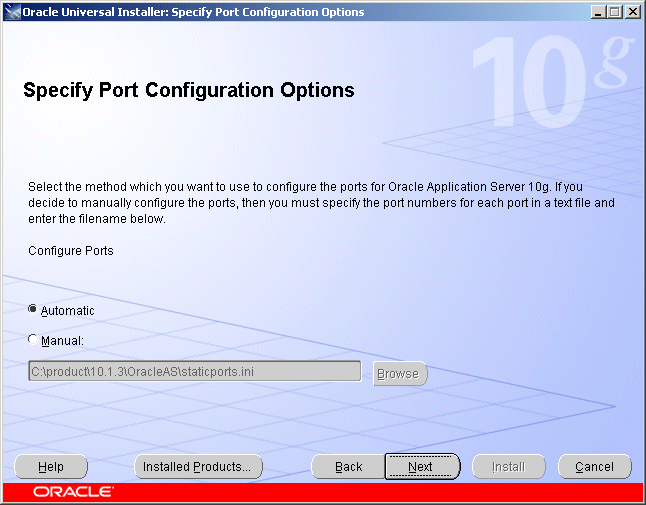
Click Automatic if you want to use all default port numbers. Refer to Appendix B for a list of all the default port numbers and ranges.
Click Manual if you want to customize your port numbers. You must supply the full path and file name to an existing port configuration file containing the port numbers you want to use for each component. Typically, this port configuration file is called staticports.ini, although any name is valid as long as the format of the file is correct. Refer to Section 2.4.4, "Using Custom Port Numbers (the "Static Ports" Feature)" for more information about the staticports.ini file that is shipped with the product.
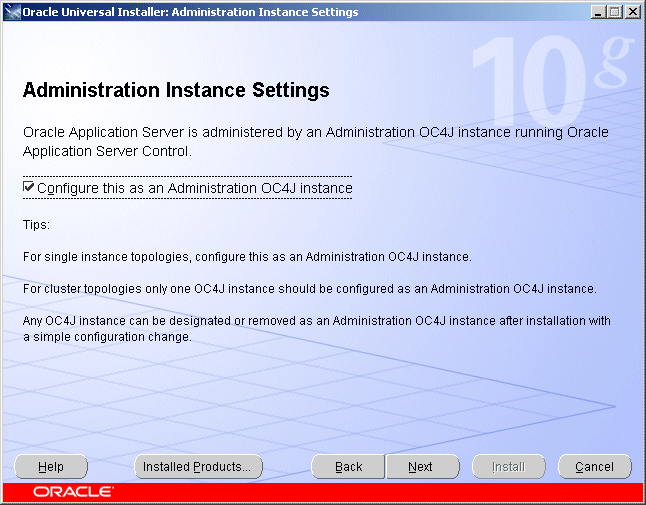
Select whether you would like to run Application Server Control on this instance.
Figure 5-5 Oracle Universal Installer: Administration Instance Settings Screen
Configure this as an Administration OC4J instance
Select this option if you want to run Application Server Control on this system to provide management capabilities.
If you are using a single instance topology, you should select this option to be able to manage the instance.
If you are using a cluster topology, you should select this option if you want this instance to administer the cluster using Application Server Control. In a cluster topology, only one instance should be configured as an Administration OC4J instance. Note that the Administration OC4J instance for the cluster does not have to be the first installed node.
If you do not select Configure this as an Administration OC4J instance, then Application Server Control will be configured to not run on this system. This Application Server instance will need to be managed by Application Server Control running on another OC4J instance within the cluster topology. You can configure the Application Server Control to run on this instance following installation if required. See "Enabling Remote Management by Setting Administrator Credentials" in the Oracle Application Server Administrator's Guide for details.
Specify the Oracle Application Server instance name, oc4jadmin password, and the OC4J instance name.
Figure 5-6 Oracle Universal Installer: Administration Settings Screen
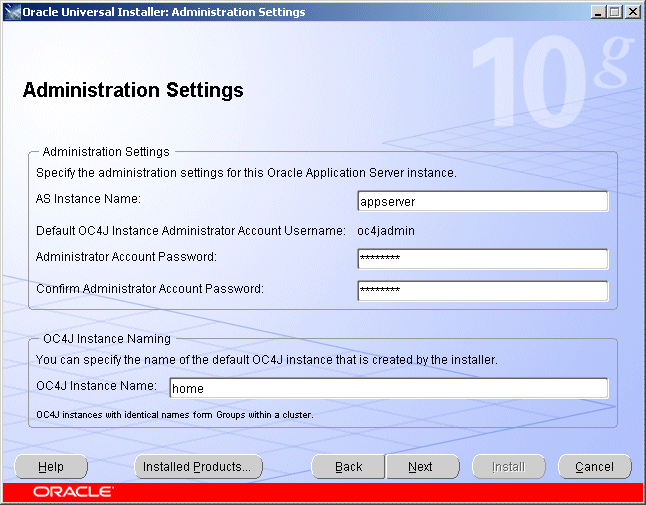
AS Instance Name
The AS Instance Name uniquely identifies this Oracle Application Server instance.
For more information about instance names, see Section 3.3, "Oracle Application Server Instances and Instance Names".
Default OC4J Instance Administrator Account Username
The administrative username for Oracle Application Server instances is set to oc4jadmin and cannot be changed. To manage Oracle Application Server instances using Enterprise Manager, log in as the oc4jadmin user.
For more information about the oc4jadmin user, see Section 3.4, "The oc4jadmin User and Restrictions on its Password".
Administrator Account Password and Confirm Administrator Account Password
On a host, you can install multiple Oracle Application Server instances, each with its own unique instance name, but the name of the administrative user is oc4jadmin for all instances. You can specify a different password for the oc4jadmin user for each instance.
For more information about the oc4jadmin password, see Section 3.4, "The oc4jadmin User and Restrictions on its Password".
OC4J Instance Name
The OC4J instance name identifies the default OC4J instance created by the installer.
OC4J instance names can consist only of the alphanumeric characters (A-Z, a-z, 0-9) and the underscore character (_).
There is no maximum length for an OC4J instance name.
This screen only appears if you select the Web Server and Process Management option on the Select Installation Type screen shown in Figure 5-3.
Figure 5-7 Oracle Universal Installer: Specify Instance Name Screen
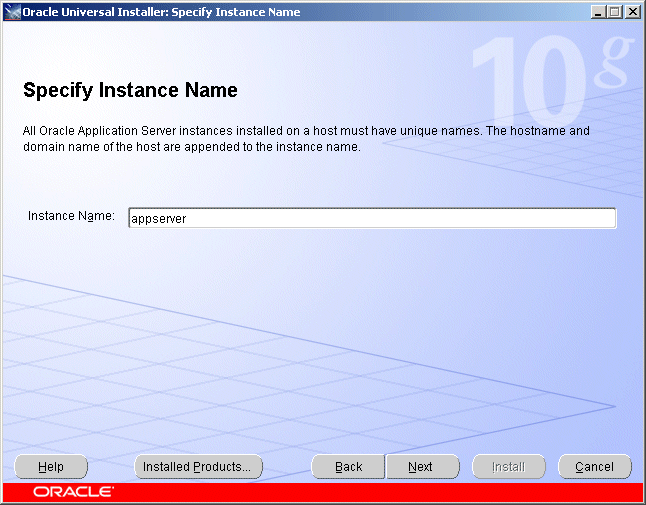
Instance Name
Specify the Oracle Application Server instance name. The instance name uniquely identifies this Oracle Application Server instance.
For more information about instance names, see Section 3.3, "Oracle Application Server Instances and Instance Names".
Select whether you would like to configure this instance to be part of an Oracle Application Server cluster topology.
Figure 5-8 Oracle Universal Installer: Cluster Topology Configuration (J2EE)
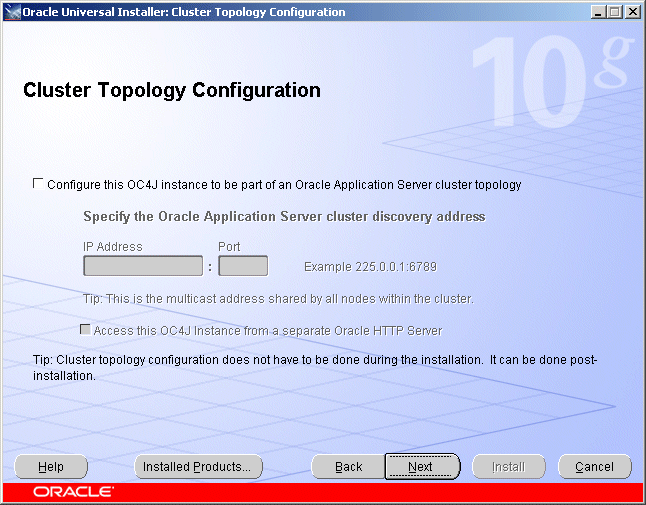
Configure this OC4J instance to be part of an Oracle Application Server cluster topology
Select this option if you would like to configure this instance to be part of an Oracle Application Server cluster topology. You may also configure the cluster topology following installation. See Section 7.4, "Configuring OracleAS Clusters" for details.
Specify the Oracle Application Server cluster discovery address
Specify the IP Address and the Port for the multicast address shared by all the nodes in the cluster.
|
Note:
|
If you are adding an instance to an existing cluster and do not know the multicast address, find the <discover> element in the opmn.xml file on an Oracle Application Server instance in the topology. The <discover> element should appear like this:
<notification-server>
  <topology>
    <discover list="*225.0.0.20:8001"/>
  </topology>
...
</notification-server>
In this example, the IP address is 225.0.0.20 and the port is 8001.
Access this OC4J Instance from a separate Oracle HTTP Server
Select this option if you want the OC4J instance to accept requests from an Oracle HTTP Server instance. If you select this option, then the OC4J instance will be configured so that its default web site is running in AJP protocol mode and accepts requests from mod_oc4j running in Oracle HTTP Server.
If you do not select this option, the OC4J instance will listen for requests from browser clients using its own HTTP listener. The OC4J instance will be configured so that its default web site is running in HTTP protocol mode and can be directly accessed from browser clients.
You can change how this OC4J instance is accessed following installation. See "Configuring Multicast Discovery with opmnctl" in the Oracle Containers for J2EE Configuration and Administration Guide.
Select whether you would like to configure this instance to be part of an Oracle Application Server cluster topology.
Figure 5-9 Oracle Universal Installer: Cluster Topology Configuration (Web Server)
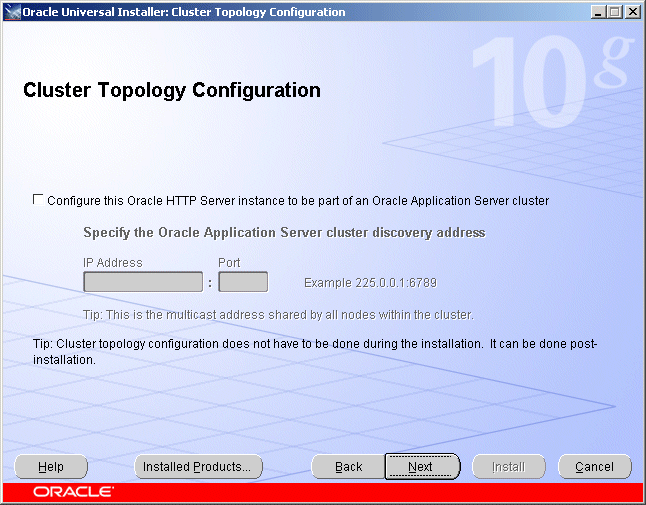
Configure this Oracle HTTP Server instance to be part of an Oracle Application Server cluster
Select this option if you would like to configure this instance to be part of an Oracle Application Server cluster. You may also configure the cluster following installation. See Section 7.4, "Configuring OracleAS Clusters" for details.
Specify the Oracle Application Server cluster discovery address
Specify the IP Address and the Port for the multicast address shared by all the nodes in the cluster.
|
Note:
|
If you are adding an instance to an existing cluster and do not know the multicast address, find the <discover> element in the opmn.xml file on an Oracle Application Server instance in the topology. The <discover> element should appear like this:
<notification-server>
  <topology>
    <discover list="*225.0.0.20:8001"/>
  </topology>
...
</notification-server>
In this example, the IP address is 225.0.0.20 and the port is 8001.
Select whether you would like to configure this instance to be part of an Oracle Application Server cluster topology.
Figure 5-10 Oracle Universal Installer: Cluster Topology Configuration (Integrated)
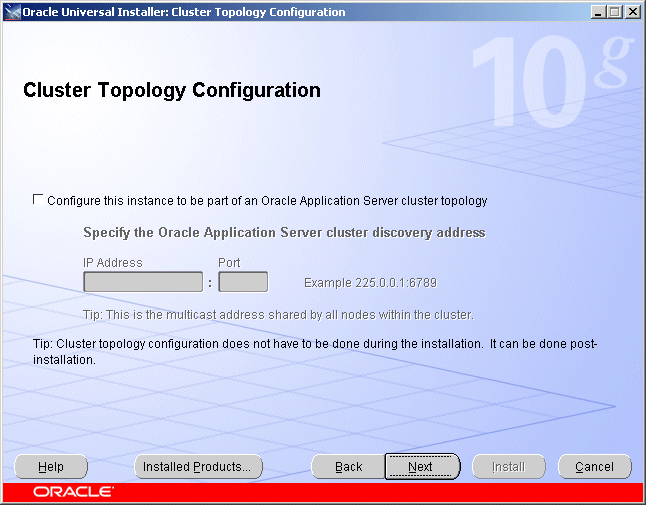
Configure this instance to be part of an Oracle Application Server cluster topology
Select this option if you would like to configure this instance to be part of an Oracle Application Server cluster topology. You may also configure the cluster topology following installation. See Section 7.4, "Configuring OracleAS Clusters" for details.
Specify the Oracle Application Server cluster discovery address
Specify the IP Address and the Port for the multicast address shared by all the nodes in the cluster.
|
Note:
|
If you are adding an instance to an existing cluster and do not know the multicast address, find the <discover> element in the opmn.xml file on an Oracle Application Server instance in the topology. The <discover> element should appear like this:
<notification-server>
  <topology>
    <discover list="*225.0.0.20:8001"/>
  </topology>
...
</notification-server>
In this example, the IP address is 225.0.0.20 and the port is 8001.
Check and verify that the installation parameters shown in this window are correct.
Figure 5-11 Oracle Universal Installer: Summary Screen
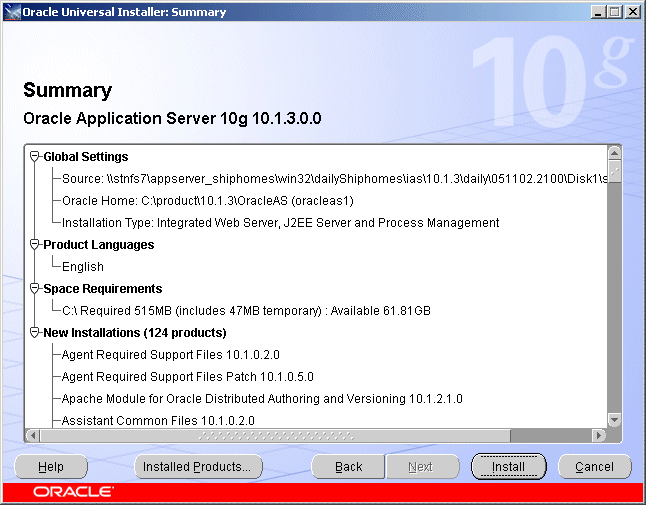
Click Install to begin the installation.
This screen shows the progress of the installation.
Figure 5-12 Oracle Universal Installer: Install Screen
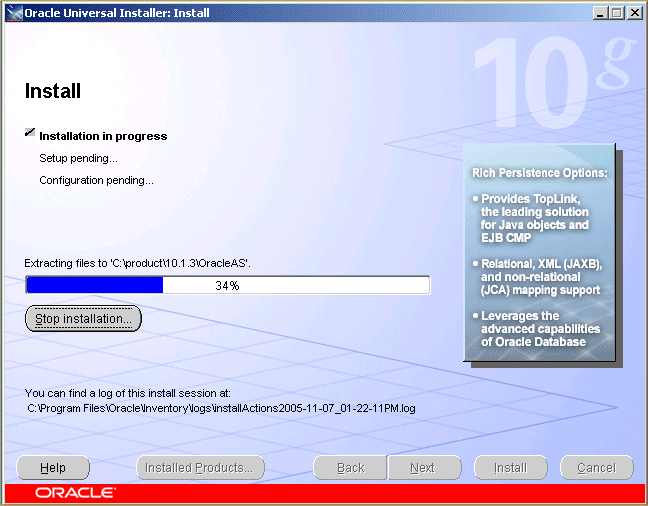
Click Stop Installation if you want to abort the installation. You will be asked to verify that you want to stop the installation.
This screen also provides the location of the install log, in case you want to view the contents of the log.
This screen shows the name, status, and tool type for tools recommended to be run before completing the installation.
Figure 5-13 Oracle Universal Installer: Configuration Assistants Screen
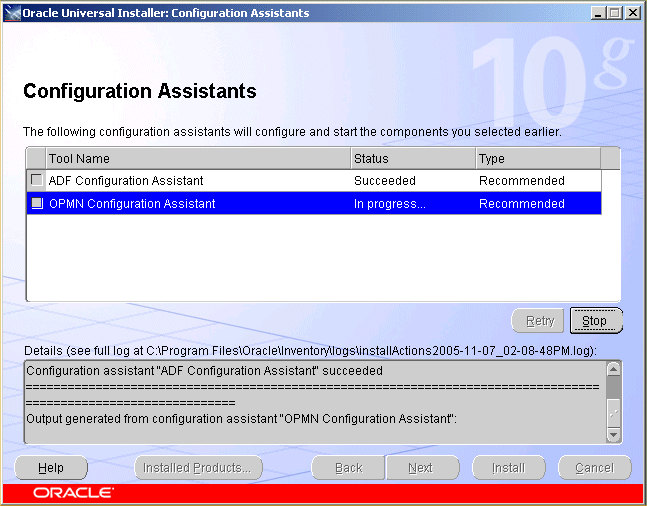
A tool may have one of the following states, as shown in the status column:
Succeeded: The tool ran successfully.
Failed: The tool ran, but failed.
Pending: The tool is waiting to run.
Cancelled: The tool was cancelled by the user (by clicking Stop).
In Progress: The tool is currently running.
Skipped: A configuration assistant running before this tool was cancelled or failed. Tools that follow a failed or cancelled tool are skipped.
When you select a tool, its details are shown in the Details box. Details are displayed as the tool is running. If you want to stop a configuration assistant while it is running, click Stop.
If all tools succeed on the first try, OUI automatically proceeds to the next page. Otherwise, OUI remains on the Configuration Assistants page until all tools are successful. You can then click Next to proceed.
If one or more tools fail, OUI does not proceed to the next page. Instead, you can read the details of failed tools, fix the problems, and try running the configuration assistant again. You should also consult the installation document for the product being installed for instructions on what to do if a tool fails. For all failed or skipped tools, OUI generates a list of the tool names and the commands used to run them; you can copy/paste this information directly into a shell script or batch file to run these tools after installation is complete.
By default, the check box in the Retry column will be checked for all tools that failed or were skipped. To retry all checked configuration assistants, click Retry.
To continue without fixing the problem, click Next.
|
Note: The installation is considered successful even if all configuration assistants failed, irrespective of their type (Recommended or Optional). However, failing to successfully run all recommended tools results in an improperly configured product that may not function. |
This screen tells you whether or not your Oracle Application Server installation was successful and displays some important information that you must remember about the products you have installed. For example, it might contain information about the URLs for particular Web applications. Write down this information so that you can remember it.
This information can also be found in the ORACLE_HOME\install\readme.txt file.
Figure 5-14 Oracle Universal Installer: End of Installation
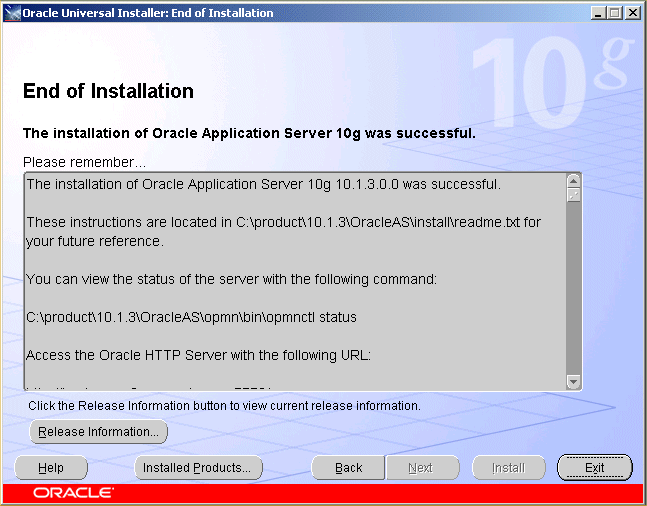
To view release notes for the products you have installed, click Release Information or see the documentation page on OTN (http://www.oracle.com/technology/documentation).
Click Exit to exit the Oracle Universal Installer.
If you encounter any problems with the installation, configuration assistants, or product in general, refer to Appendix E, "Troubleshooting" for common problems and solutions.
After the installation is complete, you should:
Refer to Chapter 7 for instructions and information about postinstallation tasks you should perform.
Refer to the Oracle Application Server Administrator's Guide for information about how to configure, administer, and manage Oracle Application Server after it has been successfully installed.