| Oracle® Database Express Edition 2 Day Developer Guide 10g Release 2 (10.2) Part Number B25108-01 |
|
|
View PDF |
| Oracle® Database Express Edition 2 Day Developer Guide 10g Release 2 (10.2) Part Number B25108-01 |
|
|
View PDF |
This section discusses creating and managing database objects in your schema, plus design considerations when developing applications with the Oracle Database Express Edition.
This section contains the following topics:
See Also:
Oracle Database SQL Reference for information about schema objects, object names, and data typesYou need to create tables, indexes, and possibly other database objects in a schema before you start developing your application. A schema is a collection of database objects. A schema is owned by a database user and has the same name as that user, such as the HR schema. Schema objects are logical structures created by users. Objects can define areas of the database to hold data, such as tables, or can consist of just a definition, such as views.
Tables are the basic database objects and contain all the user data. When creating a table, it is important that you define that data that you want to store in the table. You need to specify the datatype of the data and any restrictions on the range of values. See "Using Datatypes" and "Ensuring Data Integrity in Tables With Constraints".
This chapter discusses tables, indexes, views, sequences, and synonyms. Other database (schema) objects include functions, packages, procedures, and triggers. Functions, packages, and procedures are discussed in Chapter 5, "Using Procedures, Functions, and Packages". Triggers are discussed in Chapter 6, "Using Triggers".
You can create, view, and manipulate database objects in your schema with Object Browser or SQL. With Object Browser, the underlying SQL is generated for you. In this chapter, the examples use Object Browser.
This section contains the following topics:
See Also:
Oracle Database Express Edition Application Express User's Guide for a detailed description of the use of Object Browser to manage database objects
Oracle Database Express Edition 2 Day DBA for information about getting started with Oracle Database Express Edition
Some object types have many more management options than others, but most have a number of similarities. Every object in the database belongs to just one schema and has a unique name within that schema. Therefore, when you create an object, you must ensure it is in the schema where you intend to store it. Generally, you place all of the objects that belong to a single application in the same schema.
A database object name must abide by certain rules. For example, object names cannot be longer than 30 bytes and must begin with a letter. If you attempt to create an object with a name that violates any of these rules, then Oracle Database XE raises an error.
The following sections describe how to view, create, and manage the various types of objects in your database schemas.
You can use the Object Browser page to create, modify, or view all your database objects. For example, with Object Browser you can create a table and then modify it by adding and deleting columns or adding constraints. You can also view all the objects that are currently used in a schema, such as those associated with the HR user.
To access the Object Browse page:
Log in to the Database Home Page. See "Logging in to the Database Home Page". To view the database objects or run the examples discussed in this guide, enter HR in the Username field and your password for the HR user account in the Password field. See "Sample HR Account".
On the Database Home Page, click the Object Browser icon.
The Object Browser page displays with two sections:
The Object Selection pane displays on the left side of the Object Browser page and lists database objects of a selected type within the current schema. For example, for the HR user the Tables object list includes countries, departments, employees, jobs, job_history, locations, and regions.
The Detail pane displays to the right of the page and displays detailed information about the selected object in the object list. You can click the tabs at the top of the Detail pane to view additional details about the current object.
On the Object Browser page, you can create, alter, and view database objects. Click the HR EMPLOYEES table in the Tables object list to display information about the structure of that table.
The information for the employees table includes the following about the columns and their datatypes:
Column Name Data Type Nullable------------------------ ---------------- ---------EMPLOYEE_ID NUMBER(6,0) NoFIRST_NAME VARCHAR2(20) YesLAST_NAME VARCHAR2(25) NoEMAIL VARCHAR2(25) NoPHONE_NUMBER VARCHAR2(20) YesHIRE_DATE DATE NoJOB_ID VARCHAR2(10) NoSALARY NUMBER(8,2) YesCOMMISSION_PCT NUMBER(2,2) YesMANAGER_ID NUMBER(6,0) YesDEPARTMENT_ID NUMBER(4,0) YesNote the employees table uses numeric (NUMBER), character (VARCHAR2), and date (DATE) datatypes. See "Using Datatypes".
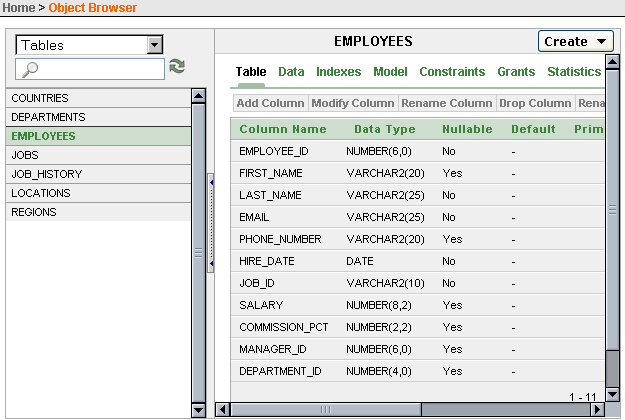
In the Tables object list for the HR user, click the DEPARTMENTS table to view information about the structure of that table.
The information for the departments table includes the following:
Column Name Data Type Nullable------------------------ ---------------- ---------DEPARTMENT_ID NUMBER(4,0) NoDEPARTMENT_NAME VARCHAR2(30) NoMANAGER_ID NUMBER(6,0) YesLOCATION_ID NUMBER(4,0) YesIn the Tables object list for the HR user, click the JOBS table to view information about the structure of that table.
The information for the jobs table includes the following:
Column Name Data Type Nullable------------------------ ---------------- ---------JOB_ID VARCHAR2(10) NoJOB_TITLE VARCHAR2(35) NoMIN_SALARY NUMBER(6,0) YesMAX_SALARY NUMBER(6,0) YesIn the Tables object list for the HR user, click the JOB_HISTORY table to view information about the structure of that table.
The information for the job_history table includes the following:
Column Name Data Type Nullable------------------------ ---------------- ---------EMPLOYEE_ID NUMBER(6,0) NoSTART_DATE DATE NoEND_DATE DATE NoJOB_ID VARCHAR2(10) NoDEPARTMENT_ID NUMBER(4,0) YesIn the Tables object list for the HR user, click the LOCATIONS table to view information about the structure of that table.
The information for the locations table includes the following:
Column Name Data Type Nullable------------------------ ---------------- ---------LOCATION_ID NUMBER(4,0) NoSTREET_ADDRESS VARCHAR2(40) YesPOSTAL_CODE VARCHAR2(12) YesCITY VARCHAR2(30) NoSTATE_PROVINCE VARCHAR2(25) YesCOUNTRY_ID CHAR(2) YesNote the use of the CHAR datatype for a fixed-length character field. See "What Are the Character Datatypes?".
In the Tables object list for the HR user, click the COUNTRIES table to view information about the structure of that table.
The information for the countries table includes the following:
Column Name Data Type Nullable------------------------ ---------------- ---------COUNTRY_ID CHAR(2) NoCOUNTRY_NAME VARCHAR2(40) YesREGION_ID NUMBER YesIn the Tables object list for the HR user, click the REGIONS table to view information about the structure of that table.
The information for the regions table includes the following:
Column Name Data Type Nullable------------------------ ---------------- ---------REGION_ID NUMBER NoREGION_NAME VARCHAR2(25) YesIn the object list, select Views, then click the emp_details_view view to display information about the structure of that view. That is contains columns from the employees, departments, jobs, locations, countries, and regions tables.
The information for the emp_details_view view includes the following:
Column Name Data Type Nullable------------------------ ---------------- ---------EMPLOYEE_ID NUMBER(6,0) NoJOB_ID VARCHAR2(10) NoMANAGER_ID NUMBER(6,0) YesDEPARTMENT_ID NUMBER(4,0) YesLOCATION_ID NUMBER(4,0) YesCOUNTRY_ID CHAR(2) YesFIRST_NAME VARCHAR2(20) YesLAST_NAME VARCHAR2(25) NoSALARY NUMBER(8,2) YesCOMMISSION_PCT NUMBER(2,2) YesDEPARTMENT_NAME VARCHAR2(30) NoJOB_TITLE VARCHAR2(35) NoCITY VARCHAR2(30) NoSTATE_PROVINCE VARCHAR2(25) YesCOUNTRY_NAME VARCHAR2(40) YesREGION_NAME VARCHAR2(25) YesIn the Object list, select other object types to display any existing objects of that type in the HR schema.
In addition to viewing table names and table definitions, you can view the data stored in the table as well as the SQL statement used to display the data. You can also change the SQL statement to alter the result set.
To view table data:
Log in to the Database Home Page. See "Logging in to the Database Home Page".
On the Database Home Page, click the Object Browser icon.
In the Object list, select Tables then click the employees table.
Click Data to display the rows of data in the tables.
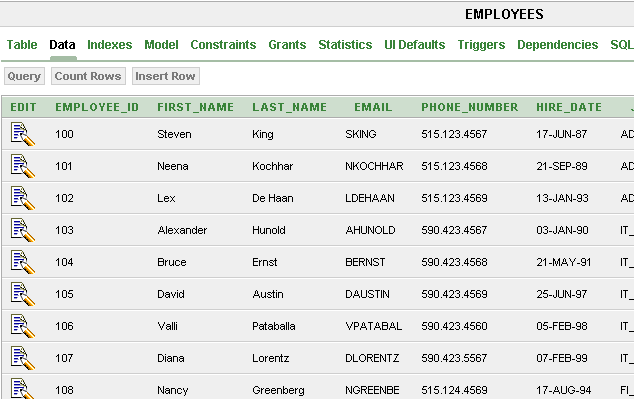
You can also write your own SQL query using a SELECT statement to see the contents of a table. See "Running SQL Statements".
You can run reports on database objects with the Reports feature of the Utilities tool. For example, you might want to run a report on all tables in the database, on all the columns in a specific table, or all database objects that are currently invalid.
To run a report on all invalid database objects:
Log in to the Database Home Page. See "Logging in to the Database Home Page".
On the Database Home Page, click the Utilities icon.
The Utilities home page appears.
On the Utilities page, click Object Reports.
On the Object Reports page, click the All Objects icon.
On the All Objects page, click the Invalid Objects icon.
On the Invalid Objects page, select -All- from Type list.
Click the Go button to display a report on all invalid objects in the database.

See Also:
Oracle Database Express Edition Application Express User's Guide for detailed information about using Object ReportsA datatype associates a fixed set of properties with values that are used in a column of a table or in an argument of a procedure or function. The properties of datatypes cause Oracle Database XE to treat values of one datatype differently from values of another datatype. For example, Oracle Database XE can use the addition operator on values of numeric datatypes, but not with values of some other datatypes.
The datatypes supported by Oracle Database Express Edition include:
Character datatypes
Numeric datatypes
Date and time (date-time) datatypes
Large Object (LOB) datatypes
When you create a table, you must specify a datatype for each of its columns to define the nature of the data to be stored in the column. For example, a column defined as a DATE datatype cannot accept the value February 29 (except for a leap year) or the values 2 or SHOE. When specifying a datatype, you can also indicate the longest value that can be placed in the column. In most cases, you only need columns of NUMBER, VARCHAR2, and DATE datatypes to create a definition of a table.
To view the datatypes specified for the columns in a database table, such as the employees table, you can use the Object Browser page. See "Managing Database Objects With Object Browser". You can use also use the DESCRIBE command entered at SQL Command Line (SQL*Plus). For information about the SQL Command Line DESCRIBE command, see "SQL Command Line DESCRIBE Command".
This section contains the following topics:
See Also:
Oracle Database SQL Reference for complete reference information about the SQL datatypes
Oracle Database SQL Reference for a complete list of built-in datatypes in an Oracle database
Oracle Database Concepts to learn about Oracle built-in datatypes
This section contains the following topics:
You can use the following SQL datatypes to store character (alphanumeric) data:
The VARCHAR2 datatype stores variable-length character literals.
When creating a VARCHAR2 column in a table, you must specify a string length between 1 and 4000 bytes for the VARCHAR2 column. Set the size to the maximum number of characters to be stored in the column. For example, a column to hold the last name of employees can be restricted to 25 bytes by defining it as VARCHAR2(25).
For each row, Oracle Database XE stores each value in the column as a variable-length field unless a value exceeds the column's maximum length, in which case Oracle returns an error. Using VARCHAR2 saves on space used by the table. For most cases where you need to store character data, you would use the VARCHAR2 datatype.
The CHAR datatype stores fixed-length character literals.
When creating a CHAR column in a table, you must specify a string length between 1 and 2000 bytes for the CHAR column. For each row, Oracle Database XE stores each value in the column as a fixed-length field. If the value of the character data is less than specified length of the column, then the value is blank-padded to the fixed length. If a value is too large, Oracle Database XE returns an error.
NCHAR and NVARCHAR2 datatypes store only Unicode character data.
The NVARCHAR2 datatype stores variable-length Unicode character literals. The NCHAR datatype stores fixed-length Unicode character literals. See Chapter 7, "Working in a Global Environment" for information about using Unicode data and globalization support.
See Also:
Oracle Database SQL Reference for information about character datatypes
Oracle Database Globalization Support Guide for information about globalization support
When deciding which datatype to use for a column that will store character data in a table, consider the following:
Space usage
To store data more efficiently, use the VARCHAR2 datatype. The CHAR datatype adds blanks to maintain a fixed column length for all column values, whereas the VARCHAR2 datatype does not add extra blanks.
Comparison semantics
Use the CHAR datatype when trailing blanks are not important in string comparisons. Use the VARCHAR2 datatype when trailing blanks are important in string comparisons.
Future compatibility
The CHAR and VARCHAR2 datatypes are fully supported.
See Also:
Oracle Database SQL Reference for more information about comparison semantics for these datatypesThis section contains the following topics:
The following SQL datatypes store numeric data:
NUMBER
BINARY_FLOAT
BINARY_DOUBLE
Use the NUMBER datatype to store integers and real numbers in a fixed-point or floating-point format. Numbers using this datatype are guaranteed to be portable among different Oracle database platforms. For nearly all cases where you need to store numeric data, you would use the NUMBER datatype. When defining numeric data, you can use the precision option to set the maximum number of digits in the number, and the scale option to define how many of the digits are to the right of the decimal point. For example, a field to hold the salary of an employee can be defined as NUMBER(8,2), providing 6 digits for the primary unit of currency (dollars, pounds, marks, and so on) and two digits for the secondary unit (cents, pennies, pfennigs, and so on).
Oracle Database XE provides the numeric BINARY_FLOAT and BINARY_DOUBLE datatypes exclusively for floating-point numbers. They support all of the basic functionality provided by the NUMBER datatype. However, while the NUMBER datatype uses decimal precision, BINARY_FLOAT and BINARY_DOUBLE datatypes use binary precision. This enables faster arithmetic calculations and usually reduces storage requirements.
See Also:
Oracle Database Concepts for information about the internal format for the NUMBER datatype
Oracle Database SQL Reference for more information about the NUMBER, BINARY_FLOAT, and BINARY_DOUBLE datatypes formats
The NUMBER datatype stores zero as well as positive and negative fixed numbers with absolute values from 1.0 x 10-130 to (but not including) 1.0 x 10126. If you specify an arithmetic expression whose value has an absolute value greater than or equal to 1.0 x 10126, then Oracle Database XE returns an error.
The NUMBER datatype can be specified with a precision (p) and a scale (s) designator. Precision is the total number of significant decimal digits, where the most significant digit is the left-most, nonzero digit, and the least significant digit is the right-most, known digit. Scale is the number of digits from the decimal point to the least significant digit. The scale can range from -84 to 127. For examples, see Table 2-1.
You can specify a NUMBER datatype as follows:
NUMBER(p) for an integer
This represents a fixed-point number with precision p and scale 0, and is equivalent to NUMBER(p,0).
NUMBER(p, s) for a fixed-point number
This explicitly specifies the precision (p) and scale (s). It is good practice to specify the scale and precision of a fixed-point number column for extra integrity checking on input. Specifying scale and precision does not force all values to a fixed length. If a value exceeds the precision, then Oracle Database XE returns an error. If a value exceeds the scale, then Oracle Database XE rounds it.
NUMBER for a floating-point number
The absence of precision and scale designators specifies the maximum range and precision for an Oracle number.
Table 2-1 show how Oracle Database XE stores data using different values for precision and scale. Note that the values are rounded to the specified scale.
The BINARY_FLOAT and BINARY_DOUBLE datatypes store floating-point data in the 32-bit IEEE 754 format and the double precision 64-bit IEEE 754 format respectively. Compared to the Oracle NUMBER datatype, arithmetic operations on floating-point data are usually faster for BINARY_FLOAT and BINARY_DOUBLE. High-precision values require less space when stored as BINARY_FLOAT and BINARY_DOUBLE datatypes.
The BINARY_FLOAT datatype has a maximum positive value equal to 3.40282E+38F and the minimum positive value equal to 1.17549E-38F.
The BINARY_DOUBLE datatype has a maximum positive value equal to 1.79769313486231E+308 and the minimum positive value equal to 2.22507485850720E-308.
Oracle Database XE stores dates in its own internal format that corresponds to century, year, month, day, hour, minute, and second. For input and output of dates, the standard Oracle Database XE default date format is DD-MON-RR. The RR date-time format element enables you store 20th century dates in the 21st century by specifying only the last two digits of the year. Time is stored in a 24-hour format as HH24:MI:SS.
Oracle Database Express Edition provides various SQL functions to calculate and convert date-time data. For examples, see "Using Date Functions" and "Using Conversion Functions". For more information about manipulating date formats on a global level, see Chapter 7, "Working in a Global Environment".
This section contains the following topic:
See Also:
Oracle Database SQL Reference for more information about date and time formats
Oracle Database Concepts for information about Julian dates
Oracle Database supports the following date and time (date-time) datatypes:
DATE
TIMESTAMP
TIMESTAMP WITH TIME ZONE
TIMESTAMP WITH LOCAL TIME ZONE
Table 2-2 shows examples of DATE and TIMESTAMP datatypes.
Table 2-2 DATE and TIMESTAMP Examples
| Datatype | Example |
|---|---|
|
|
09-DEC-05 |
|
|
09-DEC-05 02.05.49.000000 PM |
|
|
09-DEC-05 02.05.49.000000 PM -08:00 |
|
|
09-DEC-05 02.05.49.000000 PM |
See Also:
Oracle Database SQL Reference for information aboutDATE, TIMESTAMP, TIMESTAMP WITH TIME ZONE, and TIMESTAMP WITH LOCAL TIME ZONE datatypesUse the DATE datatype to store point-in-time values (dates and times) in a table. For example, a column to hold the date that an employee is hired can by defined as a DATE datatype. An application that specifies the time for a job might also use the DATE datatype. For most cases where you need to store date data, you would use the DATE datatype.
DATE columns are automatically formatted by Oracle Database XE to include a date and time component. The DATE datatype stores the century, year, month, day, hours, minutes, and seconds. The valid date range is from January 1, 4712 BC to December 31, 9999 AD. Although both the date and time are stored in a date column, by default, the date portion is automatically displayed for you, when retrieving date data. However, Oracle Database Express Edition enables you great flexibility in how you can display your dates and times. See "Using Date Functions".
Use the TIMESTAMP datatype to store values that are precise to fractional seconds. An application that must decide which of two events occurred first might use TIMESTAMP.
Because the TIMESTAMP WITH TIME ZONE datatype can also store time zone information, it is particularly suited for recording date information that must be gathered or coordinated across geographic regions.
Use the TIMESTAMP WITH LOCAL TIME ZONE datatype when the time zone is not significant. For example, you might use it in an application that schedules teleconferences, where participants each see the start and end times for their own time zone.
The TIMESTAMP WITH LOCAL TIME ZONE datatype is appropriate for two-tier applications in which you want to display dates and times that use the time zone of the client system. It is generally inappropriate in three-tier applications because data displayed in a Web browser is formatted according to the time zone of the Web server, not the time zone of the browser. The Web server is the database client, so its local time is used.
Large Objects (LOBs) are a set of datatypes that are designed to hold large amounts of data. A LOB can hold up to a maximum size ranging from 8 terabytes to 128 terabytes depending on how your database is configured. Storing data in LOBs enables you to access and manipulate the data efficiently in your application.
The BLOB, CLOB, and NCLOB datatypes are internal LOB datatypes and are stored in the database. The BFILE datatype is the only external LOB datatype and is stored in an operating system file, outside the database.
See Also:
Oracle Database Application Developer's Guide - Large Objects for more information about Large Object datatypesTables are the basic unit of data storage in an Oracle database. They hold all user-accessible data. A table is a two-dimensional object made up of columns and rows. For example, the employees table includes (vertical) columns called employee_id, first_name, and last_name. Each (horizontal) row in the table contains a value for employee name and ID number. The most common type of table in an Oracle database is a relational table.
This section contains the following topics:
See Also:
Oracle Database Administrator's Guide for information about managing tables
Oracle Database Concepts for conceptual information about tables types
Oracle Database SQL Reference for the syntax required to create and alter tables
Oracle Database Express Edition Application Express User's Guide for information about managing tables
With Oracle Database XE, you can define integrity constraints to enforce business rules on data in your tables to preserve the integrity of the data. Business rules specify conditions and relationships that must always be true, or must always be false. For example, in a table containing employee data, the employee e-mail column must be unique. Similarly, in this table you cannot have two employees with the same employee ID.
When an integrity constraint applies to a table, all data in the table must conform to the corresponding rule. When you issue a SQL statement that inserts or modifies data in the table, Oracle Database XE ensures that the new data satisfies the integrity constraint, without the need to do any checking within your program. Any attempt to insert, update, or remove a row that violates a constraint results in an error, and the statement is rolled back. Likewise, any attempt to apply a new constraint to a populated table also results in an error if any existing row violates the new constraint.
Constraints can be created and, in most cases, modified with a number of different status values. The options include enabled or disabled, which determine if the constraint is checked when rows are added, modified, or removed; and deferred or immediate, which cause constraint validation to occur at the end of a transaction or at the end of a statement, respectively.
You can enforce rules by defining integrity constraints more reliably than by adding logic to your application. Oracle Database XE can check that all the data in a table obeys an integrity constraint faster than an application can.
Constraints can be defined at the column level or at the table level:
Column-level constraints are syntactically defined where the column to which the constraint applies is defined. These constraints determine what values are valid in the column. When creating a table with Object Browser, the only constraint defined at the column level is the NOT NULL constraint, which requires that a value is included in this column for every row in the table.
Table-level constraints are syntactically defined at the end of the table definition and apply to the entire table. With Object Browser, you can create primary key, foreign key, unique, and check constraints.
This section contains the following topics:
See Also:
Oracle Database Concepts for more information about constraintsYou can define default values that are values that are automatically stored in the column whenever a new row is inserted without a value being provided for the column. When you define a column with a default value, any new rows inserted into the table store the default value unless the row contains an alternate value for the column. Assign default values to columns that contain a typical value. For example, in the employees table, if most employees work in the sales department, then the default value for the department_id column can be set to the ID of the sales department.
Depending on your business rules, you might use default values to represent zero or FALSE, or leave the default values as NULL to signify an unknown value. Default values can be defined using any literal, or almost any expression including SYSDATE, which is a SQL function that returns the current date. For an example of the use of the DEFAULT column value, see Example 3-34.
The NOT NULL constraint is a column-level constraint that requires that the column must contain a value whenever a row is inserted or updated. The NOT NULL constraint must be defined as part of the column definition.
Use a NOT NULL constraint when the data is required for the integrity of the database. For example, if all employees must belong to a specific department, then the column that contains the department identifier should be defined with a NOT NULL constraint. On the other hand, do not define a column as NOT NULL if the data might be unknown or might not exist when rows are added or changed, for example, the second, optional line in a mailing address.
A primary key constraint automatically adds a NOT NULL constraint to the columns included in the primary key, in addition to enforcing uniqueness among the values.
For an example of the use of the NOT NULL constraint, see "Creating a Table".
A check constraint requires that a column (or combination of columns) satisfies a condition for every row in the table. A check constraint must be a Boolean expression that is evaluated using the column value about to be inserted or updated to the row.
Use check constraints when you need to enforce integrity rules based on logical expressions, such as comparisons. Never use CHECK constraints when any of the other types of integrity constraints can provide the necessary checking.
Examples of check constraints include the following:
A check constraint on employee salaries so that no salary value is less than 0.
A check constraint on department locations so that only the locations Boston, New York, and Dallas are allowed.
A check constraint on the salary and commissions columns to prevent the commission from being larger than the salary.
For an example of the use of the check constraint, see "Adding a Check Constraint".
A unique constraint requires that every value in a column be unique. That is, no two rows can have duplicate values in a specified column or combination of columns.
Choose columns for unique constraints carefully. The purpose of these constraints is different from that of primary keys. Unique key constraints are appropriate for any column where duplicate values are not allowed. Primary keys identify each row of the table uniquely, and typically contain values that have no significance other than being unique. In the employees table, the email column has a unique key constraint because it is important that the e-mail address for each employee is unique. Note that the email column has a NOT NULL constraint.
Some examples of good unique keys include:
An employee social security number, where the primary key might be the employee number
A truck license plate number, where the primary key might be the truck number
A customer phone number, consisting of the two columns area_code and local_phone, where the primary key might be the customer number
A department name and location, where the primary key might be the department number
For an example of the use of the unique constraint, see "Adding a Unique Constraint".
A primary key requires that a column (or combination of columns) be the unique identifier of the row and ensures that no duplicate rows exist. A primary key column cannot contain NULL values. Each table can have only one primary key.
Use the following guidelines when selecting a primary key:
Whenever practical, create a sequence number generator to generate unique numeric values for your primary key values. See "Managing Sequences".
Choose a column whose data values are unique, because the purpose of a primary key is to uniquely identify each row of the table.
Choose a column whose data values are never changed. A primary key value is only used to identify a row in the table, and its data should never be used for any other purpose. Therefore, primary key values should rarely or never be changed.
Choose a column that does not contain any null values. A PRIMARY KEY constraint, by definition, does not allow any row to contain a null value in any column that is part of the primary key.
Choose a column that is short and numeric. Short primary keys are easy to type.
Minimize your use of composite primary keys. A composite primary key constraint applies to more than one column. Although composite primary keys are allowed, they do not satisfy all of the other recommendations. For example, composite primary key values are long and cannot be assigned by sequence numbers.
For an example of the use of the primary key constraint, see "Adding a Primary Key Constraint".
Whenever two tables contain one or more common columns, you can enforce the relationship between the tables through a referential integrity constraint with a foreign key. A foreign key requires that all column values in the child table exist in the parent table. The table that includes the foreign key is called the dependent or child table. The table that is referenced is called the parent table.
An example of a foreign key constraint is when the department column of the employees table (child) must contain a department ID that exists in the departments table (parent).
Foreign keys can be made up of multiple columns. Such a composite foreign key must reference a composite primary or unique key of the exact same structure, with the same number of columns and the same datatypes. Because composite primary and unique keys are limited to 32 columns, a composite foreign key is also limited to 32 columns. You must use the same datatype for corresponding columns in the parent and child tables. The column names do not need to match.
For performance purposes, you might want to add an index to the columns you define in a child table when adding a foreign key constraint. Oracle Database XE does not do this for you automatically. See "Indexes for Use with Constraints" and "Creating an Index".
When you create a foreign key constraint on a table, you can specify the action to take when rows are deleted in the referenced (parent) table. These actions include:
Disallow Delete - Blocks the delete of rows from the referenced table when there are dependent rows in the table.
Cascade Delete - Deletes the dependent rows from the table when the corresponding parent table row is deleted from the referenced table.
Null on Delete - Sets the foreign key column values in the table to null values when the corresponding table row is deleted from the referenced table.
For an example of the use of the foreign key constraint, see "Adding a Foreign Key Constraint".
You can use the Object Browser page to create a table. The procedure in this section creates a table that contains personal information for employees in the employees sample table.
To create a table:
Log in to the Database Home Page. See "Logging in to the Database Home Page".
On the Database Home Page, click the Object Browser icon.
In the object list under Create, select Table.
In the Table Name field, enter the name of the table (personal_info).
Enter the following column names and datatypes and enable the NOT NULL constraint where designated. The NOT NULL constraint specifies that a value must be entered in the column.
employee_id NUMBER(6,0) NOT NULLbirth_date DATE NOT NULLsocial_security_id VARCHAR2(12) NOT NULLmarital status VARCHAR2(10)dependents_claimed NUMBER(2,0)contact_name VARCHAR2(45) NOT NULLcontact_phone VARCHAR2(20) NOT NULLcontact_address VARCHAR2(80) NOT NULLFor information about datatypes, see "Using Datatypes". For information about the NOT NULL constraint, see "NOT NULL Constraint".
Ensure that Preserve Case has been left unchecked so that names are stored in the default manner (uppercase), which avoids any extra overhead.
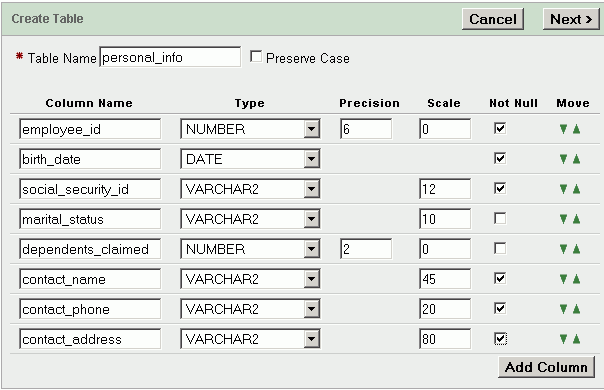
After you have enter the column information, click Next.
On the Primary Key page, do not create a key at this time. Click the Next button. See "Adding a Primary Key Constraint".
On the Foreign Key page, do not create a key at this time. Click the Next button. See "Adding a Foreign Key Constraint".
On the Constraints page, do not create a constraint at this time. Click the Finish button. See "Adding a Unique Constraint" and "Adding a Check Constraint".
On the Create Table page, click the SQL button to view the SQL statements that produce the table. This option shows the statement even if it is incomplete. You need to complete your input to see the complete SQL statement when using this option.
Click the Create button to create the table.
You can use Object Browser to add columns to a table.
To add a column to a table:
Log in to the Database Home Page. See "Logging in to the Database Home Page".
On the Database Home Page, click the Object Browser icon.
In the Object list, select Tables and then click the personal_info table that you previously created.
Click Add Column.
Enter the data to add a column named contact_email. The column can be NULL. The datatype is VARCHAR2 with a length of 30.
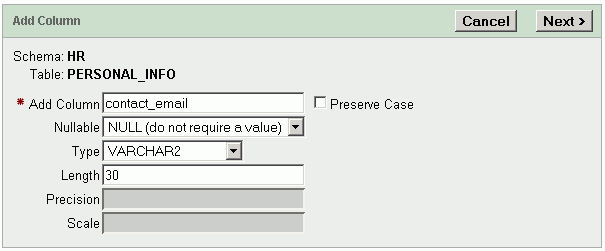
Click the Next button.
Click the Finish button to complete the action.
You can use Object Browser to modify a column in a table.
To modify a column in a table:
Log in to the Database Home Page. See "Logging in to the Database Home Page".
On the Database Home Page, click the Object Browser icon.
In the Object list, select Tables and then click the personal_info table that you previously created.
Click Modify Column.
Select the contact_email column. Change the datatype to VARCHAR2 with a length of 40. Change the column to be NOT NULL.

Click the Next button.
Click the Finish button to complete the action.
You can use Object Browser to delete columns in a table. Before you do delete a column, make sure the data in that column is not going to be needed later.
To delete a column:
Log in to the Database Home Page. See "Logging in to the Database Home Page".
On the Database Home Page, click the Object Browser icon.
In the Object list, select Tables then click the personal_info table that you previously created.
Click Drop Column.
Select the contact_address column and click the Next button.
Click the Finish button to complete the action.
You can use Object Browser to add a constraint to a table after it has been created. In the personal_info table, you might want to check that the number of dependents claimed is always greater than 0. For information about the check constraint, see "Check Constraint".
To add a check constraint:
Log in to the Database Home Page. See "Logging in to the Database Home Page".
On the Database Home Page, click the Object Browser icon.
In the Object list, select Tables then click the personal_info table that you previously created.
Click the Constraints tab.
Click the Create button.
On the Add Constraint page, use the following information to complete the page.
PERSONAL_INFO_CHECK_CONCheckDEPENDENTS_CLAIMED(NUMBER)> 0
Click the Next button.
Click the Finish button to complete the action.
You can use Object Browser to add a constraint to a table after it has been created. In the personal_info table, you might want to enforce the rules so that each social security ID is unique. For information about the unique constraint, see "Unique Constraint".
To add a unique constraint:
Log in to the Database Home Page. See "Logging in to the Database Home Page".
On the Database Home Page, click the Object Browser icon.
In the Object list, select Tables then click the personal_info table that you previously created.
Click the Constraints tab.
Click the Create button.
On the Add Constraint page, use the following information to complete the page.
PERSONAL_INFO_UNIQUE_CONUniqueSOCIAL_SECURITY_ID(VARCHAR2)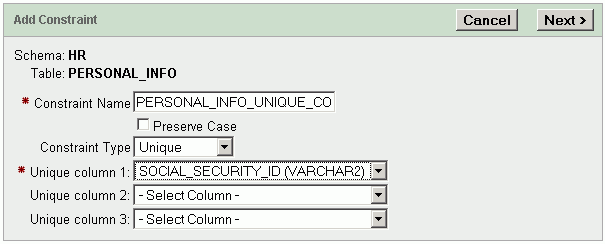
Click the Next button.
Click the Finish button to complete the action.
You can use Object Browser to add a primary key constraint on a column in a table. The primary key uniquely identifies each record (row) that is inserted in the table and ensures that no duplicate rows exist. For information about the primary key constraint, see "Primary Key Constraint".
To add a primary key constraint:
Log in to the Database Home Page. See "Logging in to the Database Home Page".
On the Database Home Page, click the Object Browser icon.
In the Object list, select Tables then click the personal_info table that you previously created.
Click the Constraints tab.
Click the Create button.
On the Add Constraint page, use following information to complete the page:
PERSONAL_INFO_PKEYPrimary KeyEMPLOYEE_ID(NUMBER)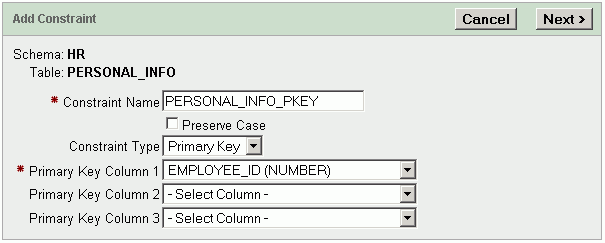
Click the Next button.
Click the Finish button to complete the action.
You can use Object Browser to add a foreign key constraint on a column in one table to a column in a reference table. This ensures that a value inserted in a column matches a valid value in the reference table. For information about the foreign key constraint, see "Foreign Key Constraint".
To add a foreign key constraint:
Log in to the Database Home Page. See "Logging in to the Database Home Page".
On the Database Home Page, click the Object Browser icon.
In the Object list, select Tables then click the personal_info table that you previously created.
Click the Constraints tab.
Click the Create button.
On the Add Constraint page, select Foreign Key for the Constraint Type. Use following information to complete the page:
PERSONAL_INFO_FKEYEMPLOYEE_IDEMPLOYEESEMPLOYEE_IDDo not check the Preserve Case box. Check the On Delete Cascade box.
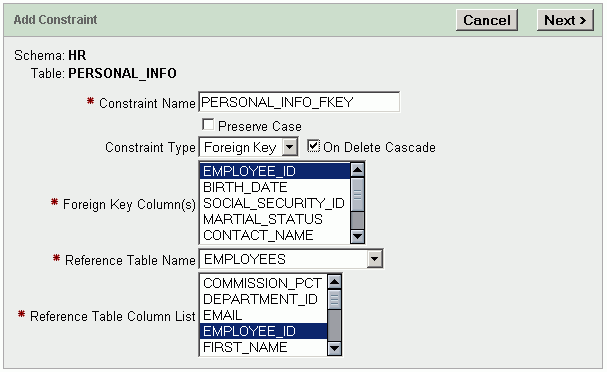
Click the Next button.
Click the Finish button to complete the action.
You can use Object Browser to view existing constraints on a table.
To view constraints:
Log in to the Database Home Page. See "Logging in to the Database Home Page".
On the Database Home Page, click the Object Browser icon.
In the Object list, select Tables then click the personal_info table that you previously created.
Click the Constraints tab to view a list of the constraints on the personal_info table and information about the constraints.
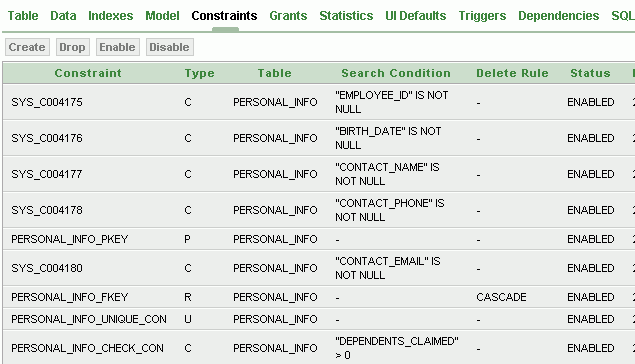
You can use Object Browser to disable or enable a constraint.
To disable and enable a constraint:
Log in to the Database Home Page. See "Logging in to the Database Home Page".
On the Database Home Page, click the Object Browser icon.
In the Object list, select Tables then click the personal_info table that you previously created.
Click the Constraints tab.
Click the Disable button.
On the Disable Constraint page, select the check constraint that you created on the dependents_claimed column (PERSONAL_INFO_CHECK_CON). See "Viewing Existing Constraints" to determine the name of the constraint.
Click the Next button.
Click the Enable button on the Constraints tab.
On the Enable Constraint page, select the check constraint that you created on the dependents_claimed column (PERSONAL_INFO_CHECK_CON). See "Viewing Existing Constraints" to determine the name of the constraint.
Click the Next button.
Click the Finish button to complete the action.
You can use Object Browser to drop constraints from a table. Although you do not have to disable a constraint before dropping it, you can determine whether the constraint can be dropped by attempting to disable it first. If a constraint in a parent table enforces a foreign key constraint in a child table, and if the child table contains dependent rows, then the constraint cannot always be disabled or dropped.
Continuing with the current example, you drop the check constraint that you created earlier in the section, "Adding a Check Constraint".
To drop a constraint:
Log in to the Database Home Page. See "Logging in to the Database Home Page".
On the Database Home Page, click the Object Browser icon.
In the Object list, select Tables then click the personal_info table that you previously created.
Click the Constraints tab.
Click the Drop button.
On the Drop Constraint page, select the check constraint that was created on the contact_email column that specifies a NOT NULL constraint. See "Viewing Existing Constraints" to determine the name of the constraint, such as SYS_C004180.
Click the Next button.
Click the Finish button to complete the action.
You can add (or insert) a row of data to a table with Object Browser.
To add data to a table:
Log in to the Database Home Page. See "Logging in to the Database Home Page".
On the Database Home Page, click the Object Browser icon.
In the Object list, select Tables then click the personal_info table that you previously created.
Click Data.
Click the Insert Row button.
On the Create Row page, enter the following values:
14201-SEP-65555-11-4444Married4Marilyn Davies15552229999marilyn.davies@mycompany.comNote that when you add the data to the personal_info table, the values must conform to any constraints on the table. For example, the contact_email value must be 40 characters or less and the employee_id value must match a value in the employee_id column of the employees table. If data is entered that violates any constraint, then an error displays when you attempt to create a row.
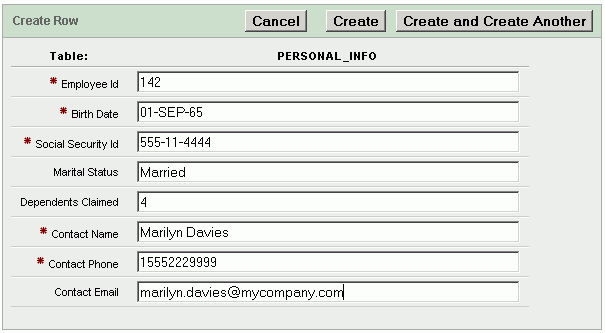
Click the Create and Create Another button to insert the row of data and create another row in the table.
In the Create Row page, enter the following values:
14301-MAR-72555-77-4444Single1Carolyn Matos15553338888carolyn.matos@myinternet.comClick the Create button to insert the row of data.
You can use the Object Browser page to modify data in a table.
To modify data:
Log in to the Database Home Page. See "Logging in to the Database Home Page".
On the Database Home Page, click the Object Browser icon.
In the Object list, select Tables then click the personal_info table that you previously created.
Click Data.
Click Edit next to employee_id equal to 142.
Change the value of phone_number to 15551118888.
Click the Apply Changes button.
You can use Object Browser to remove a row from a table.
To remove a row:
Log in to the Database Home Page. See "Logging in to the Database Home Page".
On the Database Home Page, click the Object Browser icon.
In the Object list, select Tables then click the personal_info table that you previously created.
Click Data.
Click Edit next to employee_id equal to 143.
Click the Delete button to remove this row from the table.
Click OK to confirm the delete action.
If you no longer need a table or its contents, then you can drop the table using Object Browser. Be certain that you do not need the data in the table before you drop it. It may be difficult and time-consuming to retrieve the records, if they can be retrieved, after you execute the drop operation.
To test this procedure, follow the procedure in "Creating a Table" to create a table.
To drop a table:
Log in to the Database Home Page. See "Logging in to the Database Home Page".
On the Database Home Page, click the Object Browser icon.
In the Object list, select Tables then click the personal_info table that you previously created.
Click Drop.
Click the Finish button to complete the action.
Indexes are optional structures associated with tables. You can create them to improve query performance. Just as the index in this book helps you to quickly locate specific information, an Oracle Database XE index provides a quick access path to table data. Before you add additional indexes, examine the performance of your database. You can then compare performance after the new indexes are added.
You can create indexes on one or more columns of a table. After an index is created, it is automatically maintained and used by Oracle Database XE. Changes to the structure of a table or data in a table, such as adding new rows, updating rows, or deleting rows, are automatically incorporated into all relevant indexes.
This section contains the following topics:
See Also:
Oracle Database Express Edition Application Express User's Guide for information about managing indexesIndexes can be categorized in a number of ways. The primary ways are:
Normal Index
A standard, B-tree index contains an entry for each value in the index key along with an address to the row where the value is stored. A B-tree index is the default and most common type of index in an Oracle database.
Text Index
An index is used by Oracle Text for text searching, such as full-text retrieval over documents and Web pages.
Single-Column and Concatenated Indexes
You can create an index on one column, which is called a single-column index, or on multiple columns, which is called a concatenated index. Concatenated indexes are useful when all of the columns are likely to be included in the WHERE clause of frequently executed SQL statements.
For concatenated indexes, define the columns used in the index carefully so that the column with the fewest duplicate values is named first, the column with the next fewest duplicate values is second, and so on. Columns with many duplicate values or many rows with null values should not be included or should be the last named columns in the index definition.
Ascending and Descending Indexes
The default search through an index is from the lowest to highest value where character data is sorted by ASCII values, numeric data is sorted from smallest to largest number, and date data is sorted from the earliest to the latest value. This default behavior is performed by indexes created as ascending indexes. You can reverse the search order of an index by creating the related index with the descending option.
Column and Function-Based Indexes
Typically, an index entry is based on the values found in the columns of the table. This is a column index. Alternatively, you can create a function-based index in which the indexed value is derived from the table data. For example, to find character data that can be in mixed case, you could use a function-based index to search for the values as if they were all in uppercase characters.
All enabled unique and primary keys require corresponding indexes. Oracle Database XE automatically creates the indexes necessary to support data integrity defined with constraints when you add or enable those constraints. For example, a column with the constraint that its values be unique causes Oracle Database XE to create a unique key index.
Note the following:
Constraints use existing indexes where possible, rather than creating new ones.
Unique and primary keys can use non unique and unique indexes. In addition, they can use just the first few columns of non unique indexes.
At most, one unique or primary key can use each non unique index.
The column orders in the index and the constraint do not need to match.
For performance purposes, you might want to add an index to the columns you define in a child table when adding a foreign key constraint. Oracle Database XE does not do this for you automatically.
You can create indexes on columns to speed up queries. Indexes provide faster access to data for operations that return a small portion of the rows of in a table.
You can create an index on any column; however, if the column is not used in any of these situations, creating an index on the column does not increase performance, and the index takes up resources unnecessarily.
This section contains the following topics:
Use the following guidelines to determine when to create an index on a table or column:
Create an index on the columns that are used for joins to improve join performance.
You might want to create an index on a foreign key. See "Foreign Key Constraint" for more information.
Small tables do not require indexes. However, if a query is taking too long, then the table might have grown.
Columns with one or more of the following characteristics are good candidates for indexing:
Values in the column are unique, or there are few duplicate values.
There is a wide range of values.
The column contains many nulls, but queries often select all rows that have a value.
Columns that contain many null values are less suitable for indexing if you do not search on the non-null values.
The more indexes, the more overhead is incurred as the table is altered. When rows are inserted or deleted, all indexes on the table must be updated. When a column is updated, all indexes on the column must be updated.
You must weigh the performance benefit of indexes for queries against the performance overhead of updates. For example, if a table is primarily read-only, you might use more indexes; but, if a table is heavily updated, you might use fewer indexes.
It does not speed up queries. The table might be very small, or there might be many rows in the table but very few index entries.
The queries in your applications do not use the index.
You cannot drop an index that was created through a constraint. You must drop the constraint and then the index is dropped also.
If you drop a table, then all associated indexes are dropped. To drop an index, the index must be contained in your schema or you must have the DROP ANY INDEX system privilege.
You can create an index with the Object Browser page. To create an index, you specify one or more columns to be indexed and the type of index you want to create.
In the following example, an index is created on the hire_date column of the employees table. When the hire_date column is used as a condition for retrieving data, an index on that column increases the speed of those queries.
To create an index:
Log in to the Database Home Page. See "Logging in to the Database Home Page".
On the Database Home Page, click the Object Browser icon.
In the Detail pane, select Index from the Create menu.
In the Table Name field, enter employees.
Set the Type of Index to Normal, then click the Next button. See "Index Types".
In the Index Name field, enter EMPLOYEES_HIREDATE_IDX.
Do not check the Preserve Case box.
Ensure that Uniqueness is set to Non Unique. The hire_date column can have duplicate values.
In the Index Column 1 list, select HIRE_DATE, then click the Next button.
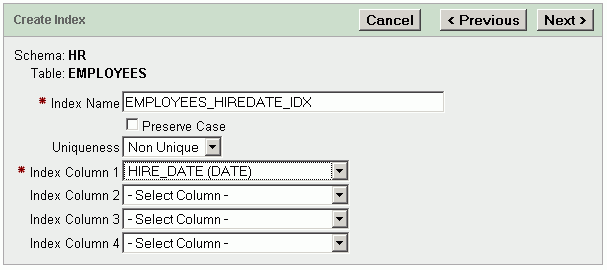
Click the SQL button to view the SQL statement that creates the index.
Click the Finish button to complete the action.
You can use Object Browser to display information about an index on a specific table.
To display information for an index:
Log in to the Database Home Page. See "Logging in to the Database Home Page".
On the Database Home Page, click the Object Browser icon.
In the Object list, select Tables, then click the employees tables.
Click Indexes to display the indexes for the table.
In the Index list, click the EMP_NAME_IX index to display details for that index. After viewing the object details for the index, click the SQL tab to display the SQL statement used to create the index.
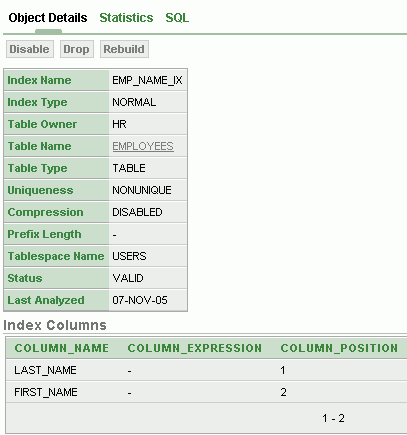
Click other indexes in the Object list to display information about those indexes.
If you no longer need an index, you can use the Object Browser page to drop the index. See "Drop Indexes That Are No Longer Required".
To test this procedure, follow the procedure in "Creating an Index" to create an index.
To drop an index:
Log in to the Database Home Page. See "Logging in to the Database Home Page".
On the Database Home Page, click the Object Browser icon.
In the Object list, select Indexes, then click the EMPLOYEES_HIREDATE_IDX that you previously created.
Click the Drop button to drop the selected index.
Click the Finish button to complete the action.
Note:
You cannot drop an index that is currently used to enforce a constraint. You must disable or drop the constraint and then, if the index is not dropped as a result of that action, drop the index.Views are customized presentations of data in one or more tables or other views. You can think of them as stored queries. Views do not actually contain data, but instead derive their data from the tables upon which they are based. These tables are referred to as the base tables of the view.
As with tables, views can be queried, updated, inserted into, and deleted from, with some restrictions. All operations performed on a view affect the base tables of the view. Views provide an additional level of security by restricting access to a predetermined set of rows and columns of a table. They also hide data complexity and store complex queries.
This section contains the following topics:
See Also:
Oracle Database Express Edition Application Express User's Guide for information about managing viewsYou can use Object Browser to create a view. The following example creates a view derived from the departments and employees tables to display department information along with the corresponding name of the manager.
This view combines the department_id, department_name, and manager_id columns from the departments table with the employee_id, first_name, and last_name columns of the employees table.
The tables are joined from the manager_id of the departments table to the employee_id of the employees table. This ensures that the corresponding first and last name of a manager is displayed in the view.
To create a view:
Log in to the Database Home Page. See "Logging in to the Database Home Page".
On the Database Home Page, click the Object Browser icon.
In the Detail pane, select Views from the Create menu.
In the View Name field, enter the name of the view (my_emp_view).
Click Query Builder to build the query for the view.
Click the departments table, and select the department_id and department_name columns.
Click the employees table, and select the employee_id, first_name, and last_name columns.
Click the blank box to the right of manager_id in the departments table to choose this column for a join with the employees table.
Click the blank box to the right of the employee_id in the employees table to choose this as the corresponding column for the join with manager_id of the departments table. Note the line that is added to the diagram connecting the two tables.
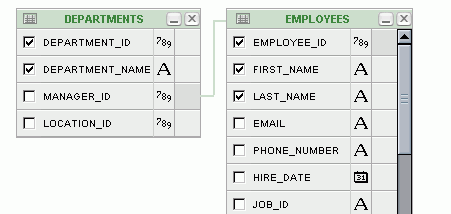
Click the Run button to see the results of querying this view.
Click the Return button to return to Object Browser.
Click the Next button.
Click the SQL button to view the SQL statement that creates the view.
Click the Create button to create the view.
You can use Object Browser to display information about a view.
To display information about a view:
Log in to the Database Home Page. See "Logging in to the Database Home Page".
On the Database Home Page, click the Object Browser icon.
In the Object list, select Views then click the EMP_DETAILS_VIEW view.
Click the SQL button to view the SQL statement that created the view.
Click the Data button to view the data displayed in the view.
If you no longer need a view, then you can use the Object Browser page to drop the view. To test this procedure, follow the procedure in "Creating a View" to create a view.
To drop a view:
Log in to the Database Home Page. See "Logging in to the Database Home Page".
On the Database Home Page, click the Object Browser icon.
In the Object list, select Views then click the my_emp_view view that you previously created.
Click the Drop button.
Click the Finish button to complete the action.
A sequence is a database object that generates unique sequential values. These values are often used for primary and unique keys. Using a sequence generator to provide the value for a primary key in a table guarantees that the key value is unique.
You can refer to sequence values in SQL statements with these pseudocolumns:
CURRVAL: Returns the current value of a sequence
NEXTVAL: Increments the sequence and returns the next value
You must qualify CURRVAL and NEXTVAL with the name of the sequence, such as employees_seq.CURRVAL or employees_seq.NEXTVAL.
When you create a sequence, you can define its initial value and the increment between its values. The first reference to NEXTVAL returns the initial value of the sequence. Subsequent references to NEXTVAL increment the sequence value by the defined increment and return the new value. Any reference to CURRVAL returns the current value of the sequence, which is the value returned by the last reference to NEXTVAL.
Before you use CURRVAL for a sequence in your session, you must first initialize the sequence with NEXTVAL.
This section contains the following topics:
For examples of managing sequences using SQL statements, see "Creating and Dropping a Sequence With SQL".
See Also:
Oracle Database Express Edition Application Express User's Guide for information about managing sequencesYou can use the Object Browser page to create a sequence.
To create a sequence:
Log in to the Database Home Page. See "Logging in to the Database Home Page".
On the Database Home Page, click the Object Browser icon.
In the Detail pane, select Sequence from the Create menu.
In the Sequence Name field, enter the name of the new sequence (my_sequence).
In the Start With field, enter 1000. This starts the sequence with a value of 1000.
For the other fields on the page, use the default values. Click the Next button.
Click the SQL button to view the SQL statement that creates this sequence.
Click the Finish button to create the sequence.
After creating and initializing a sequence, you can access and use the current value of the sequence. For an example of the use of a sequence in a SQL statement to insert data into a table, see Example 3-42.
You can use the Object Browser page to display information about a sequence.
To display information about a sequence:
Log in to the Database Home Page. See "Logging in to the Database Home Page".
On the Database Home Page, click the Object Browser icon.
In the Object list, select Sequences then click the EMPLOYEES_SEQ sequence that was created for use with the employees table.
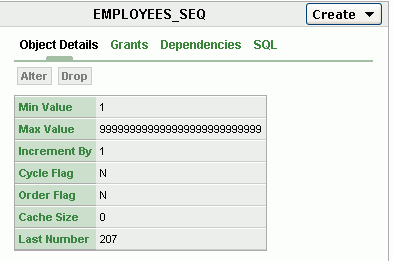
Click other sequences in the Object list to display information about those sequences.
You can use the Object Browser page to drop a sequence. To test this procedure, follow the procedure in "Creating a Sequence" to create a sequence.
To drop a sequence:
Log in to the Database Home Page. See "Logging in to the Database Home Page".
On the Database Home Page, click the Object Browser icon.
In the Object list, select Sequences then click the my_sequence that you previously created.
Click the Drop button to drop the selected sequence.
Click the Finish button to complete the action.
A synonym is an alias for any schema object such as a table or view. Synonyms provide an alternative name for a database object and can be used to simplify SQL statements for database users. For example, you can create a synonym named emps as an alias for the employees table in the HR schema.
If a table in an application has changed, such as the personnel table has replaced the employees table, you can use the employees synonym to refer to the personnel table so that the change is transparent to the application code and the database users.
Because a synonym is simply an alias, it does not require any storage in the database other than its definition.
You can create both public and private synonyms. A public synonym can be accessed by every user in a database. A private synonym is in the schema of a specific user who has control over its availability to others.
This section contains the following topics:
For examples of managing synonyms using SQL statements, see "Creating and Dropping a Synonym With SQL".
See Also:
Oracle Database Express Edition Application Express User's Guide for information about managing synonymsYou can use the Object Browser page to create a synonym.
To create a synonym:
Log in to the Database Home Page. See "Logging in to the Database Home Page".
On the Database Home Page, click the Object Browser icon.
In the Detail pane, select Synonym from the Create menu.
In the Synonym Name field, enter the name of the synonym (emps).
In the Object field, enter employees.
For the other fields on the page, use the default values. Click the Next button.
Click the SQL button to see the SQL statement that creates this sequence.
Click the Finish button to create the synonym.
You can use the Object Browser page to display information about a synonym.
To display information about a synonym:
Log in to the Database Home Page. See "Logging in to the Database Home Page".
On the Database Home Page, click the Object Browser icon.
In the Object list, select Synonyms then click the emps synonym that you previously created to display object details for that synonym.
You can use the Object Browser page to drop a synonym. To test this procedure for dropping a synonym, follow the procedure in "Creating a Synonym" to create a synonym.
To drop a synonym:
Log in to the Database Home Page. See "Logging in to the Database Home Page".
On the Database Home Page, click the Object Browser icon.
In the Object list, Select Synonyms then click the emps synonym that you previously created.
Click the Drop button to drop the selected synonym.
Click the Finish button to complete the action.