| Oracle® Access Manager Configuration Manager Installation and Administration Guide 10g (10.1.4.0.1) Part Number B32392-01 |
|
|
View PDF |
| Oracle® Access Manager Configuration Manager Installation and Administration Guide 10g (10.1.4.0.1) Part Number B32392-01 |
|
|
View PDF |
This chapter explains how to view transaction records created by the Oracle Access Manager Configuration Manager during migration and how to roll back changes for a specific transaction. Also discussed is how to restore the content of a specific environment snapshot made using the Configuration Manager. Topics in this chapter include:
Viewing Transaction Details for an Associated Directory Pair
Restoring the Content of an Environment (Directory) Snapshot
A transaction record is created automatically each time you perform a migration with Oracle Access Manager Configuration Manager. From the Transaction List page, you can select an association and view existing transaction records for that association.
Figure 5-1 shows a sample Transactions List page. Details you can view include the Transaction ID assigned automatically during the migration; the description that was entered for the transaction; the name of the user who performed the migration the date on which the migration was performed; and the status of the migration transaction.
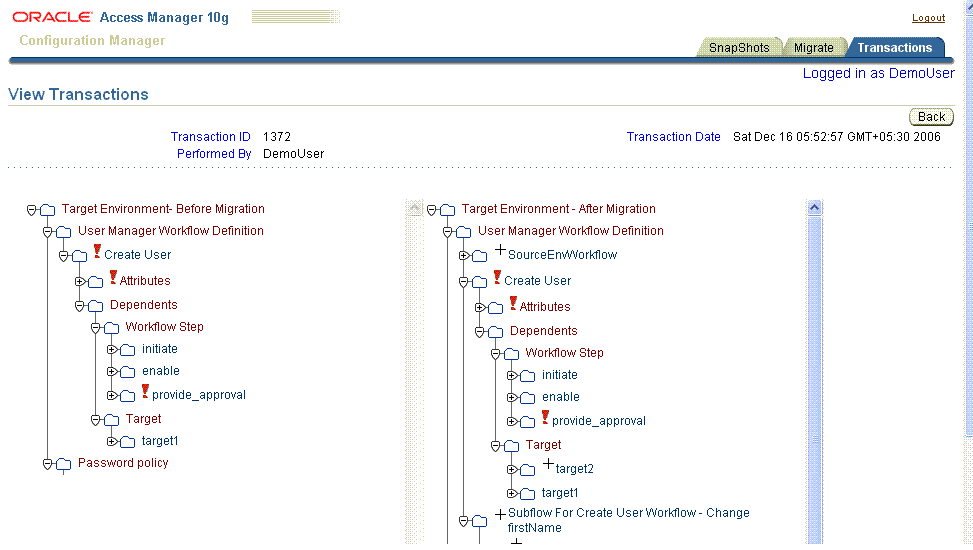
You may select a transaction record to view the changes made during the selected migration in greater detail. Figure 5-2 shows an example of the View Transactions page and the types of details that you can view for the selected migration transaction.
Figure 5-2 Viewing Differences Between the Target Before and After Migration

As shown in Figure 5-2, each folder has an expansion icon. Symbols appear between the folder icon and the object name indicate that the following types of changes occurred during the migration:
+: Add Icon (+) appears only when the object is present in one directory but not both.
!: The Diff Icon (!) appears when the logical object has differing attribute values or dependents.
If you have used Oracle Access Manager Configuration Manager to migrate data, you have seen these symbols when comparing and customizing the target. For more information about the symbols used to show differences, see "About Customizing the Target".
Note:
You cannot explicitly delete a transaction record. Transaction records are deleted only when you delete the association to which the records belong.From Oracle Access Manager Configuration Manager home page, click the Transactions tab. For example:
Transactions
From the Select Association list, select the desired directory association. For example:

The Transactions List page appears with existing transactions for the selected association.
In the Select column, click the option beside the desired Transaction ID to select it. For example:

Click the View button to display the details of this transaction. For example:
View
Review the details in the transaction record to ensure that this is what you want.
Click the Back button on this page to return to the Transaction List. For example:
Back
You may select a transaction record, then revert (roll back) the changes made during data migration using Oracle Access Manager Configuration Manager. Rolling back a transaction reverts only those changes made to logical objects during data migration using Oracle Access Manager Configuration Manager.
There are any number of reasons you may choose to rollback a migration transaction. For example, consider a scenario where you changed logical objects in the source deployment (workflows, policy domains, and WebGates). After testing and validating that the changes produced the desired result in the source deployment, you migrated the data to a target deployment. However if post-migration testing in the target deployment did not produce the results you expected, you may choose to roll back the transaction to restore the target environment. Considering a different scenario, suppose that you migrate and validate a change to one object in the target environment, and then decide to delete the object from the target. In this case, you may either roll back the transaction to remove the migrated logical object from the target or delete it directly using the Identity or Access System Console.
Before you perform a rollback, be sure to confirm that the environment involved is accessible by the Configuration Manager. When you roll back a transaction, Oracle Access Manager Configuration Manager returns the target environment to the state it was in before the migration by:
Removing logical objects on the target that were added during the migration (this does not include related logical objects)
For example, suppose that the logical object Access Client, which uses the (related) logical object Access Server, was added to the target during migration. If you roll back the transaction, Access Client is removed but not the related logical object Access Server.
Reverting logical objects on the target to their state before migration, which means that:
Migrated logic objects that had different attributes or dependents before migration are reverted to their pre-migration state.
Transformation rules are reverted (undone) during the rollback operation. Logical objects that were affected by the application of transformation rules are restored to their pre-migration (their state before the rules were applied).
Any manual customizations made to attribute values during the migration are reverted (undone) during the rollback operation.
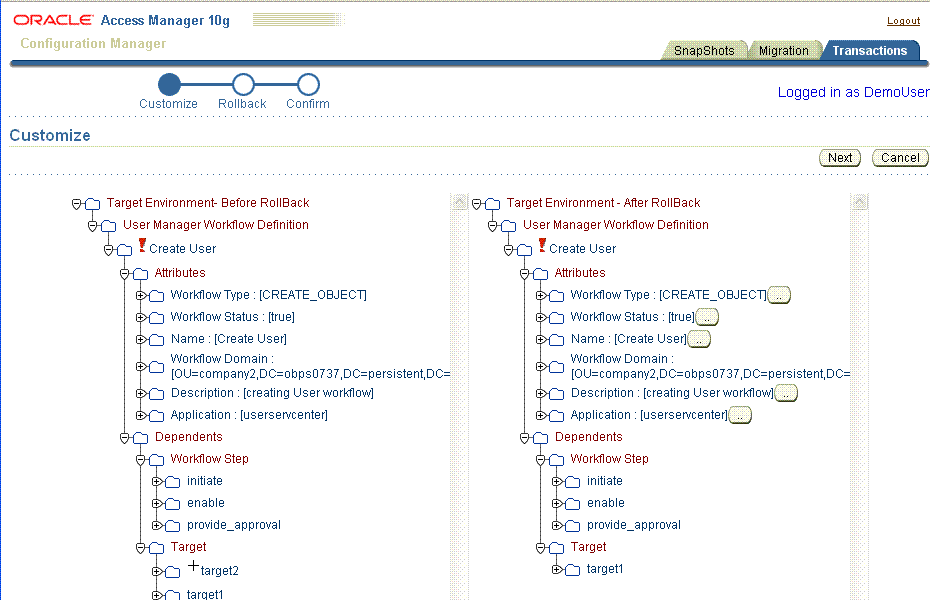
Following is a brief overview of the rollback process. After selecting the environment and initiating the rollback operation, a Customize page appears as shown in Figure 5-3. Scroll bars are provided, as usual. In the progress indicator, Customize is highlighted.
Figure 5-3 Customize Page During the Rollback Operation

The rollback Customize page provides a navigation tree of the:
Target Environment - Before Rollback: The target as it is now, after the migration transaction and before this rollback operation.
Target Environment - After Rollback: The target as it will be after this rollback operation. The rollback operation returns the target to this pre-migration state. It is in this view that you may customize attributes before rolling back the changes.
On the Customize page, symbols that appear between the folder icon and the object name indicates the following types of changes:
+: Add Icon (+) appears only when the object is present in one directory but not both.
!: The Diff Icon (!) appears when the logical object has differing attribute values or dependents.
From the Customize page, you may manually update attributes in the Target Environment - After Rollback view. The process is similar to the customization you can perform during migration. For more information about customizing attributes, see "About Customizing the Target".
Whether you customize attributes or not, you click the Next button to proceed to the Rollback Transaction page. A sample Rollback Transaction page is shown in Figure 5-4.
The Rollback Transaction page enables a final review and validation before the actual rollback. The page shows the target both as it is now (before) and as it will be (after) this rollback operation. In the progress indicator, Rollback is highlighted.
The Rollback Transaction page includes four buttons and a Transaction Description field where you enter a unique description for the record that will be created during this rollback operation. You may use the new transaction to roll back this rollback operation and restore the target to the state it is in at this moment (after the original migration and before rolling back changes).
Using the buttons on the Rollback Transaction page enables you to:
Rollback: Revert the changes made during the selected transaction and restore the environment to the condition you see in the Target Environment - After Rollback view as described in the following procedure.
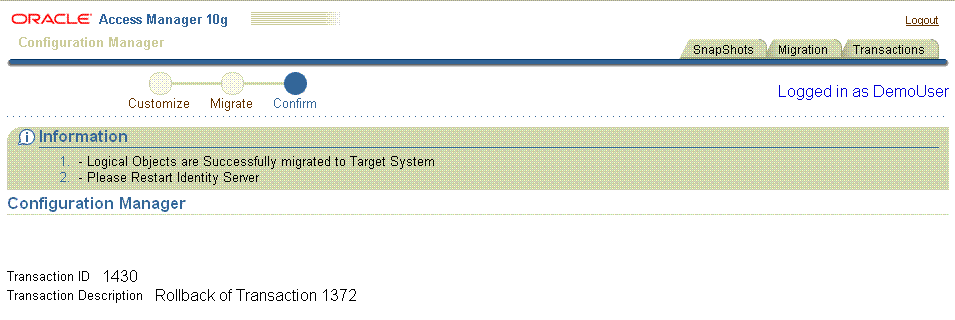
You are asked to verify that this is what you want to do. When the operation completes you are notified with an informational message that appears on the Confirm page. A transaction record is created for this rollback operation.
Export to LDIF File: Create an LDIF file (optional) containing data in the Target Environment - After Rollback view. You may use this LDIF file to edit or import the data using an external tool. In this case, no transaction record is created.
Back: Return to the Customize page where you may update attributes.
Cancel: Terminate the rollback operation without completing it and return to the Transaction List page.
The following procedure provides the steps you use to perform the rollback operation. Details about exporting data to an LDIF file and customizing attributes are included in the procedure and are optional.
To roll back the changes made during a specific migration transaction
In the Configuration Manager, select the Transactions tab. For example:
Transactions
From the Select Association list, select the desired directory association. For example:

The Transactions List page appears with existing transactions for the selected association.
Click the option beside the desired transaction to select it.

Click the Rollback button:
Rollback
Customize Attributes (Optional): Perform the following optional steps to update attributes manually; new values are assigned during the rollback operation. Otherwise, click Next and skip to step 6.
On the Customize page, click the button labeled (..) beside the attribute you want to change (to open the Update Attributes window).
In the Update Attribute window, add the new value and click Save. For example:
Attribute Name: The current attribute name is fixed and cannot be changed.
Attribute Old Value: The current attribute value.
Attribute New Value: Enter the new attribute value in the field provided.
Save: Click the Save button to save the updated attribute value and return to the Customization page.
Repeat as needed for each attribute you want to change in the After Rollback view.
When you finish with the Customize page click the Next button to display the Rollback Transaction page, then proceed with one of the following activities:
Export Data to an LDIF File: Proceed step 6 if you want to create an optional LDIF file to edit or use when importing data with an external tool. No transaction record is created.
Roll Back Changes: Proceed to step 7 to create a transaction record and roll back changes.
Cancel the Rollback Operation: Click Cancel to terminate the rollback without completing it.
Export to LDIF File (Optional): Perform the following steps, in order, only if you want to export the data to an LDIF file to import using an external tool. Otherwise, skip to step 7.
On the Rollback Transaction page, click the Export to LDIF button. For example:
Export to LDIF
In the Open MigrationData window, select a text editor (or click Open with Notepad (default)). For example:
Open with Notepad (default)
In the Notepad window review and edit the data to be exported, then save the file. For example:
Save
In the Save as window, locate the destination directory for this file and enter a file name with the .ldif extension and click Save. For example.
MigrationData_01_07.ldif
The file is created in the location you specify. No transaction record is created.
Before using an external tool to import the LDIF file, make a snapshot of the target directory as described in "Creating a Snapshot".
Roll Back: On the Rollback Transaction page, complete the following activities to complete the operation:
Enter a Transaction Description in the field provided, to name the record that is created during this rollback operation. For example:
Roll back of Transaction 1372
Click the Rollback button to revert the changes made during the original migration transaction. For example:
Rollback
Click OK to validate and start the rollback. For example:
OK
Check the informational message when the operation completes, to confirm that the rollback is successful, as shown next.

Restart Identity and Access Servers to ensure data synchronization after migration, as described in "Restarting Servers After Migration".
For your convenience, the following information about restoring the content of an environment snapshot is repeated from Chapter 3
You may want to restore a snapshot if configuration data in the oblix tree of the environment becomes inconsistent or is corrupted as a result of changes that are external to Oracle Access Manager Configuration Manager. Any individual with HMUser privileges can perform this task. The Oracle Access Manager Configuration Manager repository and associated LDAP directories must be online.
When you restore a snapshot that was made using Oracle Access Manager Configuration Manager, the entire oblix tree is restored to the directory. Revoked changes include both migration changes made using the Configuration Manager, as well as changes made outside the Configuration Manager.
Caution:
Restoring a snapshot reverts all changes made after the snapshot was taken and returns the directory to the state it was in at the time the snapshot was made.Before the restoration commences, you are asked to verify that you do want to restore the selected snapshot. After your verification a new snapshot is created to capture the current state of the directory, and then the older selected snapshot is restored. If you believe that too many changes were reverted during the restoration, you can restore the snapshot that was made during the restoration.
Note:
If you created a directory backup using any application other than Oracle Access Manager Configuration Manager, you cannot use Configuration Manager to restore the backup.To restore the content of a snapshot
From Oracle Access Manager Configuration Manager, select the SnapShots tab. For example:
SnapShots
Select an environment from the Select Environments list. For example:

In the Select column, click the option beside the name of the snapshot you want to restore. For example:

Click the Restore button. For example:
Restore
A message asks you to verify that you want to complete the operation (and revert the status of the environment to its previous state).
Click OK to verify and complete the operation (or Cancel to terminate the operation).
OK
After verifying that this is what you want to do, a new snapshot is made of the environment in its current state, then the content of the selected snapshot is restored.
On the SnapShots List, review the informational message to confirm success; you should see the new snapshot listed.