11 Managing Multiple Environments from Development to Production
This chapter discusses the strategies for managing multiple environments such as development, test, and production environments. This chapter includes the following sections:
Strategies for Managing Multiple Environments
To methodically implement mission critical projects, organizations typically maintain separate environments for developing and testing prior to releasing a project into a production environment. Although you can replicate the same Warehouse Builder project across environments, it is often desirable to assign different physical properties for each environment. For example, when loading a target table in the production environment, you may want to save all error messages to a log file; however, when loading the target in the development environment, you may decide to not save the error messages.
Furthermore, although the same logical design may be initially replicated in each environment, the designs can evolve separately. In the development environment, the development team continually implements new features and makes changes to improve performance. In the production environment, the design evolves slowly and in a controlled manner based on the discovery and correction of bugs.
Therefore, to maintain separate environments for development, testing, and production, it becomes necessary to utilize the same logical design across different physical environments and also to manage any differences in designs across those environments.
In Warehouse Builder, you can manage multiple environments by implementing either of the following solutions:
-
Multiple Environments Based on a Single Design Environment (requires the Warehouse Builder Enterprise ETL Option)
Multiple Environments Based on a Single Design Environment
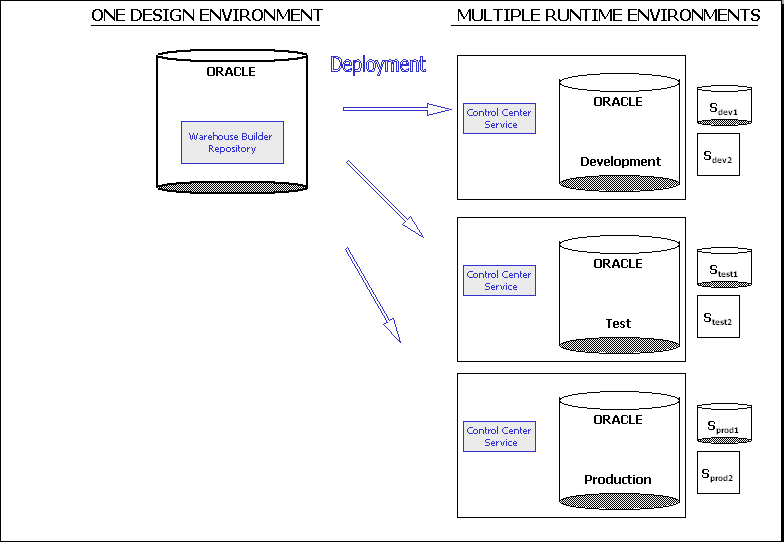
In this strategy, all design work resides within a single Warehouse Builder repository as depicted in .
Figure 11-1 Multiple Environments Based on a Single Design Environment
Description of "Figure 11-1 Multiple Environments Based on a Single Design Environment"
In the single design repository, you define a configuration and a collection for each runtime environment. You promote the design from one environment to the next by activating the appropriate configuration and then deploying the associated collection.
To promote a single design across multiple runtime environments, complete the following general steps:
-
Ensure that Warehouse Builder components are installed on the necessary computers.
Any computer designated for design work requires the Warehouse Builder repository. Any computers designated as runtime environments require the Warehouse Builder control center service. Computers that simply host source data do not require Warehouse Builder components.
depicts the design repository as hosted exclusively on its own Oracle Database. In practice, however, you could host the design repository and, for example, the development runtime on the same Oracle Database.
-
Create a configuration for each of the runtime environments, as described in "Using Configurations to Manage Multiple Environments".
-
Instruct the development team to use Warehouse Builder with the
DEVconfiguration active.The development team implements the logical design by creating the objects such as mappings and process flows. The objects they deploy are subsequently executed in the
DEVenvironment. -
To manage which objects are ready to be deployed to the test and production environments, create collections as described in the Oracle Warehouse Builder User's Guide.
A collection is a group of shortcuts to objects in the same project. For the purposes of this example, you create two collections named
Deploy To TestandDeploy To Production.When the development team determines that various design objects are ready for testing, they can add shortcuts to the Deploy To Test collection.
-
Instruct QA users to use Warehouse Builder with the
TESTconfiguration active.QA users can now deploy the objects in the Deploy To Test collection. They can deploy each object singularly or deploy all objects in the collection at once.
When a user selects a shortcut in a collection, they acquire a lock on the underlying object.
-
After deploying objects, QA users can execute the objects in Deploy To Test collection.
The executed jobs effect the targets associated with
TESTconfiguration only. The development and production environments are not effected. -
The pattern continues with QA users adding shortcuts to the Deploy To Production collection. And production users ensure that the
PRODconfiguration is active when they use Warehouse Builder.
Using Configurations to Manage Multiple Environments
The preferred method for managing multiple environments begins with creating a configuration for each environment. A configuration is a Warehouse Builder entity for containing the physical details of all objects that are required to deploy a data system.
Note: Use of the multiple configuration functionality requires the Warehouse Builder Enterprise ETL Option. If your organization has not licensed this option, you can follow the instructions in "Using Snapshots to Manage Multiple Environments".
A common scenario is to have separate environments for development, test, and production. Although the same design objects exist in all environments, it may be desirable to apply different physical configuration settings to the objects.
As a example, Table 11-1 demonstrates how you may want to specify a table to have different configuration properties depending on the environment.
Table 11-1 Configuration Properties for a Table in Different Environments
| Configuration Property | Development Environment | Test Environment | Production Environment |
|---|---|---|---|
|
Tablespace |
|
|
|
|
Parallel Access Mode |
|
|
|
|
Logging Mode |
|
|
|
To implement this scenario, create a configuration for each environment and define the tablespace settings unique to each environment.
About Configurations
Upon installing Warehouse Builder or creating a new repository, expand the Configurations node in the Project Explorer. Notice that there is a single configuration, the DEFAULT_CONFIGURATION. Also observe that the configuration is listed at the bottom left corner of the Design Center as Active Configuration: DEFAULT_CONFIGURATION.
This default configuration contains the physical properties of all the data objects in the Design Center which are necessary for deploying those objects. As a single entity, the DEFAULT_CONFIGURATION is a device that is required for the internal workings of Warehouse Builder. Namely, it enables deployment to the default control center, DEFAULT_CONTROL_CENTER.
When you define new configurations, however, then you can manage how the same logical object is defined across multiple environments. That is, you can define multiple physical properties and deployment details for a single table, view, or other such data object.
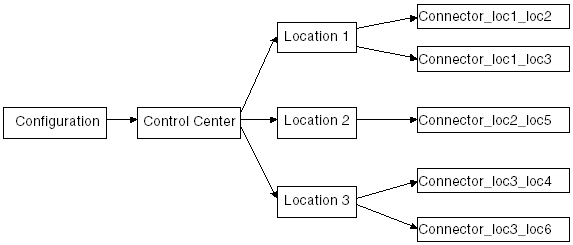
A common approach is to create three new configurations such as DEV,TEST, and PROD. Each configurations works in conjunction with a single control center and its locations, as depicted inFigure 11-2.
Figure 11-2 Relationship Between Configurations, Control Centers, and Locations
Description of "Figure 11-2 Relationship Between Configurations, Control Centers, and Locations"
Configurations specify physical object properties that correspond to the environment to which the objects are deployed. A configuration can only be associated with one control center at a time. You can change the control center that is associated with a configuration.
A control center refers to a repository on a target computer and it manages a set of source and target locations. A control center can be associated with only one configuration at a time.
A location corresponds to the database, file, or application that Warehouse Builder sources data from or deploys data to. A location can be owned by only one control center. Each location can have one or more connectors that provide connections to other locations.
When you deploy objects, Warehouse Builder creates these objects in the target associated with the currently active configuration. In a given session, only a single configuration may be active at a time. If you switch to a different configuration as described in "Activating Configurations", the name of the newly activated configuration is displayed along the bottom left corner of the Design Center.
Benefits of Using Multiple Configurations
Configuration property values belong to the configuration object and are preserved. You do not have to reset configuration values when you switch between configurations. The configuration properties that you see in the Design Center are the settings associated with the active configuration. The status bar at the bottom of the Design Center displays the name of the active configuration.
For example, the configuration associated with the development environment is currently active. Therefore, any changes you make to configuration property values are made to the development environment. For the table MY_TABLE, you set the Tablespace configuration parameter to DEV. Next activate the configuration associated with the production environment. The configuration values displayed will be the same values that you set the last time the production configuration was active. The Tablespace configuration parameter for MY_TABLE is null. You set it to PROD. This change effects only the production configuration. Switching back to the development configuration will show the Tablespace configuration parameter for MY_TABLE remains as DEV. Every object instance in a project has unique configuration values. So, in this example, setting tablespace value for MY_TABLE has no effect on any other table. Each table instance must be individually configured.
Another advantage of multiple configurations is the ease with which it enables you to make changes to your existing environment. For example, you design objects, implement your development environment, deploy objects, and then move to the testing environment. You then need to change some objects in the development environment. To do this, you just activate the configuration associated with the development environment, make the changes to objects, regenerate scripts, and deploy objects. To return to the testing environment, you activate the testing configuration.
Deploying a Design to Multiple Environments
Creating multiple configurations enables you to deploy the same design to multiple environments. To deploy a design to a particular environment, you activate the configuration associated with the environment and deploy your design.
To deploy a set of design objects to multiple environments:
-
Create a configuration for each environment to which design objects are deployed as described in "Creating New Configurations".
For each configuration, ensure that you create a separate control center that points to the environment.
-
Set the configuration properties for design objects in each configuration, as described in "Setting Configuration Properties for a Configuration".
-
Activate the configuration associated with the environment to which design objects must be deployed as described in "Activating Configurations".
-
Resolve errors related to deployment or execution.
You may encounter some errors even if you validated data objects before deploying them. These errors could be caused by configuration properties you set. Configuration property values represent physical property information that is not semantically checked before deployment. For example, the value you specify for the Tablespace Name property is not checked against the database at validation time. Such errors are encountered during deployment.
-
Deploy the design objects.
-
Repeat steps 2 to 5 for each environment to which design objects must be deployed.
Creating New Configurations
To create a new configuration:
-
In the Project Explorer, select a project and expand the navigation tree.
-
Select Configurations.
-
From the Design menu, select New.
The Create Configuration wizard opens.
-
On the Name page, provide a name and an optional description.
Click Set and save as my active configuration for this project to set the new configuration the active configuration. Any configuration parameters that you set for design objects are saved in this configuration. Also, any objects that you deploy are deployed to the control center associated with this new configuration.
-
On the Details page, select the control center that should be associated with this configuration.
If you have not already created the control center, click New to create one and associate it with the configuration.
-
Click Finish to close the wizard and create the configuration.
The new configuration appears in the Configurations folder.
Setting Configuration Properties for a Configuration
To set configuration properties for a particular configuration:
-
Ensure the desired configuration is active.
The name of the active configuration is displayed along the lower left corner of the Design Center. To switch to another configuration, see "Activating Configurations".
-
In the Project Explorer, right-click the object that you want to configure and select Configure.
-
Specify the configuration properties for the selected object.
-
Repeat steps 2 and 3 for all objects in the project for which you want to set configuration properties.
You can now deploy the design objects. The Control Center that is presented in the Deployment Manager is the Control Center that is associated with the active configuration.
Activating Configurations
There can be only one active configuration at a time. Any objects that you deploy are deployed to the control center associated with the active configuration. To implement your design to a different environment, you must deploy objects to the control center associated with that environment. You can do this by activating the configuration associated with the control center.
To activate a configuration:
-
Right-click the configuration you want to activate and select Open Editor.
-
On the Name tab, select Set and save as my Active Configuration for this project.
To activate a configuration for the current session only:
-
In the Project Explorer, select a project and expand the navigation tree.
-
Expand the Configurations folder.
-
Select a configuration.
-
From the Design menu, select Set As Active Configuration.
The selected configuration is set as the active configuration for the current session. If you exit Warehouse Builder and log in subsequently, then the changes are not saved.
Any changes that you make to the configuration parameters of objects are saved in the active configuration. If you switch to the previous configuration, then these parameters maintain their previous settings. The Control Center associated with this configuration is now active and stores all new information about validation, generation, and deployment of objects in the project.
Multiple Environments Based on Multiple Design Environments
In this strategy, there is a separate design environment for each runtime environment as depicted in Figure 11-3.
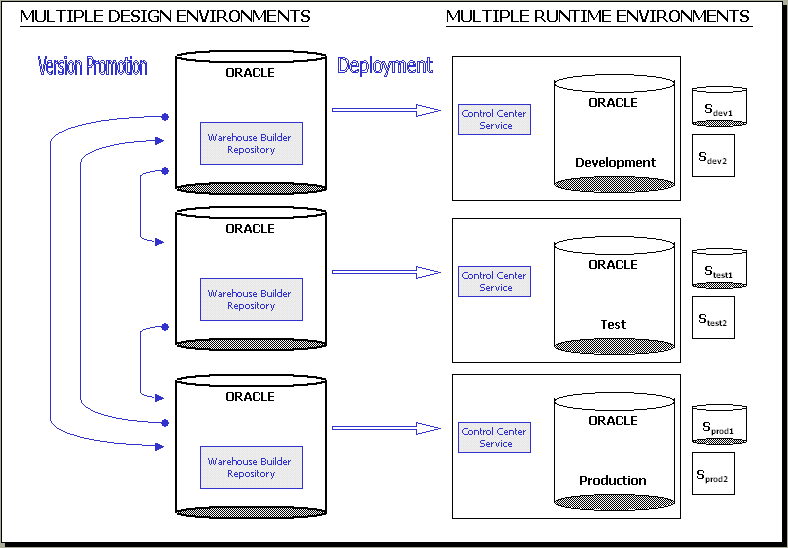
With this strategy, it becomes necessary to manage the differences between the three design environments. You can use either snapshots or the Metadata Loader to share design components between the design environments. Each time you introduce or change design metadata in an environment, you must subsequently deploy the design to the respective runtime environment.
Using Snapshots to Manage Multiple Environments
After a period of development and testing, a company puts into production a data integration project. The production version of the project, however, is not static. It is subject to change due to the discovery and correction of bugs. Meanwhile, the development version also continues to evolve as the development team incrementally implements new features. This company now faces a challenge familiar to all companies: how to best manage changes in different versions of the system.
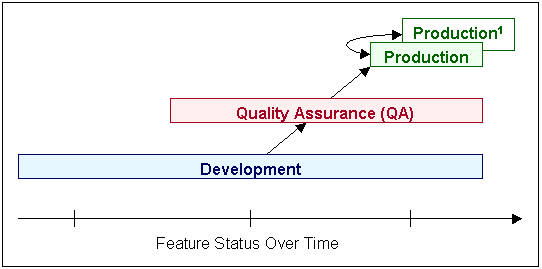
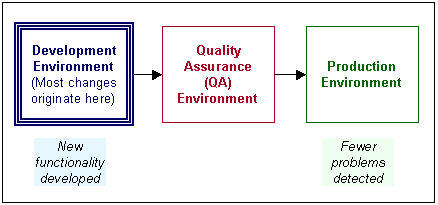
One version of this common scenario is depicted in Figure 11-4, where the development environment is consistently more advanced than the functionality in production, and QA is somewhere between the two extremes. Development changes are incrementally propagated to QA and subsequently to production. At the same time, production has its own cycle of changes, denoted in Figure 11-4 as the shadow environment labeled 'Production1', and used for controlled problem solving. 'Production' and 'Production1' are at the same stage of development, and serve to illustrate the errors that occur in Production, which are fixed and implemented directly in Production, but that must somehow be merged with Development. Other companies may have fewer or more differing environments, but the same maintenance challenges still apply.
Figure 11-4 Typical Lifecycle of a Project
Description of "Figure 11-4 Typical Lifecycle of a Project"
Companies may need multiple environments, as illustrated in Figure 11-4, because they typically implement incremental changes to the system. However, some companies implement only whole projects in production. Figure 11-4 does not apply to these companies.
In this case study, a company finds a problem with a mapping in production. The first step is to compare the production version of the mapping with the development version of the mapping, as illustrated in Figure 11-5. If the mapping is identical in both environments, the solution is simple: make the changes in either environment and copy the mapping to override the older version. If the mapping in production differs from its development version, then the approach you take depends on the maturity of the project.
Figure 11-5 Comparing the Production Mapping to Development
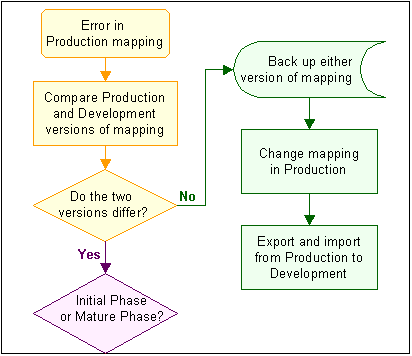
Description of "Figure 11-5 Comparing the Production Mapping to Development"
Typically, there are two phases that mark the lifecycle of a project: Initial Phase and Mature Phase. The two phases present different needs and call for two different version management methodologies, each of which has benefits and drawbacks.
Initial Phase
After implementation of a project in Production, the system is generally in its initial phase, depicted in Figure 11-6. The initial phase is marked by aggressive changes in the Development environment, coupled with errors sometimes found in Production. Because Production bugs are more likely in this mode, consider a management methodology that facilitates quick updates to each environment.
Figure 11-6 Initial Phase: Changes in Production More Likely
Description of "Figure 11-6 Initial Phase: Changes in Production More Likely"
Companies often have two to five different environments. For the initial phase, this company keeps a separate definition of the metadata in each different environment (in this case, Development, QA, and Production). To propagate a change from Production, the company exports only those portions of the system that have changed and imports them into the Development definition.
Case Study
The company has recently implemented its a data integration project in production, and the system is still in its initial phase, where many additional features are yet to be tested and rolled out. The production system is fairly new, and therefore the occurrence of problems is higher in this phase.
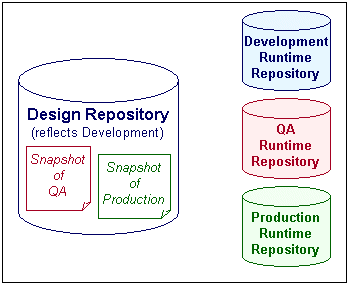
The company decides to keep a separate design repository—or definition of the system design—for each environment, as depicted in Figure 11-7. In addition, they implement their processes into a separate runtime repository for each environment.
Figure 11-7 Initial Phase: Separate Design Repositories
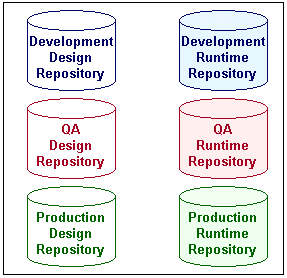
Description of "Figure 11-7 Initial Phase: Separate Design Repositories"
In this example, an error occurs in a Production mapping. The company changes the mapping in Production, then exports its definition, and merges it into Development, as illustrated in Figure 11-8.
Figure 11-8 Initial Phase: Propagate Changes from Production to Development
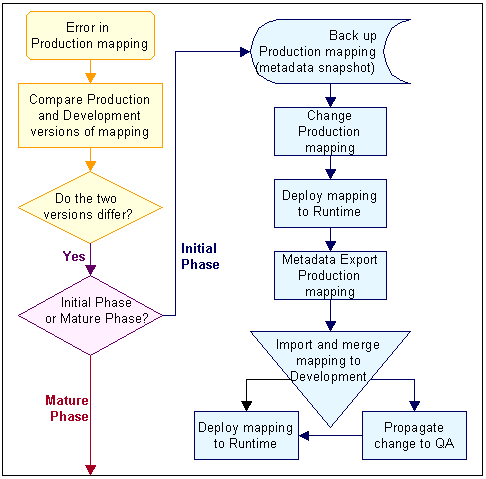
Description of "Figure 11-8 Initial Phase: Propagate Changes from Production to Development"
To correct an error found in a Production mapping during the initial phase:
-
For backup, capture the definition of any mapping before modifying it.
Create a full metadata snapshot of the mapping in the Production Design Repository. Do the same with the Development and QA versions of the mapping. Because you can restore objects from full snapshots only, a full snapshot is essential when you create a backup.
-
Correct the mapping in the Production design repository and deploy it to the Production target schema.
This results in a changed version of the mapping that must be propagated to other environments.
-
Use Metadata Export utility to export only the changed mapping from Production.
From the Design menu, select Export and then Warehouse Builder Metadata. This displays the Metadata Export dialog box.
-
Use Metadata Import to import and merge the change to Development and QA.
-
From the Metadata Import dialog box Import Options, select Merge metadata.
-
From the Metadata Import dialog box Match By options, select the Universal Identifier option.
Matching objects by Universal Identifier is important when maintaining multiple individually changing environments.
Merging the change into Development and QA can vary in complexity depending on the changed object. If the change in the mapping in this example consists of increasing the column width of a table, the merge is simple. A merge can be more complicated and time-consuming if, for example, join criteria are changed, and other dependencies exist.
-
Mature Phase
The second is the mature phase, depicted in Figure 11-9. The mature phase is marked by continued changes in the Development environment, but a decrease in changes required in Production.
Figure 11-9 Mature Phase: Fewer Changes in Production
Description of "Figure 11-9 Mature Phase: Fewer Changes in Production"
For this mode, the company chooses a methodology that saves space and administration costs: it maintains only one active definition of the design, and this definition reflects the development state of the system. The company stores the design definitions of the QA and Production environments in backup, and extracts and restores changed portions of these systems when required.
Case Study
At this stage, the project has stabilized and is now in its mature phase. Some additional functionality is still being developed in the Development environment, but fixes originating in Production are rare.
Although they continue to implement their processes into a separate runtime repository for each environment, the company decides to keep only one design repository, as depicted in Figure 11-10.
Figure 11-10 Mature Phase: One Design Repository Reflecting Development
Description of "Figure 11-10 Mature Phase: One Design Repository Reflecting Development"
The one design repository reflects the Development environment, because it is the one active environment that regularly originates design changes. The design repositories from the QA and Production environments are stored as metadata snapshots inside the Development Design Repository. Snapshots are a backup mechanism that consumes minimal space, and still provides access to any objects that you need to restore. Because design changes rarely originate in Production or QA, storing those definitions in snapshots makes sense.
Although it is more rare during the mature phase, errors still occur in the Production environment. In this example, an error occurs in a Production mapping. The company changes the mapping in Production, then restores its definition from a snapshot in Development and makes the same change there, as illustrated in Figure 11-11.
Figure 11-11 Mature Phase: Propagate Changes from Production to Development
Description of "Figure 11-11 Mature Phase: Propagate Changes from Production to Development"
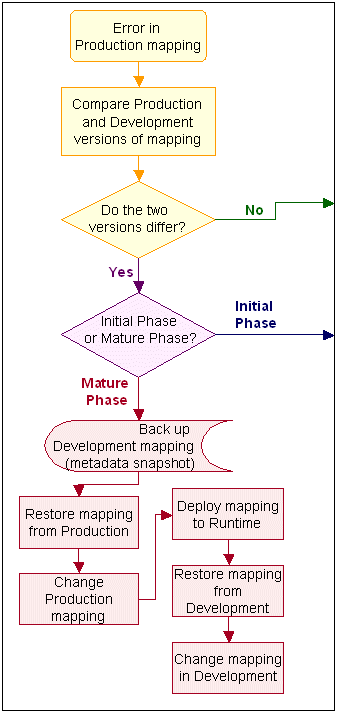
To correct an error found in a Production mapping during the mature phase:
-
Compare the Production version of the mapping in your Production snapshot to the Development version of the same mapping in your Design Repository.
-
If the two differ, the company follows the rest of the steps in this procedure.
-
If the two are identical, correct the mapping as in Step 8, then deploy it to their Design and Production Runtime Repositories, and then update their Production snapshot with the changed mapping.
Consult the online help for instructions on comparing snapshots to objects, deploying, and on updating snapshots.
-
-
Back up the Development version of the mapping by creating a full metadata snapshot of it.
The Development version of the mapping may differ from the Production version if developers have been working on a new iteration of that mapping. This step preserves their work. Creating a full snapshot is essential, because you can only restore from a full snapshot.
-
Restore the mapping in question from the Production snapshot.
This mapping should be identical to the one running in Production.
Consult the online help for instructions on restoring objects from metadata snapshots.
-
Correct the mapping that you have restored from the Production snapshot.
-
Deploy the corrected mapping to the Production Runtime Repository.
-
Remove the existing definition of the mapping from the snapshot of the Production Design Repository and update the snapshot with the new version of the mapping.
-
Restore the mapping from the full snapshot you took as a backup in Step 2.
This is the mapping from the Development Design Repository. Typically, this mapping has had other work done to it as part of development of new features.
Optionally repeat this same step for QA.
-
Make the same correction to this Development version of the mapping that you made in Step 4 to the Production version of the mapping.
The cost of this methodology is that every change has to be made at least twice, in the Production and Development versions of the object. The company uses this methodology only because the mature phase does not require frequent changes originating in Production. The benefits of this approach are the minimal administration costs and reduced space requirements on the database.