| Oracle® Application Server Installation Guide 10g Release 3 (10.1.3.1.0) for Linux x86 B31013-01 |
|
 Previous |
 Next |
| Oracle® Application Server Installation Guide 10g Release 3 (10.1.3.1.0) for Linux x86 B31013-01 |
|
 Previous |
 Next |
This chapter describes what is contained in Oracle Application Server and recommended topologies. It contains the following sections:
Oracle Application Server 10g Release 3 (10.1.3.1.0) provides the Oracle SOA Suite, which is a complete set of service infrastructure components for creating, deploying, and managing Service Oriented Architectures. Oracle SOA Suite enables services to be created, managed, and orchestrated into composite applications and business processes.
Oracle SOA Suite consists of:
Oracle BPEL Process Manager
Oracle Enterprise Service Bus (ESB)
Oracle Web Services Manager (OWSM)
Oracle Business Rules
Oracle Application Server (includes Oracle HTTP Server, Oracle Containers for J2EE (OC4J or J2EE Server), Oracle Enterprise Manager 10g Application Server Control, Oracle Process Manager and Notification Server and OC4J Java Single Sign-On)
You can integrate Oracle Application Server 10g Release 3 (10.1.3.1.0) with an existing Oracle Application Server environment that includes 10g Release 2 (10.1.2) or 10g (10.1.4.0.1) OracleAS Infrastructure.
|
See Also: Oracle Application Server Upgrade Guide for more information about which specific versions are compatible with 10g Release 3 (10.1.3.1.0). |
Table 1-1 summarizes the groups of services available with each installation type.
Table 1-1 Oracle Application Server 10g Release 3 (10.1.3.1.0) Install Types
| Install Mode | Available Installation Types |
|---|---|
|
Basic |
|
|
Advanced |
|
The basic (one-click) installation prompts you with questions on the initial installation screen, and then it proceeds to install the product without any further user interaction. The default values for all the components are used.
The advanced installation provides you with a great degree of customization and flexibility, which enables installation of additional languages, port configuration options, and cluster configuration.
Table 1-2 summarizes the differences in the customization options between basic and advanced installation.
Table 1-2 Basic and Advanced Installation Features
| Action or Option | Basic | Advanced |
|---|---|---|
|
Specify an Oracle Home |
Yes |
Yes |
|
Specify an Oracle Application Server instance name and |
Yes |
Yes |
|
Install an Oracle Olite Database (Windows only) |
Yes |
No |
|
Specify an Oracle Database |
No (Windows) Yes (Other operating systems) |
Yes |
|
Specify a Real Applications Cluster Database |
No |
Yes |
|
Select additional languages |
No |
Yes |
|
Specify administration settings |
No |
Yes |
|
Specify automatic or manual port configuration |
No |
Yes |
|
Configure Application Server Control |
Automatically configured |
Select whether or not it is configured |
|
Specify default OC4J instance name |
No |
Yes |
|
Configure instance to be part of a cluster |
No |
Yes |
|
OC4J Java Single Sign-On is deployed |
Yes |
Yes |
|
OC4J Java Single Sign-On is configured and started |
Yes |
No |
|
Configuration assistants |
Yes |
Yes |
Table 1-3 provides a road map of where to find information about the supported 10g Release 3 (10.1.3.1.0) topologies.
Table 1-3 Basic and Advanced Installation Features
| Topology | See This Documentation for Details |
|---|---|
|
A middle tier containing a single OC4J instance in one Oracle home. |
Section 1.3.1, "Installing a Standalone OC4J Instance" |
|
A middle tier containing an integrated OC4J instance with Oracle HTTP Server in one Oracle home. Application Server Control is not deployed on this middle tier. |
Section 1.3.2, "Installing an Integrated Web Server and OC4J Middle Tier" |
|
A middle tier containing an integrated OC4J instance with Oracle HTTP Server in one Oracle home. Application Server Control is deployed on this middle tier. This topology is suitable for administration the SOA suite. |
Section 1.3.3, "Installing a SOA Administration Instance" |
|
A middle tier containing a single OC4J instance with the SOA applications deployed in one Oracle home. |
Section 1.3.4, "Installing a J2EE Server with the SOA Suite" |
|
A middle tier containing a two OC4J instances and Oracle HTTP Server with the SOA applications deployed in one Oracle home. One OC4J instance contains the SOA applications and the other OC4J instance contains Application Server Control and Java SSO. |
Section 1.3.5, "Installing J2EE Server, Web Server, and the SOA Suite" |
|
Two middle tiers, one containing Oracle HTTP Server and one containing two OC4J instances. One OC4J instance contains the SOA applications and the other OC4J instance contains Application Server Control and Java SSO. |
Section 1.3.6, "Installing J2EE Server and the SOA Suite with a Remote Oracle HTTP Server" |
|
Two middle tiers, one containing Oracle HTTP Server and one containing four OC4J instances. One OC4J instance contains ESB, one contains BPEL, one contains OWSM, and one contains Application Server Control and Java SSO. |
|
|
Thee middle tiers, one containing Oracle HTTP Server, one containing one OC4J instances with the SOA applications, and another containing two OC4J instances with the SOA applications, Application Server Control and Java SSO deployed. |
Section 1.3.8, "Installing Multiple SOA Middle Tiers with a Remote Oracle HTTP Server" |
|
An enterprise data center for SOA applications that uses one of the following methods for user authentication:
Each of these topologies contains a web tier, an application tier, and a data tier. The three tiers are separated by firewalls. |
"mySOACompany," in the Oracle Application Server Enterprise Deployment Guide |
|
An OracleAS Clusters configuration in which two or more middle-tier instances serve the same content. A load balancer distributes requests equally among the active instances. |
Section 6.3, "Creating the Active-Active Topology" |
|
An Oracle Application Server Cold Failover Clusters configuration in which two or more middle-tier instances serve the same content, but only instance is active at any one time. |
Section 6.4, "Creating the Active-Passive Topology" |
|
An OracleAS Disaster Recovery configuration in which a standby site mirrors a production site. During normal operation, the production site handles all the requests. If the production site goes down, the standby site takes over and handles all the requests. |
Section 6.5, "Creating an OracleAS Disaster Recovery Configuration" |
|
High availability solutions for Oracle SOA Suite components, including BPEL, ESB, BAM, and OWSM. |
"High Availability for Oracle SOA Suite" in the Oracle Application Server High Availability Guide |
|
10.1.3.1.0 Middle Tiers with Existing 9.0.4 or 10.1.2 Environments |
|
|
10.1.2 Oracle HTTP Server: Two middle tiers, one containing 10g Release 2 (10.1.2) Oracle HTTP Server and OracleAS Web Cache components and the second containing a 10g Release 3 (10.1.3.1.0) OC4J instance. Oracle HTTP Server and OracleAS Web Cache are installed as a part of a J2EE and Web Cache middle-tier installation. |
"Configuring Oracle Application Server 10.1.2 with Oracle Application Server 10.1.3" in the Oracle Application Server Administrator's Guide |
|
10.1.4 or 10.1.2 OracleAS Infrastructure: A 10g Release 3 (10.1.3.1.0) middle-tier instance using a 10g (10.1.4) or 10g Release 2 (10.1.2) Oracle Identity Management. This topology also supports associating a 10g Release 3 (10.1.3.1.0) middle-tier instance with a new 10g (10.1.4) or 10g Release 2 (10.1.2) Oracle Identity Management for the following scenarios:
|
"Configuring Instances to Use a 10.1.4 or 10.1.2 Oracle Identity Management" in the Oracle Application Server Administrator's Guide "Moving 10.1.4 or 10.1.2 Identity Management to a New Host" in the Oracle Application Server Administrator's Guide |
|
10.1.2 OracleAS Web Cache Instance: A single 10g Release 2 (10.1.2) OracleAS Web Cache acting as a reverse proxy for a 10g Release 3 (10.1.3.1.0) middle-tier. The middle tier contains an integrated OC4J instance with Oracle HTTP Server. |
"Configuring 10.1.2 OracleAS Web Cache as a Reverse Proxy" in the Oracle Application Server Administrator's Guide |
|
10.1.2 OracleAS Web Cache Cluster: Two or more 10g Release 2 (10.1.2) OracleAS Web Cache servers configured as a cluster to reverse proxy a 10g Release 3 (10.1.3.1.0) middle-tier. The middle tier contains an integrated OC4J instance with Oracle HTTP Server. |
"Configuring 10.1.2 OracleAS Web Cache as a Reverse Proxy" in the Oracle Application Server Administrator's Guide |
The remainder of this section addresses the recommended topologies for installing Oracle HTTP Server and OC4J instances. It contains the following topics:
Section 1.3.2, "Installing an Integrated Web Server and OC4J Middle Tier"
Section 1.3.4, "Installing a J2EE Server with the SOA Suite"
Section 1.3.5, "Installing J2EE Server, Web Server, and the SOA Suite"
Section 1.3.6, "Installing J2EE Server and the SOA Suite with a Remote Oracle HTTP Server"
Section 1.3.8, "Installing Multiple SOA Middle Tiers with a Remote Oracle HTTP Server"
Figure 1-1 shows a topology in which you install a standalone OC4J instance. This topology is suitable for J2EE developers.
Requirements
The requirements are the same as those listed in Chapter 2, "Requirements".
Installation Sequence
Perform an advanced installation of J2EE Server, as described in Section 5.2.4, "Installing J2EE Server". During the installation procedure, follow the prompts, ensuring you perform the following:
On the Administration Settings screen, do not select Configure this as an Administration OC4J instance.
On the Cluster Topology Configuration screen, do not select Access this OC4J instance from a separate Oracle HTTP Server.
The J2EE Server and Web Server installation type in advanced installation mode combines an Oracle HTTP Server and OC4J middle-tier instance in the same Oracle home, as depicted in Figure 1-2. This topology is suitable for J2EE developers and cannot manage the SOA suite.
Figure 1-2 Integrated Web Server and OC4J Middle Tier

Requirements
The requirements are the same as those listed in Chapter 2, "Requirements".
Installation Sequence
Perform an advanced installation of J2EE Server and Web Server, as described in Section 5.2.3, "Installing J2EE Server and Web Server". During the installation procedure, follow the prompts, ensuring you perform the following:
On the Administration Settings screen, do not select Configure this as an Administration OC4J instance.
This topology is similar to the example in the previous section, Section 1.3.2. As in the previous section, this topology combines an Oracle HTTP Server and OC4J middle-tier instance in the same Oracle home, but it also includes Application Server Control and Java Single Sign-On, as depicted in Figure 1-3. This topology is suitable for managing the SOA Suite.
Requirements
The requirements are the same as those listed in Chapter 2, "Requirements".
Installation Sequence
Perform an advanced installation of J2EE Server and Web Server, as described in Section 5.2.3, "Installing J2EE Server and Web Server". During the installation procedure, follow the prompts, ensuring you perform the following:
On the Administration Settings screen, select Configure this as an Administration OC4J instance.
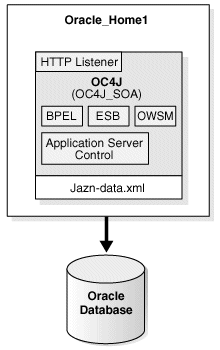
The Basic Installation Mode combines the SOA Suite and OC4J middle-tier instance in the same Oracle home with a remote Oracle Database, as depicted in Figure 1-4. This topology is suitable for SOA developers.
Figure 1-4 J2EE Server with the SOA Suite
Requirements
The requirements are the same as those listed in Chapter 2, "Requirements".
Installation Sequence
Perform a basic installation, as described in Section 4.2, "Basic Installation Steps".
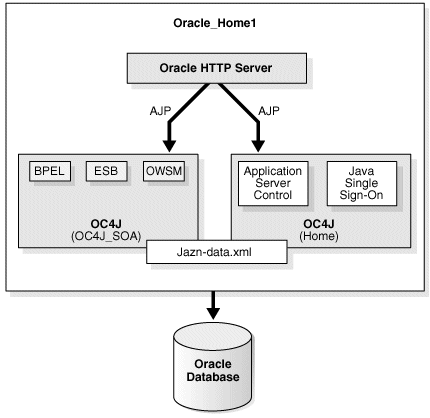
The J2EE Server, Web Server, and SOA Suite installation type in advanced installation mode combines the SOA Suite, Oracle HTTP Server, and OC4J middle-tier instance in the same Oracle home, as depicted in Figure 1-5. This topology is suitable for SOA developers.
Figure 1-5 J2EE Server, Web Server, and the SOA Suite
Requirements
The requirements are the same as those listed in Chapter 2, "Requirements".
Installation Sequence
Perform an advanced installation of J2EE Server, Web Server and SOA Suite, as described in Section 5.2.2, "Installing J2EE Server, Web Server and SOA Suite". During the installation procedure, follow the prompts, ensuring you perform the following:
On the Administration Settings screen, select Configure this as an Administration OC4J instance.
On the Cluster Topology Configuration screen, do not select Access this OC4J Instance from a separate Oracle HTTP Server.
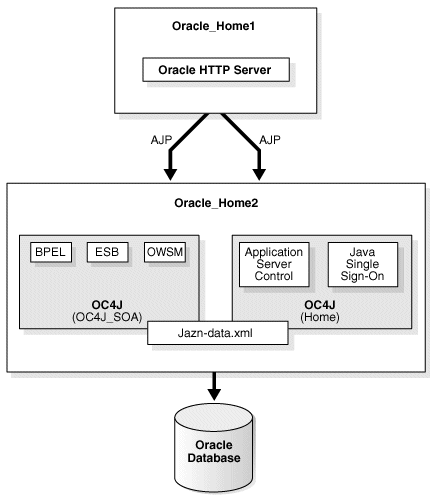
Figure 1-6 shows a topology in which you install Oracle HTTP Server on one computer and OC4J and the SOA Suite on another computer. Then, you cluster the instances using dynamic node discovery. This topology enables Oracle HTTP Server to route requests to OC4J, and OC4J to dynamically notify Oracle HTTP Server of new application bindings when an application is deployed. It also allows for flexibility and growth.
Figure 1-6 Cluster with J2EE Server and the SOA Suite and a Remote Oracle HTTP Server
Requirements
The requirements are the same as those listed in Chapter 2, "Requirements".
Installation Sequence
To install this topology:
For the first middle tier, install a Web Server instance.
Perform an advanced installation of Web Server, as described in Section 5.2.5, "Installing Web Server". During the installation procedure, follow the prompts, ensuring you perform the following:
On the Cluster Topology Configuration screen, select Configure this Oracle HTTP Server instance to be a part of an Oracle Application Server cluster and specify a cluster discovery address for the cluster. The multicast address you enter must be within the valid address range, which is 224.0.1.0 to 239.255.255.255.
Make a note of the address and port that you enter on this page; you will need them later.
Make a note of the hostname and port for the Oracle HTTP Server instance; you will need them later.
For the second middle tier, install a J2EE Server, Web Server and SOA Suite instance.
Perform an advanced installation of J2EE Server, Web Server and SOA Suite, as described in Section 5.2.2, "Installing J2EE Server, Web Server and SOA Suite". During the installation procedure, follow the prompts, ensuring you perform the following:
On the Administration Settings screen, select Configure this as an Administration OC4J instance.
On the Cluster Topology Configuration screen, select Access this OC4J Instance from a separate Oracle HTTP Server. Specify the hostname and port for the middle tier you installed in Step 1 of this procedure.
On this same screen, select Configure this instance to be part of an Oracle Application Server cluster topology and specify the same cluster discovery address as you specified in Step 1 of this procedure.
Configure Java Single Sign-On. Perform the following steps on the second Oracle Application Server instance you just installed (Oracle_Home2 in Figure 1-6):
Access the Oracle Enterprise Manager 10g Application Server Control Console.
Scroll to the Administration section and click Java SSO Configuration.
The Java SSO Configuration page appears.
Click Participating Applications.
The applications are listed.
Click the check box for the following applications to be Java SSO enabled:
orabpel (for Oracle BPEL Process Manager)
esb-dt (for Oracle Enterprise Service Bus)
ccore (for Oracle Web Services Manager)
ascontrol (for Application Server Control Console)
Click Apply.
A confirmation message appears that the SSO configuration was completed and will take effect after the instances are restarted.
Click Restart.
A confirmation message appears.
Click Yes.
The instance is restarted.
To configure JSSO for OWSM, perform the following steps:
Navigate to ORACLE_HOME/owsm/bin.
Edit the ORACLE_HOME/owsm/bin/install.properties file to set the install.sso.support property to true.
Run the following command:
prompt> wsmadmin.sh deploy password console
In the preceding commands, password is the OC4J administrator password.
Reconfigure the owsm console application with the OID security provider as described in "Steps to Use the Oracle Identity Management Security Provider" and "Settings for Authentication Method with Oracle Identity Management" in the Oracle Containers for J2EE Security Guide, Chapter 8.
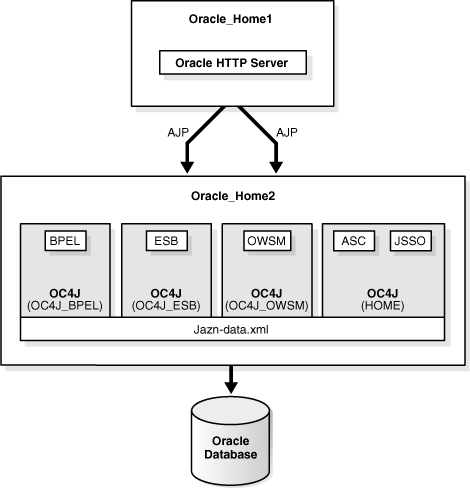
This topology is similar to the example in the previous section, Section 1.3.6. As in the previous section, this topology has an Oracle HTTP Server in one home and OC4J and the SOA applications in a separate Oracle home. Unlike the previous example, the SOA applications are separated, each with its own OC4J instance, as depicted in Figure 1-7.
Figure 1-7 Cluster with J2EE Server and Separate SOA Applications and a Remote Oracle HTTP Server
Requirements
The requirements are the same as those listed in Chapter 2, "Requirements".
Installation Sequence
To install this topology:
For the first middle tier, install a Web Server instance.
Perform an advanced installation of Web Server, as described in Section 5.2.5, "Installing Web Server". During the installation procedure, follow the prompts, ensuring you perform the following:
On the Cluster Topology Configuration screen, select Configure this Oracle HTTP Server instance to be a part of an Oracle Application Server cluster and specify a cluster discovery address for the cluster. The multicast address you enter must be within the valid address range, which is 224.0.1.0 to 239.255.255.255.
Make a note of the address and port that you enter on this page; you will need them later.
Make a note of the hostname and port for the Oracle HTTP Server instance; you will need them later.
For the second middle tier, install a J2EE Server instance.
Perform an advanced installation of J2EE Server, as described in Section 5.2.4, "Installing J2EE Server". During the installation procedure, follow the prompts, ensuring you perform the following:
On the Administration Settings screen, select Configure this as an Administration OC4J instance.
On the Cluster Topology Configuration screen, select Access this OC4J Instance from a separate Oracle HTTP Server.
On this same screen, select Configure this instance to be part of an Oracle Application Server cluster topology and specify the same cluster discovery address as you specified in Step 1 of this procedure.
You must create the OC4J instances for each of the SOA applications in Oracle_Home2, as shown in Figure 1-7. Use the steps below to create the following OC4J instances for the SOA applications:
OC4J_BPEL
OC4J_ESB
OC4J_WSM
Log in to the Application Server Control Console with the password set during installation.
The Cluster Topology page appears.
Click the link in the Members list for the application server instance in Oracle_Home2.
The Application Server page for the instance appears, listing the Admin OC4J instance in the System Components list.
Click Create OC4J Instance.
The Create OC4J Instance page appears.
Enter OC4J_BPEL in the OC4J Instance Name field. Leave the defaults for the group and check the box to start the instance.
Click Create.
The Processing: screen appears with a message, then the Application Server page appears with the new instance and a confirmation message that the instance was created and added to the group.
Click the OC4J_BPEL instance.
The OC4J page appears.
Click Administration.
The Administration Tasks table appears.
Click the Go to Task icon for Server Properties in the Properties list.
The Server Properties page appears.
Specify an unused AJP port for the default-web-site and click Apply. You can
netstat -an
The AJP port range is 12501-12600.
The Processing screen appears with a status message, then a confirmation message appears.
Repeat steps a through i for the OC4J_ESB and OC4J_WSM instances, assigning a different unique port from the range to each.
Run the following commands in Oracle_Home2:
prompt> ORACLE_HOME/opmn/bin/opmnctl stopall

prompt> ORACLE_HOME/opmn/bin/opmnctl startall
Deploy the SOA applications in Oracle_Home2:
Install BPEL using the Oracle BPEL Process Manager (10.1.3.1.0) CD. Follow the instructions in Oracle BPEL Process Manager Installation Guide.
During the installation procedure, follow the prompts, ensuring you perform the following:
Specify OC4J_BPEL as the OC4J Instance Name.
In the HTTP Host:Port field, specify the hostname and port for the middle tier you installed in Step 1 of this procedure.
Install ESB using the Oracle Enterprise Bus (10.1.3.1.0) CD. Follow the instructions in Oracle Enterprise Service Bus Installation Guide.
During the installation procedure, follow the prompts, ensuring you perform the following:
Select OC4J_ESB as the OC4J instance name.
Specify the hostname and port for the middle tier you installed in Step 1 of this procedure as the outgoing HTTP proxy.
Install OWSM using the Oracle Web Services Manager (10.1.3.1.0) CD. Follow the instructions in Oracle Web Services Manager Installation Guide.
During the installation procedure, follow the prompts, ensuring you perform the following:
Specify OC4J_WSM as the OC4J Instance name.
In the HTTP Host:Port field, specify the hostname and port for the middle tier you installed in Step 1 of this procedure.
Configure Java Single Sign-On. Perform the following steps on the second Oracle Application Server instance you just installed (Oracle_Home2 in Figure 1-7):
Access the Oracle Enterprise Manager 10g Application Server Control Console.
Scroll to the Administration section and click Java SSO Configuration.
The Java SSO Configuration page appears.
Click Participating Applications.
The applications are listed.
Click the check box for the following applications to be Java SSO enabled:
orabpel (for Oracle BPEL Process Manager)
esb-dt (for Oracle Enterprise Service Bus)
ccore (for Oracle Web Services Manager)
ascontrol (for Application Server Control Console)
Click Apply.
A confirmation message appears that the SSO configuration was completed and will take effect after the instances are restarted.
Click Restart.
A confirmation message appears.
Click Yes.
The instance is restarted.
To configure JSSO for OWSM, perform the following steps:
Navigate to ORACLE_HOME/owsm/bin.
Edit the ORACLE_HOME/owsm/bin/install.properties file to set the install.sso.support property to true.
Run the following command:
prompt> wsmadmin.sh deploy password console
In the preceding commands, password is the OC4J administrator password.
Reconfigure the owsm console application with the OID security provider as described in "Steps to Use the Oracle Identity Management Security Provider" and "Settings for Authentication Method with Oracle Identity Management" in the Oracle Containers for J2EE Security Guide, Chapter 8.
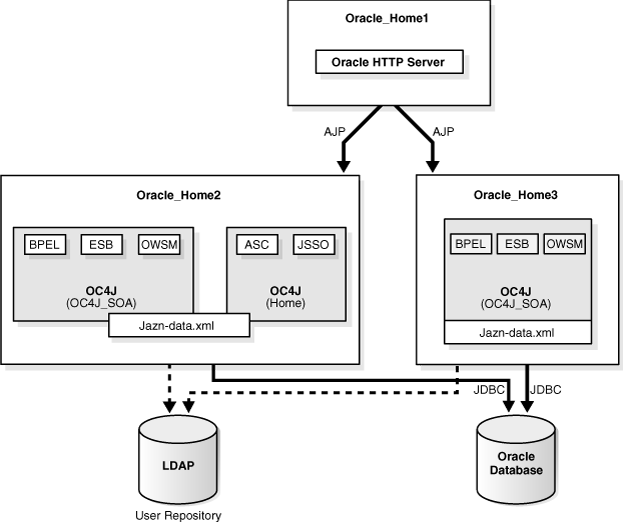
This topology builds upon the example in Section 1.3.6. It adds an additional OC4J instance with the SOA Suite, as shown in Figure 1-8. When you install this cluster topology, you install Oracle HTTP Server on one computer, install OC4J and SOA Suite instances on two separate computers, and specify cluster settings. You designate one of the OC4J instances as the Administration OC4J instance for running the Application Server Control Console. You manage both OC4J instances from this instance of Application Server Control Console.
Figure 1-8 Cluster with Multiple SOA Middle Tiers and a Remote Oracle HTTP Server
Requirements
The requirements are the same as those listed in Chapter 2, "Requirements".
Installation Sequence
To install this topology:
For the first middle tier, install a Web Server instance.
Perform an advanced installation of Web Server, as described in Section 5.2.5, "Installing Web Server". During the installation procedure, follow the prompts, ensuring you perform the following:
On the Cluster Topology Configuration screen, select Configure this Oracle HTTP Server instance to be a part of an Oracle Application Server cluster and specify a cluster discovery address for the cluster. The multicast address you enter must be within the valid address range, which is 224.0.1.0 to 239.255.255.255.
Make a note of the address and port that you enter on this page; you will need them later.
Make a note of the hostname and port for the Oracle HTTP Server instance; you will need them later.
For the second middle tier, install a J2EE Server, Web Server and SOA Suite instance.
Perform an advanced installation of J2EE Server, Web Server and SOA Suite, as described in Section 5.2.2, "Installing J2EE Server, Web Server and SOA Suite". During the installation procedure, follow the prompts, ensuring you perform the following:
On the Administration Settings screen, select Configure this as an Administration OC4J instance.
On the Cluster Topology Configuration screen, select Access this OC4J Instance from a separate Oracle HTTP Server. Specify the hostname and port for the middle tier you installed in Step 1 of this procedure.
On this same screen, select Configure this instance to be part of an Oracle Application Server cluster topology and specify the same cluster discovery address as you specified in Step 1 of this procedure.
For the third middle tier, install a J2EE Server, Web Server and SOA Suite instance.
Perform an advanced installation of J2EE Server, Web Server and SOA Suite, as described in Section 5.2.2, "Installing J2EE Server, Web Server and SOA Suite". During the installation procedure, follow the prompts, ensuring you perform the following:
On the Administration Settings screen, do not select Configure this as an Administration OC4J instance.
On the Cluster Topology Configuration screen, select Access this OC4J Instance from a separate Oracle HTTP Server. Specify the hostname and port for the middle tier you installed in Step 1 of this procedure.
On this same screen, select Configure this instance to be part of an Oracle Application Server cluster topology and specify the same cluster discovery address as you specified in Step 1 of this procedure.
Configure Java Single Sign-On. Perform the following steps on the second Oracle Application Server instance you just installed (Oracle_Home2 in Figure 1-8):
Access the Oracle Enterprise Manager 10g Application Server Control Console.
Scroll to the Administration section and click Java SSO Configuration.
The Java SSO Configuration page appears.
Click Participating Applications.
The applications are listed.
Click the check box for the following applications to be Java SSO enabled:
orabpel (for Oracle BPEL Process Manager)
esb-dt (for Oracle Enterprise Service Bus)
ccore (for Oracle Web Services Manager)
ascontrol (for Application Server Control Console)
Click Apply.
A confirmation message appears that the SSO configuration was completed and will take effect after the instances are restarted.
Click Restart.
A confirmation message appears.
Click Yes.
The instance is restarted.
To configure JSSO for OWSM, perform the following steps:
Navigate to ORACLE_HOME/owsm/bin.
Edit the ORACLE_HOME/owsm/bin/install.properties file to set the install.sso.support property to true.
Run the following command:
prompt> wsmadmin.sh deploy password console
In the preceding commands, password is the OC4J administrator password.
Reconfigure the owsm console application with the OID security provider as described in "Steps to Use the Oracle Identity Management Security Provider" and "Settings for Authentication Method with Oracle Identity Management" in the Oracle Containers for J2EE Security Guide, Chapter 8.