2 How to Create a Tabular Form
A tabular form enables users to update multiple rows in a table at once from a single page. You can use the Tabular Form Wizard to create a tabular form that contains a built-in multiple row update process. This built-in process performs optimistic locking behind the scenes to maintain the data integrity.
This tutorial explains how to create a tabular form within a new application and then how to change one of the updatable columns from a text field to a select list. To create the tabular form, you need to run a script to create database objects for a fictional Human Resources department. See "Installing the HR Database Objects".
This section contains the following topics:
Creating an Application
First, you need to create an application using the Create Application Wizard.
To create an application using the Create Application Wizard:
-
Click the Home tab.
-
On the Workspace home page, click the Application Builder icon.
The Application Builder home page appears.
-
Click Create.
-
Select Create Application and click Next.
-
Specify the page name.
-
For Name, enter
Tabular Form Application. -
For Application, accept the default.
-
For Create Application, select From scratch.
-
For Schema, accept the default.
-
Click Next.
Next, you need to add a page. You have the option of adding a blank page, a report, a form, a tabular form, or a report and form. For this exercise, you add a blank page and then create the tabular form.
-
-
Add a blank page:
-
Under Select Page Type, select Blank and click Add Page as shown in Figure 2-1.
The new page appears in the list at the top of the page.
-
Click Next.
-
-
For Tabs, accept the default, One Level of Tabs, and click Next.
-
For Copy Shared Components from Another Application, accept the default, No, and click Next.
-
For Attributes, accept the defaults for Authentication Scheme, Language, and User Language Preference Derived From and click Next.
-
For User Interface, select Theme 2 and click Next.
-
Review your selections and click Create.
The Application home page appears.
Creating a Tabular Form Using a Wizard
The Tabular Form Wizard creates a form to perform update, insert, and delete operations on multiple rows in a database table. Additionally, the wizard creates a multiple row update process that checks for MD5 checksum values before doing the update to prevent lost updates. In the following exercise you create a tabular form on the Employees table.
To create a tabular form using the Tabular Form Wizard:
-
On the Workspace home page, click the Application Builder icon.
The Application Builder home page appears.
-
Click the Tabular Form Application icon.
The Application home page appears.
-
Click Create Page.
-
For the page type, select Form and click Next.
-
Select Tabular Form and click Next.
-
For Table/View Owner:
-
From Table/View Owner, accept the default.
-
From Allowed Operations, accept the default, Update, Insert, and Delete.
-
Click Next.
-
-
For Table/View Name, select EMPLOYEES and click Next.
-
For Displayed Columns:
-
For Select Columns, press Ctrl and select the following columns:
FIRST_NAME, LAST_NAME, HIRE_DATE, SALARY, DEPARTMENT_ID
Note:
This exercise limits the number of columns to optimize the display on-screen. For a real form, you would probably want to include additional columns. -
Click Next.
-
-
For Primary Key, accept the default, EMPLOYEE_ID (Number) and click Next.
-
For Source Type, accept the default, Existing trigger, and click Next.
-
For Updatable Columns, select all columns and click Next.
-
On Identify Page and Region Attributes:
-
For Page, accept the default.
-
For Page Name, enter
Tabular Form. -
For Region Title, accept the default,
Tabular Form. -
For Region Template and Report Template, accept the defaults.
-
For Breadcrumb, accept the default.
-
Click Next.
-
-
For Tab, accept the default, Do not use tabs, and click Next.
-
For Button Labels:
-
Accept the defaults for the Cancel, Delete, and Add Row buttons.
-
For the Submit button, enter
Apply Changes. -
Click Next.
-
-
Accept the remaining defaults and click Next.
-
Confirm your selections and click Finish.
Next, run the page to view your new form.
To run the page:
-
Click the Run Page icon as shown in Figure 2-2.
-
If prompted to enter a username and password, enter your workspace username and password and click Login.
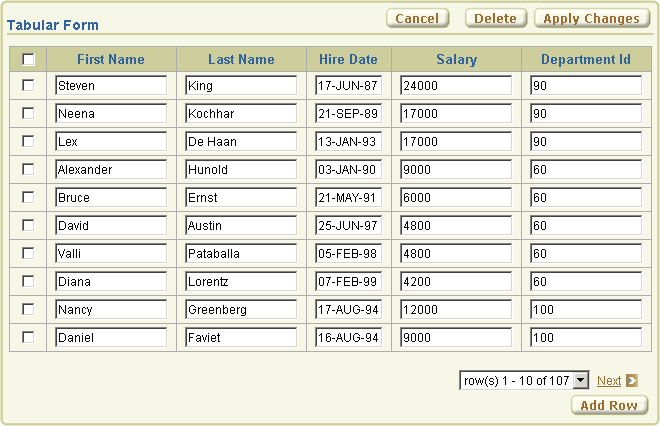
The tabular form appears as shown in Figure 2-3.
As shown in Figure 2-3, note that the tabular form contains four buttons. Cancel, Delete, and Apply Changes are displayed in the upper right corner and Add Row is displayed in the bottom right corner. Additionally, a check box appears to the left of each row, enabling the users to select one row. Users can also select all rows at once by selecting the check box to the left of the column headings. The same check box is also used in conjunction with the Delete button to identify the rows to be deleted.
Changing the Department Id Column to a Select List
When the Tabular Form Wizard creates a tabular form, updatable columns are displayed, by default, as text fields. You can change this default display by editing report column attributes. In the next exercise, you change the default display of the Department Id column to a select list.
To change the default display of a column to a select list:
-
Navigate to the Page Definition for page 2. Click Edit Page 2 on the Developer toolbar as shown in Figure 2-4.
-
Under Regions, click Report next to Tabular Form.
The Report Attributes page appears.
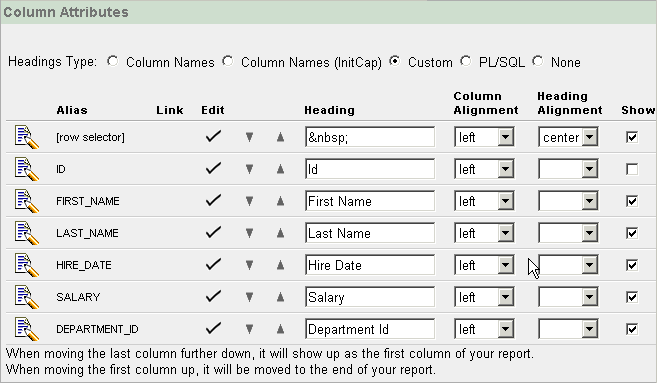
Figure 2-5 Column Attributes on the Report Attributes Page

Description of "Figure 2-5 Column Attributes on the Report Attributes Page"
-
Under Column Attributes, click the Edit icon next to the DEPARTMENT_ID column as shown in Figure 2-5. The Edit icon resembles a small page with a pencil on top of it.
The Column Attributes page appears. Next, change the default display of this column to a select list.
-
Scroll down to Tabular Form Element.
-
From the Display As list in the Name section, select Select List (query based LOV).
Next, create your query.
-
Scroll down to Lists of Values and enter the following in LOV Query:
SELECT DISTINCT department_id a, department_id b FROM employees
-
Scroll up to the top of the page and click Apply Changes.
-
Click the Run Page icon in the upper right corner the page.
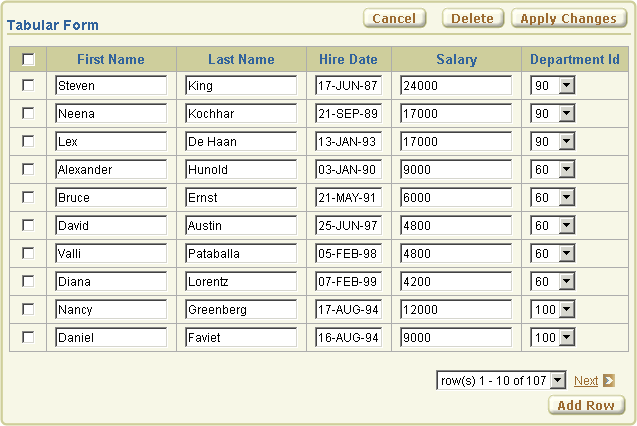
As shown in Figure 2-6, notice the Department Id column now displays as a select list.
Figure 2-6 Tabular Form with Department Id Column Changed to a Select List

Description of "Figure 2-6 Tabular Form with Department Id Column Changed to a Select List"
Note:
Do not modify the select list of a SQL statement of a tabular form after it has been generated. Doing so can result in a checksum error when altering the data in the form and applying updates.Consider the following example:
SELECT first_name FROM employees;
Note that this should not be altered to:
SELECT lower(first_name) FROM employees

