| Oracle® Warehouse Builder Installation and Administration Guide, 10g Release 2 (10.2.0.2) for Windows and UNIX Part Number B28224-04 |
|
|
View PDF |
| Oracle® Warehouse Builder Installation and Administration Guide, 10g Release 2 (10.2.0.2) for Windows and UNIX Part Number B28224-04 |
|
|
View PDF |
This chapter includes the following topics:
Use the Repository Assistant to define an Oracle Database as a Warehouse Builder repository. The assistant guides you through the most common installation scenarios and options.
Note:
Before proceeding with this wizard, first complete steps 1 through 6 in General Steps for Installing Warehouse Builder.As an alternative to using the wizard, you can install a repository using the OMB Plus scripting language. The default settings for creating a repository are the same whether you use the OMB Plus or the Repository Assistant. For example, in both methods, Warehouse Builder assigns USERS as the default tablespace for indexes. For more information installing through the scripting language, read about the OMBINSTALL command in the Oracle Warehouse Builder Scripting Reference.
The first step in installing a Warehouse Builder repository is to determine the type of repository implementation you want to perform.
The Basic Installation is designed for installing a unified repository onto a local computer and is suitable for performing a proof of concept or launching a pilot program. When you select a basic installation, the Repository Assistant guides you through Connecting to the Oracle Database and Defining a User and an Owner in the Basic Installation.
Use the Advanced Setup to create multiple users at one time, to install a repository on a remote computer, or for any implementation strategy other than the basic installation. Also select the advanced option when you want to add or drop repositories or repository users, change the repository language settings, or register a Real Application Cluster (RAC) instance.
When you select an advanced setup, the Repository Assistant guides you through Connecting to the Oracle Database and all the options available in Installing a Repository using the Advanced Setup Options.
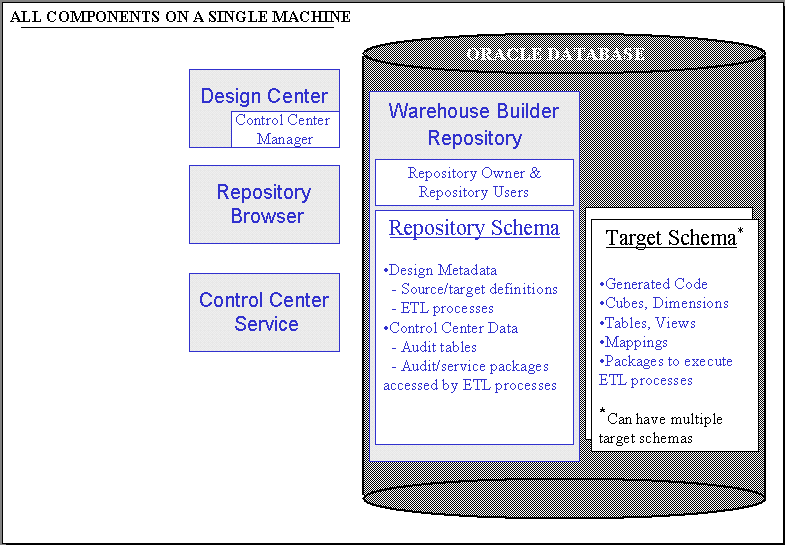
The simplest installation you can perform is a basic installation on a local computer. With a basic, local installation, the Repository Assistant guides you through defining a unified repository with one repository owner and a separate repository user enabled as a deployment target. In other words, the repository user can access both the Design Center for designing ETL processes and the Control Center Manager for deploying and auditing.
Figure 2-1 depicts a basic installation on a single laptop computer, a common scenario for consultants who use Warehouse Builder at client sites and travel with minimal hardware.
Figure 2-1 Consultant Profile: Basic Installation on a Single Computer
Use the advanced set up to accomplish any of the following:
Traditional Client/ Server Implementation: With multiple clients accessing the same repository on a server, you can define a repository user for each client.
Separate Design and Runtime Environments Implementation: Define separate repositories for design metadata and runtime data.
Implementing a Remote Runtime (Optional): Implement a remote target in which no Warehouse Builder components are installed on the computer hosting target schema.
After you specify the type of installation to perform, the assistant prompts you for connection information to the existing Oracle Database you want to define as a Warehouse Builder repository. The connection information you specify depends on type of installation you are performing.
In a RAC environment, do not type the host name, port number, and Oracle service name. Choose the SQL*NET Connection option. Type the net service name, defined in <OWB_ORACLE_HOME>\network\admin\tnsnames.ora.
For a basic installation, define a single repository user as described in Defining a User and an Owner in the Basic Installation.
For an advanced installation, you define the repository owner and multiple repository users on subsequent pages in the wizard.
To proceed with either the advanced or basic installation, note that the database must be running and you must enter a database user with SYSDBA privileges.
The basic installation is designed to enable you to quickly create a unified repository with a single repository owner and a single user. The wizard defines a default owner and prompts you to create a user.
Specify a repository user name and password based on the Guidelines for User Names and Passwords. The Repository Assistant assigns the user as a deployment target. In other words, that user can access both the Design Center for designing ETL processes and the Control Center Manager for deploying and auditing.
For simplicity, the wizard assigns a default repository owner, OWBRT_SYS. If no password is set for OWBRT_SYS, the assistant prompts you to either define an new repository owner or set a password for OWBRT_SYS.
Notice that the basic installation lets you define only one user at a time. After you complete the basic installation, you can launch the assistant again and select Advanced Set up to define multiple users at one time. Or, after you complete the basic installation, launch the Design Center and create users in the security interface as described in the Oracle Warehouse Builder User's Guide.
The basic installation is designed for local installations only. If you select Basic Installation and enter connection information for a remote computer, the Repository Assistant instructs you to return to the Install Type and select Advanced Setup.
The Repository Assistant prompts you to create user names and confirm any new or reset passwords.
To specify a valid user name and password, adhere to the security standard implemented on the Oracle Database. The default minimum requirement is that both the user name and password be a VARCHAR(30). Also, do not include any special characters. Your database may have more requirements if a password complexity verification routine was applied. For more information about user names, passwords, and password complexity verification routines, refer to the Oracle® Database Security Guide.
Choose one of the following options:
Managing the Warehouse Builder Repository Owner: Select this option if you want to create, delete, or alter a repository owner.
Managing Warehouse Builder Repository Users: Select this option to create or remove the registration for one or more repository users.
Registering a Real Application Cluster (RAC) instance: This option is only available for local installations. To register a RAC instance, select this option, click Next and then Finish on the Summary page. For additional information, see "Steps for Installing Warehouse Builder in RAC Environments".
Each repository must be associated with at least one repository owner. The repository owner has all the administrative privileges for administering the repository, its display languages, and its users.
Managing the repository owner includes:
Creating new repository owners: This entails Selecting the Default Tablespaces and Selecting the Base Language.
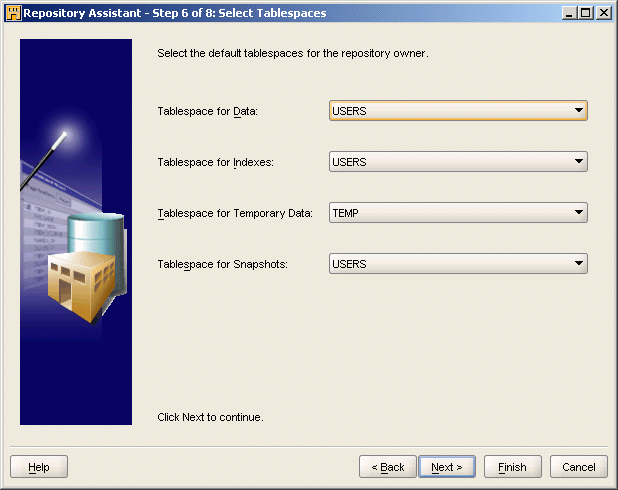
The assistant recommends a set of default tablespaces. You can accept the recommendations or specify new tablespaces.
Figure 2-2 Dialog: Selecting Default Tablespaces
The base language is the language of the repository. That is, the physical name for each repository object is assumed to be written in the base language.
The Repository Assistant assumes a default base language contingent upon the locale of the computer from which you launched the Repository Assistant. For example, when you run the assistant from a computer with its locale set to British English, the default base language for the repository is en_GB for British English.
You can accept the default or select from a list of base languages. Note, however, that you can define the base language only once. That is, after you create the repository, you cannot change the base language and you cannot add another base language. This means that when users create new repository objects, the physical names should always be written in the base language.
However, to enable users to use different languages to name objects, you have the option to support multiple display languages as described in Adding Display Languages.
Unlike the base language, you can have multiple display languages and you can add display languages after initially defining the repository.
Display languages are associated with business names only. For a given object, its physical name corresponds to the base language. However, for each display language you enable, users can create a corresponding business name.
Table 2-1 lists the International Organization for Standardization (ISO) IDs for each display language supported in Warehouse Builder.
Table 2-1 ISO IDs for Supported Languages
| ISOID | Language |
|---|---|
|
sq_AL |
Albanian |
|
en_US |
American English |
|
ar_AE |
Arabic |
|
ar_EG |
Arabic Egypt |
|
as_IN |
Assamese |
|
bn_IN |
Bangla |
|
pt_BR |
Brazilian Portuguese |
|
bg_BG |
Bulgarian |
|
fr_CA |
Canadian French |
|
ca_ES |
Catalan |
|
hr_HR |
Croatian |
|
cs_CZ |
Czech |
|
da_DK |
Danish |
|
nl_NL |
Dutch |
|
en_GB |
English |
|
et_EE |
Estonian |
|
fi_FI |
Finnish |
|
fr_FR |
French |
|
de_DE |
German |
|
el_GR |
Greek |
|
gu_IN |
Gujarati |
|
he_IL |
Hebrew |
|
hi_IN |
Hindi |
|
hu_HU |
Hungarian |
|
is_IS |
Icelandic |
|
in_ID |
Indonesian |
|
it_IT |
Italian |
|
ja_JP |
Japanese |
|
kn_IN |
Kannada |
|
ko_KR |
Korean |
|
es_US |
Latin American Spanish |
|
lv_LV |
Latvian |
|
lt_LT |
Lithuanian |
|
ms_MY |
Malay |
|
ml_IN |
Malayalam |
|
mr_IN |
Marathi |
|
es_MX |
Mexican Spanish |
|
no_NO |
Norwegian |
|
or_IN |
Oriya |
|
pl_PL |
Polish |
|
pt_PT |
Portuguese |
|
pa_IN |
Punjabi |
|
ro_RO |
Romanian |
|
ru_RU |
Russian |
|
zh_CN |
Simplified Chinese |
|
sk_SK |
Slovak |
|
sl_SI |
Slovenian |
|
es_ES |
Spanish |
|
sv_SE |
Swedish |
|
ta_IN |
Tamil |
|
te_IN |
Telugu |
|
th_TH |
Thai |
|
zh_TW |
Traditional Chinese |
|
tr_TR |
Turkish |
|
uk_UA |
Ukrainian |
|
vi_VN |
Vietnamese |
When you drop a repository owner, be aware that each repository owner can be associated with multiple repository users. After you drop a repository owner, any remaining users become orphans and you cannot use the Repository Assistant to delete them. Therefore, use the Repository Assistant to delete associated users prior to dropping a repository owner. Alternatively, you can delete orphan users through the SQL Plus.
All Warehouse Builder users and the repository owner must first be defined as Oracle Database users.
As a repository owner, the actions you can take to manage users are adding repository users or Deleting Repository Users. You cannot change user passwords from within Warehouse Builder. Change passwords directly in the Oracle Database as described in the Oracle® Database Security Guide.
The left panel in Figure 2-3 lists the existing Oracle Database users and schemas. Select existing database users from the list. Or, if adding new users, you can define and register a new user by clicking on Create New User located in the lower left corner.
If you select an existing user, Warehouse Builder prompts you for the password before allowing you to proceed.
When selecting from the list, you can select one or more database users. Notice that, for security reasons, database administrator users such as SYSDBA are not available for registering as Warehouse Builder users.
When you delete a repository user, you unregister and remove the user from the repository. Deleting the user from the Warehouse Builder repository does not delete or alter the user account on the Oracle Database.
In a remote runtime environment, target schemas are remote with respect to the Control Center Service running on another server. Therefore, to deploy and execute ETL processes in such an environment, the Control Center Service on the other server must be running.
Since no Warehouse Builder specific software is installed on the target database, the target database can reside on a platform not directly supported Warehouse Builder release. For example, since Warehouse Builder 10g Release 2 (10.2.0.2) does not support the Control Center running on HP OpenVMS Alpha, the alternative is to implement remote runtime.
When considering a remote runtime environment, be aware of an additional requirement. If the database that hosts the remote target schema also hosts its repository, then you can deploy all types of mappings to the remote target without restriction. However, if the remote target schema and the repository are in two different databases, then you cannot deploy PL/SQL mappings to the standalone target schema.
There are several scenarios for implementing remote runtime including the following:
Control Center Service Installed on the Client: Notice that an Oracle Database is not required on the computer hosting the Control Center Service. You can deploy all types of mappings to the remote target without restriction.
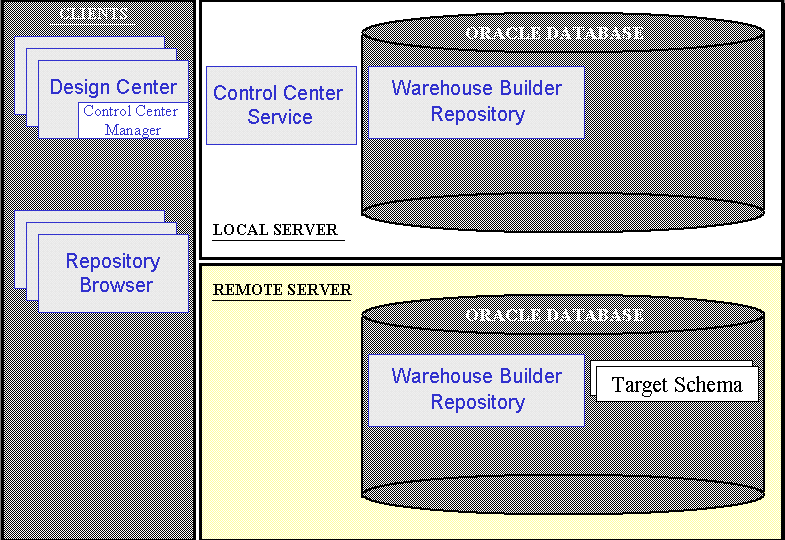
Control Center Service Installed on a Local Server: You can deploy all types of mappings to the remote target without restriction.
A Standalone Target Schema: You can deploy all types of mappings except PL/SQL mappings to a standalone target schema.
Figure 2-4 Control Center Service Installed on the Client
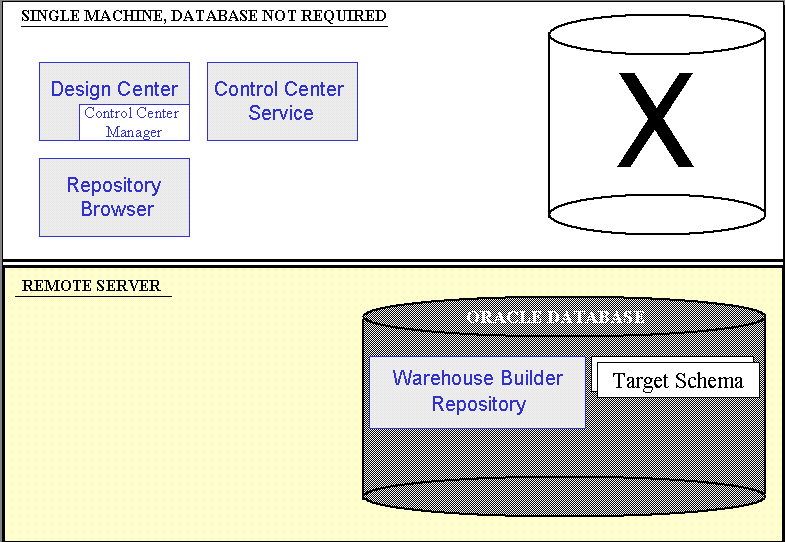
Figure 2-5 Control Center Service Installed on a Local Server
To implement a remote runtime environment, complete the following steps:
Install the client components including the Design Center and Control Center Service as depicted in Remote Runtime Scenarios.
From the client computer, launch the Repository Assistant.
Select Start, Programs, OWB_ORACLE_HOME, Warehouse Builder, Administration, then Repository Assistant.
Select the Advanced Setup option.
Connect to the server to host the standalone target schema.
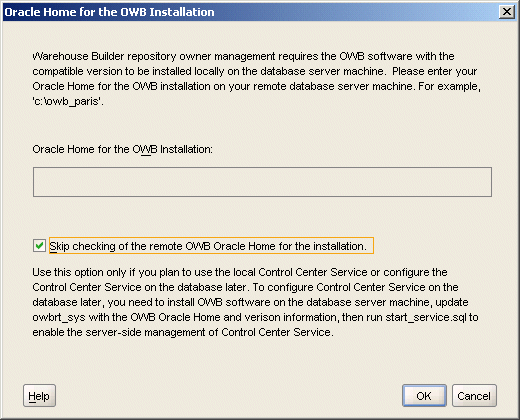
The Repository Assistant displays a dialog as shown in Figure 2-7. Enable Skip Checking of the Remote OWB Oracle home Installation and select OK.
Figure 2-7 Dialog: Oracle Home for the OWB Installation
Follow the prompts in the Repository Assistant.
From the client computer, start the Control Center Service.
Select Start, Programs, OWB_ORACLE_HOME, Warehouse Builder, Administration then Start Control Center Service. When prompted, connect to the repository you previously created. Use the repository owner user name and password.
Launch the Control Center Manager to deploy and then execute ETL processes on the target schema.
To launch the Control Center Manager, navigate to the Tools menu in the Design Center and select Control Center Manager.
Launch the Repository Assistant again to create additional target users. (Optional)
Note:
Only the Repository Assistant can create users for the target users. The security interface in the Design Center only creates users local to the repository and therefore cannot be used for this purpose.When you install a repository, Warehouse Builder enforces a default metadata security policy. The default policy is a minimal security policy appropriate for proof-of-concept or pilot projects. With minimal security, Oracle Database security policies keep data in the design repository secure and metadata is available to anyone who knows the design repository owner log on information.
You can change the default by selecting a maximum security policy. Alternatively, you can use the security interface in Warehouse Builder to design your own security policy as described in Implementing Security in Warehouse Builder. In either of these two cases, you should ensure that repository database has the Advanced Security Option enabled.
Note:
If you host the Warehouse Builder repository on a Standard Edition of the Oracle Database, the Advanced Security Option is not available. For ramifications, see Limited Password Security in Oracle Database Standard Edition.To change the default metadata security policy:
Launch the Warehouse Builder Design Center.
In Windows, from the Start button select Programs and navigate to the Oracle product group you installed in the previous step. Select Warehouse Builder and then Design Center.
Log in as the repository owner.
From the main menu, select Tools and then Preferences.
Select Security Parameters.
For the parameter Default Metadata Security Policy, specify the security policy to be applied.
Minimum security allows all users full control over objects any newly register user creates. Maximum security, however, restricts access to the registered user that created the object and Warehouse Builder administrators.