| Oracle® Warehouse Builder User's Guide 10g Release 2 (10.2.0.2) Part Number B28223-05 |
|
|
View PDF |
| Oracle® Warehouse Builder User's Guide 10g Release 2 (10.2.0.2) Part Number B28223-05 |
|
|
View PDF |
You can use data from ASCII and binary flat files as sources and targets in Warehouse Builder. For flat file sources, you have the additional option of creating a SQL representation of the data by using an external table.
This chapter includes the following topics:
You can use flat files as either sources or targets in mappings.
To use a flat file as a source, first introduce the metadata into the repository. The steps you take depend upon if the source metadata is in ASCII or binary format. For ASCII format, see "Importing ASCII Files into the Repository". For binary format, see "Adding Existing Binary Files to the Repository".
After you import the file, you can use it as a source in a mapping. Mappings require files to have a permanent name. However, if your source file is a generated file, that is, given a unique name each time it is generated on the main frame for example, you can provide the new name at runtime.
To import flat file definitions, complete the following steps:
Establish network connectivity to the files you wish to import.
If you are accessing the data files directly, and if the Warehouse Builder client and the data files reside on different types of operating systems, contact your system administrator to establish the required connectivity through NFS or other network protocol.
If the Warehouse Builder client and data files reside on Windows operating systems, store the data files on any drive the Warehouse Builder client machine can access.
Create a module for each folder in your file system from which you want to sample existing files.
Using the Import Metadata Wizard for Flat Files
Use the Import Metadata Wizard to select the flat files you wish to import. On the Connection Information page, select the option to launch the Flat File Sample Wizard.
Using the Flat File Sample Wizard
The Flat File Sample Wizard enables you to view a sample of the flat file and define record organization and file properties. The wizard enables you to sample and define common flat file formats such as string and ascii.
For files with complex record structures, the Flat File Sample Wizard may not be suitable for sampling the data. In such cases, see "Adding Existing Binary Files to the Repository".
Use the flat file as either a source or a target in a mapping.
If you intend to use the file as a source, consider the advantages of creating an external table based on the file. For more information, refer to "External Table Operators versus Flat File Operators" and"Creating a New External Table Definition".
If changes are made to the structure of the flat file, update the file definition.
To add existing binary flat files, complete the following steps:
Create a module for each folder in your file system to which you want to create new files.
Using the Create Flat File Wizard
Follow the prompts in the wizard, taking notice of the special instructions for naming the file in "Describing a New Flat File" .
An external table is a read-only table that is associated with a single record type in external data such as a flat file. External tables represent data from non-relational source in a relational table format. When you use an external table in a mapping, columns properties are based on the SQL properties you defined when importing the flat file. For more information on SQL properties for flat files, see "SQL Properties" .
When you use an external table as a source in a mapping, you can use it as you would a regular source table. Warehouse Builder generates SQL code to select rows from the external table. You can also get parallel access to the file through the table.
Note:
Use external tables are source tables only.You can either import an existing external table from another database or define a new external table as described in "Creating a New External Table Definition".
You can introduce data from a flat file into a mapping either through an external table or a flat file operator. To decide between the two options, consider how the data must be transformed.
When you use an external table operator, the mapping generates SQL code. If the data is to be joined with other tables or requires complex transformations, use an external table.
When you use a flat file operator, Warehouse Builder generates SQL*Loader code. In cases where large volumes of data are to be extracted and little transformation is required, you can use the flat file operator. From the flat file operator, you could load the data to a staging table, add indexes, and perform transformations as necessary. The transformations you can perform on data introduced by a flat file operator are limited to SQL*Loader transformations only.
In Warehouse Builder, you can use an external table to combine the loading and transformation within a single set-based SQL DML statement. You do not have to stage the data temporarily before inserting it into the target table.
For more information on differences between external tables and SQL*Loader (flat file operators in Warehouse Builder), see the Oracle Database Utilities Manual.
When you define a new flat file, typically you do so to create a new target.
Creating a New Flat File as a Target
To design a new flat file, complete the following steps:
Create a module for each folder in your file system to which you want to create new files.
Create flat file modules to store definitions of flat files you either import or define yourself.
To create a flat file module:
Right-click the Files node in the Project Explorer and select New.
Warehouse Builder displays the welcome page for the Create Module Wizard.
Define the module in the following steps:
The Finish page summarizes the information you provided on each of the wizard pages. When you click Finish, the wizard creates the flat file module and inserts its name in the Project Explorer.
If you checked Import after finish earlier in the wizard on the Connection Information Page, Warehouse Builder launches the Import Metadata Wizard described in "Using the Import Metadata Wizard for Flat Files".
Or, to define a new flat file, refer to "Using the Create Flat File Wizard".
Type a name and an optional description for the flat file module.
Recall that you create a module for each folder in your file system from which you want to sample existing files or to which you want to create new files. Therefore, consider naming the module based on the folder name. Each file module corresponds to one folder in the file system.
For example, to import flat files from c:\folder1 and a subfolder such as c:\folder1\subfolder,create two file modules such as C_FOLDER1 and C_FODLER1_SUBFOLDER.
Locations for flat file modules are the folders in the file system from which you sample existing files or to which you create new files. You can define a new location or select an existing location.
Note that a flat file location identifies a folder in the file system and does not include subfolders.
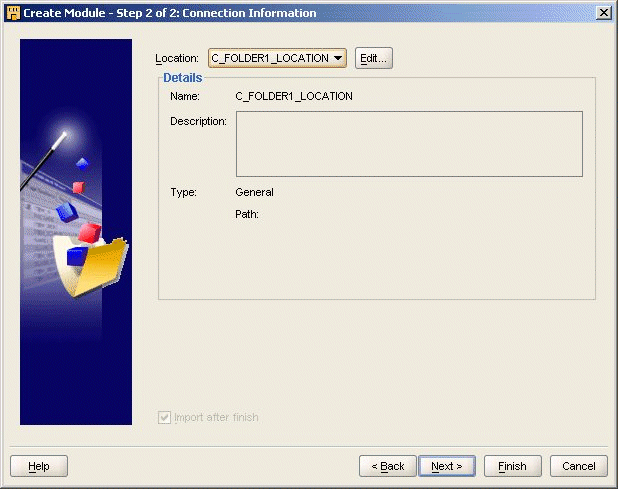
The Connection page displays with a default location named based on the module name you typed. Notice in Figure 14-1 that description and path are blank.
If you intent to import files into this module, click Edit to assign values for the location. This location becomes the folder from which you sample existing files or create new files.
Figure 14-1 Connection Information Page in the Create Flat File Modules Wizard
Use the Create Flat File Wizard to design a new flat file. The primary use of this wizard is to create a flat file for use as a target in a mapping. After you complete the wizard, you can follow the steps described in "Creating a Source or Target Based on an Existing Flat File".
Also consider using this wizard as a secondary method for introducing metadata from an existing flat file. This could be the case when the existing file has complex record formats and using the Flat File Sample wizard is not a viable solution.
The Create Flat File Wizard guides you in completing the following steps:
Use the Name and Description page to describe the new flat file to create. After you complete the file set up information, click Next to continue with the wizard.
Name: This name uniquely identifies the file in the repository. Type a name that does not include a space or any punctuation. You can include an underscore. You can use upper and lower case letters. Do not start the name with a digit. Do not use a Warehouse Builder reserved word. For a list of reserved words, see Chapter 37, "Reserved Words".
Default Physical File Name: If you are creating a new file, you can leave this name blank. If you are defining an existing binary file, type the name of the file. Do not include the file path as you specify this later in the wizard.
Character set: Character sets determine what languages can be represented in database objects and files. Select a character set or accept the default which is the character set defined for the machine hosting Warehouse Builder. For complete information on NLS character sets, see the Oracle Database Globalization Support Guide.
Description: You can type in an optional description for the file.
Use the File Properties page to specify Record Organization, Logical Record Definition, Number of Rows to Skip, and the Field Format for the new flat file.
Indicate how to organize the records in the file. Select between the two options to indicate how the length of each record in the file is determined:
Records delimited by: Select this option to designate the end of each record by a delimiter. Then specify that record delimiter. You can accept the default record delimiter, new line (\n), or you can type in a new value.
Record length (in characters): Select this option to create a file with all records having the same length. Then specify the number of characters in each record. For files with multibyte characters, count a multibyte character as one character.
By default, the wizard creates a file in which each physical record corresponds to one logical record. You can override the default to create a file composed of logical records that correspond to multiple physical records.
Number of physical records for each logical record: The data file contains a fixed number of physical records for each logical record.
PHYSICAL_RECORD1
PHYSICAL_RECORD2
PHYSICAL_RECORD3
PHYSICAL_RECORD4
In the preceding example, if the number of physical records for each logical record is 2, then PHYSICAL_RECORD1 and PHYSICAL_RECORD2 form one logical record and PHYSICAL_RECORD3 and PHYSICAL_RECORD4 form a second logical record.
End character of the current physical record: The data file contains a variable number of physical records with a continuation character at the end that signifies that the record is associated with the next physical record.
In the following example, the continuation character is a percentage sign (%) at the end of the record.
PHYSICAL_RECORD1%
PHYSICAL_RECORD2       end log rec 1
PHYSICAL_RECORD3%
PHYSICAL_RECORD4       end log rec 2
Start character of the next physical record: The data file contains a variable number of physical records with a continuation character at the beginning of each physical record that signifies that the record is associated with the previous physical record.
The following example shows two logical records with a continuation character at beginning of the record.
PHYSICAL_RECORD1
%PHYSICAL_RECORD2      end log rec1
PHYSICAL_RECORD3
%PHYSICAL_RECORD4      end log rec 2
More than two records can be joined with this technique. The following example shows four physical records for each logical record using continuation at beginning.
PHYSICAL_RECORD1
%PHYSICAL_RECORD2
%PHYSICAL_RECORD25
%PHYSICAL_RECORD26   (end log record 1)
PHYSICAL_RECORD3
%PHYSICAL_RECORD4
%PHYSICAL_RECORD45
%PHYSICAL_RECORD46 (end log record 2)
When creating a new file, you can leave this value blank.
When defining an existing file, indicate the number of records to skip at execution time in Skip rows. This is useful for skipping over unwanted header information. If one of the records includes field names, skip the preceding header records so that the record containing field names is first in the file.
Select between Fixed Length and Delimited formats for the file.
To create a delimited file, specify the following properties:
Field delimiter: Field delimiters designate where one field ends and another begins. You can type in a field delimiter or select one from the drop-down list. The drop-down list displays common field delimiters. However, you may type in any character as a delimiter except the ones used for enclosures. The default is the comma (,).
Enclosures (Left and Right): Some delimited files contain enclosures that denote text strings within a field. If the file contains enclosures, enter an enclosure character in the text box or select one from the drop-down list. The drop-down list displays common enclosures. However, you may type in any character. The default for both the left and right enclosure is the double quotation mark (").
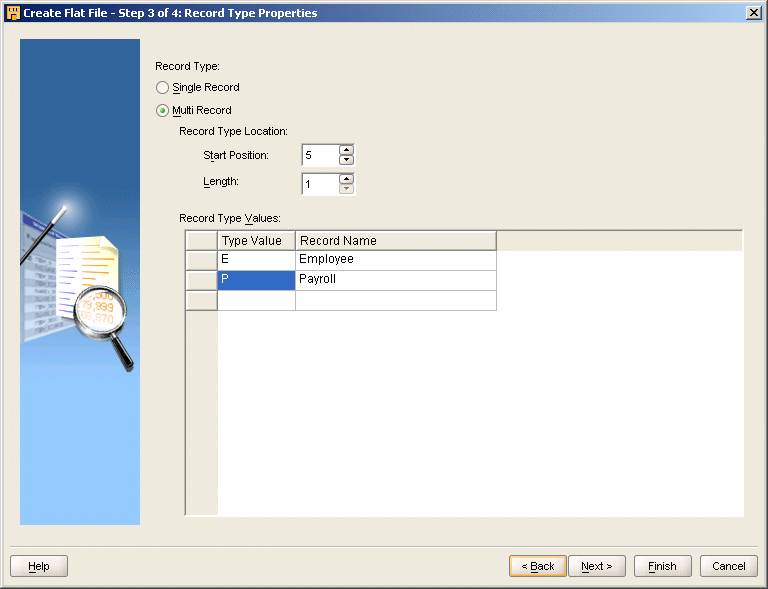
Indicate whether the file you create is to contain a single record type or multiple record types. If the file should contain only one type of record, select Single.
If the file should contain more than one record type, select Multiple. Use multiple record types, for example, to create a flat file with employee data and payroll data as shown in Figure 14-2. For each record type you want to create, specify values under Record Type Location and then its type value and record name.
Valid entries for Record Type Location depend the field format you selected on the File Properties page, fixed length or delimited fields. For example, if you specified the fields are delimited, indicate the start position and length for the record type. For fixed-length files, indicate the field position.
Figure 14-2 Record Type Properties Page in the Create Flat File Wizard
Use the Field Properties page to define properties for each field.
Since you can use a flat file in a mapping either directly as a flat file source or indirectly through an external table, the Field Properties page shows both SQL*Loader Properties and SQL Properties. Use the scroll bar to scroll to the right and view all the properties.
The wizard deactivates properties that do not apply to a given data type. For example, you can edit the Length for a CHAR, but precision and scale are not available. Deactivated properties are grayed out.
The first set of properties the wizard displays are for the SQL*Loader utility. When you use the flat file directly as a source in a mapping, Warehouse Builder relies upon SQL*Loader and the properties you set here. SQL*Loader properties include Type, Start, End, Length, Precision, Scale, Mask, NULLIF, and DEFAULTIF.
By default, the wizard displays these properties as they appear in the source file. Edit these properties or accept the defaults to specify how the fields should be handled by the SQL*Loader.
Type
Describes the data type of the field for the SQL*Loader. You can use the wizard to import many data types such as CHAR, DATE, DECIMAL EXTERNAL, FLOAT EXTERNAL, INTEGER EXTERNAL, ZONED, AND ZONED EXTERNAL. For complete information on SQL*Loader field and data types, refer to Oracle Database Utilities. Currently, only portable data types are supported.
Start
In fixed length files, indicates the field start position.
End
In fixed length files, indicates the field end position.
Length
For delimited files, specifies the maximum field length to be used by SQL* Loader.
Precision
Defines precision for DECIMAL and ZONED data types.
Scale
Defines the scale for DECIMAL and ZONED data types.
Mask
The SQL*Loader uses dd-mon-yy as its default date mask. You can override this default by entering a valid date mask when you describe the file. For example, if the input data has the format DD-Mon-YYYY rather than the SQL*Loader default, you can enter the true format as a mask.
NULLIF
You can override the default action of the SQL*Loader by placing a NULLIF condition on a field. For example, when a character field contains all blanks, you can direct SQL*Loader to mark the field as null rather than storing the blanks. Valid syntax for this field includes =BLANKS, ='quoted string', =X'ff' to indicate hexadecimal values, and != for 'not equal to' logic.
DEFAULTIF
You can override the default action of the SQL*Loader by placing a DEFAULTIF condition on a field. For example, when a numeric or DATE field contains all blanks, SQL*Loader rejects the entire record. To override this action, type =BLANKS in the DEFAULTIF property. When SQL*Loader evaluates this condition, it sets the numeric field to zeros and loads the record. Valid syntax for this field includes =BLANKS, ='quoted string', =X'ff' to indicate hexadecimal values, and != for 'not equal to' logic.
The second set of properties are the SQL properties that include SQL Type, SQL Length, SQL Precision, and SQL Scale. These properties specify how the fields in a flat file translate to the columns in a relational table for example.
The SQL properties you set here have the following implications for mapping design, validation, and generation:
External table: If you create an external table based on a single flat file record type, the columns properties are based on the SQL properties you defined for the flat file. For more information about external tables, see "Using External Tables".
Populating an Empty Mapping Table. In a mapping, if you populate an empty relational table with the metadata, the table inherits the SQL properties you defined for the flat file source.
Flat file target: If you use the flat file as a target in a mapping, the target does not inherit the SQL properties. Instead, all fields inherit the default SQL*Loader data type. For more information about using a flat file operator as a target, see "Flat File Operator".
SQL Type
Warehouse Builder supports many SQL data types such as CHAR, DATE, FLOAT, and BLOB.
The wizard assigns a default value for the SQL type based on the SQL*Loader properties you set. If you accept the default SQL type, Warehouse Builder updates that default in the event you later change the SQL*Loader properties. However, if you override the SQL type by selecting a new SQL type from the drop down list, it then becomes independent of the flat file SQL*Loader data type.
SQL Length
This property defines the length for the SQL column.
SQL Precision
When the SQL type is for example NUMBER and FLOAT, this property defines the precision for the SQL column.
SQL Scale
When the SQL type is for example NUMBER and FLOAT, this property defines the scale for the SQL column.
If you have existing flat files to use as sources or targets, you can import and then sample the metadata.
To import flat files:
Right-click a file module and select Import.
Warehouse Builder displays the welcome page for the Import Metadata Wizard.
Click Next.
The wizard displays the Filter Information page. This page gives you the option to filter file names.
All Data Files: This option returns all the data files available for the directory you specified for the flat file module.
Data files matching this pattern: Use this option to select only data files that match the pattern you type. For example, if you select this option and enter (*.dat), only files with .dat file extensions will be displayed on the next wizard page. If you type % as part of a filter string, it is interpreted as a wild card match for multiple characters. If you type '_' as part of a filter string, it is interpreted as a wild card match for a single character.
Click Next.
The wizard displays the Object Selection page, as shown in Figure 14-3.
Because Warehouse Builder does not provide inbound synchronization for flat files, the available objects will never appear in bold like other objects when they are reimported. When you reimport flat files, you always need to sample the flat file objects again.
Move the name of the files to be described from Available Objects on the left to the Selected Objects window pane on the right.
Click Next.
The wizard displays the Summary and Import page. The left-most column of this page contains a status ball which indicates if Warehouse Builder has the metadata for the file, as shown in Figure 14-4.
If the status ball is red, Warehouse Builder does not have the metadata. Proceed to the next step.
For each file on the Summary and Import page, either click Sample or select a file with a matching format from the Same As list box. If the format for a file matches that of another file on the Summary and Import page, you can select the file name from the Same As list box.
Figure 14-4 Summary and Import Page Showing File Status
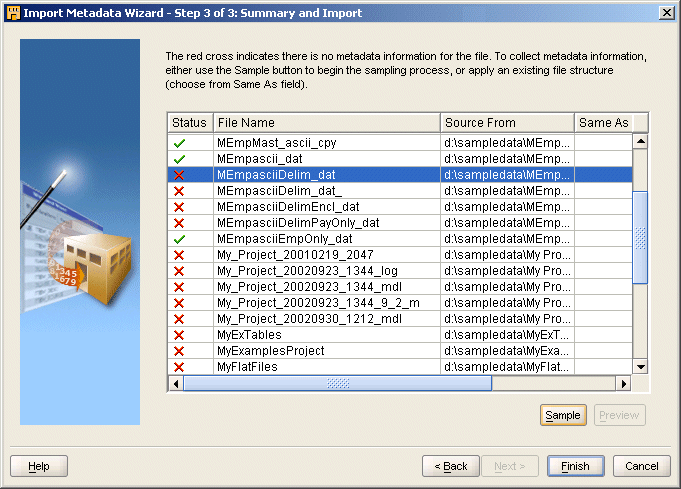
Select a file that has a red x mark and click Sample at the bottom of the Summary and Import page.
The wizard displays the welcome page for the Flat File Sample Wizard. Complete the Flat File Sample Wizard. For more information on the Sample Wizard, see Using the Flat File Sample Wizard.
After you complete the Flat File Sample Wizard for one file, Warehouse Builder returns to the Summary and Import page. The file you sampled is now displayed with a green check.
Once you sample all the files you want to import, click Finish. Warehouse Builder creates a definition for file, stores the definition in the source module, and inserts the format name in the source module Project Explorer.
Each time you use the Import Metadata Wizard to sample data from existing flat files, you have the option to launch the Flat File Sample Wizard.
Use the Flat File Sample Wizard as an aid in defining metadata from flat files. Note that although this wizard samples delimited and fixed length files, the Flat File Sample Wizard does not sample multibyte character file with a fixed record format. For these and other complex record formats such as binary files, consider "Using the Create Flat File Wizard".
After you complete the Flat File Sample Wizard, it stores the metadata in the Warehouse Builder repository and you can use the flat files as sources or targets in a mapping as described in "Creating a Source or Target Based on an Existing Flat File".
The Flat File Sample Wizard guides you in completing the following steps:
Use the Name page shown in Figure 14-5 to describe the flat file you are sampling.
Figure 14-5 Name Page for the Flat File Sample Wizard
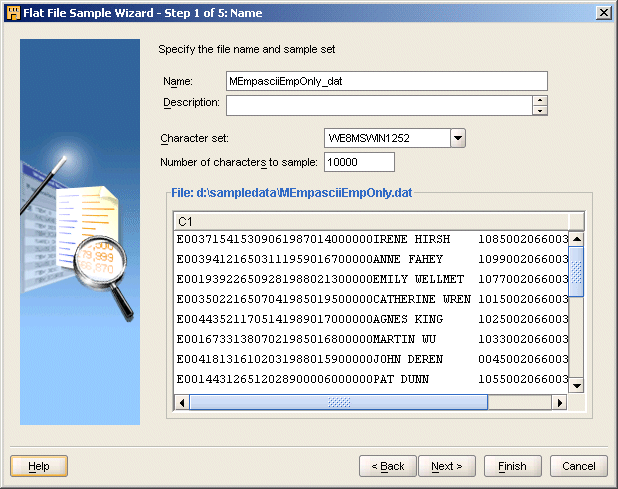
Name: This name uniquely identifies the file in the Warehouse Builder repository. By default, the wizard creates a name based on the name of the source file by replacing invalid characters with an underscore. For example, if the file name is myfile.dat, the wizard assign the repository name myfile_dat.
If you rename the file, do not include a space or any punctuation in the name. You can include an underscore. You can use upper and lower case letters. Do not start the name with a digit. Do not use a Warehouse Builder reserved word. For a list of reserved words, see Chapter 37, "Reserved Words"
Description: You can type in an optional description for the file.
Character set: Character sets determine what languages can be represented in database objects and files. In the Warehouse Builder client, the default Globalization Support or National Language Support (NLS) character set matches the character set defined for the machine hosting Warehouse Builder. If the character set differs from that of the source file, the data sample might appear unintelligible. You can display the data sample in the character set native to the source by selecting it from the drop-down list. For complete information on NLS character sets, see the Oracle Database Globalization Support Guide.
Number of characters to sample: You can indicate the number of characters for the wizard to sample from the data file. By default, the wizard samples the first 10,000 characters. To determine an optimum value for this field, see "Example: Flat File with Multiple Record Types".
After you complete the file set up information, click Next to continue with the wizard.
Use the Record Organization page to indicate how records are organized in the file you are sampling.
Figure 14-6 displays the Record Organization Page for the Flat File Sample Wizard.
Figure 14-6 Record Organization Page for the Flat File Sample Wizard
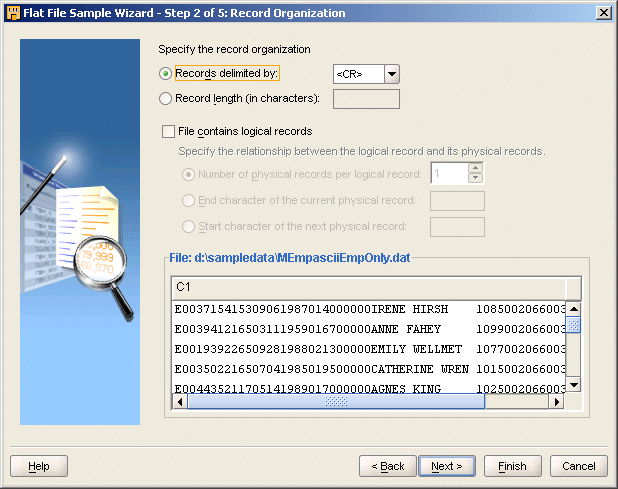
Select between the two options to indicate how the length of each record in the file is determined:
Records delimited by: Select this option if the end of each record is designated by a delimiter. Then specify that record delimiter. You can accept the default record delimiter, carriage return (<CR>), or you can type in a new value.
Record length (in characters): Select this option if each record in the file is the same length. Then specify the number of characters in each record. For files with multibyte characters, count a multibyte character as one character.
The Flat File Sample Wizard enables you to sample files composed of logical records that correspond to multiple physical records. If the file contains logical records, click File contains logical records. Then select one of the options to describe the file.
The wizard updates the display of the logical record in the lower panel to reflect your selection. The default selection is one physical record for each logical record.
After you complete the logical record information, click Next to continue with the wizard.
Number of physical records for each logical record: The data file contains a fixed number of physical records for each logical record.
PHYSICAL_RECORD1
PHYSICAL_RECORD2
PHYSICAL_RECORD3
PHYSICAL_RECORD4
In the preceding example, if the number of physical records for each logical record is 2, then PHYSICAL_RECORD1 and PHYSICAL_RECORD2 form one logical record and PHYSICAL_RECORD3 and PHYSICAL_RECORD4 form a second logical record.
End character of the current physical record: The data file contains a variable number of physical records with a continuation character at the end that signifies that the record is associated with the next physical record.
In the following example, the continuation character is a percentage sign (%) at the end of the record.
PHYSICAL_RECORD1%
PHYSICAL_RECORD2       end log rec 1
PHYSICAL_RECORD3%
PHYSICAL_RECORD4       end log rec 2
Start character of the next physical record: The data file contains a variable number of physical records with a continuation character at the beginning of each physical record that signifies that the record is associated with the previous physical record.
The following example shows two logical records with a continuation character at beginning of the record.
PHYSICAL_RECORD1
%PHYSICAL_RECORD2      end log rec1
PHYSICAL_RECORD3
%PHYSICAL_RECORD4      end log rec 2
More than two records can be joined with this technique. The following example shows four physical records for each logical record using continuation at beginning.
PHYSICAL_RECORD1
%PHYSICAL_RECORD2
%PHYSICAL_RECORD25
%PHYSICAL_RECORD26   (end log record 1)
PHYSICAL_RECORD3
%PHYSICAL_RECORD4
%PHYSICAL_RECORD45
%PHYSICAL_RECORD46 (end log record 2)
Use the File Format page to select between Fixed Length and Delimited formats for the file. The Flat File Sample Wizard does not sample multibyte character file with a fixed record format. Instead, consider "Using the Create Flat File Wizard".
Figure 14-7 displays the File Format page of the Flat File Sample Wizard.
Figure 14-7 File Format Page for the Flat File Sample Wizard
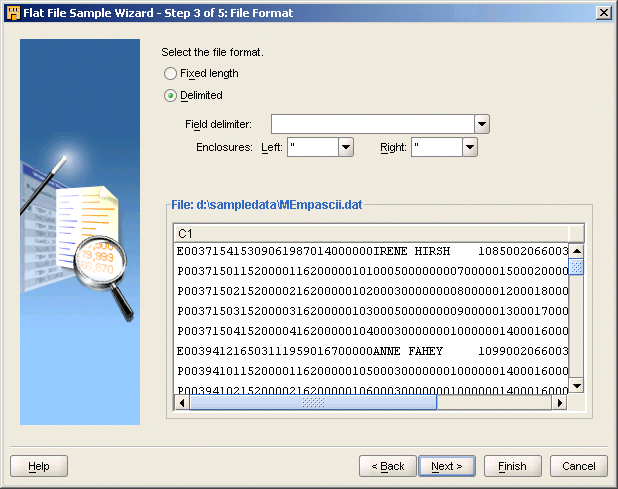
When you select a file format, the wizard updates the sample displayed at the bottom of the wizard page. You can use the scroll bars to navigate the sample data.
When your file is delimited, specify the following properties:
Field delimiter: Field delimiters designate where one field ends and another begins. You can type in a field delimiter or select one from the drop-down list. The drop-down list displays common field delimiters. However, you may type in any character as a delimiter except the ones used for enclosures. The default is the comma (,).
Enclosures (Left and Right): Some delimited files contain enclosures that denote text strings within a field. If the file contains enclosures, enter an enclosure character in the text box or select one from the drop-down list. The drop-down list displays common enclosures. However, you may type in any character. The default for both the left and right enclosure is the double quotation mark (").
Use the File Layout page shown in Figure 14-8 to specify the number of rows to skip and to select between a single record type versus multiple record types.
Figure 14-8 File Layout Page for the Flat File Sample Wizard
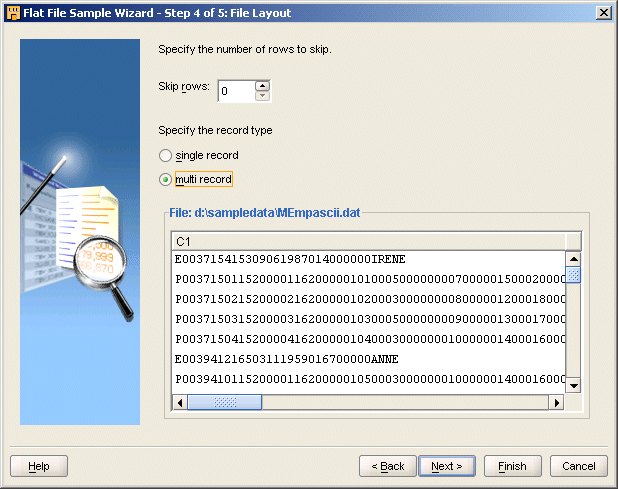
Indicate the number of records to skip in Skip rows. This is useful for skipping over unwanted header information. If one of the records includes field names, skip the preceding header records so that the record containing field names is first in the file. Later in the wizard, on the Field Properties page, you can instruct the wizard to use that record for field names if you are defining a single record file type.
Indicate whether the file contains a single record type or multiple record types.
If the file contains only one type of record, select Single.
If the file contains more than one record type, select Multiple. Later in the wizard you can instruct the wizard to scan the file for the record types. For more information on multiple record types, see "Selecting Record Types (Multiple Record Type Files Only)".
Use the Record Types wizard page to scan the flat file for record types, add or delete record types, and assign type values to the record types.
Note:
This step in not necessary for files with a single record type. If the data file has a single record type and fixed length file format, proceed to "Specifying Field Lengths (Fixed-Length Files Only)" . If the data file has a single record type and delimited file format, proceed to "Specifying Field Properties".In files with multiple record types, one of the fields distinguishes one record type from the next. Figure 14-9 shows an example of a comma delimited file with two record types, "E" and "P". When you use the Flat File Sample Wizard, you instruct the wizard to scan a specified field of every record for the record type values. In this case, instruct the wizard to scan the first field. The wizard returns "E" and "P" as the type values.
Figure 14-9 Example of a File with Multiple Record Types

When you use the wizard to sample flat files with multiple record types, ensure that the sample size you specified on the Name page is large enough to include each record type at least once. The default is 10,0000 characters.
Because sampling cannot be cancelled after it has been started, make sure you pick a "reasonable" number of characters for optimum performance. If all record types do not appear within a reasonable number of characters, you can mock up a sample file with rows selected from different parts of the master file to provide a representative set of data. If you do not know your data well, you may choose sample the entire file. If you know your data well, you can scan a representative sample and then manually add new record types.
When a delimited flat file contains several different types of records, you can use the scanning feature within the Flat File Sample Wizard to search and label record types.
Figure 14-10 shows the first field position selected for scanning for multiple record types.
Figure 14-10 Record Types Page for Delimited Files
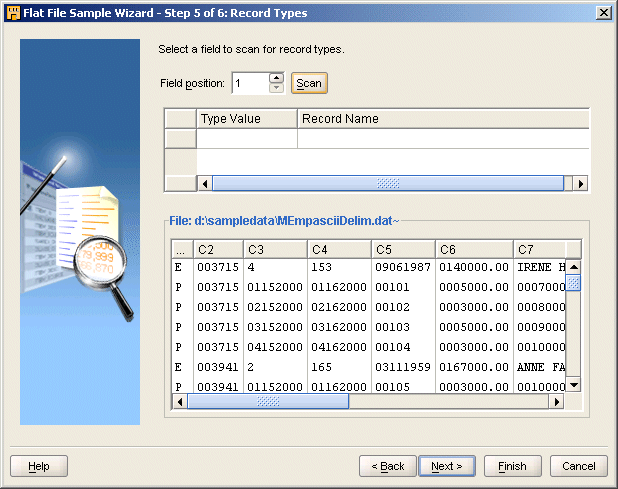
To complete the Records Type page for a delimited file:
Select the one field that identifies the record types in the file.
The wizard displays all the fields in a sample in the lower panel of the page. Select the field from the sample box. Or, in Field position, you can type in the position as it appears in the sample. Unless you specify otherwise, the wizard defaults to the first field in the file.
The wizard scans the file for the field and displays the type values. The wizard assigns default record names (RECORD1, RECORD2...) to each type value.
You can edit the record names.
Click a record name to rename it or select a different record name from the drop down list. You can associate a record name with multiple record type values. You can also add or delete type values using the New and Delete buttons.
Click Next to continue with the wizard.
When a fixed-length flat file contains several different types of records, you can use the scanning feature within the Flat File Sample Wizard to search for record types and assign a type value to each record type.
Figure 14-11 shows the results from scanning for record types based on the first field position.
Figure 14-11 Record Types Page for Fixed Length Files
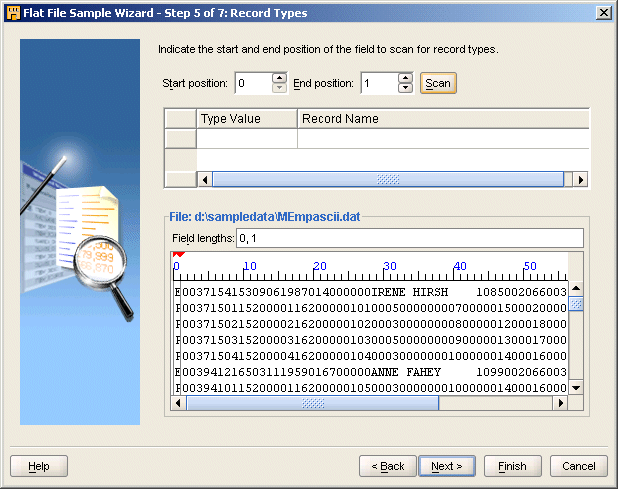
To complete the Records Type page for a fixed-length file:
Specify the one field that identifies the record types in the file. Type in values for the Start position and End position. If you want to scan for records based on the first field, enter 0 for Start Position.
The wizard indicates the selected field with a red tick mark in the ruler in the file sample in the lower panel of the page.
Click Scan.
The wizard scans the file field and displays the type values. The wizard assigns default record names (RECORD1, RECORD2...) to each type value.
You can edit the record names.
Click a record name to rename it or select a different record name from the drop down list. You can associate a record name with multiple record type values. You can also add or delete type values using the New and Delete buttons.
Click Next to continue with the wizard.
When you use the Flat File Sample Wizard to define a fixed-length flat file, you also need to define the length of each field in the file.
Note:
This step is not necessary for delimited files. Proceed to "Specifying Field Properties".You can define field lengths by typing in the field lengths or by using the ruler.
Figure 14-12 displays the Field Lengths page from the Flat File Sample Wizard.
Figure 14-12 Field Lengths Page for the Flat File Sample Wizard
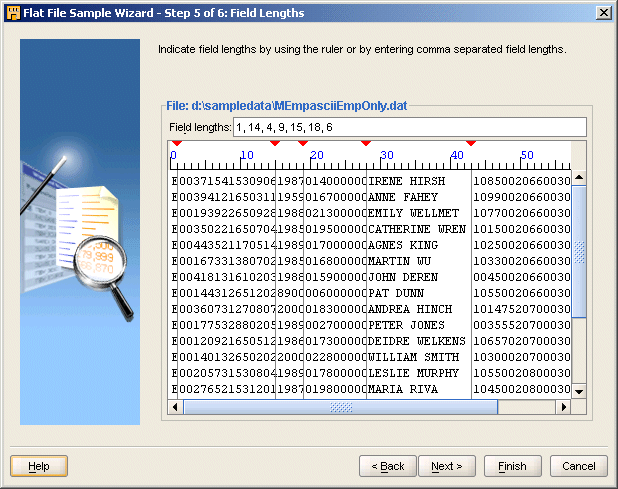
If you know the length of each field, type in the field length in Field Lengths. Separate each length by commas. The wizard displays the changes to the sample at the bottom of the wizard page.
To use the ruler, click any number or hash mark on the ruler. The wizard displays a red tick mark on top of the ruler and marks the boundary with a red line. If you make a mistake, double-click the marker to delete it or move the marker to another position. Use the ruler to create markers for each field in the file.
Note that when you specify a field length using the ruler, your tick markers indicate the starting and ending borders for each field. From this information, Warehouse Builder determines the positions occupied by each field. For example, a three-character field occupying positions 6, 7, and 8 is internally identified with the beginning and ending values of '5,8'.
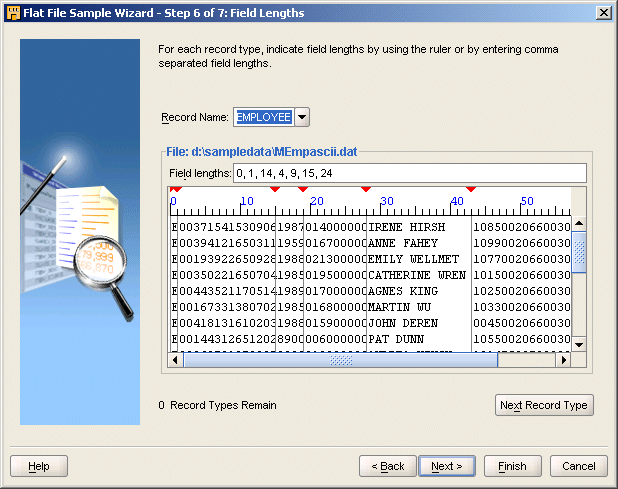
You can select the record type by name from Record Name. Or, you can select Next Record Type from the lower right corner of the wizard page. The number of records with unspecified field lengths is indicated on the lower left corner of the wizard page.
If the flat file contains multiple record types, the wizard prompts you to specify field lengths for each record type before continuing.
Figure 14-13 shows the Field Lengths page for a fixed length file with multiple record types.
Figure 14-13 Field Lengths for Multiple Record Files page
Use the Field Properties page in the Flat File Sample Wizard to define properties for each field. The wizard assigns a name to each field. It assigns 'C1'to the first field, 'C2' to the second, and so on. To rename fields, click a field and type a new name.
For single record file types, you can instruct the wizard to use the first record in the file to name the fields. Indicate this by checking the box entitled Use the first record as the field names. If you choose this option, all the field data type attributes default to CHAR.
Since you can use a flat file in a mapping either directly as a flat file source or indirectly through an external table, the Field Properties page shows both SQL*Loader Properties and SQL Properties. Use the scroll bar to scroll to the right and view all the properties.
The wizard deactivates properties that do not apply to a given data type. For example, you can edit the length for a CHAR, but precision and scale are not available. Deactivated properties are grayed out.
Note:
Once you complete the Field Properties page, verify your selections on the Summary page and select Finish. The Flat File Sample Wizard returns you to the Import Metadata Wizard described in "Using the Import Metadata Wizard for Flat Files". You can select more files to sample or select Finish to begin the import.Figure 14-14 shows the Field Properties page for the Flat File Sample Wizard.
Figure 14-14 Field Properties Page for the Flat File Sample Wizard
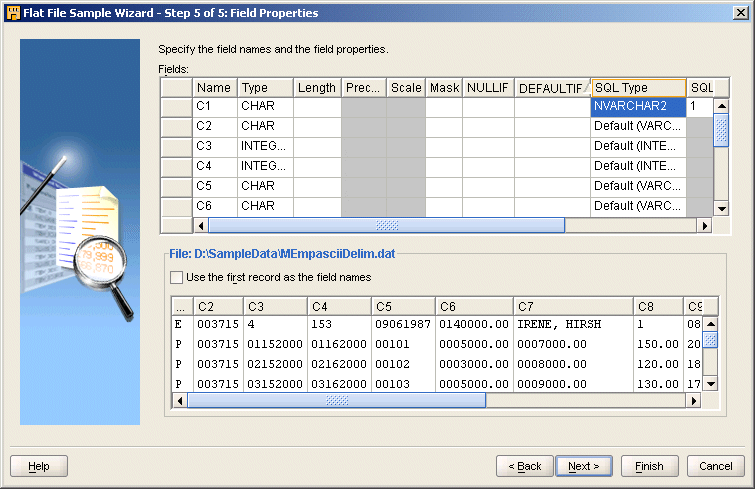
The first set of properties the wizard displays are for the SQL*Loader utility. When you use the flat file directly as a source in a mapping, Warehouse Builder relies upon SQL*Loader and the properties you set here. SQL*Loader properties include Type, Start, End, Length, Precision, Scale, Mask, NULLIF, and DEFAULTIF.
By default, the wizard displays these properties as they appear in the source file. Edit these properties or accept the defaults to specify how the fields should be handled by the SQL*Loader.
Type
Describes the data type of the field for the SQL*Loader. You can use the wizard to import many data types such as CHAR, DATE, DECIMAL EXTERNAL, FLOAT EXTERNAL, INTEGER EXTERNAL, ZONED, AND ZONED EXTERNAL. For complete information on SQL*Loader field and data types, refer to Oracle Database Utilities. Currently, only portable data types are supported.
Start
In fixed length files, indicates the field start position.
End
In fixed length files, indicates the field end position.
Length
Specifies the length of the field to be used by SQL* Loader. For delimited files, the field length is not populated, but you can manually edit it if you know the maximum length of the field.
Precision
Defines precision for DECIMAL and ZONED data types.
Scale
Defines the scale for DECIMAL and ZONED data types.
Mask
The SQL*Loader uses dd-mon-yy as its default date mask. You can override this default by entering a valid date mask when you describe the file. For example, if the input data has the format DD-Mon-YYYY rather than the SQL*Loader default, you can enter the true format as a mask.
NULLIF
You can override the default action of the SQL*Loader by placing a NULLIF condition on a field. For example, when a character field contains all blanks, you can direct SQL*Loader to mark the field as null rather than storing the blanks. Valid syntax for this field includes =BLANKS, ='quoted string', =X'ff' to indicate hexadecimal values, and != for 'not equal to' logic.
DEFAULTIF
You can override the default action of the SQL*Loader by placing a DEFAULTIF condition on a field. For example, when a numeric or DATE field contains all blanks, SQL*Loader rejects the entire record. To override this action, type =BLANKS in the DEFAULTIF property. When SQL*Loader evaluates this condition, it sets the numeric field to zeros and loads the record. Valid syntax for this field includes =BLANKS, ='quoted string', =X'ff' to indicate hexadecimal values, and != for 'not equal to' logic.
The second set of properties are the SQL properties that include SQL Type, SQL Length, SQL Precision, and SQL Scale. These properties specify how the fields in a flat file translate to the columns in a relational table for example.
The SQL properties you set here have the following implications for mapping design, validation, and generation:
External table: If you create an external table based on a single flat file record type, the columns properties are based on the SQL properties you defined for the flat file. For more information about external tables, see "Using External Tables".
Populating an Empty Mapping Table. In a mapping, if you populate an empty relational table with the metadata, the table inherits the SQL properties you defined for the flat file source.
Flat file target: If you use the flat file as a target in a mapping, the target does not inherit the SQL properties. Instead, all fields inherit the default SQL*Loader data type. For more information about using a flat file operator as a target, see "Flat File Operator".
SQL Type
Warehouse Builder supports many SQL data types such as CHAR, DATE, FLOAT, and BLOB.
The wizard assigns a default value for the SQL type based on the SQL*Loader properties you set. If you accept the default SQL type, Warehouse Builder updates that default in the event you later change the SQL*Loader properties. However, if you override the SQL type by selecting a new SQL type from the drop down list, it then becomes independent of the flat file SQL*Loader data type.
SQL Length
This property defines the length for the SQL column.
SQL Precision
When the SQL type is for example NUMBER and FLOAT, this property defines the precision for the SQL column.
SQL Scale
When the SQL type is for example NUMBER and FLOAT, this property defines the scale for the SQL column.
You can update the definition of the file format by editing its property sheet.
To update a file definition:
Select the file definition in the Project Explorer.
Right-click the file name and select Properties.
Warehouse Builder displays the Flat File property sheet with the following tabs:
Name Tab: Use this tab to edit the name and descriptive for the file.
General Tab: Use this tab change the global properties, such as the physical record size, the number of physical records for each logical record, and the delimiter and enclosure characters.
Record Tab: This tab is available only for flat files with multiple record types. Use this tab to redefine fields or add, delete, or edit record types.
Structure Tab: Use this tab to edit field level attributes, SQL Loader and SQL Properties.
Use this tab to edit the name, default physical file name, description, and character set for the file.
Use this tab to change the global properties, such as the physical record size, the number of physical records for each logical record, and the delimiter and enclosure characters.
For delimited records, the General tab contains the following fields:
Records delimited by: Select this option if the end of each record is designated by a delimiter. Then specify that record delimiter. You can accept the default record delimiter, carriage return (<CR>), or you can type in a new value.
Record length (in characters): Select this option if each record in the file is the same length. Then specify the number of characters in each record. For files with multibyte characters, count a multibyte character as one character.
If the file contains logical records, click File contains logical records. Then select one of the following options to describe the file:
Number of physical records for each logical record: The data file contains a fixed number of physical records for each logical record.
End character of the current physical record: The data file contains a variable number of physical records with a continuation character at the end that signifies that the record is associated with the next physical record.
Start character of the next physical record: The data file contains a variable number of physical records with a continuation character at the beginning of each physical record that signifies that the record is associated with the previous physical record.
If the file contains multiple record types, you can select each record type from the Record Name field. Warehouse Builder displays the Record sheet and you can edit the record type information.
Record type is in column number: This field displays the column that contains the record type indicator. You can change this value. For example, if you have a flat file with two record types that are distinguished from each other by the first character in the third column as shown in the following list, then the value in this field is 3:
Record Type 1: 2002 0115 E 4564564
Record Type 2: 2003 1231 D 659871 Q HKLIH
Record type values: This table displays each record type, the value that distinguishes it from the other record types, and the name you have given to the record type. Table 14-1 shows an example of what the record type values for the two sample records earlier might be:
To add new record types, click New and enter a Type Value and a Record Name describing the record type.
To delete record types, select the check box to the left of each record type you want to remove and click Delete.
After you have identified and defined the sources for our target system, you are ready to model your target schema.
Use the Structure tab to edit a field name, data type, mask, SQL*Loader Properties and SQL Properties. You can add or delete a field. You can also add a field mask, NULLIF condition, or DEFAULTIF condition.
If the file contains multiple record types, you can select each record type from the Record Name field. Warehouse Builder displays the Record sheet and you can edit the record type information.
The wizard deactivates properties that do not apply to a given data type. For example, you can edit the length for a CHAR, but precision and scale are not available.
External tables are database objects in the Oracle Database, versions 9i and higher. You cannot use external tables with any other database type or any Oracle Database previous to the 9i release.
External tables are tables that represent data from flat files in a relational format. They are read-only tables that behave similarly to regular source tables in Warehouse Builder. When you create and define an external table, the metadata for the external table is saved in the Warehouse Builder repository. You can use these external table definitions in mappings to design how you want to move and transform data from flat file sources to your targets.
The following sections provide information about external tables:
Before you begin
Each external table you create corresponds to a single record type in an existing flat file. Before you begin, first define the file within the Warehouse Builder repository by one of two methods described in "Importing ASCII Files into the Repository" and "Adding Existing Binary Files to the Repository".
To create a new external table definition:
From the Warehouse Builder Project Explorer expand the Databases node and then the Oracle node.
Expand the target module where you want to create the external table.
Right-click the External Tables node and select New.
Warehouse Builder displays the Welcome page of the Create External Table wizard. Use the wizard to complete the following pages:
Use the Name page to define a name and an optional description for the external table. Enter the name in the Name field. In physical mode, you must type a name between 1 and 30 valid characters. Spaces are not allowed. In logical mode, you can type a unique name up to 4000 characters in length. The external table name must be unique within the table. Spaces are allowed.
Use the Description field to enter an optional description for the external table.
The wizard displays the File Selection page as shown in Figure 14-15.
Figure 14-15 File Selection Page for External Table
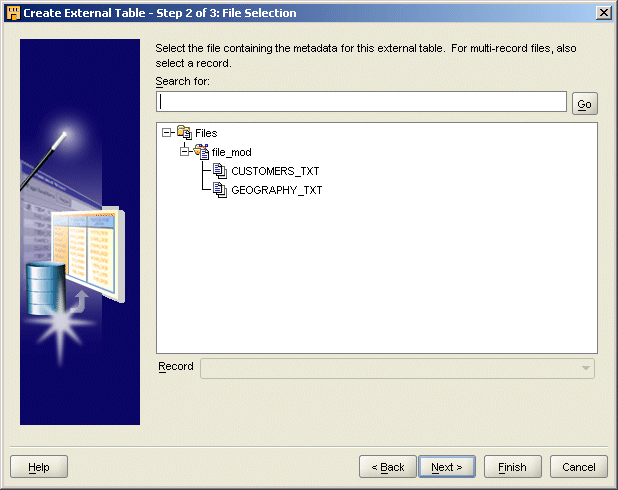
The wizard lists all the flat files available in the repository. Select a file upon which to base the external table. To search through long lists of files, type the first few letters of the file name and click Find.
If you cannot find a file, make sure you either imported or defined the metadata for the file as described in "About Flat Files in Warehouse Builder".
If you select a file that contains multiple record types, you must also select the record type name at the bottom of the File Selection page. An external table can represent only one record type.
You can select a location from the drop down box which lists the locations associated with flat files. Alternatively, you can leave the location unspecified. If you do not specify a location in the wizard, you can later specify a location on the external table properties sheet.
Tip:
You must create and deploy a connector between the locations for the flat file and the Oracle module before you can deploy the external table.Warehouse Builder enables you to update the external table definition with the metadata changes made to the file associated with the external table. You do this by synchronizing the external table with the source file.
To synchronize an external table definition with a record in a file:
In the Project Explorer, right-click the external table that you want to synchronize and select Synchronize.
Warehouse Builder displays the Reconcile dialog.
Use the Select the Object to synchronize drop-down list to specify the flat file with which the external table is to be synchronized.
By default, Warehouse Builder displays the flat file that was used to create the external table in this drop-down list. Expand the list to see a list of flat file modules and the flat files they contain.
Click Advanced.
Warehouse Builder displays the Advanced dialog.
Use the Match Strategy drop-down list to specify how Warehouse Builder searches for matches and updates the external table with the information from the flat file. The options for match strategy are:
MATCH_BY_OBJECT_ID: This strategy compares the field IDs of that the external table columns references with the field IDs in the flat file.
MATCH_BY_OBJECT_NAME: This strategy compares the physical names in the external table with the physical names in the flat file.
MATCH_BY_OBJECT_POSITION: This strategy matches by position, regardless of physical names and IDs. The first external table attribute is reconciled with the first record in the file, the second with the second, and so on. Use this strategy when you want to reconcile the external table with a new record.
Use the Synchronize Strategy drop-down list to indicate how Warehouse Builder handles differences in metadata between the existing external table definition and the record you specified.
Merge: Warehouse Builder combines the metadata from the existing external table definition and the record you specified.
Replace: Warehouse Builder deletes metadata from the external table definition if it does not match the metadata from the record you specified. The resulting reconciled external table contains metadata that matches the file record metadata.
Click OK.
The Advanced dialog is closed and you return to the Reconcile dialog.
Click OK to complete synchronizing the external table definition.
You use the External Table editor to edit an external table definition. To open the editor, right-click the name of the external table from the Project Explorer and select Open Editor. The Edit External Table dialog is displayed. The tabs and properties that you can edit depend on how you defined the external table in the repository.
The External Table Properties window displays with the following tabs:
Access Parameters Tab (display only under certain circumstances)
Use the Name tab to rename the external table. The same rules for renaming tables apply to external tables. For more information, see "Naming Conventions for Data Objects".
Use the Columns tab to add or edit columns. The same rules for adding columns to tables apply to external tables. For more information, see "Editing Table Definitions".
Use the File tab to view the name of the flat file that provides the metadata for the external table. If the source flat file has multiple record types, the File tab also displays the record name associated with the external table. You can update this relationship or change it to a different file and record by reconciling the external table. For more information, see "Synchronizing an External Table Definition with a Record in a File".
The File tab displays under the following conditions:
You used the New External Table Wizard to create the external table and you specified a file name.
You did not specify a file name in the New External Table Wizard, but you reconciled the external table definition with a file and record.
Use the Location tab to view or change the flat file location. The Location drop-down list displays the available locations. Select a location from this list.
Use the Data Rules tab to define data rules for the external table. For more information about using data rules, see "Using Data Rules".
Access parameters define how to read from the flat file. In some cases, the External Table editor displays the Access Parameters tab instead of the File tab.
The tab for the access parameters displays under the following conditions:
You imported an external table from another repository. In this case, you can view and edit the access parameters.
You created an external table in an Oracle Database and imported its definition into Warehouse Builder. In this case, you can view and edit the access parameters.
You used the Create External Table Wizard to create an external table and did not specify a reference file. The access parameters will be empty. Before generating the external table, you must reconcile the external table definition with a flat file record or manually enter the access parameters into the properties sheet.
The access parameters describe how fields in the source data file are represented in the external table as columns. For example, if the data file contained a field emp_id with a data type of INTEGER(2), the access parameters could indicate that field be converted to a character string column in the external table.
Although you can make changes to the access parameters that affect how Warehouse Builder generates and deploys the external table, it is not recommended. Warehouse Builder does not validate the changes. For more information on the access parameters clause, see Oracle Database Utilities Manual.
Configure the following properties for an external table:
Note:
When you import an external table into the repository and when you manually define access parameters for an external table, some external table configuration properties are overruled by settings on the Access Parameters tab in the External Table Properties window.To configure the physical properties for an external table:
Select an external table from the Project Explorer.
From the Edit menu, select Configure. You can also click the Configure icon from the tool bar.
The Configuration Property window displays.
To configure a property, click the white space and make a selection from the drop down box.
If you imported the external table into the repository or created the external table without specifying a source file, do not configure these properties. Access specification properties are overruled by settings on the Access Parameters tab in the External Table Properties window.
Under Access Specification, you can indicate the following file names and locations Warehouse Builder uses to load the external table through SQL*Loader.
Bad File: If you specify a name and location for a bad file, Warehouse Builder directs the Oracle Database to write to that file all records that were not loaded due to errors. For example, records written to the bad file include those not loaded due to a data type error in converting a field into a column in the external table. If you specify a bad file that already exists, the existing file is overwritten.
Discard File: If you specify a name and location for a discard file, Warehouse Builder directs the Oracle Database to write to that file all records that were not loaded based on a SQL *Loader load condition placed on the file. If you specify a discard file that already exists, the existing file is overwritten.
Log File: If you specify a name and location for a log file, Warehouse Builder directs the Oracle Database to log messages related to the external table to that file. If you specify a log file that already exists, new messages are appended.
For each of these files, you can either specify a file name and location, select Do not use, or select Use default location.
Under Reject, you can indicate how many rejected rows to allow. By default, the number of rejected rows allowed is unlimited. If you set Rejects are unlimited to false, enter a number in Number of rejects allowed.
Parallel: Enables parallel processing. If you are using a single system, set the value to NONPARALLEL to improve performance. If you are using multiple systems, accept the default PARALLEL.The access driver attempts to divide data files into chunks that can be processed separately. The following file, record, and data characteristics make it impossible for a file to be processed in parallel:
Sequential data sources (such as a tape drive or pipe).
Data in any multibyte character set whose character boundaries cannot be determined starting at an arbitrary byte in the middle of a string. This restriction does not apply to any data file with a fixed number of bytes for each record.
Records with the VAR format
If you imported the external table into the repository or created the external table without specifying a source file, do not configure these properties. Data characteristics properties are overruled by settings on the Access Parameters tab in the External Table Properties window.
Under Data Characteristics you can set the following properties:
Endian: The default for the Endian property is Platform. This indicates that Warehouse Builder assumes the endian of the flat file matches the endian of the platform on which it resides. If the file resides on a Windows platform, the data is handled as little-endian data. If the file resides on Sun Solaris or IBM MVS, the data is handled as big-endian. If you know the endian value for the flat file, you can select big or little-endian. If the file is UTF16 and contains a mark at the beginning of the file indicating the endian, Warehouse Builder uses that endian.
String Sizes in: This property indicates how Warehouse Builder handles data with multibyte character sets, such as UTF16. By default, Warehouse Builder assumes the lengths for character strings in the data file are in bytes. You can change the selection to indicate that strings sizes are specified in characters.
If you imported the external table into the repository or created the external table without specifying a source file, do not configure these properties. Field editing properties are overruled by settings on the Access Parameters tab in the External Table Properties window.
Under Field Editing, you can indicate the type of whitespace trimming to be performed on character fields in the data file. The default setting in Warehouse Builder is to perform no trim. All other trim options can reduce performance. You can also set the trim option to trim blanks to the left, right, or both sides of a character field.
Another option is set the trim to perform according to the SQL*Loader trim function. If you select SQL*Loader trim, fixed-length files are right trimmed and delimited files specified to have enclosures are left trimmed only when a field is missing an enclosure.
You can indicate how to handle missing fields in a record. If you set the option Trim Missing Values Null to true, fields with missing values are set to NULL. If you set the property to false, fields with missing values are rejected and sent to specified bad file.
See "Identification" for details.
You must add at least one data file to an external table to associate the external table with more than one flat file.
To add a data file:
Right-click the Data Files node and select Create.
Type a name for the datafile such as DATAFILE1. Your entry displays as a new node in the right panel of the Configuration Properties dialog.
Type in the following values for each datafile you define:
Data File Location: Location for the flat file.
Data File Name: The name of the flat file including its extension. For example, type myflatfile.dat.