|
Configuring Siebel eBusiness Applications > Configuring Docking Rules >
Adding a New Dock Table to a Dock Object
Your new table should be a dock object table of an existing dock object. In this situation, the new table is a child of an existing dock object table. Mobile users receive records in the new table if they have access to its parent record in the existing table. NOTE: You must select a custom extension table (that is, beginning with CX_) and right-click to access the Docking Wizard.
You add new dock object visibility rules for existing dock objects when you use the Docking Wizard. By creating a new dock object visibility rule, you provide access to records in existing tables to mobile users who "own" a record in the new table. This is appropriate when the new table can act as a parent to the primary table of another, limited visibility dock object or when the new table has a foreign key to the primary table of another limited visibility dock object. Before launching the Docking Wizard, you need to lock the project containing the customer dock object to which you want to add your new table. You also need to lock all projects containing the dock objects where your new table's parent tables reside. To create a new table to be added to an existing dock object
- Lock all necessary projects.
- Select File > New Object.
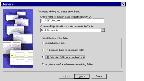
The New Object dialog box appears.
- Select the Table icon under the General tab.
- In the first General dialog box enter the name of your new table beginning with CX_, select the project, and then select the radio button for the type of table you want.
For example, create a new one-to-many extension table of CX_TEST_PRI.
- Click Next.
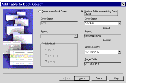
The Parent Table Specification dialog box appears.
- Specify the parent table, for example CX_TEST_PRI.
- Click Next to display the Finish dialog box with a summary of your choices.
- Click Finish.
The new table is created and displayed in the Object List Editor.
To add the new table to an existing dock object
- Select the Table object type in the Object Explorer.
- Select the new table, for example CX_TEST_PRI_XM, in the Tables list.
- Right-click and select Docking Wizard from the menu options.
The Add Table to Dock Object dialog box appears.
- Select the Add the Table to an Existing Dock Object radio button.
- Select an entry in the Dock Object field.
The choices are a list of all Dock Objects that contain tables to which the new table has a foreign key.
The associated locked project is displayed in the Project field.
- Select an entry in the Source Column field.
This field allows you to choose a column from the new table that is a foreign key to the parent table contained in the selected Dock Object Table. Frequently, there is only one such column, but there may be more in some cases.
NOTE: When the Source Column field entry is selected, the Target Table field is populated.
- Click Next to display the Summary dialog box.
- If the information displayed is correct, click Finish.
The Docking Wizard creates a Dock Object Table object based on the new table and displays it in the Object List Editor.
|