| Oracle® Retail Financial Integration for Oracle Retail Merchandise Operations Management and Oracle Financials Installation Guide Installation Guide Release 19.0 F23582-01 |
|

 Previous |
 Next |
| Oracle® Retail Financial Integration for Oracle Retail Merchandise Operations Management and Oracle Financials Installation Guide Installation Guide Release 19.0 F23582-01 |
|
Previous |
Next |
This chapter includes:
Before proceeding you must install Oracle WebLogic Server 12c 12.2.1.3.0 and any patches listed related to Weblogic Server 12c 12.2.1.3.0. Create a WebLogic domain called rfi_domain. This WebLogic domain must be of a base domain type. Create a managed server (for example, rfi-server) inside this rfi_domain. The ORFI application will be installed into the WebLogic managed server (for example, rfi-server). It is assumed that the Oracle database has already been configured and loaded with the appropriate ORFI, RMS, EBS, and ODI (Master, Work, and Staging Area) schema details for your installation. This server is referred to as RFI_SERVER in this document.
You need to execute the steps in the Expand the ORFI Installer Distribution section if the UNIX environments for the ORFI database and WebLogic Server are different.
Update $WEBLOGIC_HOME/server/lib/weblogic.policy file with the following:
|
Note:
|
grant codeBase
"file:<WEBLOGIC_HOME>/user_projects/domains/rfi_domain/servers/rfi-server/tmp/_WL_user/ retail-financial-integration-ear-<version>.ear/-" {permission java.security.AllPermission;permission oracle.security.jps.service.credstore.CredentialAccessPermission "credstoressp.credstore", "read,write,update,delete";permission oracle.security.jps.service.credstore.CredentialAccessPermission "credstoressp.credstore.*", "read,write,update,delete";}
An example of the full entry that might be entered is:
grant codeBase
"file:/u00/rfi1/Oracle/Middleware/user_projects/domains/rfi_domain/servers/rfi-server/tmp/_WL_user/ retail-financial-integration-ear-19.0.0.ear/-" {permission java.security.AllPermission;permission oracle.security.jps.service.credstore.CredentialAccessPermission "credstoressp.credstore", "read,write,update,delete";permission oracle.security.jps.service.credstore.CredentialAccessPermission "credstoressp.credstore.*", "read,write,update,delete";};
|
Note:
|
|
Note: The nodemanager.properties file is created after NodeManager is started for the first time. It will not be available before that point. The NodeManager must be restarted after making changes to the nodemanager.properties file. |
Log in to the UNIX server where the WebLogic server is installed as a user who has sufficient access to deploy an application from the Oracle WebLogic installation.
Create a new staging directory for the ORFI installer distribution (RetailFinancialIntegrationPak19.0.0ForRfi19.0.0_eng_ga.zip). There should be a minimum of 50 MB disk space available for the application and database schema installation files. This location is referred to as INSTALL_DIR for the remainder of this chapter.
Copy RetailFinancialIntegrationPak19.0.0ForRfi19.0.0_eng_ga.zip to <INSTALL_DIR> and extract its contents.
|
Note: Before proceeding with below installation, read through the below instructions and ensure follow the same during installation:
|
The rfi-deployment-env-info.json file serves multiple purposes. It is used by the installation process and it also acts as a single master configuration file that describes the entire topology of the integration system. The values in this file must be accurate for the system to work properly. All values in the file are not user editable; the installation process needs these fixed names to match what the compiled runtime code already expects. Some examples of these fixed values that must not be changed are constants like "GET_FROM_WALLET"; jndi name like "jdbc/RfiDataSource" and so on.
You need to configure the following list of deployment information to run the ORFI deployment script. This file can be found under $INSTALL_DIR/retail-financial-integration-solution/service-based-integration/conf/.
|
Note:
|
Update the following details from RfiDeploymentEnvInfo -> integratingToEbsOrPsftOrCfin, mentioned based on whether integration is with EBS PeopleSoft OR Cloud Financials
If integration is with EBS, the value should be integratingToEbsOrPsftOrCfin":"EBS", Or,
If integration is with PeopleSoft, the value should be integratingToEbsOrPsftOrCfin":"PSFT", Or,
If integration is with Cloud Financials, the value should be integratingToEbsOrPsftOrCfin":"CFIN"
|
Note: Default configuration would be integratingToEbsOrPsftOrCfin":"PSFT". |
Update the following details from RfiDeploymentEnvInfo -> DataSourceDef configuration:
Based on whether the integration is with EBS, PeopleSoft or Cloud Financials enter the below mentioned details against corresponding datasource names.
In EbsDataSource, enter the EBS database connection details:
"jdbcUrl":"jdbc:oracle:thin:@//<Server Name>:<Port>/<SID>"
OR
In PsftDataSource , enter the PeopleSoft database connection details
In RmsDataSource, enter the RMS database connection details:
"jdbcUrl":"jdbc:oracle:thin:@//<Server Name>:<Port>/<SID>"
In RfiDataSource, enter the ORFI database connection details:
"jdbcUrl":"jdbc:oracle:thin:@//<Server Name>:<Port>/<SID>"
In OdiMasterDataSource, enter the ODI Master repository database connection details:
"jdbcUrl":"jdbc:oracle:thin:@//<Server Name>:<Port>/<SID>"
In OdiWorkDataSource, enter the ODI Work repository database connection details:
"jdbcUrl":"jdbc:oracle:thin:@//<Server Name>:<Port>/<SID>"
In OdiStagingAreaDataSource, enter the ODI Staging database connection details:
"jdbcUrl":"jdbc:oracle:thin:@//<Server Name>:<Port>/<SID>"
|
Note: It is recommended to have the ODI Staging Schema (RFI_ODI_TEMP) in the EBS or PeopleSoft database. |
Update the following details from RfiDeploymentEnvInfo -> MiddlewareServerDef -> RfiAppServer configuration:
Enter the WebLogic domain name:
"weblogicDomainName":"<RFI Domain Name>",
Enter the RFI Domain Home:
"weblogicDomainHome":"<RFI Domain Name>",
Enter the RFI Domain Server URL:
"weblogicDomainAdminServerURL":"t3://Server Host name:port",
Enter the WebLogic admin server protocol:
"weblogicDomainAdminServerProtocol":"t3",
Enter the WebLogic admin server host name:
"weblogicDomainAdminServerHost":"<Server Host Name>"
Enter the WebLogic server port:
"weblogicDomainAdminServerPort":"<port>"
Enter the WebLogic Managed Server Name:
"weblogicDomainTargetManagedServerName":"<Server Name>"
Enter the End point URL for GlAccount Service:
"glAccountValidationServiceEndPointUrl":"http://myhostname:7001/GlAccountValidationBean/GlAccountValidationService?WSDL",
If integration is with PeopleSoft enter the End point URL for below mentioned services. If integration is with EBS please skip 1 - 4 service configuration steps
Enter the End point URL for drillBackForward Service: drillBackForwardUrlServiceEndPointUrl":"http://myhostname:7001/DrillBackForwardUrlBean/DrillBackForwardUrlService?WSDL",
Enter the End point URL for Supplier Service: supplierBusinessEventHandlerServiceEndPointUrl":"http://myhostname:7001/SupplierBusinessEventHandlerServiceBean/SupplierBusinessEventHandlerService?WSDL",
Enter the End point URL for Payterms Service: payTermBusinessEventHandlerServiceEndPointUrl":"http://myhostname:7001/PayTermBusinessEventHandlerServiceBean/PayTermBusinessEventHandlerService?WSDL",
Enter the End point URL for Currency Rate Service: currencyRateBusinessEventHandlerServiceEndPointUrl":"http://myhostname:7001/CurrencyRateBusinessEventHandlerServiceBean/CurrencyRateBusinessEventHandlerService?WSDL",
If integration is with Cloud Finanacials enter the End point URL for below mentioned services. If integration is with EBS please skip 1 - 4 service configuration steps
Enter the End point URL for drillBackForward Service: drillBackForwardUrlServiceEndPointUrl":"http://myhostname:7001/Drill BackForwardUrlBean/DrillBackForwardUrlService?WSDL",
Enter the End point URL for Supplier Service:
supplierExportOutboundServiceEndPointUrl":"http://myhostname:7001/SupplierBusinessEventHandlerServiceBean/SupplierBusinessEventHandlerService?WSDL",
Enter the End point URL for Payterms Service:
payTermBusinessEventHandlerServiceEndPointUrl":"http://myhostname:7001/PayTermBusinessEventHandlerServiceBean/PayTermBusinessEventHandlerService?WSDL",
Enter the End point URL for Currency Rate Service:
currencyRateBusinessEventHandlerServiceEndPointUrl":"http://myhostn ame:7001/CurrencyRateBusinessEventHandlerServiceBean/CurrencyRate BusinessEventHandlerService?WSDL",
Enter the ORFI UI URL host name and port details:
"rfiAdminUiUrl":"http://<host>:<port>/retail-financial-integration-web",
Enter the SMTP server host:
"smtpServerHost":"<SMTP Server Host>"
Enter the SMTP server port:
"smtpServerPort":"<SMTP Server Port>"
Enter the SMTP server type (for example, SSL or TSL):
"smtpServerListenerType":"<SMTP Server Type>"
Enter "true" if authentication required for SMTP server, else "false":
"smtpAuthenticationRequired":"<true/false>"
Enter the From Email Address:
"smtpMailFromAddress":"<From Address>"
Enter the Comma (,) separated To Address list:
"smtpMailToAddressList":"<To Address Email Id's>"
For example:
"smtpMailToAddressList":"<ToAddr1@example.com,ToAddr2@example.com>"
Update an Integrated Gateway Services detail for Currency Rate service from RfiDeploymentEnvInfo -> MiddlewareServerDef -> IgsAppServer configuration.
Enter the IGS Currency Rate End point URL:
"currencyRateServiceEndPointUrl":"<Currency Rate URL>"
Update RfiDeploymentEnvInfo -> MiddlewareServerDef -> RmsAppServer details for Supplier Service.
Enter the Supplier service End point URL:
"supplierServiceEndPointUrl":"<Supplier URL>"
If integration is with peopleSoft enter the End point URL for below mentioned services. If integration is with EBS please skip 1 - 2 service configuraiton steps.
Enter the report locator service End point URL: reportLocatorServiceEndPointUrl":"http://rmshostname:19203/ReportLocatorBean/ReportLocatorService?WSDL",
Enter the payterm service End point URL: payTermServiceEndPointUrl":"http://rmshostname:19203/PayTermBean/PayTermService?WSDL",
If integration is with CFIN enter the End point URL for below mentioned service.
Enter the payterm service End point URL:
payTermServiceEndPointUrl":"http://rmshostname:19203/PayTermBean/Pay TermService?WSDL",
If integrating with EBS, Update RfiDeploymentEnvInfo -> MiddlewareServerDef -> EbsAppServer details for Supplier Service:
Enter the EBS server $JAVA_TOP folder path
"ebsInstanceJavaTopLocation":"<JAVA_TOP>"
For example:
"ebsInstanceJavaTopLocation":" /u01/applmgr/apps/apps_st/comn/java/classes"
Enter the WebLogic DomainAdminServerUrl
For example:
"weblogicDomainAdminServerUrl": t3://ebshostname:7001
|
Note: If EBS is installed on Oracle Application Server substitute the corresponding OAS/oc4j information instead of WebLogic server information. |
If integrating with PeopleSoft, Update RfiDeploymentEnvInfo -> MiddlewareServerDef -> PsftAppServer
Enter the WebLogic domain name:
"weblogicDomainName":"<PSFT Domain Name>",
Enter the WebLogic domain home:
"weblogicDomainHome":"/path/<PSFT Domain Name>",
Enter the WebLogic domain admin server url:
"weblogicDomainAdminServerUrl":" t3://psfthostname:7777",
Enter the WebLogic domain admin server useralias
"weblogicDomainAdminServerUserAlias":"psftAppServerAdminServerUserAlias"
Enter the PeopleSoft Application URL:
"psftApplicationUrl":"http://psfthostname:port/psp",
Enter the Combochart Field service End point URL:
"comboChartFieldServiceEndPointUrl":"http://psfthostname:7777/PSIGW/PeopleSoftServiceListeningConnector/COMBO_CF_EDIT_REQUEST.1.wsdl",
Enter the rfiInvoice Drill forward service End point URL:
"rfiInvoiceDrillForwardServiceEndPointUrl":"http://psfthostname:7777/PSIGW/PeopleSoftServiceListeningConnector/RFI_INV_DRILLFORWARD_SERVICE.1.wsdl"
If integrating with Cfin, Update RfiDeploymentEnvInfo -> MiddlewareServerDef -> CfinAppServer
Enter the Financial Util Service End Point URL:
"financialUtilServiceEndPointUrl":"http://serve.example.com/finFunShared/FinancialUtilService?WSDL",
Enter the General Ledger Account Validation Service End Point URL:
"financialUtilServiceEndPointUrl":"http://serve.example.com/fscmService/AccountCombinantionService?WSDL",
Update the following details from RfiDeploymentEnvInfo -> MiddlewareServerDef -> RfiBulkServer configuration:
Enter the odi host name: "odiHost":"odihostname",
Enter the odi url : odiUrl:"/path/odi_is_installed",
Enter the odi Agent host : "odiAgentHost":"odihostname",
Enter the odi Agent port : odiAgentPort":"20910"
The supported configuration is for Unsecured and Policy A configuration.
Update the application security configuration for your environment. ORFI application is certified with Policy-A (UsernameToken over HTTPS). Add one of the key words policyA or Unsecured to service settings based on the nature of security selected at the service level.
Example:
For Currency Rate Service, Policy A (HTTPS) setting, update the JSON file with policyName to policyA:
"currencyRateServiceEndPointSecurityPolicyName":"policyA".
For Supplier Service, Policy A (HTTPS) setting, update the JSON file with policy Name to policyA:
"supplierServiceEndPointSecurityPolicyName":"policyA".
For Currency Rate Service, unsecured setting, update the JSON file with policyName to spaces:
"currencyRateServiceEndPointSecurityPolicyName":" Unsecured".
For Supplier Service, Unsecured setting, update the JSON file with policyName to spaces:
" supplierServiceEndPointSecurityPolicyName":" unsecure".
Refer to Appendix B, "Appendix: JSON in Tabular Format" for complete JSON configuration in Tabular format.
|
Note: By default the maximum number of in-memory sessions for WebLogic web applications is unlimited. This setting can be misused by external attackers to create unlimited number of sessions by accessing the web application. In such cases it is possible that the WebLogic server run out of memory and eventually crash. So it is required to limit the number of sessions to a reasonable number (e.g., 100). The settings can be changed through the admin console of the WebLogic server. Follow the steps below to change this configuration setting:
|
ORFI can be secured with policy-A (UsernameToken over HTTPS), if the service hosted by the ORFI application is secured, then the consumer of the service (Example: RMS) must be configured such that it can invoke the secured service. For more information on Service consumer configuration for Policy A, see the Oracle Retail Services Backbone Security Guide.
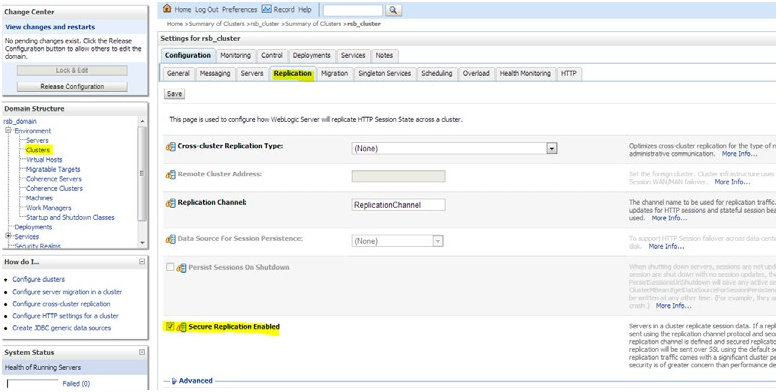
If cluster server is SSL enabled only, enable secure replication.
If secure application is not enabled and if managed server is started, managed server will move to ADMIN mode.
Enable the Secure Replication Enabled option available in Environment --> Clusters --> <cluster name> --> Configuration --> Replication.
|
Note: Due to known vulnerabilities, SSLv3.0 is not considered secure and should be disabled in WLS. For secured installations the latest TLS version is recommended. Use -DWebLogic.security.SSL.minimumProtocolVersion=TLSv1.2-Dweblogic.security.SSL.protocolVersion=TLS1. |
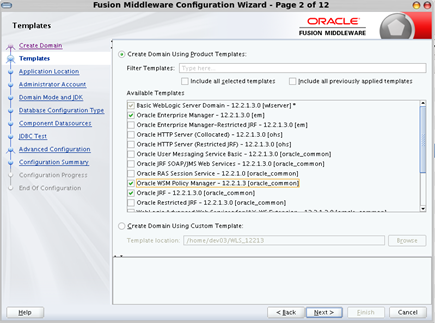
WebLogic 12.2.1.3.0, needs OWSM for Policy A and C to work. The OWSM template choice while creating the wls domian will provide an option to deploy the wsm-pm application to the admin server. This application is required for policies to work. If http ports are disabled in the server, then wsm-pm app will not be reachable , unless its configured to use SSL port. To configure SSL ports for wsm-pm, EM has to be deployed.
Perform the following procedure to configure the RIB domain:
Select the following RIB domain creation template options:
Access the enterprise Manager URL of WebLogic.
For example: https://<host>:<port>/em
From the navigation pane, expand WebLogic Domain and select the domain to be configured.
From the WebLogic Domain menu, select Web Services, then WSM Domain Configuration.
Select the Policy Access tab.
In the Policy Manager section of the page, clear the Auto Discover check box. The PM URL Edit button is enabled.
Click the PM URL Edit button.
In the Edit PM URL Values page, click the sign and enter the URL for the Administration Server, such as t3s://host:admin_port/wsm-pm.
For example, t3s://localhost:9002/wsm-pm.
Click OK to close the window.
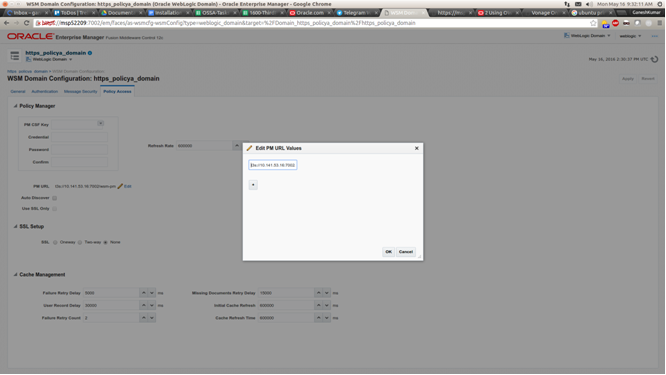
Click Apply on the Policy Access page.
|
Note: The steps mentioned in this section should be performed only if you are integrating with EBS as Oracle Financials applications. If not, Please skip this section and continue with the "Deploy the ORFI Application". |
If EBS is the Oracle Financials application: You need to generate an EBS component jar file (ebs-financial-common-19.0.0.jar). This should be placed in the EBS application environment to communicate the supplier and currency rate events to the Oracle Retail Merchandise system.
|
Note: Ensure JAVA_HOME and WL_HOME variables are set in the environment. WL_HOME points to the folder location till <WebLogic Installed folder>/wlserver. Aliases names and Admin Group name are not editable. |
Run the rfi-deployer.sh (available in $INSTALL_DIR/retail-financial-integration-solution/service-based-integration/bin/) script to configure and save the AppServer and DB credentials to ORFI wallet.
The script takes two arguments on the command line: -setup-credentials and -prepare-ebs-side-component.
For example:
prompt$ sh rfi-deployer.sh -setup-credentials -prepare-ebs-side-component
The installer prompts for the following details:
WebLogic login credentials
Credential required for weblogicDomainAdminServerHost (<HOST_NAME>) weblogicDomainAdminServerPort (<PORT>):
Enter username for alias (rfiAppServerAdminServerUserAlias):<Enter WebLogic Admin server Login name>
Enter Password: <Enter WebLogic Admin server Login password>
ORFI Admin Group login Credentials (ORFI Admin UI)
Credential required for rfiAdminUiUrl (<Entered value in JSON file>):
Enter username for alias (rfiAdminUiUserAlias):<Enter the login name for ORFI Admin>
Enter Password: <Enter ORFI Admin Login password>
ORFI Database Schema details
Credential required for jdbcUrl (<Entered value in JSON file>):
For Currency Rate Service, Policy A setting: Installer will prompt for AdminService username, Adminservice password.
Email Details - From Email Address and password
EBS Schema details
Enter username for alias (rfiDataSourceUserAlias):<Enter the ORFI Schema user name>
Enter Password: <Enter ORFI Schema password>
Credential required for jdbcUrl(<Entered value in JSON file>):
Enter username for alias (ebsDataSourceUserAlias):apps
Enter Password: <Enter EBS APPS Schema password>
Credential required for email address (<Entered value in JSON file>):
Verify email by retyping above email address (smtpMailFromAddressAlias): <Enter From Email Address>
Enter Password: <Enter Password for the above From Email Address>
Secured Service details:
Pre-requisites - Security admin user has been configured, User name and password has been captured. If not, follow these instructions provided in the Oracle Retail Integration Bus Security Guide.
|
Note: For Policy A Security Admin User name and Password should be provided. |
The installer will prompt for service username, service password if policyA setting is configured in the JSON file. For Unsecured settings, the following steps will be skipped.
The examples below contain a combination of service and policy settings:
For Example: Credential required for Currency Rate service for Policy A:
currencyRateServiceUserAlias(https://samplehost:21977/igs-CurRatePublishing-AppServiceDecorator/ProxyService/CurRatePublishingAppServiceProxy?wsdl):
Enter username for alias
(currencyRateServiceEndPointUserAlias): <adminusername>
Enter Password:
<adminuserpasswordserviceuserpassword>
For Supplier Service, Policy A setting: Installer will prompt for service username and password, enter the username and password.
For Example: Credential required for Supplier service for Policy A:
supplierServiceEndPointUserAlias(https://samplehost:21999/SupplierBean/SupplierService?WSDL):
Enter username for alias
(supplierServiceEndPointUserAlias): <adminusername>
Enter Password:
<adminuserpassword>
The generated components can be verified from the following target folders:
If integrating with EBS, A jar file "ebs-financial-common-<version>.jar" should be available in folder $INSTALL_DIR/retail-financial-integration-solution/service-based-integration/target/ebs-side/rfi/rfi-ebs-event-handler/.
|
Note: The "rfi" folder in $INSTALL_DIR/retail-financial-integration-solution/service-based-integration/target/ebs-side/ should be copied to a staging folder in the EBS server which will be referred as EBS_COMP_DIR in EBS UNIX environment. |
|
Note: The steps mentioned in this section should be performed only if you are integrating with EBS as Oracle Financials applications. If not, Please skip this section and continue with the "Deploy the ORFI Application for PeopleSoft". |
Before proceeding, ensure that steps mentioned under section "Generate the EBS component" is executed successfully.
|
Note: Ensure JAVA_HOME and WL_HOME variables are set in the environment. WL_HOME points to folder location till <WebLogic Installed folder>/wlserver. |
Run the rfi-deployer.sh (available in $INSTALL_DIR/retail-financial-integration-solution/service-based-integration/bin/) script to deploy the ORFI application to the WebLogic server. This script considers all the configuration values defined in previous processes.
The script takes two arguments on the command line: -use-existing-credentials and -deploy-rfi-app.
For example: prompt$ sh rfi-deployer.sh -use-existing-credentials -deploy-rfi-app
After successful deployment of the ORFI application, restart the WebLogic server.
Restrict access to RFI-HOME:
cd $RFI-HOME
chmod -R 700 .
|
Note:
|
Run the rfi-deployer.sh (available in $INSTALL_DIR/retail-financial-integration-solution/service-based-integration/bin/) script to deploy the ORFI application to the WebLogic server. This script considers all the configuration values defined in previous processes.
The script takes two arguments on the command line: -setup-credentials and -deploy-rfi-app.
For example: prompt$ sh rfi-deployer.sh - setup-credentials -deploy-rfi-app
After successful deployment of the ORFI application, restart the WebLogic server.
Restrict access to RFI-HOME:
cd $RFI-HOME
chmod -R 700 .
|
Note:
|
Run the rfi-deployer.sh (available in $INSTALLDIR/retail-financial-integration-solution/service-based-integration/bin/) script to deploy the ORFI application to the WebLogic server. This script considers all the configuration values defined in previous processes.
The script takes two arguments on the command line: -setup-credentials and -deploy-rfi-app.
For example: prompt$ sh rfi-deployer.sh - setup-credentials -deploy-rfi-app
After successful deployment of the ORFI application, restart the WebLogic server.
Restrict access to RFI-HOME:
cd $RFI-HOMEchmod -R 700 .
Log in to the WebLogic console and verify the deployments. The ORFI application ear (retail-financial-integration-ear-<version>.ear) should be available.
|
Note: The ORFI console now includes a new page "Domain Data Cross Reference" for viewing, searching, browsing the Cross References (XREF) and DVM records setup in ORFI.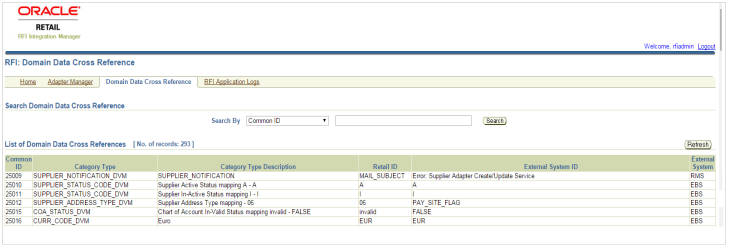 |
