| Oracle® Retail Integration Bus Installation Guide Release 19.0.1 F44789-01 |
|

 Previous |
 Next |
This chapter provides instruction on RIB HA setup.
There are two RIB App Server nodes. Nodes must be pre-identified as primary(active) and secondary(passive) node.
RIB domain is available in both nodes.
In this chapter, node1 is considered as ACTIVE node. We will assume node1 has WebLogic1.
In this chapter, node2 is considered as the PASSIVE node. We will assume node2 has WebLogic2.
Assumption is all credentials (App-DB, EH, AQ JMS etc) are same for rib in node1 and node2.
Install using command line tool following the below instructions.
Download and extract the RibKernel<RIB_MAJOR_VERSION>ForAll<RETAIL_ APP_VERSION>Apps_eng_ga.tar.
e.g tar xvf RibKernel19.0.1ForAll19.x.xApps_eng_ga.jar
Download RibFuncArtifact<RIB_MAJOR_VERSION>ForAll<RETAIL_APP_ VERSION>Apps_eng_ga.tar and put it in rib-home/download-home/rib-func-artifacts directory.Do not extract the tar file. This will be done by the check-version-and-unpack tool.
Download all the RibPak<RIB_{MAJOR|MINOR}_ VERSION>For<RETAIL_APP_ NAME><RETAIL_APP_VERSION>_eng_ ga.tar and put it in the rib-home/download-home/all-rib-apps directory. Do not extract the tar file. This will be done by the check-version-and-unpack tool.
For Linux and Solaris OS only. Set the JAVA_HOME environment variable. The JAVA_HOME must be set to a JDK1.8.0+64bit with latest security updates, within the1.8codeline.64bit.
Run the rib-home/download-home/bin/check-version-and-un pack.sh script from rib-home/download-home/bin directory.
Make a copy of rib-home/deployment-home/conf/rib-deployment-env-info.xml file, name the file to rib-home/deployment-home/conf/rib-deployment-env-info.xml.node1
Edit rib-home/deployment-home/conf/rib-deployment-env-info.xml.node1 file to specify the deployment environment information of weblogic1 in node1.
Run rib-home/application-assembly-home/bin/select-deployment-options.sh script from rib-home/application-assembly-home/bin directory. This script is to specify which environment to which you want to deploy.
example: ./select-deployment-options.sh -deployment-file-extension node1 -set-adapter-status adapter-up
Compile: Run the rib-home/application-assembly-home/bin/rib-app-compiler.sh script with setup-security-credential from rib-home/application-assembly-home/bin directory.
example: ./rib-app-compiler.sh -setup-security-credential
Deploy: Execute the rib-home/deployment-home/bin/rib-app-deployer.sh script with the appropriate command line parameter.
rib-app-deployer.sh -prepare-jms
Verify: Once the rib- app is deployed, open the rib-admin-gui from a web browser:<http or https://>host:port/rib-<app>-admin-gui
Eg- http://ribrmshost:7001/rib-rms-admin-gui
All the adapters should be up and running.
No need of creating rib-home for each box, same rib-home should be used for deploying in node2. No need of downloading tarballs and running check-version-and-unpack script. Follow these steps:
Make a copy of rib-home/deployment-home/conf/rib-deployment-env-info.xml file, name the file to rib-home/deployment-home/conf/rib-deployment-env-info.xml.node2
Edit rib-home/deployment-home/conf/rib-deployment-env-info.xml.node2 file to specify the deployment environment information of weblogic2 in node2.
Run rib-home/application-assembly-home/bin/select-deployment-options.sh script from rib-home/application-assembly-home/bin directory. This script is to specify which environment you want to deploy to
example: ./select-deployment-options.sh -deployment-file-extension node2 -set-adapter-status adapter-down
|
Note: To deploy on secondary node ie. node2 (Passive) use adapter-down, so that all adapters would be down. |
Run the rib-home/application-assembly-home/bin/rib-app-compiler.sh script without setup-security-credential from rib-home/application-assembly-home/bin directory. assumption is all credentials are same between node1 and node2 rib.
example: ./rib-app-compiler.sh
Execute the rib-home/deployment-home/bin/rib-app-deployer.sh script with the appropriate command line parameter.
rib-app-deployer.sh -prepare-jmsrib-app-deployer.sh -deploy-rib-app-ear rib-<app>
Verify: Once the rib- app is deployed, open the rib-admin-gui from a web browser:<http or https://>host:port/rib-<app>-admin-gui
Eg- http://ribrmshost:7001/rib-rms-admin-gui
All the adapters should be down. Bring down the secondary rib domain after the deployment. Only primary must be running.
Switch to the passive node only when the active node/weblogic has become corrupt that it can no longer be brought up without rebuilding it. Rebuilding the node/weblogic will take days and we will miss the SLA.
When primary domain can't be recovered easily, then bring down the domain, make sure that there are no processes still running. Only after this bring up the secondary node.
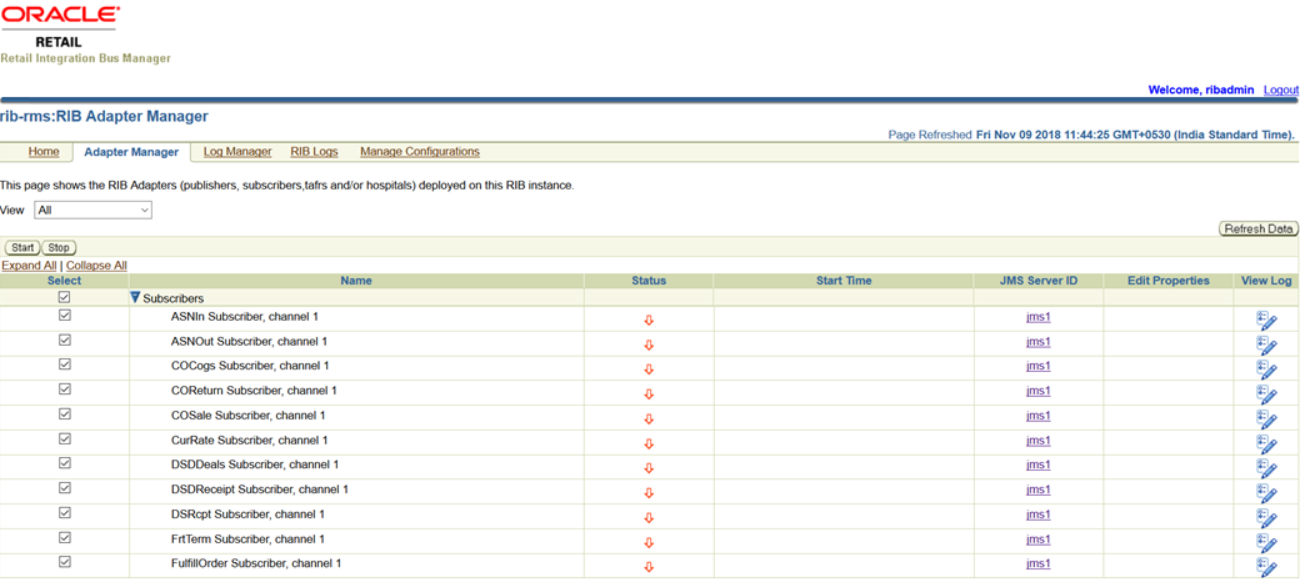
Then from the admin GUI bring up the adapters.
|
Note: This also means making node1 PASSIVE from its ACTIVE state. |
Follow these steps:
Bring down the rib domain in WebLogic1 in node1. Shutdown all managed servers and Admin server, make sure there are no processes still running.
Bring up the rib domain in Weblogic2 in node2
Open the rib-admin-gui from a web browser:
<http or https://>host:port/rib-<app>-admin-gui
(eg.-http://ribrmshost:37005/rib-rms-admin-gui)
Then from the rib admin gui bring up the adapters by selecting the checkboxes and clicking the Start button (see screen shot for reference)