| Oracle® Retail Integration Cloud Service Integration Console User Guide Release 19.1.000 F32000-02 |
|

 Previous |
 Next |
| Oracle® Retail Integration Cloud Service Integration Console User Guide Release 19.1.000 F32000-02 |
|
Previous |
Next |
This chapter provides an overview of RIC modes and provides instructions for configuring and installing RIC. The RIC installation steps differ for different RIC modes. RIC can be deployed in three modes in this release, the following table shows RIC modes:
| Supported Models | Description | When to use? | Settings in the deployment file |
|---|---|---|---|
| RIB ONLY | RIC is configured to collect and display only RIB data. | If RIB is in-scope for your integration. | "ribEnable":"true",
"bdiEnable":"true", |
How do you decide the mode in which you should run RIC?
To use only messaging infrastructure for integration (RIB) must configure RIC with RIB_ONLY mode.
BDI is disabled by default in all RIC is out of scope for this release. The value of the properties ribEnable in the ric configuration file ric-deployment-env-info.json inside ric-home/conf/ folder decides RIC mode.
Take the following steps to configure RIC:
Edit the ric-deployment-env-info.json as follows:
cd ric-home/conf/
vi ric-deployment-env-info.json
The following is an example configuration:
{
    "RicDeploymentEnvInfo":{
        "DataSourceDef":{
            "RicDataSource":{
                "dataSourceName":"RicDataSource",
                "dataSourceClass":"oracle.jdbc.pool.OracleDataSource",
                "dataSourceJndiName":"jdbc/RicDataSource",
                "jdbcUrl":"jdbc:oracle:thin:@//richost.com:1521/orcl",
                "jdbcUserAlias":"ricDataSourceUserAlias",
                "jdbcUser":"GET_FROM_WALLET",
                "jdbcPassword":"GET_FROM_WALLET"
            }

        },
        "MiddlewareServerDef":{
            "RicAppServer":{

                "weblogicDomainName":"TOOLS_Domain",
                "weblogicDomainHome":"/scratch/u00/webadmin/WLS12.2.1.4/user_projects/domains/TOOLS_Domain/",
                "weblogicDomainAdminServerUrl":"t3://richost.com:24001",
                "weblogicDomainAdminServerProtocol":"t3",
                "weblogicDomainAdminServerHost":"richost.com",
                "weblogicDomainAdminServerPort":"24001",
                "weblogicDomainAdminServerUserAlias":"ricAppServerAdminServerUserAlias",
                "weblogicDomainTargetManagedServerName":"ric-server",

                "ricUiUrl":"http://richost.com:24012/rsb-admin",
                "ricUiUserGroup":"RicAdminGroup",
                "ricUiUserAlias":"ricAdminUiUserAlias",
                "ricUiUser":"GET_FROM_WALLET",
                "ricUiPassword":"GET_FROM_WALLET",
                "secureCookie":"false"
            }
        },
        "IntegrationProduct":{
            "ribEnable":"true",
            "bdiEnable":"true",
            "ribHome":"../../../RIB/rib-home/",
            "bdiHome":"../../ric-home"
        },
        "RicApplication":{
            "ricAppUses":[
                "RicDataSource",
                "RicAppServer"
            ]
        },
                "BdiBatchJobAdminInfo":{
            "BdiRmsAdmin":{
                "batchJobAdminUrl": "http://bdihost:8080/bdi-rms-batch-job-admin",
                "optional":"true"
            },
            "BdiSimAdmin":{
                "batchJobAdminUrl": "http://bdihost:8080/bdi-sim-batch-job-admin",
                "optional":"true"
            },
 "BdiOcdsAdmin":{
                "batchJobAdminUrl": "http://bdihost:8080/bdi-ocds-batch-job-admin",
                "optional":"true"
            }
        },
        "BdiProcessFlowAdminInfo":{
            "processFlowAdminUiUrl":"http://bdihost:7001/bdi-batch-process-flow-admin",
            "optional":"true"
        },
        "BdiSchedulerAdminInfo":{
            "schedulerAdminUiUrl":"http://bdihost:7001/bdi-batch-scheduler-admin",
            "optional":"true"
        }
    }
}
Modify the DataSourceDef, the MiddlewareServerDef, and the IntegrationProduct with information that is specific to your environment.
In order to hide host and port wherever exposed in RIC, set the below java option to TRUE in the Weblogic instance startup.
JAVA_OPTIONS="${JAVA_OPTIONS} -DMaskServerInfo.appServerHostPort=true"
For the masking of the jdbc url in RIC, set the below java option to TRUE in the Weblogic instance startup.
JAVA_OPTIONS="${JAVA_OPTIONS} -DMaskServerInfo.db=true"
After configuring the RIC, follow the installation steps according to the selected RIC mode.
Install the RIC in the RIB only mode to provide visibility into the RIB. The following pre-requisites must be met:
RIB must be deployed.
JMS Console must be deployed from the rib-home/tools-home/.
rib-home must be accessible to ric-home, that is both must reside in the same file system.
The rib-deployment-env-info.xml must have a correct notification configuration for every rib-app in scope. RIC will use this email address to send notifications related to RIB.
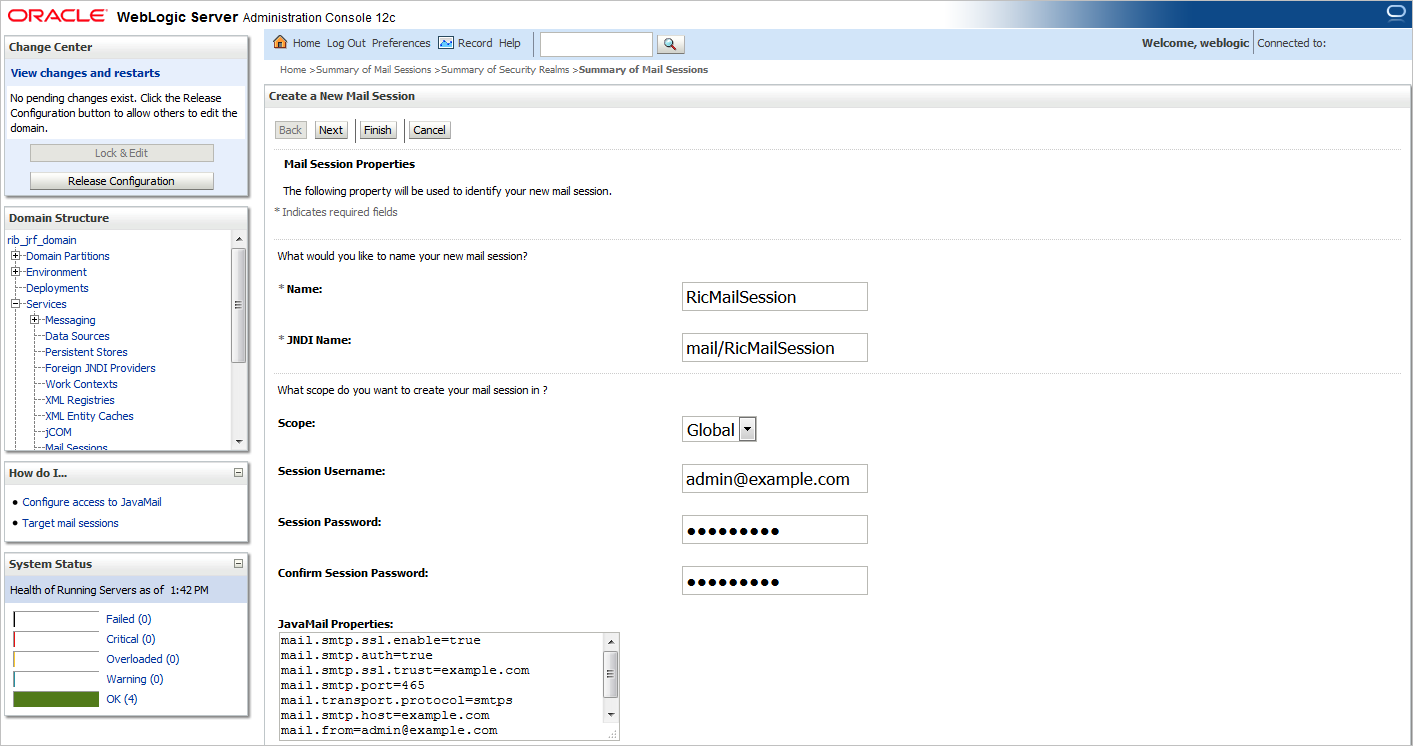
Configure a new mail session as below on the Weblogic server where you deploy RIC. This is for RIC to send notification emails on exceeding the error thresholds.
Login to the Weblogic admin console.
Navigate to Admin Console > Services > Mail Sessions.
Create a new mail session with the JNDI Name as "mail/RicMailSession".
Add the below JavaMail properties:
mail.smtp.ssl.enable=true
mail.smtp.auth=true
mail.smtp.ssl.trust=example.com
mail.smtp.port=465
mail.transport.protocol=smtps
mail.smtp.host=example.com
mail.from=admin@example.com
Take the following steps to deploy the RIC in RIB only mode:
Download RicKernel19.1.000ForAll19.x.xApps_eng_ga.zip to a location (for example, RIC-APP-BUILDER) on the computer which has your rib-home.
Edit the ric-deployment-env-info.json configuration file located in the ric-home/conf/ folder.
Modify MiddlewareServerDef and IntegrationProduct with information that is specific to your environment.
Set the value of the ribEnable property in the configuration file to True.
Set the value of the ribHome property in the configuration file to point to rib-home.
Set the value of secureCookie to true if the cookies has to be secure.
Set the value of the RicAppServer fields to point to the environment where you want to deploy RIC.
Go to the ric-home/bin/ folder and run the compiler to update the RIC ear as follows: $ sh ric-app-compiler.sh -setup-credentials.
When prompted by the compiler, enter the user name and password for WebLogic server and RIC admin user. The RIC admin user is used to log in to the RIC.
From the same folder, run the deployer script to create the user and group and deploy RIC on the WebLogic server as follows: $ sh ric-app-deployer.sh –deploy-ric-app.
Restrict access to the $RIC-HOME folder:
cd $RIC-HOME
chmod -R 700 .
