| Oracle® Retail Integration Cloud Service Oracle® Universal Service Mapper User Guide Release 19.1.000 F31998-01 |
|

 Previous |
| Oracle® Retail Integration Cloud Service Oracle® Universal Service Mapper User Guide Release 19.1.000 F31998-01 |
|
Previous |
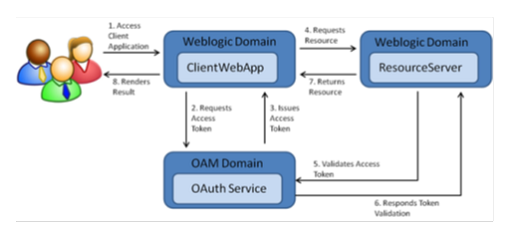
OAuth 2.0 is the industry-standard protocol for authorization. The OAuth 2.0 authorization framework enables a third-party application to obtain limited access to an HTTP service, either on behalf of a resource owner by orchestrating an approval interaction between the resource owner and the HTTP service, or by allowing the third-party application to obtain access on its own behalf.
IDCS provides out of the box OAuth Services, which allows a Client Application to access protected resources that belong to an end-user (that is, the Resource Owner).
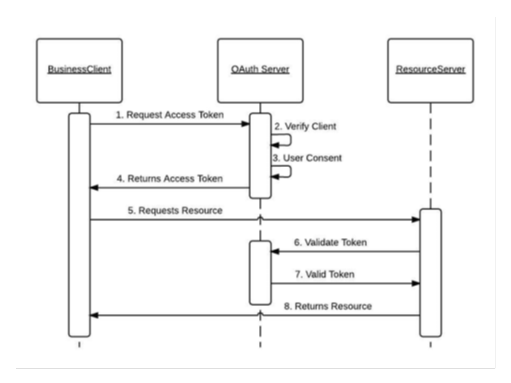
Business to Business (2-legged flow)
It usually represents an application that calls another application or service without end-user intervention.
A client (Business Client application) will make a call to a service, business service (in OAuth spec, a resource server), and request some business information while passing the access token.
Because there is no end-user intervention, the client is pre-authorized to have access to the resource.
Resource Server - The server hosting the protected resource.
Resource Owner - An entity capable of granting access to a protected resource.
Client - An application making protected resource requests on behalf of the resource owner. It can be a server-based, mobile, or a desktop application.
Authorization Server - The server issuing access tokens to the clients after successfully authenticating the resource owner and obtaining authorization.
A step-by-step guide to get a clientId and secret for grant_type=Password (Resource Owner Password Credentials) when configuring Logfile/WMS.
Create a screen using module api/oauth2/applications.
Log in to the oracle WMS cloud using credentials https://<wms-domain>/<env-name>/.
For example: https://***.wms.ocs.oraclecloud.com/lgf_int_qa/
Username: <username>
Password: <password>
Append api/oauth2/applications to the above URI.
For example: https://<wms-domain>/<env-name>/api/oauth2/applications
|
Note: If you access the URL without first signing you, you will receive a 'Forbidden error'. |
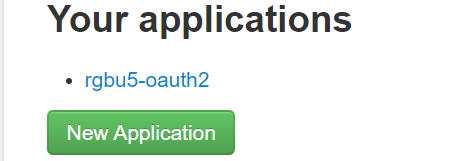
Open the URL created in step 3 in a web browser. The 'Your applications' screen opens:
Click the New Application button.
The 'Register a new application' screen opens.
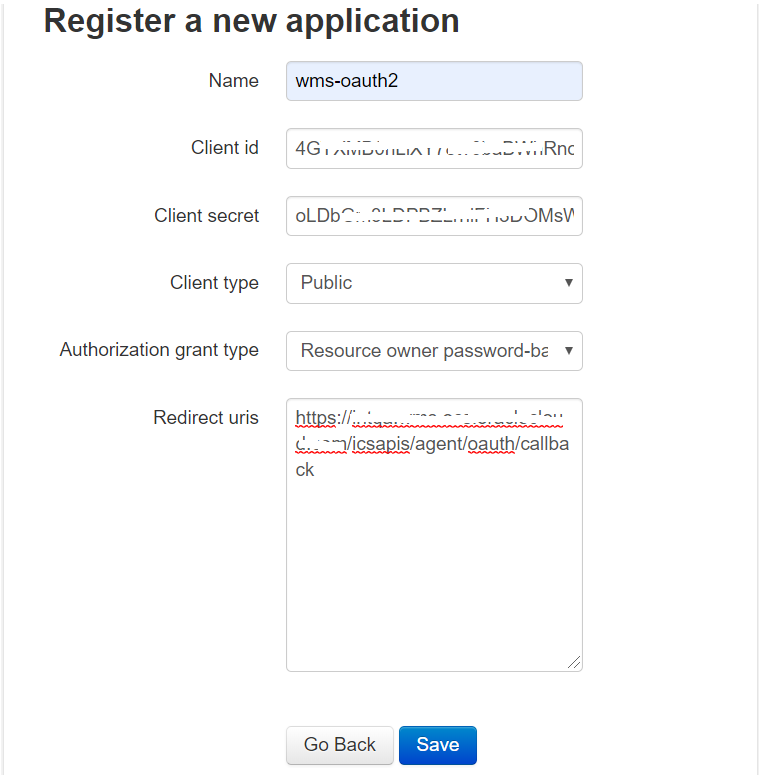
Register a new application using this screen.
Enter the Provide Name, Client Type, Authorization grant type and Redirect uris.
Client type can be public/confidential.
Client Id and Secret are generated.
Click the Save button.
Provide steps for grant type Resource Owner Password Credentials.
Redirect uri is optional for grant type Resource Owner Password Credentials, but without a URI, it is not able to register.
So provide the Redirect uri as:
<wms-domain>/<env-name>/icsapis/agent/oauth/callback - https://<wms-domain>/<env-name>/icsapis/agent/oauth/callback
Request an access token for grant type Resource Owner Password Credentials. Scope is optional.
Enter the following values:
Retrieve the token using the clientId and secret through a curl statement.
curl -v -X POST -u "<ClientId>:<Secret>" -d "grant_type=password&username=<username>&password=<pwd>" <wms-domain>/<env-name>/api/oauth2/token/
For example:
curl -v -X POST -u "<ClientId>:<Secret>" -d "grant_type=password&username=rgbu5_adm&password=welcome1#" https://***.wms.ocs.oraclecloud.com/lgf_int_qa/api/oauth2/token/
A successful response will be in the following format:
{"access_token": "<access-token>", "token_type": "Bearer", "expires_in": 36000, "refresh_token": "<refresh-token>", "scope": "read write"
Test the token by accessing the Logfile URL using the access_token with a curl statement:
curl -X POST -i -H 'Authorization: Bearer <access-token>' \
'https://***.wms.ocs.oraclecloud.com/lgf_int_qa/wms/api/init_stage_interface/' --data "@./ItemLgfDataNoNewLine.xml"
A successful response has the following format:
<?xml version="1.0" encoding="utf-8"?>
<root><success>True</success><response><message>Stage table processing com-plete</message></response></root>
The Logfire services are consumed by using the following security policies:
Basic Authentication 2.OAuth2.
By configuring this property in the configuration file, you can switch between basic and oauth2 authentication.
OAuth2 Consumer Configuration:
Table 8-1 external_env_info.LogFireIntegration.json
| Configuration Property | Description |
|---|---|
|
"name": "Lgf_Oauth2_Authentication","value": "true" |
|
|
"name": "lgf_oauth2_alias_key", "value": "lgfOauth2ApplicationClientAlias" |
Save the ClientId and Secret in the credential store using the alias |
|
"name": "LogFire_Host_Url_Key", "value": "<Logfire Login URL> |
Logfire URL used for the OAuth token. |
After receiving a Logfire clientId and secret from the above steps:
Store these credentials in the credential store for further reference in the USM application to create an OAuth token.
Once the OAuth token is issued, further API calls are made.
Save the clientId and secret in the credential store with the alias name lgfOauth2ApplicationClientAlias, as defined in the JSON.
The USM application uses this alias to make a call to Logfire and get the OAuth token. Once obtained, the OAuth2 token services calls are made.
Pass the JSON request to the service. This saves the credentials(clientId/secret combination.
JSON request format:
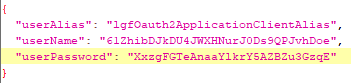
{
"userAlias": "<Alias>",
"userName": "<Id>",
"userPassword": "<password>"
}
For example:
USM consumer simplifies access of services protected by OAuth 2.0. The USM consumer executes the following steps:
Gets the token from the Logfire server using client ID, client secret, and scope.
Adds the "Authorization Bearer <token>" HTTP header.
Calls the service.