| Oracle® Communication and Mobility Server Administrator Guide Release 10.1.3 Part Number B31497-01 |
|
|
View PDF |
| Oracle® Communication and Mobility Server Administrator Guide Release 10.1.3 Part Number B31497-01 |
|
|
View PDF |
This chapter describes how administrators create customized installations of Oracle Communicator. This chapter includes the following sections:
You can customize Oracle Communicator installations that populate user accounts with default settings appropriate to the configuration and topology of a particular site. For example, you can distribute installer files to Communicator users that set their accounts to use a SIP proxy with the default address of ourproxy.example.com. You set these defaults by creating an XML file called customize.xml. Using a program that supports adding files to a RAR file, you then package this file with the installer file (the self-extracting RAR file called OracleCommunicatorSetup.exe) that you distribute to Communicator users.
When a user installs a setup file that includes customize.xml, the properties from the customize file are used to overwrite the following two files in the Oracle Communicator install directory:
Program Files\Oracle\Oracle Communicator\defaults.xml
Program Files\Oracle\Oracle Communicator\customize\vendor.xml
defaults.xml is a template for creating account-specific XML files. These files are updated whenever users modify their configurations through the user interface. As a result, these properties can vary from account to account. For example, one user account-specific XML file may designate the proxy as beta.testcomany.com, while another may designate proxy.example.com.
vendor.xml describes the properties that are the same for all Communicator users.
If you package customize.xml with the installer, then the default properties defined in vendor.xml and default.xml are overwritten by those set in customize.xml during installation. For example, if you define an outbound proxy address in customize.xml, it will replace the value for the outbound proxy address in default.xml. All properties that are not overwritten by customize.xml will use default values (that is, either values already present in defaults.xml or vendor.xml, or values that are generated at runtime).
The Oracle Communicator installer includes a template file for customize.xml called customize-sample.xml. This file documents every property that might require customization. By modifying and renaming this file to customize.xml and then packaging it with the installer file as described in "Creating a Customized Installer File", you set the defaults for all of the users in an Oracle Communicator installation.
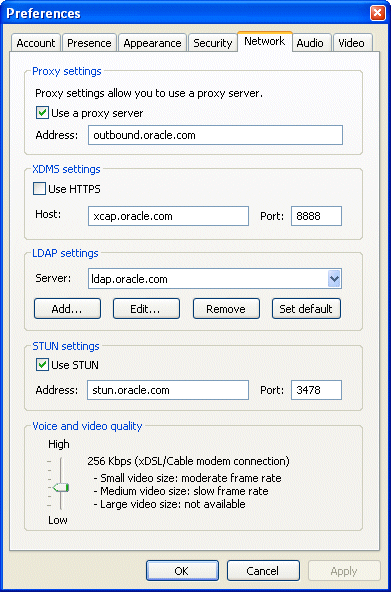
The customize-sample.xml file is divided in two sections: Vendor and Account. In general, Vendor settings apply to every account in a given Oracle Communicator installation and cannot be changed by the user. The settings configured in the Account section are used to create an account-specific XML file whenever a user creates a new Communicator account. Some of the properties in a user's account-specific XML file are set using Communicator's Preferences dialog (Figure 11-1).
Figure 11-1 The Oracle Communicator Preferences Dialog

customize-sample.xml includes all of the elements needed for creating a custom installer. You can remove any element in the Vendor or Account sections that does not require customization. If you remove an XML element, the system uses a default value documented in customize-sample.xml.
Example 11-0 illustrates the structure of customize-sample.xml. For the full file, see Appendix C, "Configuration Files".
Example 11-1 customize-sample.xml
<Customize>
<Vendor>
   <SelfProv>...</SelfProv>
</Vendor>
<Account>
   <UseOutboundProxyAddress>...<UseOutboundProxyAddress>
   <OutboundProxyAddress>...<OutbounProxyAddress>
   <Theme>...</Theme>
   <XDMSSettings>...</XDMSSettings>
   <UseRPortForNatTraversal>...</UseRPortForNatTraversal>
   <UseStun>...</UseStun>
   <StunServerAddress>...</StunServerAddress>
   <StunServerPort>...</StunServerPort>
   <LdapServers>...</LdapServers>
   <Provisioning>...</Provisioning>
   <VersionControl>...</VersionControl>
</Account>
</Customize>
Only include the elements that are appropriate to the topology and configuration of the OCMS installation.
The <Vendor> element provides Communicator users with read-only values. The properties set within this section are the same for all users. Setting the content of the <SelfProv> element to 1 enables end users to see the Service Settings menu option. This opens the service provider's Web page URL. See "Setting the Service Provider's Web Page" for more information on configuring this URL.
To enable use of the outbound proxy, enter 1 as the content for <UseOutboundProxy>. Next, enter the IP address of the outbound proxy server where all requests are sent on the first hop. For example, enter sip:my.host:5060;transport=tcp. If you do not specify this value, then a default address of outbound.<host> is used instead, where <host> is taken from the Oracle Communicator user's SIP address. See also the SIPOutboundProxy attribute of the PresenceSupplierWebService and PresenceConsumerWebService MBeans.
The <Theme> element sets the default theme for the Oracle Communicator user interface. The current options are Communicator, Classic, Jazz and Steel Can.
The <XDMSSettings> element and its child elements enable presence for Oracle Communicator users by specifying the address the XDMS Server, the presence rules and hard-state settings. The child elements include:
<UseHttps>
Set to 1 to use HTTPS to connect to the Aggregation Proxy. To enable this secure connection to the server, refer to "Securing the XDMS Server with the Aggregation Proxy".
<Host>
The host of the XDMS Server. For example, enter your.xdms.domain.com. For HTTPS, define the host for the Aggregation Proxy.
<Port>
The port number of the XDMS Server. For HTTPS, configure the port as the HTTPS port of the Aggregation Proxy host. For example, enter 443.
<RootContext>
The root of the XDMS Server. The default value is services. Set <RootContext> to aggregationproxy, the context root of the Aggregation Proxy, for either HTTP or HTTPS connections to the Aggregation Proxy. If Communicator connects to the Aggregation Proxy using HTTPS (that is, <UseHttps>1</UseHttps>), then you must define <RootContext> as aggregationproxy. If the Aggregation Proxy is not used, then set <RootContext> to the default value of services.
<PresRuleAUID>
The ID of the application usage for presrules. The default is pres-rules.
<PresRuleDocName>
The name of the pres-rules document. The default value is presrules.
<HardStateAUID>
The ID of the application usage for PIDF (Presence Information Data Format) manipulation. The default value is pidf-manipulation.
<HardStateDocName>
The document name for pidf manipulation application usage. Unauthenticated users are blocked when no rule is found. The default is hardstate.
See also "Presence" and "XCapConfig".
The <USeRPortforNatTraversal>, <UseStun>,<StunServerAddress> and <StunServerPort> elements are used to enable NAT traversal (that is, to enable a user to connect from behind a router). The latter three properties are used to provide information on the STUN Server, if one is available. Configure these elements as follows:
<UseRPortforNatTraversal>
Set to 1 to enable use the rport parameter specified in RFC 3581. The rport parameter, which is in the Via header field, enables the Communicator client to request OCMS to send the response back to the source IP address and port from which the request originated.
Caution:
You must set<useRPortforNatTraversal> to 0 for clustered configurations of Oracle Communication and Mobility Server.<UseStun>
Set to 1 to enable STUN.
<StunServerAddress>
The address of the STUN Server.
<StunServerPort>
The primary STUN port to which to bind for listening for incoming binding requests. The value is UDP port 3478, the default STUN Port as described in RFC 3489.
For more information, see "Stun Service".
The LDAP server that you define within the <LdapServers> element enable Oracle Communicator users to search contact lists through Oracle Communicator's support of LDAPv3. By default, Oracle Communicator does not define an LDAP Server. The child <LdapServer> elements have their own children, which specify the LDAP Server accessed by Oracle Communicator users. These include:
<Name>
The name of the LDAP Server.
<Ip>
The IP address of the LDAP Server.
<Port>
The port number of the LDAP Server
<BaseObject>
The starting point for searches using the DN (Distinguished Name) syntax. For example, enter dc=oracle,dc=com to search within oracle.com.
<Default>
Set this as the default LDAP server if more than one LDAP servers are defined.
<useTLS>
Set to 1 to use a TLS connection to the LDAP server.
<UseAuthentication>
Set to 1 to use the DN for authorization.
<AuthenticationAttribute>
The attribute to use as the DN for authorization. For example, enter uid.
<SipUriAttribute>
Indicates which LDAP schema attribute, if any, should be mapped to the SIP address of a contact.
<SipUriProtocolPrefix>
If set to 1, this indicates that the LDAP server returns SIP addresses prepended with sip:.
<SipUriLowercaseTransform>
If set to 1, then the SIP address of a contact returned by the LDAP server is put in lower case.
Defining the <Provisioning> element's child, <Location>, defines the service provider's Web page that Oracle Communicator user's to launch from the Service Settings menu item. The value for <Location> is a URL.
To create the customized installer file:
Download and install an application that supports adding files to a RAR. These instruction use WinRAR (http://www.rarlab.com/) as an example.
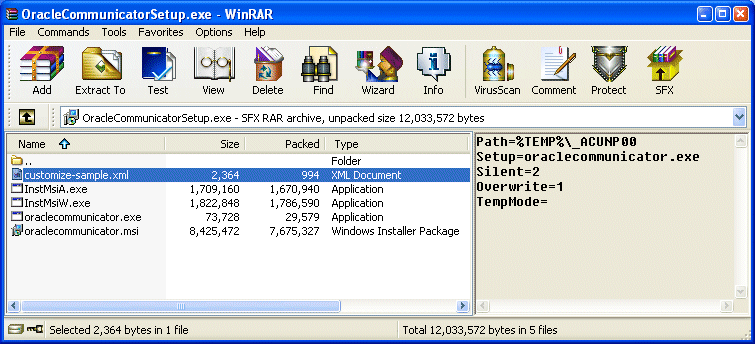
Open the self-extracting RAR file, OracleCommunicatorSetup.exe, in WinRAR.
Figure 11-2 Opening the Oracle Communicator Setup File

Extract customize-sample.xml and rename it customize.xml.
Edit the customize.xml file with your specific settings. Typically, you edit all of the server settings to match the deployment. You can comment out or remove the XML elements for those properties for which the default values suffice.
Using WinRAR (or another application that manages RAR files), package customize.xml with the setup file (OracleCommunicatorSetup.exe) using one of the following methods:
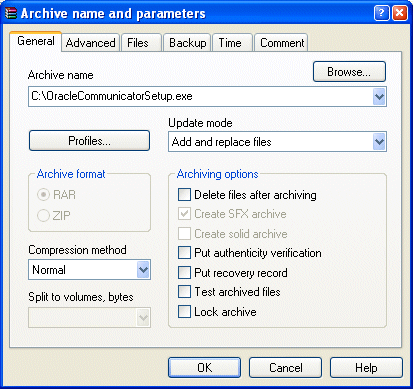
Open OracleCommunicatorSetup.exe in WinRAR (Figure 11-2) and then drag and drop customize.xml into OracleCommunicatorSetup.exe. In the Archive Name and Parameters dialog (Figure 11-3), select OracleCommunicatorSetup.exe as the archive and then click OK.
Figure 11-3 Adding custom.xml to the Installer

Open OracleCommunicatorSetup.exe in WinRAR (Figure 11-2), click Commands and then select Add Files to Archive. In the Select Files to Add dialog, navigate to customize.xml using the Browse function and then select customize.xml. In the Archive Name and Parameters dialog, select OracleCommunicatorSetup.exe as the archive and then click OK. You can either add customize.xml back to OracleCommunicatorSetup.exe or rename a copy of the setup file and add customize.xml to that.
Note:
You can also rename the.exe file. You can give this file any name.If desired, sign the new self-extracting.exe so that users who download it have confidence in the source of the modified installer.
Distribute the modified self-extracting.exe to end-users.
This section describes how to configure customize.xml to specify the upgrade policy for all Oracle Communicator instances installed by end users.
To set the upgrade policy, you first create an XML file, such as upgrade.xml (Example 11-2) that contains information regarding the site-wide recommended and required settings for Oracle Communicator. This file should reside on a Web server that is accessible to all of the installed Oracle Communicator clients. Example 11-2 illustrates the contents of this file.
Example 11-2 The Oracle Communicator Upgrade Policy
<?xml version="1.0" encoding="UTF-8"?>
<Upgrade>
<Must>10.1.3.20002</Must>
<Recommend>10.1.3.20003</Recommend>
<Interval>86400</Interval>
<Download>http://example.com/myInstallInstructions.html</Download>
</Upgrade>
You then reference this document within customize.xml by defining the <VersionControl> element (Example 11-2) that is located in the <Account> section. For example, configuring the <Location> element to point to upgrade policy results in the retrieval and review of the upgrade policy when a user logs into Oracle Communicator.
<VersionControl>
   <UseVersionControl>1</UseVersionControl>
   <Location>http://policy.example.com/upgrade.xml</Location>
</VersionControl>
Note:
upgrade.xml and the installation instructions referenced in the <Location> element do not have to be located on the same server; they need only be in a locations that Communicator clients can access through HTTP. The <Location> element can point to a page that you create that contains downloading instructions, or it can point directly to the executable of the new installer.If the version of the user's Communicator client is lower than the required version defined in <Must> element of the upgrade policy, then Communicator displays a dialog that alerts users to the fact that they must upgrade. (Figure 11-4).
Clicking the dialog's upgrade button opens the download URL in a default URL and closes Communicator. If the user's version is higher than the required version specified in the <Must> element, but lower than the version defined in the <Recommended> element, then Communicator presents the user with a dialog with that enables the user to open the download URL from the default browser or to ignore this option.
For a Communicator installation that points to the upgrade policy described in Example 11-2, for example, Communicator does not prompt users to upgrade to versions of Communicator greater than, or equal to, both the versions set for the <Must> (10.1.3.20002) and <Recommended> (10.1.3.0003) elements and will wait the number of seconds specified in <Interval> (864000) before retrieving upgrade.xml again. The upgrade policy described in Example 11-2 would affect users running Versions 10.1.3.20001, 10.1.3.20002, 10.1.3.20003, and 10.1.3.20004 of Communicator as follows:
10.1.3.20001: Communicator prompts the user that an upgrade is required. When the user then clicks the button, Communicator is closed and the URL specified in upgrade.xml is launched in the default browser.
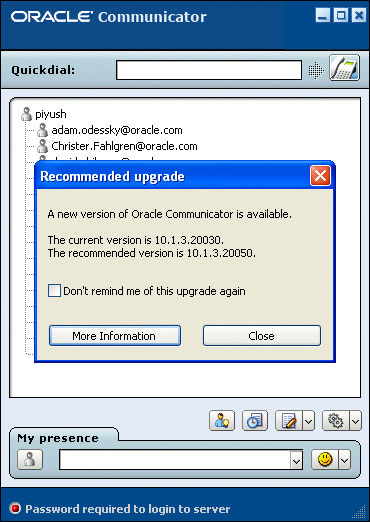
10.1.3.20002: Because the user has the latest required version, but not the latest recommended version, Communicator alerts the user that the recommended version is available (Figure 11-5). The user can then opt to close this dialog or can click a button that launches the upgrade URL in the default browser. Communicator closes when the user clicks this button.
Figure 11-5 The Recommended Upgrade Dialog

10.1.3.20003: Communicator does not prompt the user to upgrade.
10.1.3.20004: Communicator does not prompt the user to upgrade.
If upgrade.xml is not available for some reason (for example, the server is down, the <VersionControl> and <Location> elements were not specified properly, or a firewall blocks access to the upgrade document), then the upgrade process will fail silently with no ill effect on the user's experience. The user can login normally.
Note:
It is not possible to ensure that every instance of Communicator running at a site matches the version specified in the<Must> element in some situations. For example, a user with a personal firewall that blocks access to uprgrade.xml will never be prompted to upgrade.