| Oracle® TopLink Developer's Guide 10g Release 3 (10.1.3.1.0) Part Number B28218-01 |
|
|
View PDF |
| Oracle® TopLink Developer's Guide 10g Release 3 (10.1.3.1.0) Part Number B28218-01 |
|
|
View PDF |
This chapter explains how to create TopLink sessions, including the following:
For information on the various types of session available, see "Session Types".
Each TopLink session is contained within a sessions configuration (sessions.xml) file. You can create a sessions configuration using TopLink Workbench or Java code. Oracle recommends that you use TopLink Workbench to create and manage your sessions (see "Creating a Sessions Configuration").
Alternatively, you can create sessions in Java. For more information on creating sessions in Java, see Oracle TopLink API Reference.
After you create a session, you must configure its various options (see "Configuring a Session"). After configuring the session, you can use it in your application to manage persistence (see "Acquiring and Using Sessions at Run Time").
TopLink Workbench lets you create session instances and save them in the sessions.xml file. It represents the sessions.xml file as a sessions configuration. Individual session instances are contained within the sessions configuration. You can create multiple sessions configurations, each corresponding to its own uniquely named sessions.xml file.
Oracle recommends that you use TopLink Workbench to create and manage sessions. It is the most efficient and flexible approach to session management. For more information about the advantages of this approach, see "Session Configuration and the sessions.xml File".
TopLink Workbench displays sessions configurations and their contents in the Navigator window. When you select a session configuration, its attributes are displayed in the Editor window.
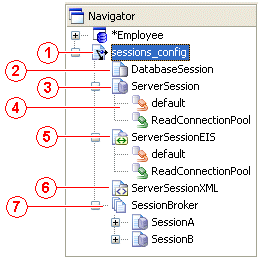
Figure 73-1 calls out the following user interface elements:
Sessions Configuration
Database Session
Relational Server Session
Connection Pool
EIS Server Session
XML Session
Session Broker
Figure 73-1 Sessions Configurations in Navigator Window
To create a TopLink sessions configuration (sessions.xml file), use this procedure:

Click New on the toolbar and select Sessions Configuration.

You can also create a new sessions configuration by selecting File > New > Session Configuration from the menu, or by clicking Create New Sessions Configuration in the standard toolbar.
The new sessions configuration element appears in the Navigator window; the Sessions Configuration property sheet appears in the Editor window.
Enter data in each field on the Sessions Configuration property sheet as "Configuring a Sessions Configuration" describes.
Each TopLink sessions configuration (sessions.xml file) can contain multiple sessions and session brokers. In addition, you can specify a classpath for each sessions configuration that applies to all the sessions it contains.
To configure a session configuration, use this procedure:
Select the session configuration in the Navigator. Its properties appear in the Editor.
Figure 73-2 Sessions Configuration Property Sheet
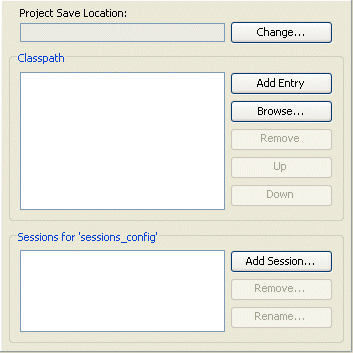
Use the following information to enter data in each field of the Sessions configuration property sheet:
| Field | Description |
|---|---|
| Project Save Location | Click Change and select the directory in which to save the sessions configuration. |
| Classpath | Lists the JAR or ZIP files that contain the compiled Java classes on which this sessions configuration depends for features that require an external Java class (for example, session event listeners).
|
Sessions for <sessions configuration name> |
Lists the available sessions defined in this sessions configuration:
For more information on creating sessions using TopLink Workbench, seen the following: |
Oracle recommends that you create server sessions using TopLink Workbench (see "Using TopLink Workbench").
After you create a server session, you create a client session by acquiring it from the server session (see "Acquiring a Client Session").
Before you create a server session, you must first create a sessions configuration (see "Creating a Sessions Configuration").
Creating a Session
To create a new TopLink server session, use this procedure:
Select the sessions configuration in the Navigator window in which you want to create a session.

Click Add Session on the toolbar. The Create New Session dialog box appears.
You can also create a new server session by right-clicking the sessions configuration in the Navigator and selecting New > Session from the context menu, or by clicking Add Session on the Sessions Configuration property sheet.
Figure 73-3 Create New Session Dialog Box, Server Session Option
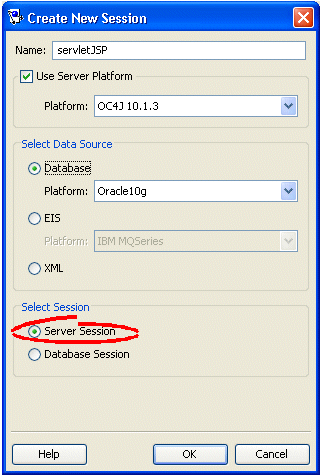
Use the following information to enter data in each field of the dialog box:
| Field | Description |
|---|---|
| Name | Specify the name of the new session. |
| Use Server Platform | Check this field if you intend to deploy your application to a J2EE application server.
If you check this field, you must configure the target application server by selecting a Platform. |
| Platform | This option is only available if you check Use Server Platform.
Select the J2EE application server to which you will deploy your application. TopLink supports the following J2EE application servers:
The server platform you select is the default server platform for all sessions you create in this sessions configuration. At the session level, you can override this selection or specify a custom server platform class (see "Configuring the Server Platform"). |
| Select Data Source | Select the data source for this session configuration. Each session configuration must contain one data source. Choose one of the following:
See "TopLink Project Types" for more information. |
| Select Session | Select Server Session to create a session for a single data source (including shared object cache and connection pools) for multiple clients in a three-tier application. |
Footnote 1 You cannot create a server session for an XML project.
You can create a server session in Java code using a project. You can create a project in Java code, or read a project from a project.xml file.
Example 73-1 illustrates creating an instance (called serverSession) of a Server class using a Project class.
Example 73-1 Creating a Server Session from a Project Class
Project myProject = new Project();
Server serverSession = myProject.createServerSession();
Example 73-2 illustrates creating an instance (called serverSession) of a Server class using a Project read in from a project.xml file.
Example 73-2 Creating a Server Session from a project.xml File Project
Project myProject = XMLProjectReader.read("myproject.xml");
Server serverSession = myProject.createServerSession();
Example 73-3 illustrates creating a server session with a specified write connection pool minimum and maximum size (when using TopLink internal connection pooling). The default write connection pool minimum size is 5 and maximum size is 10.
A session broker may contain both server sessions and database sessions. Oracle recommends that you use the session broker with server sessions because server sessions are the most scalable session type.
Oracle recommends that you create server sessions using TopLink Workbench (see "Using TopLink Workbench").
After you create and configure a session broker with server sessions, you can acquire a client session from the session broker at run time to provide a dedicated connection to all the data sources managed by the session broker for each client. For more information, see "Acquiring a Client Session".
Before you create a session broker session, you must first create a sessions configuration (see "Creating a Sessions Configuration") and one or more server sessions ("Creating a Server Session"), or one or more database sessions ("Creating Database Sessions").
To create a new TopLink session broker, use this procedure:
Select the sessions configuration in the Navigator window in which you want to create a session broker.

Click Add Session Broker on the toolbar. The Create New Session Broker dialog box appears.
You can also create a new session broker by right-clicking the sessions configuration in the Navigator window and selecting Add Session Broker from the context menu or by clicking Add Session Broker on the Sessions Configuration property sheet.
Figure 73-4 Create New Session Broker Dialog Box
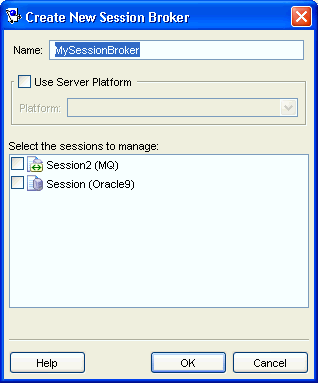
Use the following information to enter data in each field of the dialog box:
| Field | Description |
|---|---|
| Name | Specify the name of the new session broker. |
| Use Server Platform | Check this field if you intend to deploy your application to a J2EE application server.
If you check this field, you must configure the target application server by selecting a Platform. |
| Platform | This option is available only if you check Use Server Platform.
Select the J2EE application server to which you will deploy your application. TopLink supports the following J2EE application servers:
The server platform you select is the default server platform for all sessions you create in this sessions configuration. At the session level, you can override this selection or specify a custom server platform class (see "Configuring the Server Platform"). |
| Select the sessions to Manage | Select sessions to be managed by this new session broker (from the list of available sessions) and click OK.
Note: This field appears only if the configuration contains valid sessions. |
Footnote 1 Includes support for both 9.0.3 and 9.0.4.
Continue with Chapter 74, "Configuring a Session".
Example 73-4 illustrates how you can create a session broker in Java code by instantiating a SessionBroker and registering the brokered sessions with it.
Because the session broker references other sessions, configure these sessions before instantiating the session broker. Add all required descriptors to the session, but do not initialize the descriptors or log the sessions. The session broker manages these issues when you instantiate it.
Example 73-4 Creating a Session Broker
Project databaseProject = new MyDatabaseProject();
Server databaseSession = databaseProject.createServerSession();

Project eisProject = new MyEISProject();
Server eisSession = eisProject.createServerSession();

SessionBroker sessionBroker = new SessionBroker();
sessionBroker.registerSession("myDatabase", databaseSession);
sessionBroker.registerSession("myEIS", eisSession);

sessionBroker.login();
Oracle recommends that you create database sessions using TopLink Workbench (see "Using TopLink Workbench").
After you create a database session, you can acquire and use it at run time. For more information on acquiring a database session, see "Acquiring a Session From the Session Manager".
Before you create a database session, you must first create a sessions configuration (see "Creating a Sessions Configuration").
To create a new TopLink database session, use this procedure:
Select the session configuration in the Navigator window in which you want to create a session.

Click Add Session on the toolbar. The Create New Session dialog box appears.
You can also create a new configuration by right-clicking the sessions configuration in the Navigator window and selecting New > Session from the context menu.
Figure 73-5 Create New Session Dialog Box, Database Session Option
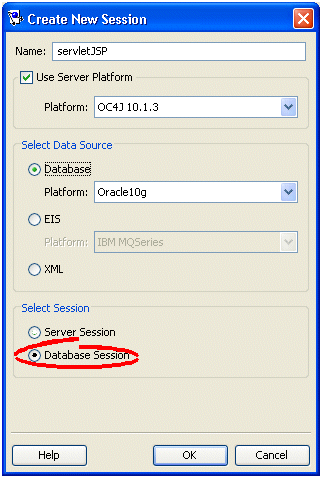
Use the following information to enter data in each field of the dialog box:
| Field | Description |
|---|---|
| Name | Specify the name of the new session. |
| Use Server Platform | Check this field if you intend to deploy your application to a J2EE application server.
If you check this field, you must configure the target application server by selecting a Platform. |
| Platform | This option is available only if you check Use Server Platform.
Select the J2EE application server to which you will deploy your application. TopLink supports the following J2EE application servers:
The server platform you select is the default server platform for all sessions you create in this sessions configuration. At the session level, you can override this selection or specify a custom server platform class (see "Configuring the Server Platform"). |
| Select Data Source | Select the data source for this session configuration. Each session configuration must contain one data source. Choose one of the following:
See "TopLink Project Types" for more information. |
| Select Session | Select Database Session to create a session for a single database (including shared object cache and connection pools) for a single client suitable for simple applications or prototyping. |
Footnote 1 Includes support for both 9.0.3 and 9.0.4.
Enter the necessary information and click OK.
TopLink Workbench window appears, showing the database session in the Navigator window.
Continue with Chapter 74, "Configuring a Session".
You can create an instance of the DatabaseSession class in Java code using a Project. You can create a project in Java code or read a project from a project.xml file.
Example 73-5 illustrates creating a DatabaseSession using a Project class.
Example 73-5 Creating a Database Session from a Project Class
Project myProject = new Project();
DatabaseSession databaseSession = myProject.createDatabaseSession();
Example 73-6 illustrates creating a DatabaseSession using a Project read in from a project.xml file.
Remote sessions are acquired through a remote connection to their server-side session. Remote sessions are acquired through Java code on the remote client. The server-side session must also be registered with an oracle.toplink.remote.ejb.RemoteSessionController and accessible from the RMI naming service.
You create remote sessions entirely in Java code (see "Using Java").
Example 73-7 and Example 73-8 demonstrate how to create a remote TopLink session on a client that communicates with a remote session controller on a server that uses RMI. After creating the connection, the client application uses the remote session as it does with any other TopLink session.
Example 73-7 shows the code you add to your application's RMI service (MyRMIServerManagerImpl) to create and return an instance of an RMIRemoteSessionController to the client. The controller sits between the remote client and the local TopLink session.
The RMIRemoteSessionController you create on the server is based on a TopLink server session. You create and configure this server session as described in "Creating a Server Session" and "Configuring Server Sessions".
Example 73-7 Server Creating RMIRemoteSessionController for Client
RMIRemoteSessionController controller = null;
try {
    // Create instance of RMIRemoteSessionControllerDispatcher which implements
    // RMIRemoteSessionController. The constructor takes a TopLink session as a parameter
    controller = new RMIRemoteSessionControllerDispatcher (localTopLinkSession);
} catch (RemoteException exception) {
    System.out.println("Error in invocation " + exception.toString());
}
return controller;
The client-side code gets a reference to the application's RMI service (in this example it is called MyRMIServerManager) and uses this code to get the RMIRemoteSessionController running on the server. The reference to the session controller is then used to create the RMIConnection from which it acquires a remote session.
Example 73-8 Client Acquiring RMIRemoteSessionController from Server
MyRMIServerManager serverManager = null;
// Set the client security manager
try {
    System.setSecurityManager(new MyRMISecurityManager());
} catch(Exception exception) {
    System.out.println("Security violation " + exception.toString());
}
// Get the remote factory object from the Registry
try {
    serverManager = (MyRMIServerManager) Naming.lookup("SERVER-MANAGER");
} catch (Exception exception) {
    System.out.println("Lookup failed " + exception.toString());
}
// Start RMIRemoteSession on the server and create an RMIConnection
RMIConnection rmiConnection = null;
try {
    rmiConnection = new RMIConnection(
        serverManager.createRemoteSessionController()
    );
} catch (RemoteException exception) {
    System.out.println("Error in invocation " + exception.toString());
}
// Create a remote session which we can use as a normal TopLink session
Session session = rmiConnection.createRemoteSession();