| Oracle® TopLink Developer's Guide 10g Release 3 (10.1.3.1.0) Part Number B28218-01 |
|
|
View PDF |
| Oracle® TopLink Developer's Guide 10g Release 3 (10.1.3.1.0) Part Number B28218-01 |
|
|
View PDF |
This chapter describes the various components that you must configure in order to use a relational variable one-to-one mapping.
For more information, see the following:
Table 38-1 lists the configurable options for a relational variable one-to-one mapping.
Table 38-1 lists the configurable options for a relational variable one-to-one mapping.
Table 38-1 Configurable Options for Relational Variable One-to-One Mapping
| Option | Type | TopLink Workbench |
Java |
|---|---|---|---|
|
"Configuring Reference Descriptor" |
Basic |
 |
 |
|
"Configuring Method Accessing" |
Advanced |
 |
 |
|
"Configuring Read-Only Mappings" |
Advanced |
 |
 |
|
"Configuring Private or Independent Relationships" |
Advanced |
 |
 |
|
|
Advanced |
 |
 |
|
"Configuring Mapping Comments" |
Advanced |
 |
 |
|
"Configuring Query Key Association" |
Advanced |
 |
 |
|
|
Basic |
 |
 |
|
"Configuring Unique Primary Key" |
Basic |
 |
 |
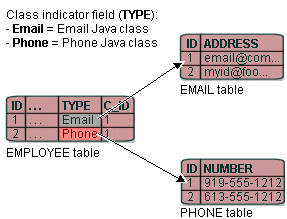
In variable one-to-one mappings, you can use an indicator column in the source table to specify the correct target table, as illustrated in Figure 38-1. This section includes information on implementing class indicators.
A source table has an indicator column that specifies the target table through the class indicator field.
Figure 38-1 illustrates the EMPLOYEE table that has a TYPE column that indicates the target for the row (either PHONE or EMAIL).
Figure 38-1 Variable One-to-One Mapping using Class indicator Field

The principles of defining such a variable class relationship are similar to defining a normal one-to-one relationship, except:
The reference class is a Java interface, not a Java class. However, the method to set the interface is identical.
You must specify a type indicator field.
You specify the class indicator values on the mapping so that mapping can determine the class of object to create.
You must specify the foreign key names and the respective abstract query keys from the target interface descriptor.
Alternatively, you can use unique primary keys to specify the correct target. See "Configuring Unique Primary Key" for more information.
To specify the class indicators for a variable one-to-one mapping, use this procedure:
Select the variable one-to-one mapping in the Navigator. Its attributes appear in the Editor.
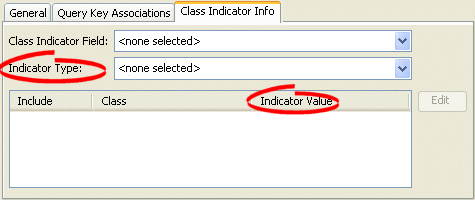
Click the Class Indicator Info tab. The Class Indicator Info tab appears.
Use the Class Indicator Field to select the field on the database table (associated with the mapping's descriptor) to use as the indicator for the variable mapping.
Use the Indicator Type to specify the data type of the class indicator field by selecting the data type from the list.
To specify the specific class indicator field values for each (nonabstract) child class, click Edit and enter the appropriate value for each child class.
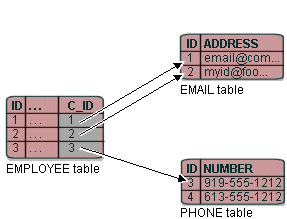
In variable one-to-one mappings, you can use a unique primary key in the source table to specify the correct target table, as illustrated in Figure 38-3. This section includes information on implementing class indicators.
Alternatively, you can use a class indicator to specify the correct target. See "Configuring Class Indicator" for more information.
As Figure 38-3 illustrates, the value of the foreign key in the source table (C_ID) mapped to the primary key of the target table is unique. No primary key values among the target tables are the same, so primary key values are not unique just in the table, but also among the tables.
Figure 38-3 Variable One-to-One Relationship with Unique Primary Key

If there is no indicator stored in the source table, TopLink cannot determine to which target table the foreign key value is mapped. Therefore, TopLink reads through all the target tables until it finds an entry in one of the target tables. This is an inefficient way of setting up a relation model. The class indicator is much more efficient as it reduces the number of reads performed on the tables to get the data. In the class indicator method, TopLink knows exactly which target table to look into for the data.
The principles of defining such a variable class relationship are similar to defining class indicator variable one-to-one relationships, except:
A type indicator field is not specified.
The class indicator values are not specified.
The type indicator field and its values are not needed, because TopLink goes through all the target tables until data is finally found.
To specify the variable one-to-one mapping with a primary key, use this procedure:
Select the variable one-to-one mapping in the Navigator. Its attributes appear in the Editor.
Click the Class Indicator Info tab. The Class Indicator Info tab appears.
Figure 38-4 Class Indicator Info Tab, Configuring Primary Key

Use the Class Indicator Field to select none.
Use the Indicator Type to select none.
Use the Indicator Value column to specify none.
After choosing the reference descriptor for the mapping, deselect the Include check boxes.
|
Note: You cannot deselect the value in the Class Indicator Field, unless the foreign key values in the source table are unique. |
Example 38-1 illustrates how to define a variable one-to-one mapping using a unique primary key in Java code.
Example 38-1 Defining a variable one-to-one mapping using a unique primary key
VariableOneToOneMapping variableOneToOneMapping = new VariableOneToOneMapping();
variableOneToOneMapping.setAttributeName("contact");
variableOneToOneMapping.setReferenceClass (Contact.class);
variableOneToOneMapping.setForeignQueryKeyName ("C_ID", "id");
variableOneToOneMapping.dontUseIndirection();
variableOneToOneMapping.privateOwnedRelationship();
The API to configure query key associations is oracle.toplink.mappings.VariableOneToOneMapping method addForeingQueryKeyName(String, String).
To specify the query keys used for a variable one-to-one mapping, use this procedure:
Select the variable one-to-one mapping in the Navigator. Its attributes appear in the Editor.
Click the Query Key Associations tab. The Query Key Associations tab appears
Use the following information to enter data in each field on the tab:
Use the Indicator Type to specify the data type of the class indicator field by selecting the data type from the list.
| Field | Description |
|---|---|
| Foreign Key | The field from the database table to use as the foreign key in this relationship. |
| Query Key Name | The name of the query key (from the referenced descriptor) for this association. See "Configuring Query Keys" for more information. |