| Oracle® WebCenter Framework Developer's Guide 10g (10.1.3.2.0) B31074-04 |
|
 Previous |
 Next |
| Oracle® WebCenter Framework Developer's Guide 10g (10.1.3.2.0) B31074-04 |
|
 Previous |
 Next |
This chapter explains how to integrate Oracle WebCenter Wiki into a WebCenter application. You will learn about wiki, the wiki syntax, and how to consume the Oracle WebCenter Wiki Web Service into your WebCenter applications.
To learn about the administration options for Oracle WebCenter Wiki, refer to Appendix E, "Administering Oracle WebCenter Wiki".
This chapter contains the following sections:
Oracle WebCenter Suite enables you to integrate many different services into your WebCenter application, including the Oracle WebCenter Wiki. A wiki is a type of Web site where users can browse available content, update, remove, and otherwise edit the content, sometimes without the need for registration. This ease of interaction and the variety of operations makes wiki an effective tool for collaborative authoring, where multiple people create written content together using the wiki markup language. For more information about wiki, see the Wikipedia at http://en.wikipedia.org/wiki/Wiki.
Oracle WebCenter Suite enables you to use Oracle WebCenter Wiki, which includes its own Web-based interface and a Web Service that enables you to embed the wiki into your WebCenter applications. Users of the Oracle WebCenter Suite can use wiki's Web-based interface to create and edit wiki pages. WebCenter application developers can embed some of the wiki functionality into their applications using the Web Service interface.
This section describes how to install and configure wiki for your Oracle WebCenter Suite environment.
To install the Oracle WebCenter Wiki, perform the following steps:
Log in to the Application Server Control as an administrator.
Click the Oracle Application Server instance to go to its application server page.
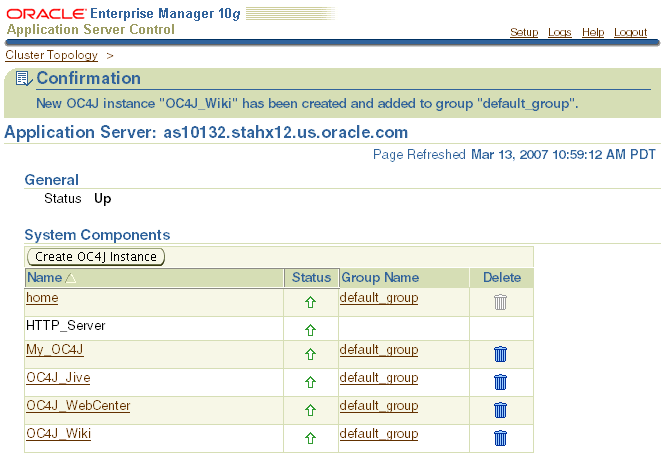
We recommend you create a new OC4J instance to contain Oracle WebCenter Wiki. Although not recommended, you can use an existing OC4J instance. To create a new OC4J instance, click Create OC4J Instance (Figure 6-1).
Figure 6-1 Application Server Page of Application Server Control
Fill in the values for your new OC4J instance. Be sure to check Start this OC4J instance after creation, then click Create.
Follow the instructions in Section 18.3, "Configuring Your Application Server or Standalone OC4J to Run Portlets" to configure your OC4J instance to run portlets.
Click the name of OC4J instance to which you plan to deploy wiki. The Home tab displays (Figure 6-2).
Click the Applications tab (Figure 6-3).
Figure 6-3 Applications Tab for OC4J Instance
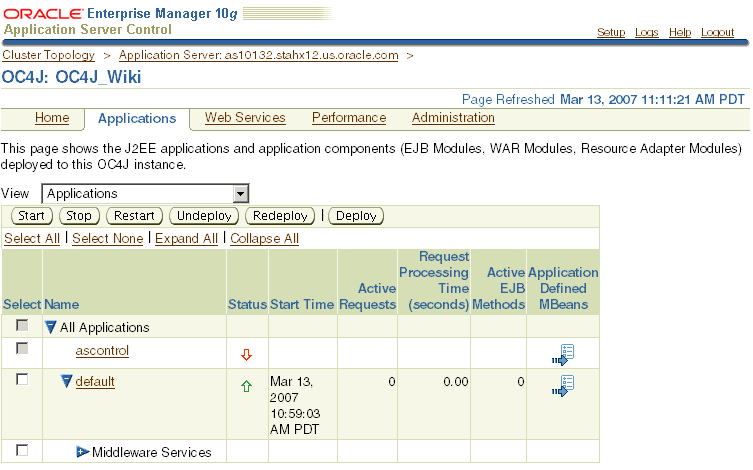
Click Deploy.
Choose the location of the EAR file (local or host) and specify the path (Figure 6-4).
|
Tip: The Oracle WebCenter Wiki EAR file isowc_wiki.ear. |
Choose Automatically create a new deployment plan (Figure 6-4).
Click Next. Note that, if the EAR file is local, it may take several minutes to upload to the server.
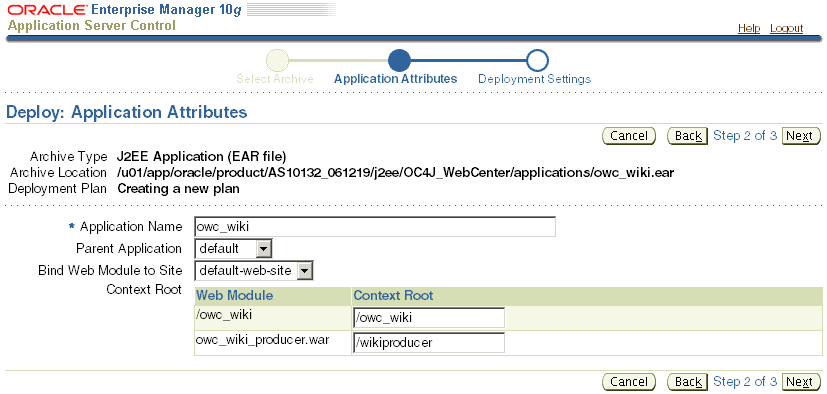
Enter Application Name, for example, owc_wiki and ensure that the Context Root is also set to something similar to the application name. You will use the context root to access the application (Figure 6-5).
Figure 6-5 Deploy: Application Attributes Page
Click Next.
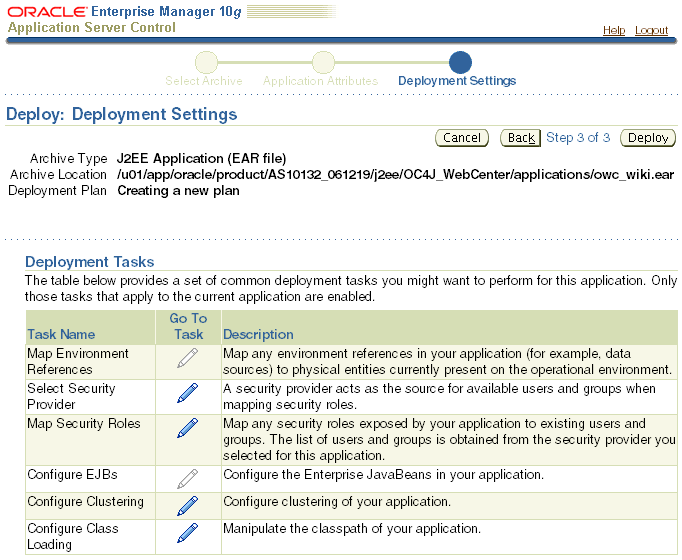
Verify the deployment settings (Figure 6-6).
Figure 6-6 Deploy: Deployment Settings Page
Click Deploy. Once the deployment has completed successfully, you see a confirmation message. If the deployment is not successful, review the log and confirm that you had the correct deployment settings.
|
Note: Oracle WebCenter Wiki includes an HSQL database which runs on a specific port (1475). If that port is not available, you can modify the port after the installation in thebeans.xml file, which is located in OC4J_HOME/applications/application_root/owc_wiki/WEB-INF/classes. |
Click Return. You should now see the application running in your OC4J instance (Figure 6-7).
Figure 6-7 Applications Tab with Wiki Application Deployed

Because Oracle WebCenter Wiki uses Oracle WebCenter Suite Java SSO, you must enable Java SSO on the Application Server to which you deploy Oracle WebCenter Wiki. To verify that Java SSO is running, go back to Enterprise Manager and start the OC4J instance. Java SSO should appear as an application under the OC4J instance. Once the instance is started, confirm that Java SSO is running. If Java SSO is down, then start it.
When you start Java SSO, you may get a warning message (Figure 6-8) that Java SSO is not properly configured. This warning indicates that you are running multiple Java SSO applications in a cluster. To ensure that you properly configure Java SSO for a clustered environment, refer to Section 6.2.2.2, "Clustered Configurations for Java SSO".
Figure 6-8 Warning for Java SSO Configuration

|
Note: For more information on Java SSO, refer to the Oracle Containers for J2EE Security Guide athttp://download-west.oracle.com/docs/cd/B32110_01/web.1013/b28957/javasso.htm#BABGJCFD. For additional information on SSO setup, refer to Chapter 14 "OC4J Java Single Sign-On" of the Oracle Containers for J2EE Security Guide, located at http://download-west.oracle.com/docs/cd/B32110_01/web.1013/b28957/javasso.htm#JISEC1120 |
This section contains information on:
Only WebCenter application users who possess the security role authenticated-users can log in and view Oracle WebCenter Wiki pages. By default, there are two Oracle WebCenter Suite security groups (oc4j-administrators and users) that possess this security role. Only members that belong to one of these two groups can access the wiki pages. You can assign (or remove) the role authenticated-user to any Oracle WebCenter Suite groups or users to control who can log in and view the wiki pages. To do so, see Chapter "General Tasks for OC4J Security" in the Oracle Containers for J2EE Security Guide, located here: http://download-west.oracle.com/docs/cd/B32110_01/web.1013/b28957/deploysimple.htm#CHDIGIFJ.
After deployment, there is a default wiki user oc4jadmin, which is assigned to the wiki role ADMIN. When a user logs into a WebCenter application and accesses the wiki for the first time, Oracle WebCenter Wiki checks if a wiki user with the same user name already exists in its user repository. If one already exists, the user is authenticated and accesses the wiki. If the name does not already exist, Oracle WebCenter Wiki creates a new wiki user with the same name as the WebCenter application user and assigns the user to the wiki role USER.
As the wiki administrator (a user assigned to the wiki role ADMIN), you can create new users. Once you have created a user either manually or automatically, you can manually change the wiki user's role to ADMIN or USER.
|
Note: For more information on wiki administration, refer to Appendix E, "Administering Oracle WebCenter Wiki". |
You can set custom.sso.key.alias from Enterprise Manager. Click Java SSO Configuration at the bottom of the Cluster Topology page for your application server instance. Refer to the OC4J Java Single Sign-On chapter in the Oracle Containers for J2EE Security Guide.
When you configure Java SSO from Enterprise Manager, users may encounter an error where the Oracle Application Server home page displays when they try to logout. To correct this problem, delete the following properties from jazn.xml:
property name="custom.sso.cookie.domain" value=""

property name="custom.sso.url.param" value=""
After you deploy Oracle WebCenter Wiki, you must generate a passphrase that the wiki developer will use when calling methods in the Oracle WebCenter Wiki Web Service or running the sample portlets, as described later in Section 6.4.1.2, "Web Service Security".
|
Note: You may skip this section if you do not plan to use the Oracle WebCenter Wiki Web Service. |
To generate the parameter key, perform the following steps:
Log in to Enterprise Manager.
Under the OC4J instance where you installed Oracle WebCenter Wiki, locate the deployed Oracle WebCenter Wiki application. The application root should be similar to owc_wiki.
Click the application.
Click the owc_wiki module.
Click the Administration tab.
On the Administration page, click Environment Entry Mappings.
Locate the task: Environment Entry Mappings and update the value for /oracle/webCenter/owcWiki/webServiceSecurityPassphrase.
Update the value with a new passphrase., which is an arbitrary value that you create, then click OK. When you update the deployed value, deploying the application again will not overwrite the value you have set.
Once you have deployed the EAR file and set up your wiki configuration file, you can integrate wiki into your WebCenter applications, as described in Section 6.4, "Integrating Oracle WebCenter Wiki into a WebCenter Application". Table 6-1 describes access points for the wiki.
Table 6-1 Web Access Points and Locations
| Web Access Point | URL |
|---|---|
|
wiki |
http://host:port/owc_wiki |
|
Web Service end point |
http://host:port/owc_wiki/services/WikiRemoteService |
|
Web Service WSDL file |
http://host:port/owc_wiki/services/WikiRemoteService?WSDL |
|
portlet producer URL |
http://host:port/wikiproducer/portlets/wsrp2?WSDL |
|
Note: Use the host and port for the location to which you deployed Oracle WebCenter Wiki. |
Oracle WebCenter Wiki stores wiki pages in the file system under OC4J_HOME/applications/application_name/owc_wiki/pages. The folders at this location are the domains and the files in each folder are the pages.
The Oracle WebCenter Wiki enables users to create, edit and modify pages without having to perform any of the administrative tasks, which are described in Appendix E, "Administering Oracle WebCenter Wiki". Oracle WebCenter Wiki provides a number of other standard wiki features, such as adding attachments to pages, bookmarks, and search.
This section contains the following:
Oracle WebCenter Wiki categorizes its content into domains and pages. Wiki users can create and edit pages. Administrators create domains that contain these pages. The administrator can also create a menu for each domain, which enables users to quickly access domain pages and other built-in functions, such as popular pages. The wiki tracks every version of the page, including the author, the date and time of the modification.
This section shows you how to edit existing pages and create new pages with Oracle WebCenter Wiki.
To access the wiki, go to the following URL, then log in.
http://host:port/owc_wiki
|
Note: The host and port are the location where you installed Oracle WebCenter Wiki. If you are not an authenticated earlier, a login prompt displays, where you can enter your user name and password. |
In the upper right corner, several links enable you to navigate to other areas of the wiki: bookmarks and administration. You can view the pages you have bookmarked and administer the wiki (when you are logged in as the administrator).
|
Note: For more information about administering the wiki and the various options on the Administration page, refer to.Section E.1, "Accessing the Administration Mode". |
Users can perform several tasks on a page, such as viewing it, editing it, viewing information about the page, and adding attachments. To perform each of these tasks, simply click the appropriate tab, as shown in Figure 6-10.
To edit the current page, click the Edit tab, which then displays the Edit page text box where you can modify the page source, as shown in Figure 6-11. Here, you can control who can edit the page, add and remove page labels, and modify the page. The page source uses the wiki syntax, which is described in Section 6.3.3, "Wiki Markup". When you finish editing the page, click Submit Query at the bottom of the page. If you do not want to save the changes, click Cancel. If you do not click either Submit Query or Cancel, then navigate to another page (or click the View tab), Oracle WebCenter Wiki locks the currently edited page typically for 10 minutes.
|
Note: For information on the administrative task of locking and unlocking pages, refer to Section E.3, "Locking and Unlocking Pages" |
As a user, you can create new pages within an existing domain that the administrator has created.
To create new pages within a domain, perform the following steps:
In the wiki, in the upper left corner, click All Domains, then click the domain in which you wish to create a page.
In the upper right corner, click the Add Page icon next to the Logout link, as shown in Figure 6-12.
On the Create new page screen as shown in Figure 6-13, in the Page name field, enter a page name, such as MyWikiPage. Ensure that you follow the wiki naming convention for pages. You can also choose a template for your page.
Click Create Page. The Edit page screen displays where you can modify the contents of your page.
Oracle WebCenter Wiki uses a special markup language to format the content of the pages. This section describes some commonly used rules and examples of usage. For general information about creating and editing pages, refer to Section 6.3.2, "Editing and Creating Pages".
Table 6-2 Commonly Used Wiki Formatting Rules
| Formatting Rule | Description | Syntax Examples |
|---|---|---|
|
Headers |
Define headers using exclamation points (!). The number of exclamation points defines the header depth. |
!Header1 !!Header2 !!!!Header4 |
|
Emphasis |
Wrap the text you wish to emphasize with the following characters: Bold: * Italics: # Underlined: _ Note that you cannot use this markup at the beginning of a line. |
The following is*bold text*. The following is #italicized text#. The following is _underlined text_. |
|
Links |
Display external links either by simply entering the URL to display the URL (http://www.oracle.com) or by using the following to display the URL name: [ name of the link | URL ] Display internal links to other wiki pages by using the following: [name of the link | wiki page you want to link] Note that if the internal page does not exist, wiki will create a new one and display a question mark (?) next to the page name in the View mode, which users can click to edit the page. |
[ oracle | http://www.oracle.com ] [ Seattle | SeattleSupportPage ] |
|
Wiki Page Names |
Use the camel notation to name your wiki pages. This notation uses an initial upper case letter followed by lower case letters, then another upper case letter and another series of lower case letters, for example, MyWikiPage. To use an alternate name for your page, use the following convention: [ alternate name | Wiki page name ] |
[ My Page | MyPage ] |
|
Lists |
At the beginning of a new line, use an asterisk (*) to denote a bulleted list or the number sign (#) to denote a numbered list. |
* bulleted item 1 * bulleted item 2 # numbered item 1 # numbered item 2 |
|
Tables |
Use HTML to create a table. Open and close the table with the <table></table> tag and define columns by using the "|" symbol. |
<table width="75%" border="0"> *col1* | *col2* Hello | world Here | I am </table> |
|
Images |
Use standard HTML to define an image source. |
<img src="http://www.anyserver.com/image.gif"/> |
You can integrate Oracle WebCenter Wiki into your WebCenter application components, which access the Oracle WebCenter Wiki service and the pages stored in it. This section explains how you can use the Oracle WebCenter Wiki Web Service to enable users to access the wiki This section also explains how to create JSR 168 portlets that access information in the wiki.
This section contains the following:
Oracle WebCenter Wiki provides a Web Service that enables interaction between your WebCenter application and the wiki. Once you have installed Oracle WebCenter Wiki, you can access the Web Service end point by using the following URL:
http://localhost:port/owc_wiki/services/WikiRemoteService
|
Note: In this URL, the host and port information refers to the computer where you installed Oracle WebCenter Wiki. |
The Oracle WebCenter Wiki Web Service provides access to obtain information and content from the wiki pages and domains. It also enables the creation, modification, and removal of wiki pages and domains. You can use Oracle JDeveloper to create a proxy for the Web Service from the WSDL definition, located here:
http://host:port/owc_wiki/services/WikiRemoteService?WSDL
The sample portlets code bundle also contains a proxy. You can find the this proxy in the web_service_proxy.jar file, located in portlet_producer_sample.zip in the Oracle WebCenter Wiki files. You can find more information about the proxy by viewing the Javadoc located in the portlet_producer_sample.zip file.
This section describes the Web Service interface. For information about the Web Service security, refer to Section 6.4.1.2, "Web Service Security".
Some of the methods return information in JavaBeans. Table 6-3 shows the attributes of the DomainInfo and PageInfo beans. You can also use the getter methods of the described attributes, for example, long getCreated().
Table 6-3 Web Service Data Structures
DomainInfo Bean |
PageInfo Bean |
|---|---|
String domain; |
String domain; |
String description; |
String name; |
String author; |
int revision; |
long created; |
int views; |
String startPage; |
String author; |
long created; |
|
String editor; |
|
long modified; |
|
String viewURL; |
|
String editURL; |
The Web Service methods include methods for accessing and performing actions on the domains and pages in the wiki, as described in Table 6-4 and Table 6-5.
Table 6-4 Domain-Related Methods
| Attribute | Method |
|---|---|
DomainInfo |
getDomainInfo(String domainName, String key) |
DomainInfo[] |
getAllDomainInfo(String key) |
void |
createDomain (String domainName, String description, String startPage, String key) |
void |
deleteDomain(String domainName, String key) |
Table 6-5 Page-Related Methods
| Return Type | Method | Description |
|---|---|---|
PageInfo |
getPageInfo (String domainName, String pageName, String key) |
|
PageInfo[] |
getAllPageInfo (String domainName, String key) |
|
void |
createPage (String domainName, String pageName, String key) |
|
void |
deletePage (String domainName, String pageName, String key) |
|
String |
getPlainPage (String domainName, String pageName, String key) |
Returns the page content in the wiki markup format. |
String |
getRenderedPage (String domainName, String pageName, String key) |
Returns the content rendered to HTML. |
void |
savePage (String domainName, String pageName, String content, String key) |
String content takes the page's new content in wiki markup format |
All Oracle WebCenter Wiki Web Service methods are protected to prevent unauthorized access. Every method contains a String key parameter to ensure authorized access. This key is generated as a function of a user's name and a preconfigured passphrase, using the KeyEncryptor.genkey(<username>, <passphrase>) method. The passphrase is an arbitrary string which the administrator sets up in the Oracle WebCenter Wiki application after installation (see Section 6.2.2.3, "Generating the Passphrase"). As the Oracle WebCenter Wiki developer, you need to know this passphrase in order to use the Web Service interface to access the wiki.
|
Note: The classKeyEncryptor is located in the Java library ora_wiki_sec.jar in the portlet_producer_sample.zip file. You can also find Javadoc for this library in the ZIP file. |
To create the key, use the following method:
String key = KeyEncryptor.genkey(username, passphrase);
|
Note: In this method, the username refers to the name of the user on whose behalf the Web Service is making the call (for example, the user logged into your WebCenter application who is accessing the wiki by means of a portlet) and the passphrase refers to the password you wish that user to use. |
The following code is an example of a Java program that accesses the Web Service interface. This program will list all the page names in the Training domain.
package oracle.webcenter.wiki.ws.test;

import  oracle.webcenter.wiki.ws.*;

import  oracle.webcenter.wiki.security.*;


public class ListPages

{
In this example, because we have deployed the wiki to the Oracle WebCenter Preconfigured OC4J, we will hard code the Web Service end point. You can, however, parameterize the end point.
  private static final String endpoint =

    "http://localhost:6688/owc_wiki/services/WikiRemoteService";
Each Web Service method must authenticate the caller to the Web Service. Authentication consists of a user name and a preconfigured passphrase In this example, we will hard code these values.
  private static final String username = "jsmith";

  private static final String passphrase = "passphrase";
We will also hard code the domain name in this example.
  private static final String domain = "Training";


  public static void main(String[] args) throws Exception

    {

      try

      {
Next, we will create a client-side proxy to access the Web Service.
      WikiRemoteServiceClient client =

          new WikiRemoteServiceClient();
We then set the end point of the proxy to the actual location where we deployed the Web Service.
client.setEndpoint(endpoint);
Each Web Service method must pass a security key to authenticate the user and call the method. We can calculate the key based on the user's name and the Web Service-configured passphrase.
String key = KeyEncryptor.genkey(username, passphrase);
Using the Web Service proxy, we fetch into an array the information about all the pages in the selected domain: If there is no such domain, the program will throw an exception. If the domain does not contain any pages, the program returns an empty array.
      PageInfo[] pages = client.getAllPageInfo(domain, key);

      System.out.println("Pages in " + domain + " domain:");
Throughout the pages array, print the name of each page using the getter method getName().
      for (int i = 0; i < pages.length; i++)

      {

        System.out.println("  " + pages[i].getName());

      }

    }

  }
If there is an exception, the program captures the error and prints it.
    catch (Exception e)

    {

      System.out.println("Exception: " + e);

    }

  }
}
To integrate wiki into your WebCenter application, you can also use Oracle JDeveloper's Web Service Data Control wizard to create a data control based on the Oracle WebCenter Wiki Web Service. Once you have created the data control, you can drag and drop wiki operations onto your WebCenter application page.
Oracle WebCenter Wiki contains four sample JSR 168 portlets, which you can add to a page in your WebCenter application to enable your users to access certain operations in the wiki. When you install Oracle WebCenter Wiki, you automatically install the sample portlet producer. You can access the portlet producer test page at:
http://host:port/wikiproducer/info
|
Note: Use the host and port for the location to which you deployed Oracle WebCenter Wiki. The source of the portlets is contained in the fileportlet_producer_sample.zip in the Oracle WebCenter Wiki files. |
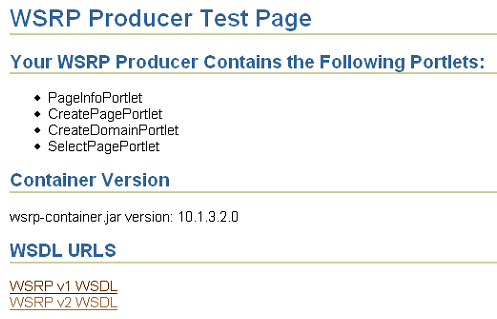
The test page shown in Figure 6-14 displays. Because the portlets use Oracle's extension to pass parameters, use the WSRP 2.0 URL when you register the producer to a WebCenter application:
http://host:port/wikiproducer/portlets/wsrp2?WSDL
Figure 6-14 Sample Portlet Producer Test Page
The sample portlets use an environment entry for the Web Service endpoint.
To set up the environment entry, perform the following steps:
In Oracle WebCenter Wiki, update the Environment Entry in Enterprise Manager. First, log in to Enterprise Manager.
Locate the deployed Oracle WebCenter Wiki application. The application root should be owc_wiki.
Click the application, for example owc_wiki.
Click the owc_wiki_producer module, as shown in Figure 6-15.
On the Administration page, click Environment Entry Mappings.
Locate the task /oracle/webCenter/owcWiki/portlet/webServiceEndPoint.
Set this value to the Web Service Endpoint:
http://host:port/owc_wiki/services/WikiRemoteService
Then, update the passphrase for the portlet producer to match the one you created in Section 6.2.2.3, "Generating the Passphrase".
To update the passphrase for the portlet producer, on the Environment Entry mappings page, locate the task: Environment Entry Mappings and update the value for /oracle/webCenter/owcWiki/webServiceSecurityPassphrase.
Update the value with the passphrase you entered in Section 6.2.2.3, "Generating the Passphrase". When you update the deployed value, deploying the application again will not overwrite the value you have set.
Now that you have set up the environment for the portlets, you can view the sample portlets in a WebCenter application, as described in Section 6.4.2.2, "Viewing the Sample Portlets".
Table 6-6 contains descriptions of the four sample portlets included with Oracle WebCenter Wiki.
Table 6-6 Sample Portlets and Their Descriptions
| Portlet | Description |
|---|---|
|
Page Information |
This portlet shows the information about a selected wiki page. You can also customize this portlet to enable the user to view or edit the selected page. |
|
Create Domain |
This portlet enables the user to create a new domain in the wiki. |
|
Create Page |
This portlet enables the user to select an existing domain in the wiki and create a new page within the domain. |
|
Select Page |
This portlet enables the user to select an existing domain in the wiki, then choose an existing page from the wiki to display in a new browser window. |
To view the sample portlets, perform the following steps:
In Oracle JDeveloper, create a new WebCenter application.
Register the WSRP producer with your new application, using the following URL endpoint for the WSDL:
http://host:port/wikiproducer/portlets/wsrp2?WSDL
|
Note: The host and port refer to the computer hosting the OC4J instance containing the sample portlets. For steps to register a WSRP producer, refer to Section 4.3.1.1, "Registering WSRP Portlet Producers". |
After you register the WSRP producer, return to the Applications Navigator.
Within the ViewController project, create a JSF JSP page, and select all Portlet Technologies for the page.
You can now drag and drop the sample portlets from the Component Palette, as shown in Figure 6-17, onto your JSF JSP page.
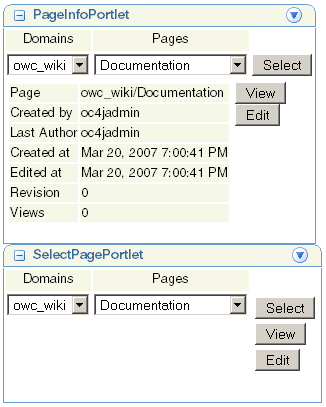
After you add the four portlets to your page, run the page to your browser. You should see page shown in Figure 6-18 and Figure 6-19.
Figure 6-18 Sample Portlets: CreateDomainPortlet and CreatePagePortlet
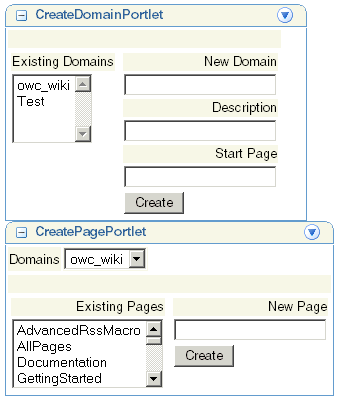
Figure 6-19 Sample Portlets: PageInfoPortlet and SelectPagePortlet
|
Note: If you are unable to view the sample portlets, you may need to implement security on your page. To do so, while your page is open in Oracle JDeveloper, choose Tools > ADF Security Wizard, then accept the default settings in the wizard.When you run your application to your browser, you will be prompted with a login prompt. Enter the default administrator user name and password to view the portlets (for example, |
As shown in Figure 6-20, this portlet enables users to select a domain, then a page in the selected domain. Oracle WebCenter Wiki then passes the name of the selected domain and page to the WebCenter page. This portlet also enables the user to easily view or edit the selected page.
The existing domains display in the first drop-down list. Pages within the currently selected domain display in the second drop-down list. When the user selects a different domain, the second drop-down list refreshes and shows the pages of the newly chosen domain.
The two buttons open the selected page in a new browser window. The View button opens the page in the wiki's View mode, and the Edit button displays the page in the wiki's Edit mode.
In addition to the general customizable portlet attributes, this portlet has the customizable attributes shown in Figure 6-21:
Figure 6-21 Customize Page of the Select Page Portlet
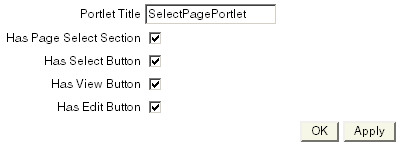
Table 6-7 shows the customizable options and their descriptions.
Table 6-7 SelectPagePortlet Customizable Options
| Customizable Option | Description |
|---|---|
|
Has Page Select Section |
Deselecting this check box hides the Page drop-down list. You can also use this portlet to enable users to only select the domain. |
|
Has Select Button |
Toggles the display of the Select button. |
|
Has View Button |
Toggles the display of the View button. |
|
Has Edit Button |
Toggles the display of the Edit button. |
This portlet enables users to view information about a selected wiki page as shown in Figure 6-22.
The information displayed about the page includes the name of the domain and page, the user who created and who edited the last time the page, and the dates for the page creation. Revisions show how many times the users modified the page since creation. Views show how many times users have displayed the page since creation.
Clicking the View or Edit button opens the page in wiki, within the same browser window.
In addition to the general customizable portlet attributes, this portlet has the customizable attributes shown in Figure 6-23:
Figure 6-23 Customize Page of the Page Information Portlet

Table 6-8 shows the customizable attributes and their descriptions.
Table 6-8 Page Information Portlet Customizable Options
| Customizable Attribute | Description |
|---|---|
|
Has Information Section |
Deselecting this check box hides the information displayed about the page. Only the domain and page name display. |
|
Has View Button |
Toggles the display of the View button. |
|
Has Edit Button |
Toggles the display of the Edit button. |
Your users can create a new domain using this portlet as shown in Figure 6-24.
The Existing Domains drop-down list displays the domains that already exist within the wiki. The user can enter a new domain name, a description, and a start page for the new domain in this portlet. Clicking on the Create button creates the new domain. A confirmation or error message displays within the portlet to alert the user whether Oracle WebCenter Wiki created the page.
This portlet has no additional customizable attributes.
|
Note: If you are unable to view this sample portlet, you may need to implement security on your page. To do so, while your page is open in Oracle JDeveloper, choose Tools > ADF Security Wizard, then accept the default settings in the wizard.When you run your application to your browser, you will be prompted with a login prompt. Enter the default administrator user name and password to view the portlets (for example, |
Your users can select a domain and create a new page within that domain using the Create Page Portlet as shown in Figure 6-25.
The user can choose a domain and view the existing pages within that domain. Then, the user can enter a new page name in the New Page field and click the Create button to create the page. A confirmation or error message displays within the portlet to alert the user whether Oracle WebCenter Wiki created the page.
This portlet has no additional customizable attributes.
|
Note: If you are unable to view this sample portlet, you may need to implement security on your page. To do so, while your page is open in Oracle JDeveloper, choose Tools > ADF Security Wizard, then accept the default settings in the wizard.When you run your application to your browser, you will be prompted with a login prompt. Enter the default administrator user name and password to view the portlets (for example, |
This section shows you how to create a portlet to access the wiki functionality using the Web Service interface described in Section 6.4.1, "Oracle WebCenter Wiki Web Service Interface". You can then add this portlet to a WebCenter application page.
The sample portlets include a Page Information portlet that describes a selected page in the wiki, including such information as: the name of the domain, the name of the page, the name of the author and the date of the latest update. The following code illustrates how to write a portlet using the Oracle WebCenter Wiki Web Service interface. This portlet is a simplified version of the Page Information portlet available in the sample files.
This portlet accepts two parameters, domain and page, and displays information about the page based on these values. The portlet also has two buttons through which you can view or edit the selected page using the wiki user interface.
The JSP in this example implements the show mode for this JSR 168 portlet. In the following highlighted code, replace the localhost and port values with the location where your wiki is deployed.
|
Note: In this example, we have hard coded the Web Service endpoint in the endpoint string variable. In a complex portlet, you can use a different value, such as one from a customizable attribute. |
 <%@ page contentType="text/html"

     pageEncoding="windows-1252"

     import="javax.portlet.*,

             java.util.*,

             java.text.*, oracle.webcenter.wiki.security.KeyEncryptor,

     oracle.webcenter.wiki.ws.*"

 %>

 <%@ taglib uri="http://java.sun.com/portlet" prefix="portlet"%>

 <portlet:defineObjects/>


 <%

   String endpoint = http://localhost:6688/owc_wiki/services/WikiRemoteService
Here, you get the values of the domain and page parameters:
   String domainName = renderRequest.getParameter("domain");

   if ((domainName != null) && (domainName.length() == 0))

     domainName = null;

   String pageName = renderRequest.getParameter("page");

   if ((pageName != null) && (pageName.length() == 0))

     pageName = null;
Next, provide an error message if the user does not provide a value for either of the parameters:
   if ((domainName == null) || (pageName == null))

   {

 %>

 <i>No page selected for display!</i>
Use the Date format to display the Date data type in medium detail and using the current locale:
 <%

   }

   else

   {

     DateFormat df =

       DateFormat.getDateTimeInstance(DateFormat.MEDIUM,

                                      DateFormat.MEDIUM,

                                      renderRequest.getLocale());
Create a proxy object and set the endpoint:
     WikiServiceSoapHttpPortClient client =

       new WikiServiceSoapHttpPortClient();

     client.setEndpoint(endpoint);
Use the passphrase generated by your administrator (see Section 6.2.2.3, "Generating the Passphrase") to access the secured Web Service method, then use the client proxy's getPageInfo() method to obtain the PageInfo JavaBean that contains the selected page's attributes:
     String username = "jsmith";

     String passphrase = "passphrase";


     KeyEncryptor.genkey(username, passphrase);


     PageInfo info = client.getPageInfo(domainName, pageName, key);
If the getPageInfo method returns a null value, the selected page does not exist and displays an error message:
     if (info == null)

     {

 %>

 <b>No such page:</b> <%= domainName %> /  <%= pageName %>

 <%

     }
If the getPageInfo method returns a value, the domain name then the page name display:
     else

     {

 %>

   <table>

     <tr><td valign="top">

       <table>

         <tr class="portlet-table-text">

           <td align="left">Page</td>

           <td align="left"><%= domainName %>/<%= pageName %></td>

         </tr>
The info object is a JavaBean holding the page's attributes. You can use the getter methods to access the individual attributes. Here, the info.getAuthor() object returns the page's author:
         <tr class="portlet-table-text">

           <td align="left">Created by</td>

           <td align="left"><%= info.getAuthor() %></td>

         </tr>
Similarly, you can use other getter methods to obtain other attributes.
         <tr class="portlet-table-text">

           <td align="left">Last Author</td>

           <td align="left"><%= info.getEditor() %></td>

         </tr>
Format the date information, such as the creation date, before displaying it:
         <tr class="portlet-table-text">

           <td align="left">Created at</td>

           <td align="left"><%= df.format(new Date(info.getCreated().getTime())) %></td>

         </tr>

         <tr class="portlet-table-text">

           <td align="left">Edited at</td>

           <td align="left"><%= df.format(new Date(info.getModified().getTime())) %></td>

         </tr>

         <tr class="portlet-table-text">

           <td align="left">Revision</td>

           <td align="left"><%= info.getRevision() %></td>

         </tr>

         <tr class="portlet-table-text">

           <td align="left">Views</td>

           <td align="left"><%= info.getViews() %></td>

         </tr>

       </table>
Next, create two buttons to enable users to view or edit the page in wiki. Both buttons have their own separate <form> tags and receive the action URL of the form element from the info bean:
     </td>

     <td align="left" valign="top">

   <form action="<%= info.getViewURL() %>" method="GET">

     <input type="submit" class="portlet-form-button" value="View"

   </form>

   <form action="<%= info.getEditURL() %>" method="GET">

     <input type="submit" class="portlet-form-button" value="Edit"

   </form>

     </td></tr>

   </table>

 <%

     }

   }

 %>