| Oracle® Identity Manager Administrative and User Console Guide Release 9.0.3 Part Number B32450-01 |
|
|
View PDF |
| Oracle® Identity Manager Administrative and User Console Guide Release 9.0.3 Part Number B32450-01 |
|
|
View PDF |
The Resource Management feature enables you to mange resource objects for an organization or an individual user. Managing resources includes the following:
Ability to search for a resource and view its details
Ability to disable, enable, revoke a resource from users or organizations
Manage Resource Administrator and Authorizer groups
This chapter covers the following topics related to managing resources:
The following procedure describes how to manage resources.
Note:
As described in the following procedure, when performing a search, if you select a value from the drop-down list and do not enter a corresponding search value, an error occurs. Also, if you select the same value twice, from the drop-down menu, an error occurs.To manage resources:
Click Resource Management, and then click Manage.
The Resource Search page appears.
Use the boxes at the top of the page to select search criteria, and enter the corresponding attribute in the next field or use the asterisk (*) as a wildcard. To use the Resource Type and Target criteria, select a value from the corresponding box.
Click Search.
The Results table appears.
Click the name of a resource, for example, you may select a resource named Oracle Identity Manager User.
The Resource Detail page appears.
To view detailed information about the resource, use the menu.
The additional details include the following options:
Organization Associated With This Resource
Resource Administrators
Resource Authorizers
You can enable, delete, and revoke resources that are associated with an organization. You can also determine mapping categories for resources that are provisioned more than once to an organization.
To work with an organization that is associated with a resource:
Select the Organization Associated For the Resource option.
The Organization Associated For the Resource page appears.
Use the radio buttons to filter the list of associated organizations.
The All radio button lists all the organizations. The By Status radio button filters the organizations on the Resource Status column. The organizations associated with the resource are listed under the Organization Name column. The Resource Status in this case, indicates that the resource is provisioned for each of the organizations listed. To modify the resource for the organization, do one of the following:
Enable
Disable
Revoke
The value in the Identifier column corresponds with a field type that you can map from the Process Definition Form in the Oracle Identity Manager Design Console using the Map Descriptive Field. This value lets you distinguish which mapping category is defined (Process Type, Organization Name, or Request Key) when the same resource has been provisioned several times to the same organization.
In the Resource Detail page, select the Resource Administrator option. The Resource Administrators page displays the names of groups that are assigned as administrators to this resource. This page also displays the Write Access and Delete Access permissions. These are permissions that the administrator groups have on the resource (but not with resource parameters). Write access allows the group to make changes to the resource. Delete access allows the group to delete the resource.
You can perform the following operations:
To assign a user group as administrators for resources:
Click Assign.
The Assign Administrators page appears.
This page displays all group names that can be assigned to this resource. Select the check boxes to activate Write Access and Delete Access options and assign the group to this resource.
Click Assign.
The Confirm Assign page appears. This page displays the new user groups assigned to this resource.
Click Confirm Assign or click Cancel.
The Resource Administrators page appears with a list of all group names associated with this resource. You can make modifications to this information.
You can create a new group to administer a resource. A Delegated Admin Wizard is provided for this process.
Note:
When you create a new group, if you belong to other groups with write and delete access, these other groups become administrative groups for the new group. This is also true when you create a new organization.To create a new group:
Click Create New Group.
The Assign Administrators – STEP 1: Assign Administrators page appears.
In the Results table, click the User Login names that you want in the administrative group and click the Add button.
The names appear in the Selected display panel.
Click Continue, or click Exit to end the wizard.
The Assign Administrators – STEP 2: Specify Alias page appears.
Enter the alias name for the administrator group and click Continue.
Or, click Back to return to the previous page or Exit to end the wizard.
The Assign Administrators – STEP 3: Specify Permissions page appears.
Click the Write and Delete checkboxes to assign these permissions to the administrator group, then click Continue.
Otherwise, click Back to return to the previous page or Exit to end the wizard.
The Assign Administrators – STEP 4: Verify Delegation Information page appears.
To make a change to the information you entered in the previous steps, click the desired category Change link.
The corresponding step page appears.
After verifying your changes click Continue, or click Back to return to the previous page or Exit to end the wizard.
The Resource Administrator page appears. The new group is added to the Results table.
You can update the permissions of an administrative group.
To update the permissions:
Click Update Permissions.
The Resource Detail >> Resource Administrators >> Update Administrators page appears.
To change the permission setting for an administrative group, click the desired checkboxes for Write Access and Delete Access.
Click Update to make the modifications, otherwise, click Cancel.
The Confirmation page appears. It displays the administrative group names that you updated.
If these are the correct names, click Confirm Update, otherwise, click Cancel.
You can determine what user groups are authorized to provision the resource.
To use the resource authorizers option:
In the Resource Detail page, select the Resource Authorizer option from the menu.
The Resource Detail >> Resource Authorizers page appears.
To set the level of priority for authorizing this resource, select the Increase/Decrease Priority radio button.
To delete the authorizer of this resource, select the appropriate Group Name checkbox and click Delete.
To add additional user groups to authorize resources, click Assign.
The Resource Detail >> Resource Authorizers >> Assign Authorizers page appears.
Select the desired Group Name checkbox and click Assign, otherwise, click Cancel.
The Confirmation page appears.
If this is correct, click Confirm Assign, otherwise, click Cancel.
The Resource Detail >> Resource Authorizers page appears. Note that the Group Name that you assigned to this resource is added to the Results table.
The Graphical Workflow Visualizer tool provides a visual representation of task sequences, dependencies, and other components of a workflow definition. The visual representation provides an overview of the workflow, its relationships, and the task components that make up the flow. You can edit and print the workflow view. The Graphical Workflow Visualizer tool displays the Approval and Provisioning process types. You usually use the Approval type of process to approve the provisioning of Oracle Identity Manager resources to users or organizations. Unlike provisioning processes, approval processes usually consist of tasks that must be completed manually. The Provisioning type of process is used to provision Oracle Identity Manager resources to users or organizations.
Note:
To access the Workflow Visualizer, the Nexaweb applet requires your web browser configuration to use Java Virtual Machine 1.4.2.x.x.This section covers the following topics:
To launch the visualizer:
In the Resource Detail page, select the Resource Workflows option from the pull-down menu.
The Resource Detail >> Resource Workflows page appears. This page displays the Resource Name and a table that lists all the names of the workflow definitions for this resource.
To render the workflow definition into a graphic flowchart, click the link of the desired Workflow Name.
A new web browser window is launched and a graphical representation of the workflow definition appears.
The Approval Workflow Definition is displayed as one flow that represents the entire approval process. The workflow details header shows no information on the form since the approval process has no form of its own. The Workflow Visualizer does not display the Name of Process Form information field.
The Information Fields of the Workflow Visualizer are the following:
| Field Name | Description |
|---|---|
| Workflow Name | The name of the Process Definition. |
| For Resource | The name of the Object Name (resource object that is either approved or provisioned). |
| Workflow Type | The name of the Process Definition type (Approval or Provisioning). The type also indicates whether the workflow is the default for the resource. |
The Toolbar Menu Items of the Workflow Visualizer are the following:
| Field Name | Description |
|---|---|
| Display Option | Display Unknown Response Code: The Unknown response code is defined for every task in the workflow. It is not used in the logic of the workflow. However, you have the option of showing them (Unknown Response Code) or not.
Display Adapter Name On-Screen: You can display the name of the automated adapter. Display Undo Tasks: You can display the undo tasks for the tasks on-screen. Display Recovery Tasks: You can display the recovery tasks for the tasks on-screen. |
| Generate Image | This option enables you to save the workflow view as an image that can be printed at a later time. Upon clicking on this menu item, a new browser window is launched and displays a JPEG formatted image. The entire workflow is displayed, even parts of the flowchart that are hidden due to scrolling limitations of the display area. You can then use the standard web browser mechanisms to save the image locally on your machine by right-clicking on the image and selecting Save Picture As… from the menu. |
| Reload Workflow | This option refreshes the workflow view. |
| Legend | This option provides an explanation of all visual components that are used to create the flowchart of the workflow definition.
Markers The Markers Nodes represent position markers for special conditions. These conditions are: Start Point: This marker represents the logical start point within the workflow. It is not an actual task within the workflow definition. On-Page Reference: This marker represents a task node that has already been drawn somewhere else in the workflow chart. It is used to show connectivity to other tasks without crowding the workflow view with crossing links. Response Sub-Tree: The Response Sub-Tree (Expansion Nodes) help keep the workflow controllable by hidden significant sub-trees of responses nodes. Double click the Expansion Node marker and the workflow view will redraw the flowchart with the responses. Tasks The Tasks Nodes represent the tasks in the workflow. They are: Manual Tasks: The Manual Tasks represent any task in a process that requires user action in order to be completed. Approval processes are generally comprised of manual tasks. Automated Tasks: The Automated Tasks represent any task in a process that does not require user interaction for completion. Automated tasks always require a process task adapter. Provisioning processes are generally comprised of automated tasks. Responses The Response Nodes represent the Response Codes that are defined on the tasks. The Response Node shows the actual Response Code within it. The Response Code is based on the status that the response is set on the task. Completes Task: The process task has been completed and is indicated by a green color. Rejected Task: The process task has been rejected and is indicated by a red color. Cancels Task: The process task has been cancelled and is indicated by a blue color. Links Direction arrows lines connect the task and response nodes and indicate the flow of the workflow. The color of the link indicates the type of relationship between two nodes that it connects. Initial Task: The Initial Task is the first process task in the workflow definition. Response Generated Task: The Response Generate Task is defined as a process task that is triggered when the current task is Completed. Generally, a new process task can then be triggered when the conditional task receives a particular response code in conjunction with the execution of the process task. Recovery Task: The Recovery Task is defined as process task that is triggered when the current process task is Rejected. Undo Task: The Undo Task is defined as process task that is triggered when the current process task is Cancelled. Dependent Task: The Dependent Task is defined as a process task that is dependent upon another process. Oracle Identity Manager can only initiate this type of task once the process task on which it is dependent is completed. |
The Workflow Visualizer enables you to manipulate the workflow view by using the following features:
Drag and Drop
Display Option (menu item)
Task Node (right-click menu)
Expansion Nodes (Response Sub-Tree)
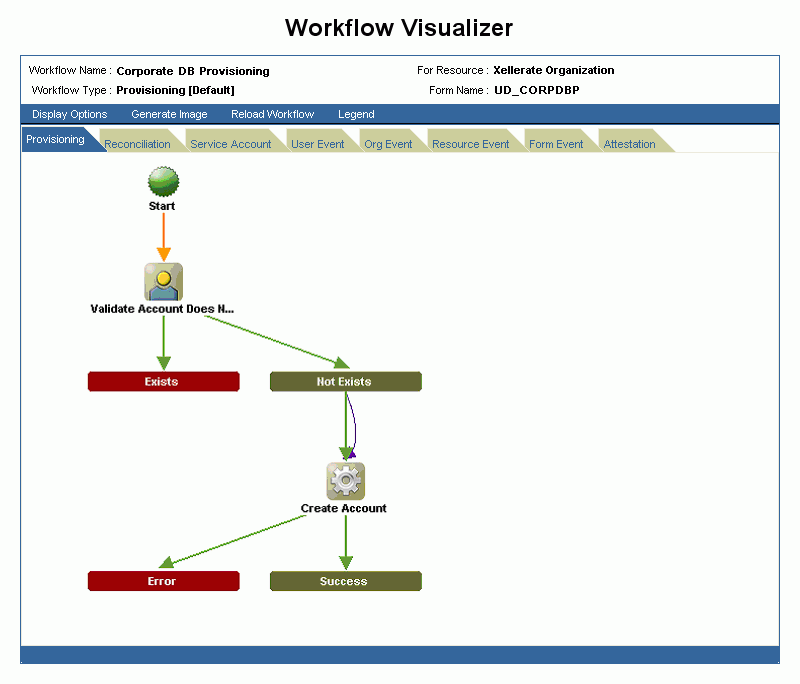
For example, suppose that the Corporate DB Provisioning workflow definition is shown. Selecting an event tab displays the appropriate sequence of tasks for that event. These event tabs are discussed in the "Using the Provisioning Workflow Definition Event Tabs".
Figure 12-1 Using the Workflow Visualizer

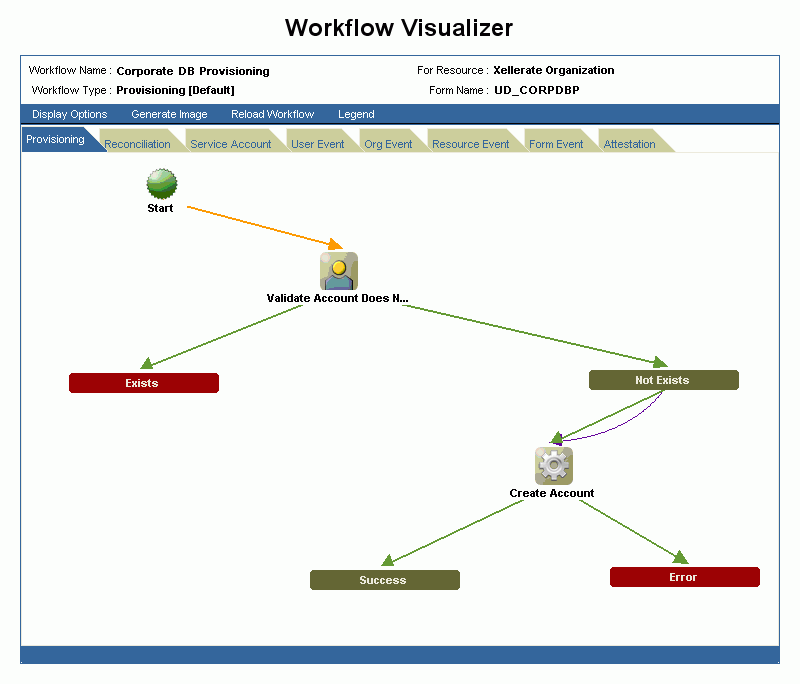
You can rearrange the graphical workflow by dragging and dropping the icons that make up the workflow definition to any location in the workflow view. As you move an icon component, the direction arrow continues to associate the link.
Figure 12-2 Using Drag and Drop in the Workflow Visualizer

You can also use the Display Options toolbar menu item to display or hide Unknown Response Code, Adapter Name, Undo Tasks, and Recovery Tasks. The workflow automatically refreshes and re-draws the workflow based on your criteria.
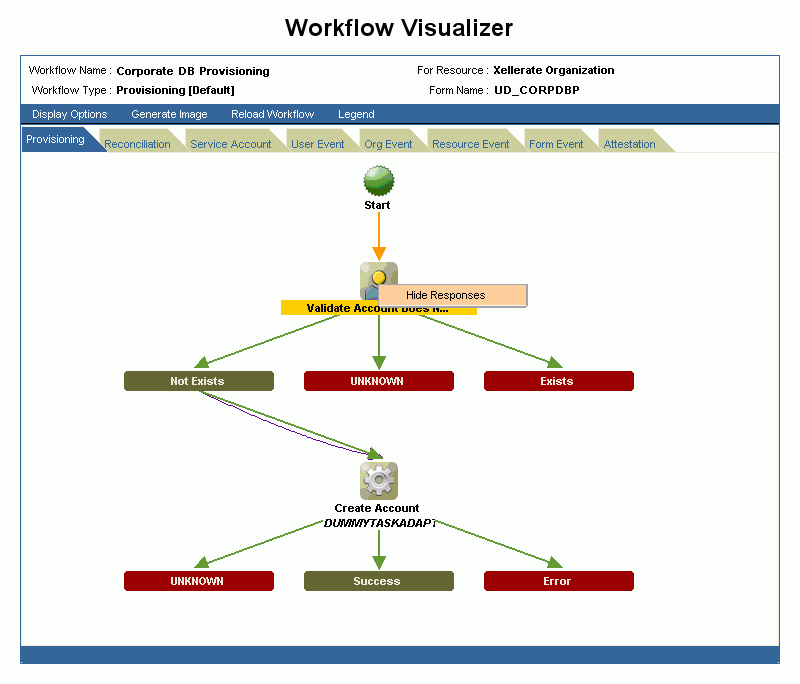
When you right click the task node, the Hide Responses option appears. When you click this option the response sub-tree collapses and is replaced with an expansion node. The task node label is highlighted in yellow to denote that it was collapsed. If the node is collapsed, the Hide Responses action option does not appear.
Figure 12-3 Using the Task Node (Right-Click Menu)

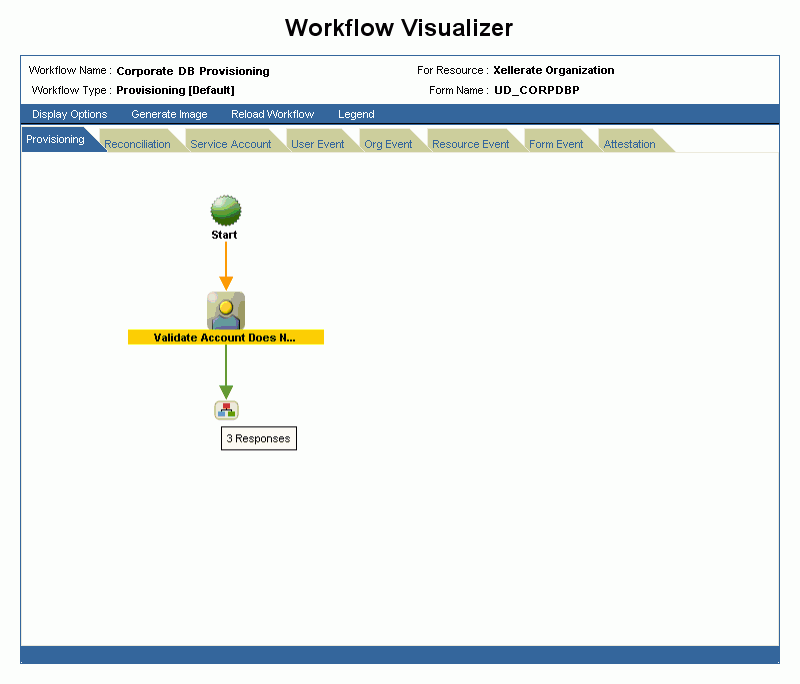
Task Nodes with more than five response codes, not including the Unknown Response code, are not be drawn with their responses in the flowchart. Instead, an expansion node replaces the entire response sub-tree. When you double-click the expansion node, the flowchart is redrawn to display the response sub-tree for the parent task (node). The label of the task node is highlighted in yellow.
Figure 12-4 Collapsed Response Subtree in the Workflow Visualizer

Note:
When you place your cursor over the expansion node, it indicates how many response codes are associated with it. Unknown Response Codes are hidden by default.The Provisioning Workflow Definition is displayed with associated event tabs of the logical flow. The event tabs represent the various task sequences for a specific event in the workflow definition. By clicking an event tab, the tab displays the appropriate tasks for the workflow event of the process. You can arrange the flowchart to your desired view. If there is no task defined for the workflow event, the tab displays a blank view. If there is more than one task sequence for the workflow event type, the tab displays a pull-down menu where you can select the process flowchart that you want to view.
The Provisioning tab shows the task that will provision a resource. When the process type is Provisioning, the process flowchart shows all task needed to provision a resource.
The Reconciliation tab shows the reconciliation event for the provisioning process with marker tasks inserted into it – either Reconciliation Insert Received or Reconciliation Update Received. These tasks can have adapters attached to them to initiate a provisioning action. If no adapters are attached to it, a response code of Event Processed is assigned to that task. Additional provisioning process tasks can be generated based on this response code to initiate a provisioning flow due to the reconciliation event.
The Service Account tab shows all the provisioning processes of service accounts for users (administrators). When a user is provisioned with a service account, Oracle Identity Manager manages a mapping from the user's identity to the service account. When the resource is revoked or the user is deleted, the provisioning process for the service account is not cancelled. Instead, a task is inserted into the provisioning process to removes the mapping from the user to the service account. The provisioning processes of service account are: Service Account Changed, Service Account Alert, and Service Account Moved.
The User Event tab shows the workflows that respond to changes to a user record, for example, updating the password or user ID.
The Org Event tab shows workflows that respond to changes to an organization record, for example, updating the name, the parent name, or the key of the organization the resource is provisioned to or the organization of the user that the resource is provisioned to.
The Resource Event tab shows workflows that respond to state changes of the provisioned resource instance, for example, being enabled or disabled.
To view detailed information for a particular task, double click the task icon. The Task Detail window is similar to the task definition window in the Process Definition Form of the Oracle Identity Manager Design Console. The Task Detail window displays information about the task definition, which is presented in logical grouping of tabs. The tabs include:
General: This tab displays task information, for example, the name and description.
Automation: This tab provides information about any adapter automating the task, its status, and variable mappings.
Task Assignment: This tab displays information about how the task is assigned and all associated information.
Depends On: The tab lists all tasks that the selected task depends on.
Resource Status Management: This tab shows the mapping between the task status and the resource status.
| Field Name | Description |
|---|---|
| Task Name | The name of the process task. |
| Task Description | Explanatory information about the process task. |
| Task Effect | This field indicates the process action for this task. It can be ENABLED, DISABLED, or NONE. A process is enabled or disabled for a user's access to a resource. A disabled action will also disable all associated tasks. The NONE action indicates that this task is not associated with a particular process action. |
| Retry Interval | This field indicates the time in minutes that you want to wait before adding this process task instance. |
| Retry Attempt Limit | This field indicates the number of times Oracle Identity Manager will retry a rejected task. |
| Conditional Task | This field specifies any condition that must be met for the process task. |
| Complete On Recovery | This field indicates that Oracle Identity Manager will change the status of the current process task from Rejected to Unsuccessfully Completed upon completion of all recovery tasks that are generated. This flag triggers other dependent process tasks. |
| Allow Cancellation While Pending | This field indicates whether the process task can be cancelled if its status is Pending. |
| Allow Multiple | This field indicates if the task is allowed to be inserted multiple times within a single process instance. |
| Required For Workflow Completion | This field indicates that the process cannot be completed if the process task does not have a status of Completed. |
| Manual Insert | This field indicates whether a user can manually add the current process task to the process. |
Tasks belonging to provisioning processes are usually automated.
Note:
If the task is not automated this tab does not appear.| Field Name | Description |
|---|---|
| Adapter Name | The name of the adapter. |
| Adapter Status | This indicates if the adapter is completely mapped or not. |
| Adapter Variable | This is a user-defined placeholder within the adapter that contains runtime application data used by its adapter tasks. |
| Mapped? | This indicates if the adapter variable is mapped or not. |
This tab specifies the assignment rules for the process task. These rules determine how the process task is assigned.Task assignment rules are associated with tasks of approval processes, since these tasks are usually completed manually. Tasks belonging to provisioning processes are usually automated. As a result, they do not need task assignment rules.
A resource is provided with predefined provisioning statuses that represent the various statuses of the resource object throughout its lifecycle as it is provisioned to the target user or organization. This tab displays the link between the status of a process task (Task Status) and the provisioning status of the resource (Resource Status) to which it is assigned
| Field Name | Description |
|---|---|
| Task Status | One of the pre-defined provisioning status types. |
| Resource Status | The status can be one of the following: Waiting, Provisioning, None, Ready, Enabled, Disabled, Revoked, Provisioned, and Provide Information. |