2 Deploying the IdF Advanced Adapter for ACF2
The IdF Mainframe Adapter is composed of the following main components:
Pioneer: As discussed in one of the earlier chapters, Pioneer (also known as the Provisioning Agent) receives native mainframe identity and authorization change events from the LDAP Gateway. These events are processed against the mainframe authentication repository, in which all provisioning updates from the LDAP Gateway are stored. The response is parsed and returned to the LDAP Gateway.
Voyager: This component is also known as the Reconciliation Agent. The Voyager captures native mainframe events by using System Exits. The Voyager transforms these events into LDAPv3 protocol notification messages through the LDAP Gateway.
System Exits: These are programs that are run after system events in IBM RACF have been detected. System Exits capture these events in real time. They are events occurring from the TSO logins, the command prompt, batch jobs, and other native mainframe events.
Note:
Before you install the mainframe components of the RACF Advanced Adapter on a Production environment, Oracle recommends that you install the product on a Test and/or Development environment for testing, prior to installing on a Production environment.2.1 IDF Mainframe Adapters Functional Characteristics
Pioneer can post-process ACF2 commands initiated through the LDAP gateway (INSERT, CHANGE, and DELETE). The following topics provide more information on post-processing:
2.1.1 Alias Post-Processing
The Alias processing is controlled by the usage of a Pioneer parameter in its control file. If the "POST_PROC_ALIAS" parameter is set to 'T' or true, then it enables post-processing. If set to 'F' or false, then it disables ALIAS post-processing.
2.1.2 Other Post-Processing
Post-processing is invoked by using an entry in the Pioneer control file to submit a z/OS JCL Stream to the internal reader for processing.
-
C=function, m=member name, L=PDS Library name
function can be INSERT, CHANGE, or DELETE
Example1, C=INSERT,M=INSERT10,L=TEST.CNTL.LIB
Example2, C=CHANGE,M=CHANGE33,L=TEST.CNTL.LIB
Example3, C=DELETE,M=DELETE99,L=TEST.CNTL.LIB
Example 1
Pioneer dynamically allocates 'TEST.CNTL.LIB', member = INSERT10 and reads and punches it to the z/OS INTRDR. The ACF2 command for the INSERT also occurs. This process occurs for every INSERT.
Example 2
Pioneer dynamically allocates 'TEST.CNTL.LIB', member = CHANGE33 and reads and punches it to the z/OS INTRDR. The ACF2 command for the CHANGE also occurs. This process occurs for every CHANGE.
Example 3
Pioneer dynamically allocates 'TEST.CNTL.LIB', member = INSERT10 and reads and punches it to the z/OS INTRDR. The ACF2 command for the INSERT also occurs. This process occurs for every INSERT.
If Pioneer finds no 'C=' commands in the control file, then post-processing does not occur.
Pioneer does NOT check the result of the JCL Stream submitted to z/OS. Any actions performed by the submitted stream are independent of Pioneer processing.
-
Utilize PIONEER ACF2 Control cards
-
POST_PROC_ALIAS=T
-
FILTER=NO
Also, note that what this allows is for example A REXX script named M=INSERT10 to be executed for SYSTSIN &mbrname lid.
You can also look at using COBOL, PL/I, ASSEMBER or other mainframe languages to process them.
-
-
C=function, m=member name, L=PDS Library name
Function can be INSERT, CHANGE, or DELETE
Example1: C=INSERT,M=INSERT10,L=TEST.CNTL.LIB
Example2: C=CHANGE,M=CHANGE33,L=TEST.CNTL.LIB
Example3: C=DELETE,M=DELETE99,L=TEST.CNTL.LIB
-
The M= is the PDS or PDSE member name and L= is the PDS or PDSE library dataset name.
-
For example when C=INSERT is found, Pioneer dynamically allocates the library name in "L=" and its member name in "M=".
-
Pioneer reads the PDS or PDSE member name and inserts a %mbrname and ACF2 LID into the read job stream, as shown in the following JLC example:
//Yourjobn JOB ,SYSTEMS,CLASS=A,MSGCLASS=X,
//           MSGLEVEL=(1,1),REGION=4096K,NOTIFY=&SYSUID
//STEP1 EXEC PGM=IKJEFT01,DYNAMNBR=20
//SYSEXEC DD DSN=yourhlq.CLIST.LIBRARY,DISP=SHR
//SYSPRINT DD SYSOUT=*
//SYSTSPRT DD SYSOUT=*
//SYSTSIN DD *
&mbrname lid
Note that this job stream is executed for every INSERT sent to Pioneer.
-
Pioneer submits the preceding job-stream to the internal reader for z/OS execution.
-
The PDS or PDSE is then "Freed".
-
2.2 Prerequisites
The prerequisites for installing the IdF Advanced adapter as follows:
2.2.1 Message Transport Requirements
Between the LDAPv3 server and mainframe environments, the software supports TCP/IP. For the TCP/IP message transport layer, ports 5190 and 5790 are the default ports for the Voyager Agent and Pioneer Agent, respectively. You can change the ports for these agents. The procedures to configure these message transport layers are described later in this guide.
2.2.2 APF Authorization
Authorized Program Facility(APF). Granting the APF Authorized status to a program is similar to giving super user status. This process will allow a program to run without allowing normal system administrators to query or interfere with its operation. Both the program that runs on the mainframe system and the user account it runs under must have APF authorization. The IdF Agent user account must have APF authorization.
2.3 Mainframe Adapter Installation
The following sections of this chapter describe the procedure to install the adapter.
-
Section 2.3.1, "Extracting the Files from the Distribution Zip Archive File"
-
Section 2.3.4, "Editing the Mainframe Batch Job Files to Match the Settings for the Customer's Site"
-
Section 2.3.7, "Creating an ACF2 LID for Pioneer and Voyager with Permissions"
-
Section 2.3.8, "Adding Pioneer/Voyager to the Resource Rule Facilities (BPX and IRR)"
2.3.1 Extracting the Files from the Distribution Zip Archive File
To extract the files from the distribution zip file:
Extract the contents of the following file to a temporary directory, distribution zip archive file.
The following are the contents of the zip file:
-
acf2-readme.txt
-
linklib.xmi
-
proclib.xmi
-
parmlib.xmi
-
jclib.xmi
2.3.2 Uploading the Files
You must upload the files that are extracted with the .xmi extension to the computer that is hosting the mainframe. See Section 2.3.1, "Extracting the Files from the Distribution Zip Archive File" for information about extracting the files for deployment.
You can upload the files either by using a QWS3270P emulator or FTP. The following is the procedure to upload files by using the QWS3270P emulator:
-
Log in to the TSO environment of the mainframe, type ISPF at the READY prompt, and then press Enter.
-
From the
ISPFmenu, on the Option line, enter"6".The Command entry screen to enter TSO commands is displayed.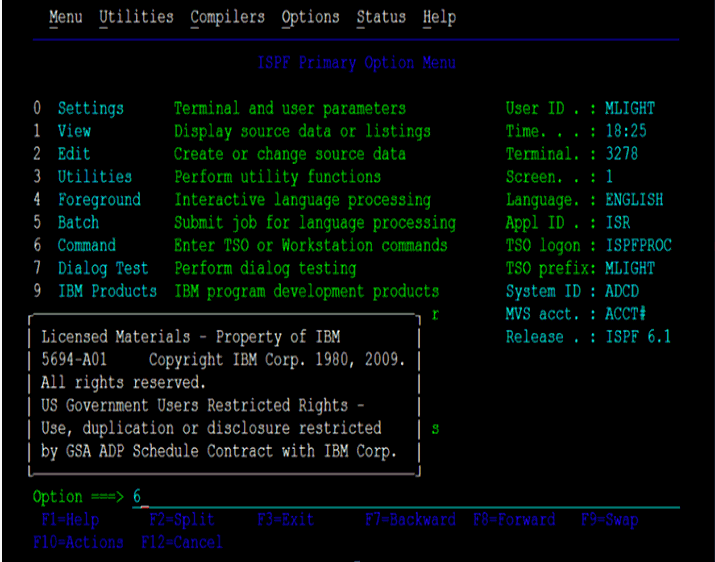
-
Use the IND$FILE command to upload files to the computer hosting the mainframe. The upload option of the QWS3270P program enters a formatted command.
In this example the host file name is LINKLIB.XMIT' and the sending or local file name is as follows:
The Upload File dialog box is displayed with the following options:
C:\Users\My_Name\Desktop\test-acf2\linklib.xmi.The upload options are in the upload window for QWS3270P are:
File Conversion: Nothing selected (No ASCII/EBCDIC translation and no CRLF).
Host Type: TSO
Record Format: Default selected.
Sizes: LRECL and BLKSIZE are left blank.
Alternatively you can set the LRECL to
80and the BLKSIZE set to3120.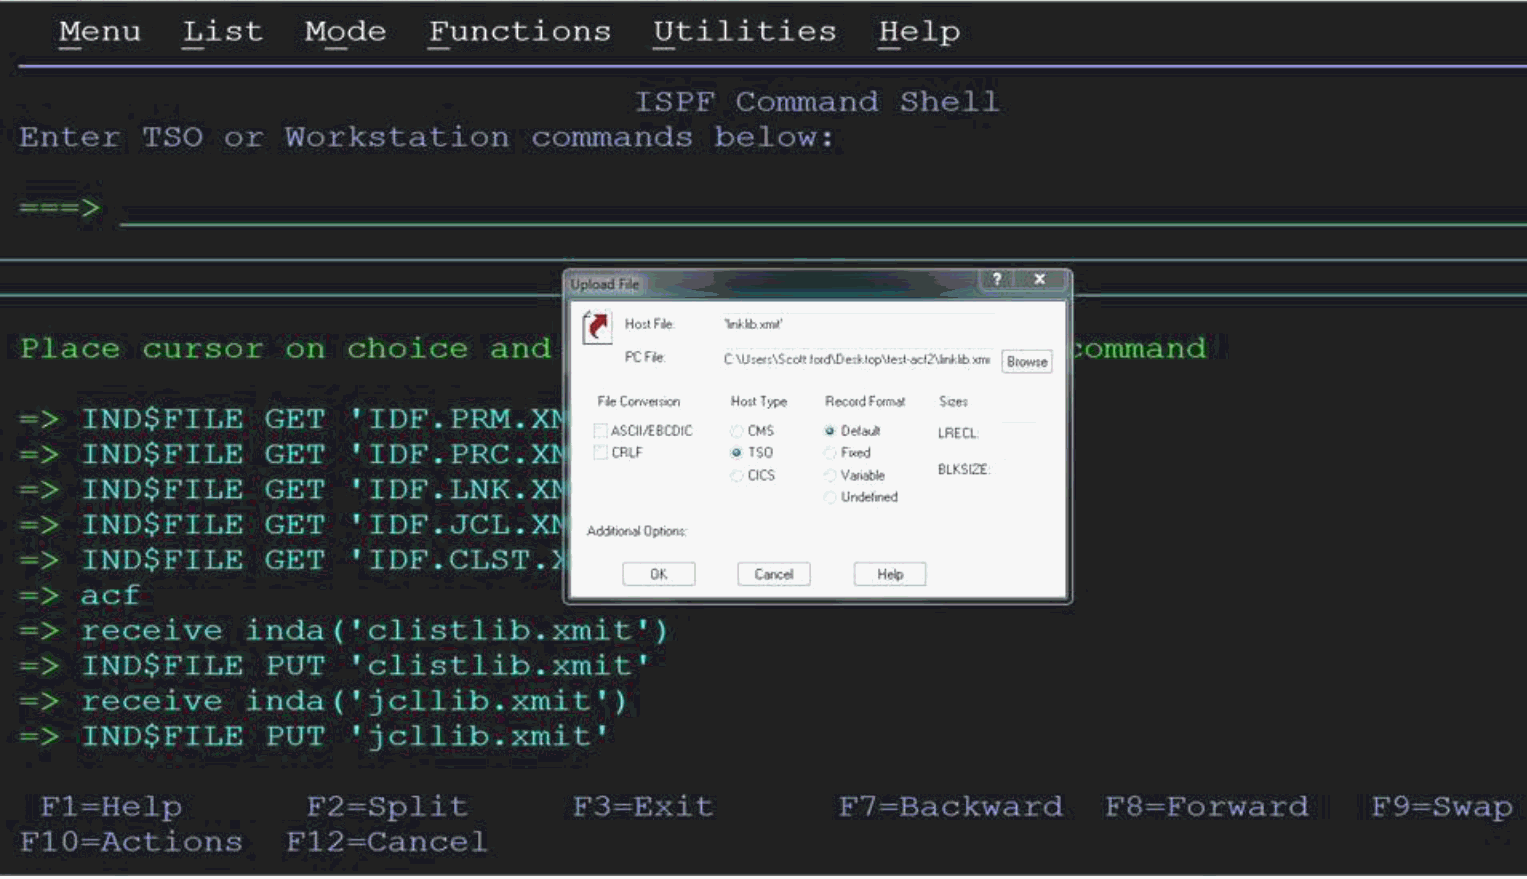
-
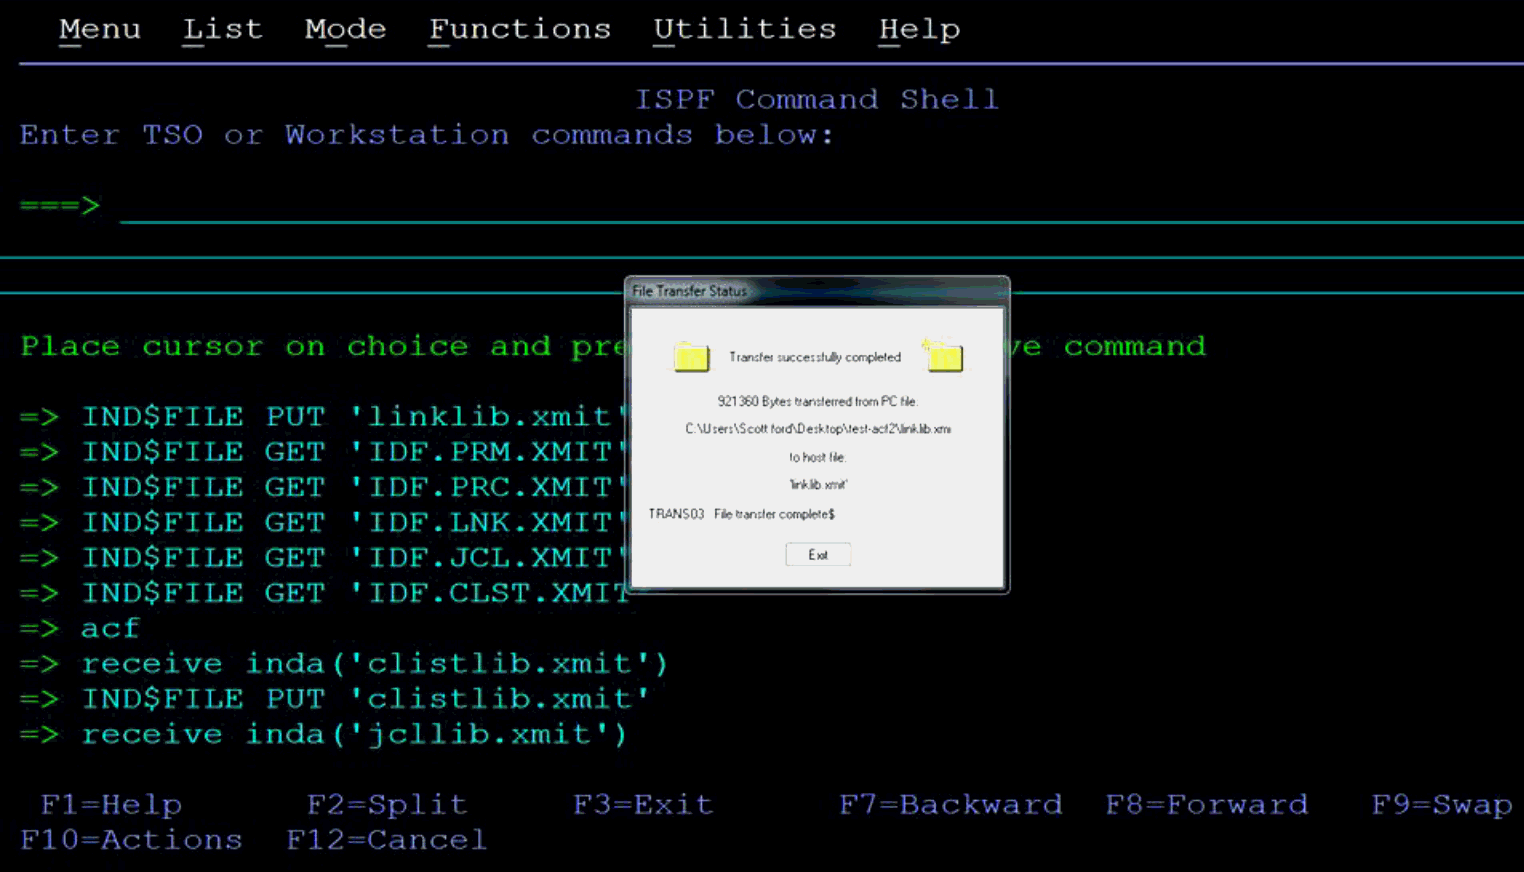
Click OK to initiate file upload.
The File Transfer Status dialog box with a message that the transfer was successfully completed is displayed.
-
Click Exit to dismiss the dialog box.
-
Repeat Steps 3 through 6 to upload the rest of the .XMI files.
Table 2-1 lists the uploaded files:
2.3.3 Extracting the XMIT Files
The files uploaded to the computer hosting the mainframe (by using the procedure described in Section 2.3.2, "Uploading the Files") are XMIT files. An XMIT file is an archived file format used on the mainframe.
To extract the files or Partition Datasets (PDS) in the XMIT file:
-
Enter the RECEIVE command in the area designated to enter commands.
For example, enter the following command:
receive inda('linklib.xmit')Note:
Filenames in mainframe are case insensitive. -
When prompted, enter the following to complete running the RECEIVE command:
Enter restore parameters or "DELETE" or "END" + -
Enter the name of the PDS that the XMIT file will expand into. In this case, enter the following:
dataset('USER_NAME.idf.FILE_NAME')
In this command, replace:
-
USER_NAME with the user name on the system you have access to.
-
FILE_NAME with the name of the XMIT file to be extracted.
For example:
dataset('IDF.LINKLIB.XMIT')
In this example, the prefix IDF is the user name that is being used in this section. In your environment, replace the prefix IDF with the user name on the system you have access to. If you specify the PDS name within single quotation marks, then the PDS name with a user name. That is the fully qualified name.
If single quotation marks are not used, then the PDS is created with a prefix of the user name that you are logged on with. In this case, the response is as follows:
dataset(idf.linklib)
Table 2-2 lists the XMIT file names and the corresponding PDS names:
Table 2-2 XMIT File Names and PDS Names
| XMIT File Name on Mainframe Host | Recommended PDS Name on Mainframe Host |
|---|---|
|
LINKLIB.XMIT |
IDF.LINKLIB |
|
PROCLIB.XMIT |
IDF.PROCLIB |
|
PARMLIB.XMIT |
IDF.PARMLIB |
|
JCLLIB.XMIT |
DF.JCLLIB |

Enter the response and follow the given steps:
-
Press Enter again for the RECEIVE command to continue.
The following two screen shots shows the output from the execution of the RECEIVE command.
-
Press Enter for each screen displayed since the output stops when the screen is full. The Receive command completes when the Restore successful message has been displayed on the screen.
-
Press Enter one last time to bring back the command entry screen.
-
Enter the RECEIVE command for each of the uploaded files using the host files name you selected for them.
-
Enter the restore parameters in response to each Receive command you enter.

Note:
The IDF.LINKLIB once "RECEIVED" can be either a STEPLIB or added to the environments existing Linklist. This library MUST be APF authorized. -
After all the files have been processed (extracted from the XMIT file with the Receive command), look at the members of each PDS using the Data Set List Utility which is ISPF option 3.4.
-
Enter =3.4 on the command line to go there from the command entry screen.
Note:
The IDF.LINKLIB must be APF authorized. It can be a steplib or added to the systems existing Linklist. See Appendix C to see how to find the APF authorized files on your system.
-
In the Data Set List Screen we entered SFORD.IDF.* in the Dsname Level field on the screen, because the user name that we used was SFORD. This will display a list of the files that match.

-
Press Enter to bring up the list. Here is the list of the files which matched what you entered.

-
Enter V (for view) to the left of one file names, and press the Enter to view the members in the PDS.
-
Enter E (for edit) to edit the members in the list.

-
Place the cursor to the left of one of the member names on this screen to bring up the editor.
-
Click EDIT mode to make changes.
2.3.4 Editing the Mainframe Batch Job Files to Match the Settings for the Customer's Site
The PDS IDF.JCLLIB contains the following members: CREATEDSN, IEBCOPYL, IEBCPYRP, and LOADDSN which will have to be edited to change file names, volsers, and job names to match your installation specifications. Modify the jobcard for each batch job to meet your installation specifications. The job card will usually be the first three lines of the batch file.
To make changes to the batch job files:
-
Click Edit mode.
-
Open the CREATDSN member in the editor s to make changes.

-
To change existing text in the file, type over the existing text with new text.
-
The editor will respond and provide a line to enter the text.
-
Press Enter before entering the text to remove the line.
-
Press Enter to add another line.
-
Press Enter to finish.

There are also variations to the insert line command. A common variation is to enter a number after the "I".
To indicate the number of lines to insert:
-
Use the arrow keys or the mouse to position the cursor to the line to enter text.
If you press the Enter before you have finished entering text in your lines, then the lines that you didn't enter text into will disappear.


To delete lines in the file:
-
Enter D in the number area on the line that you want to delete.
-
Press Enter to delete the line.
You can see that after entering a "D" in the first screen and in the second screen the line has been deleted.


There are variations of the delete line command. A common variation is to enter a number after D to indicate the number of lines to delete. For example:
-
-
Enter D3 to delete 3 lines.


To navigate through the file you need to use the function keys as follows:
-
Press F7 to scroll the edit screen up a screen to the beginning of the file.
-
Press F8 to scroll the edit screen down a screen to the end of the file.
-
Press F3 to finish editing the file.

The Following are the Members of PDS IDF.JCLLIB:
-
The CREATDSN member is an IEFBR14 file creation stream that will build the files required for Pioneer and Voyager. For each dataset name (DSN), PIONEER is used for the High-Level qualifier (HLQ) for Pioneer files and VOYAGER is used for the HLQ for Voyager files. The HLQ will have to be changed to meet installation standards. The VOL=SER= should be changed to point to the installation dasd volumes. The allocations are adequate. Once this member has been reviewed and changed, submit this job and review the output. The return code (RC) should be 0000.
-
The LOADDSN 1 member loads the files created by CREATDSN to the defined load area. For each DSN, PIONEER is used for the HLQ for Pioneer files and VOYAGER is used for the HLQ for Voyager files. The HLQ will have to be changed to meet installation standards. The SYSUT1 value defines the member to be loaded and SYSUT2 value defines the sequential or flat file it is being loaded into. Submit the job and review the output. The RC should be 0000.
-
The IEBCOPYL member copies the ACF2 exits (LIDPOST, NEWPXIT, and EXPPXIT) and the called caching routine IDFCACHE to an installation LPA library that ACF2 has access to. Review and change the LPA library name to meet installation standards. Submit the job and review the output. The RC should be 0000.
If your host mainframe has any of the exits already in place that IdF ships (LIDPOST, NEWPXIT, and EXPPXIT), then it is your responsibility to integrate these exits. If the customer does not have the staff or knowledge then IdF can be contacted and they will provide assistance via a Professional Services contract.
-
The IEBCPYPR member is an IEBCOPY file copy stream for the STC procedures and procedures used by the product. Pioneer and Voyager are STC procedures. Startup and Wrapup are emergency only procedures to build the subpool (STARTUP) and delete the subpool(WRAPUP) for Voyager. Normally, when z/OS is shutdown the subpool storage area is released. Review the names and change to meet installation specifications. Change the procedure library name to the installation procedure library name. Submit the JOB stream and review the output. The RC should be 0000.
Remember that the jobcard for each of the above batch jobs will have to be changed to meet installation specifications. Files must not be shared in a SYSPLEX. Each Pioneer and Voyager must have their own set of files.
Below is shown the "Createdsn" supplied in the JCLLIB PDS. The "YOURHLQ" is the installation Highlevel qualifier used for the Pioneer and Voyager datasets. The second portion of the dataset name is only a reference to illustrate the correspondence between the STC Pioneer and Voyager to the datasets. The VOL=SER=?????? is the dasd volume where the files are to be created. If SMS is being used this JCL will have to be changed to match installation definitions for these type and size datasets.
YOURHLQ //CREATDSN JOB SYSTEMS,MSGLEVEL=(1,1),
// MSGCLASS=X,CLASS=A,PRTY=8,
// NOTIFY=&SYSUID,REGION=4096K
//*-------------------------------------------*
//* CHANGE YOURHLQ TO THE INSTALLATION HLQ
//* CHANGE VOL=SER=?????? TO YOUR INSTALLATION VOL=SER
//* STEP 1 = PIONEER DDNAME=LISTINR
//* STEP 2 = PIONEER DDNAME=IDCAMSD
//* STEP 3 = PIONEER DDNAME=ACF2CTL
//* STEP 4 = PIONEER DDNAME=ACF2OUT
//* STEP 5 = VOYAGER DDNAME=CACHESAV
//* STEP 6 = VOYAGER DDNAME=PARMFLE
//* STEP 7 = PIONEER DDNAME=PARMFLE
//*-------------------------------------------*
//STEP1 EXEC PGM=IEFBR14
//INDD1 DD DSN=YOURHLQ.ALIASOUT,
// DCB=(DSORG=PS,RECFM=VBA,LRECL=133,BLKSIZE=0),
// UNIT=SYSDA,SPACE=(CYL,5),DISP=(NEW,CATLG),
// VOL=SER=??????
//STEP2 EXEC PGM=IEFBR14
//INDD2 DD DSN=YOURHLQ.IDCAMSD.FILE,
// DCB=(DSORG=PS,RECFM=F,LRECL=80,BLKSIZE=80),
// UNIT=SYSDA,SPACE=(TRK,2),DISP=(NEW,CATLG),
// VOL=SER=??????
//STEP3 EXEC PGM=IEFBR14
//INDD3 DD DSN=YOURHLQ.ACF2.CTL,
// DCB=(DSORG=PS,RECFM=F,LRECL=80,BLKSIZE=80),
// UNIT=SYSDA,SPACE=(TRK,2),DISP=(NEW,CATLG),
// VOL=SER=??????
//STEP4 EXEC PGM=IEFBR14
//INDD4 DD DSN=YOURHLQ.ACF2OUT,
// DCB=(DSORG=PS,RECFM=VBA,LRECL=133,BLKSIZE=0),
// UNIT=SYSDA,SPACE=(CYL,30),DISP=(NEW,CATLG),
// VOL=SER=??????
//STEP5 EXEC PGM=IEFBR14
//INDD5 DD DSN=YOURHLQ.CACHESAV,
// DCB=(DSORG=PS,RECFM=FB,LRECL=112,BLKSIZE=27888),
// UNIT=SYSDA,SPACE=(CYL,10),DISP=(NEW,CATLG),
// VOL=SER=??????
//STEP6 EXEC PGM=IEFBR14
//INDD6 DD DSN=YOURHLQ.CONTROL.FILE,
// DCB=(DSORG=PS,RECFM=F,LRECL=80,BLKSIZE=80),
// UNIT=SYSDA,SPACE=(TRK,1),DISP=(NEW,CATLG),
// VOL=SER=??????
//STEP7 EXEC PGM=IEFBR14
//INDD7 DD DSN=YOURHLQ.CONTROL.FILE,
// DCB=(DSORG=PS,RECFM=F,LRECL=80,BLKSIZE=80),
// UNIT=SYSDA,SPACE=(TRK,1),DISP=(NEW,CATLG),
// VOL=SER=??????
Table 2-4 shows the LOADDSN1.
Pioneer and Voyager were used below as High Level Qualifiers to illustrate the job stream below.
| LOADDSN1 |
|---|
|
//LOADDSN JOB SYSTEMS,MSGLEVEL=(1,1), // MSGCLASS=X,CLASS=A,PRTY=8, // NOTIFY=&SYSUID,REGION=4096K |
|
//STEP1 EXEC PGM=IEBGENER //SYSUT1 DD DSN=IDF.PROD.JCLLIB(PCTLFLE),DISP=SHR //SYSUT2 DD DSN=PIONEER.CONTROL.FILE,DISP=SHR //SYSPRINT DD SYSOUT=* //SYSIN DD DUMMY /* |
|
//STEP2 EXEC PGM=IEBGENER //SYSUT1 DD DSN=IDF.PROD.JCLLIB(VCTLFLE),DISP=SHR //SYSUT2 DD DSN=VOYAGER.CONTROL.FILE,DISP=SHR //SYSPRINT DD SYSOUT=* //SYSIN DD DUMMY |
The "YOURHLQ" is the installation Highlevel qualifier used for the Pioneer and Voyager datasets. The second portion of the dataset name is only a reference to illustrate the correspondance between the STC Pioneer and Voyager to the datasets. The VOL=SER=?????? is the dasd volume where the files are to be created. If SMS is being used this JCL will have to be changed to match installation definitions for these type and size datasets.
See Appendix E for information about the relationships between the DSNs in each step in the LOADDSN1 member and the file contents that are loaded into Pioneer's datasets.
The following is the IEBCOPYL member:
//IEBCOPYL JOB SYSTEMS,MSGLEVEL=(1,1),
// MSGCLASS=X,CLASS=A,PRTY=8,
// NOTIFY=&SYSUID,REGION=4096K
//*
---------------------------------------
//* COPY EXITS TO LPA LOADLIB
//*
---------------------------------------
//MODUCPY1 EXEC PGM=IEBCOPY
//INDD DD DSN=IDF.TEST.LINKLIB,DISP=SHR
//OUTDD DD DSN=USER.ACF2.LPALIB,DISP=SHR
//SYSPRINT DD SYSOUT=*
//SYSIN DD * COPY INDD=((INDD,R)),OUTDD=OUTDD
S M=((IDFACF2E,,R))
S M=((IDFACF2P,,R))
S M=((IDFACF2X,,R))
S M=((IDFCACHE,,R))
/*
The following is the IEBCPYPR member:
//IEBCPYPR JOB SYSTEMS,MSGLEVEL=(1,1),
// MSGCLASS=X,CLASS=A,PRTY=8,
// NOTIFY=&SYSUID,REGION=4096K
//*
---------------------------------------------
//* COPY STC PROCEDURES TO PROCLIB--------------
//*---------------------------------------------
//JCLCPY EXEC PGM=IEBCOPY
//INDD2 DD DSN=IDF.TEST.PROCLIB,DISP=SHR
//OUTDD2 DD DSN=IDF.TEST.PPPRC,DISP=SHR
//SYSPRINT DD SYSOUT=*
//SYSIN DD *
COPY INDD=((INDD2,R)),OUTDD=OUTDD2
S M=((VOYAGER,,R))
S M=((PIONEER,,R))
2.3.5 Submitting Batch Job Streams
For submitting batch job streams to z/OS for execution and verify jobs completed successfully, after the jcl files have been edited to reflect the settings for the target environment, the jcl needs to be submitted for batch processing, perform the following steps:
-
Submit the jobs from the screen where the members of the JCLLIB were displayed.
-
Type SUBMIT to the left of the member you want to submit for processing.
-
Press Enter to verify that the jobs have completed successfully.
If there are any errors when submitting a job, fix the errors in the job and resubmit the job.

2.3.6 Loading and Activating the Exits
To load and activate the exits (new install):
-
In TSO enter the ACF environment by entering ACF in the option
#6command line. The text in green is entered by the user.
-
If an exit has been loaded already and you want to change it, then a CHANGE SYSID (xxxx) EXITS with the exit name and module name will have to be performed. If the exits don't exist then an INSERT SYSID (xxx) exit name and module names will have to be performed.
Display the exits that are loaded.

-
Set APF authorization for Pioneer and Voyager with progID as follows:
-
Verify that the LPA library containing the exits are in the LPA, IEASYSXX. Start member of Z/OS, usually contained within the SYS1.PARMLIB.
-
The executable code (IBM z/OS loadlibs) of Pioneer and Voyager must be APF authorized. This can be achieved by running a dynamic set command (T PROG=ID) or by placing the installation loadlib containing Pioneer and Voyager in the IBM z/OS link list. In order to refresh the LPA library, IPL the IBM z/OS system.
IBM® provides the PROGxx parmlib member as an alternative to IEAAPFxx, which allows you to update the APF list dynamically and specify an unlimited number of APF-authorized libraries. IBM suggests that you use PROGxx to specify the APF list (regardless of whether you plan to take advantage of the dynamic update capability). The system will process IEAAPFxx and PROGxx if both parameters are specified. If you decide to use PROGxx only, remove APF=xx system parameters from IEASYSxx and IEASYS00.
-
Note:
Voyager also needs AUDIT to list. So it will beINSERT VOYAGER NAME(VOYAGER) AUDIT STC.2.3.7 Creating an ACF2 LID for Pioneer and Voyager with Permissions
To create an ACF 2 LID for Pioneer and Voyager with permissions:

After the LIDs have been created an ACF LIST should show this output:


2.3.8 Adding Pioneer/Voyager to the Resource Rule Facilities (BPX and IRR)
To add Pioneer or Voyager to the resource rule facilities:


List the new rules.

Note:
-
Pioneer must have SECURITY privileges, which acts as a central site security administrator and must be able to add lids, change lids, delete lids as well as resources, rules. Voyager does not need this level of security. Pioneer needs to be able to perform all functions for IRR.RADMIN so we will use IRR.RADMIN.*.
-
Voyager only needs to be able to perform IRR.RADMIN.LISTUSER.
-
All IRR.RADMIN calls are through the standard IBM module IRRSEQ00. Verify that the RACF subsystem interface is activated at IPL time.The SYS1.PARMLIB member is IEFSSNxx, where xx is the user's suffix. The required parameters for the RACF API are as follows: SUBSYS SUBNAME(RACF) /* RACF SUBSYSTEM */ INITRTN(IRRSSI00) INITPARM('#') (Or) SUBSYS SUBNAME(RACF). All ACF2 commands are passed through the RACF API interface (service Radmin, program = IRRSEQ00).
-
The SYS1.PARMLIB member (IFAPRDnn) must be updated to set the 'SECURITY SERVER' to a disabled state:
For example:
(not the "STATE(DISABLED)")
PRODUCT OWNER('IBM CORP')
NAME('z/OS')
VERSION(*) RELEASE(*) MOD(*)
STATE(DISABLED)
You can ignore the "IRR418I RACF product disabled: IRRSSI00 ended." message that appears.
The INITPARM can contain any character that IBM z/OS supports. There may be more than one character in the list such as INITPARM('#,X'). Even though the Security Subsystem is ACF2, this RACF API is still used by Pioneer when it makes the call to R_admin (IRRSEQ00) API.
2.3.9 Testing the Installation
Review this connector guide for the control file parameters for Voyager and Pioneer and change the configuration files (Pioneer and Voyager STC PARMFLE DDs) for the installation. Consult the Identity Manage Installation Staff for TCPIP PORT addresses and TCPIP Addresses for both Voyager and Pioneer. Also consult the IDM staff for the VOYAGER_ID= variable explained later in this connector guide in the Voyager parameters section.
To test the installation:
-
IPL the system to bring in the new LPA library modules.
-
Check that the exit modules have been loaded.
The following are the list of the members in USER.PROCLIB.

-
Execute Voyager.
-
Note:
STARTUP and WRAPUP are not required any more. Voyager performs their functions.Start the Voyager Agent by running "S VOYAGER" from the console or SDSF in TSO. By adding the STC procedure for VOYAGER inside a Job Scheduler is another way you can start the task. To quiesce VOYAGER:
"F VOYAGER,SHUTDOWN"Upon entering the "F VOYAGER,SHUTDOWN", Voyager closes the IP connection the LDAP and then closes all open files. The last task that is performed is deletion of a storage subpool token and deletion of the subpool.
Voyager Control File Used for Testing:
* COMMENT FOR VOYAGER
SUBPOOL_SIZE=1000K
TCPN=TCPIP
IPAD=xxx.xxx.xxx.xxx
PORT=5197
DEBUG=N
ESIZE=16
DEBUGOUT=SYSOUT,CLAS(K)
VOYAGER_ID=TESTACF2
FILTER1=NO
FILTER2=NO
FILTER3=NO
CACHE_DELAY=005
AUDIT=YES,SYSOUT,CLASS(S)
JCL for the Voyager Started Task (STC):
Voyager STC:
//VOYAGER  PROC
//STEP1    EXEC PGM=VOYAGERX,REGION=0M,TIME=1440
//STEPLIB  DD DISP=SHR,DSN=IDF.LINKLIB      <--- IF NOT IN LINKLIST
//CACHESAV DD DSN=VOYAGER.CACHSAV,DISP=SHR
//DEBUGOUT DD SYSOUT=*
//SYSOUT   DD SYSOUT=*
//AUDTLOG  DD SYSOUT=*
//PARMOUT  DD SYSOUT=*
//PARMFLE  DD DISP=SHR,DSN=VOYAGER.CONTROL.FILE
//SYSPRINT DD SYSOUT=*
//SYSUDUMP DD SYSOUT=X
//
To Execute Voyager (STC log):
0290  S  VOYAGER
0281  $HASP100 VOYAGER  ON STCINRDR
0290  IEF695I START VOYAGER  WITH JOBNAME VOYAGER  IS ASSIGNED TO USER VOYAGER
0090  $HASP373 VOYAGER  STARTED
0090  ACF9CCCD USERID VOYAGER  IS ASSIGNED TO THIS JOB - VOYAGER
0281  IEF403I VOYAGER - STARTED - TIME=13.08.42
0090  IDMV000I - VOYAGER RECONCILATION  AGENT STARTING
0090  IDMV000I - VOYAGER IS EXECUTING  FROM AN APF AUTHORIZED LIBRARY
0090  IDMV000I - VOYAGER FOUND          ACF2 SECURITY SUBSYSTEM
0090  IDMV202E - VOYAGER NO STORAGE TOKEN     FOUND
0090  IDMV000I - VOYAGER SUBPOOL  INITIALIZATION OK
0090  IDMV003I - VOYAGER SP231  ALLOCATED OK
0090  IDMV001I - VOYAGER SUBPOOL  SIZE IS:    1000 K
0090  IDMV002I - VOYAGER SUBPOOL  WILL HOLD :   10240 MESSAGES
0090  IDMV004I - VOYAGER STORAGE TOKEN BUILT OK
0090  IDMV152I - VOYAGER IP CONNECT REQUEST 71.14.2.190
0090  IDMV002I - VOYAGER BUILD          LEVEL IS AT        201301081402-4.7.0.5
0090  IDMV003I - VOYAGER SUBPOOL        100 BYTE VERSION
0090  IDMV004I - VOYAGER DETECTS       (TCPIP)JOBNAME      TCPIP
0090  IDMV005I - VOYAGER DETECTS       (TCPIP)IP ADDRESS   71.14.2.190
0090  IDMV002I - ORACLE BUILD           LEVEL IS AT        09.00.04.19.0
0090  IDMV006I - VOYAGER DETECTS       (TCPIP)IP PORT      5097
0090  IDMV013I - VOYAGER DETECTS        DEBUGGING IS       OFF
0090  IDMV017  - VOYAGER DETECTS AUDLOG IS NOW : ACTIVE
0090  IDMV015I - VOYAGER DETECTS        COUNTRY CODE OF    US
0090  IDMV007I - VOYAGER DETECTS        ENCRYPTION IS      ON
0090  IDMV011I - VOYAGER DETECTS        ENCRYPTION KVER    200610261425
0090  IDMV019I - VOYAGER INITIALIZATION OF TCP API WAS     SUCCESSFUL
0090  IDMV022I - VOYAGER INITIALIZATION OF PTON WAS SUCCESSFUL
0090  IDMV009I - VOYAGER DETECTS        CACHE FILE OPENED  OK
0090  IDMV155I - VOYAGER CACHESAVE WAS READ        0  MESSAGES
To Execute Voyager (PARMSOUT log):
01/08/13 13:08:43:11 * PARMFLE * OPEN
01/08/13 13:08:43:11 VOYAGER PARMS FOUND:
01/08/13 13:08:43:11 SUBPOOL_SIZE=1000K
01/08/13 13:08:43:11 TCPN=TCPIP
01/08/13 13:08:43:11 IPAD=xxx.xxx.xxx.xxx
01/08/13 13:08:43:11 * IPAD=RACF.LEGACYIDM.COM
01/08/13 13:08:43:11 PORT=5097
01/08/13 13:08:43:11 DEBUG=N
01/08/13 13:08:43:11 ESIZE=16
01/08/13 13:08:43:11 VOYAGER_ID=TESTVGER
01/08/13 13:08:43:11 FILTER1=NO
01/08/13 13:08:43:11 FILTER2=NO
01/08/13 13:08:43:11 CACHE_DELAY=002
01/08/13 13:08:43:11 AUDIT=YES,SYSOUT,CLASS(S)
01/08/13 13:08:43:14 ALL PARMS GOOD
-----------------------------------------------------------
-
-
Starting Pioneer:
Start the Pioneer Agent by running "S PIONEER" from the console or by running /S PIONEER in SDSF under TSO. Adding the STC procedure for PIONEER inside a Job Scheduler is another way you can start the task.
Pioneer Control File Used for Testing:
* CONTROL FILE COMMENT
TCPN=TCPIP
IPAD=0.0.0.0
PORT=5190
DEBUG=N
LPAR=ACF2-100BYTE-SYS
POST_PROC_ALIAS=F
IDLEMSG=N
DEBUGOUT=SYSOUT,CLASS(X)
SPIN_CLASS=K
FILTER=NO
AUDIT=YES,SYSOUT,CLASS(S)
STATS=NO
The "YOURHLQ" is the installation Highlevel qualifier used for the Pioneer and Voyager datasets. The second portion of the dataset name is only a reference to illustrate the correspondence between the STC Pioneer and Voyager to the datasets. The VOL=SER=?????? is the dasd volume where the files are to be created. If SMS is being used this JCL will have to be changed to match installation definitions for these type and size datasets.
See Appendix F for information about Pioneer control file parameter descriptions.
JCL for the Pioneer Started Task (STC):
Pioneer STC:
//PIONEER  EXEC PGM=PIONEERX,REGION=0M,TIME=1440
//JCLOUTP  DD SYSOUT=*
//DEBUGOUT DD SYSOUT=*
//PARMOUT  DD SYSOUT=*
//RULELOG  DD SYSOUT=*
//SYSOUT   DD SYSOUT=*
//AUDTLOG  DD SYSOUT=*
//PARMFLE  DD DISP=SHR,DSN=YOURHLQ.CONTROL.FILE
//LISTINR  DD DISP=SHR,DSN=YOURHLQ.ALIASOUT,
//            DCB=(RECFM=VB,LRECL=137)
//IDCAMSD  DD DISP=SHR,DSN=YOURHLQ.IDCAMSD.FILE
//ACF2CTL  DD DISP=SHR,DSN=PIONEER.ACF2.CTL
//ACF2OUT  DD DISP=SHR,DSN=PIONEER.ACF2OUT,
//            DCB=(RECFM=VB,LRECL=137)
//SYSPUNCH DD SYSOUT=(*,INTRDR)
//SYSPRINT DD SYSOUT=*
//SYSUDUMP DD SYSOUT=X
//
To Execute Pioneer (STC log):
0290  S PIONEER
0281  $HASP100 PIONEER  ON STCINRDR
0290  IEF695I START PIONEER  WITH JOBNAME PIONEER  IS ASSIGNED TO USER PIONEER
0090  $HASP373 PIONEER  STARTED
0090  ACF9CCCD USERID PIONEER  IS ASSIGNED TO THIS JOB - PIONEER
0281  IEF403I PIONEER - STARTED - TIME=14.36.28
0090  IDMP201I - PIONEER ALL POST PARMS WERE GOOD  STATUS = GOOD
0090  IDMP071I - PIONEER  PARMFLE    IS NOW CLOSED
0090  IDMP201I - PIONEER ALL PARMS WERE GOOD       STATUS = GOOD
0090  IDMP000I - PIONEER STARTING
0090  IDMP001I - PIONEER INPUT    PARAMETERS ARE   OK
0090  IDMP002I - PIONEER DETECTS  IDF-BUILD        201201081531-4.7.0.5
0090  IDMP002I - PIONEER DETECTS  AUDIT LOG IS NOW: ACTIVE
0090  IDMP002I - PIONEER DETECTS  ORACLE BUILD     09.00.04.19
0090  IDMP003I - PIONEER DETECTS  TCPIP JOBNAME    TCPIP
0090  IDMP004I - PIONEER DETECTS  TCPIP IP ADDRESS 0.0.0.0
0090  IDMP005I - PIONEER DETECTS  TCPIP IP PORT    5697
0090  IDMP006I - PIONEER DETECTS  DEBUGGING IS     ACTIVE
0090  IDMP011I - PIONEER DETECTS  CPUID            01B0DB1090
0090  IDMP012I - PIONEER DETECTS  SYSPLEX SYSNAME  ADCD
0090  IDMP013I - PIONEER DETECTS  LPARNAME AS      ACF2-QA-ZOS112
0090  IDMP014I - PIONEER DETECTS  COUNTRY CODE OF  US
0090  IDMP009I - PIONEER DETECTS  ENCRYPTION       ENABLED
0090  IDMA000I - PIONEER EXECUTING FROM APF AUTHORIZED LIBRARY
0090  IDMP030I - PIONEER INITAPI   WAS SUCCESSFUL
0090  IDMP031I - PIONEER GETCLIENTID WAS SUCCESSFUL
0090  IDMP032I - CLIENT  NAME IS PIONEER
0090  IDMP033I - CLIENT  TASK IS PIONEERX
0090  IDMP035I - PIONEER BIND SOCKET WAS SUCCESSFUL
0090  IDMP036I - PIONEER LISTENING PORT IS  5697
0090  IDMP037I - PIONEER LISTENING ADDRESS IS 0.0.0.0
0090  IDMP038I - PIONEER LISTEN SOCKET CALL WAS  SUCCESSFUL
0090  ** PIONEER LISTENING READY FOR MESSAGES **
To Execute Pioneer (PARMSOUT):
01/08/13 14:36:29.32 IDMP400I  *PARMS* - TCPN=TCPIP
01/08/13 14:36:29.32 IDMP400I  *PARMS* - IPAD=0.0.0.0
01/08/13 14:36:29.32 IDMP400I  *PARMS* - PORT=5697
01/08/13 14:36:29.32 IDMP400I  *PARMS* - DEBUG=Y
01/08/13 14:36:29.32 IDMP400I  *PARMS* - ESIZE=16
01/08/13 14:36:29.32 IDMP400I  *PARMS* - LPAR=ACF2-QA-ZOS112
01/08/13 14:36:29.32 IDMP400I  *PARMS* - POST_PROC_ALIAS=T
01/08/13 14:36:29.33 IDMP400I  *PARMS* - IDLEMSG=N
01/08/13 14:36:29.33 IDMP400I  *PARMS* - DEBUGOUT=SYSOUT,CLASS(S)
01/08/13 14:36:29.33 IDMP400I  *PARMS* - SPIN_CLASS=K
01/08/13 14:36:29.33 IDMP400I  *PARMS* - FILTER=NO
01/08/13 14:36:29.33 IDMP400I  *PARMS* - AUDIT=YES,SYSOUT,CLASS(S)
01/08/13 14:36:29.33 IDMP400I  *PARMS* - STATS=NO
01/08/13 14:36:29.33 IDMP400I  *PARMS* - PARMOUT CLOSED
-
Stopping the started tasks.
The operator interface is named POLLOPER in both Voyager and Pioneer. Both STCs are single thread and commands are passed to them via a z/OS modify("F") command.
Pioneer can be controlled by commands via Operator Interface with the commands given in Table 2-5.
Functions:
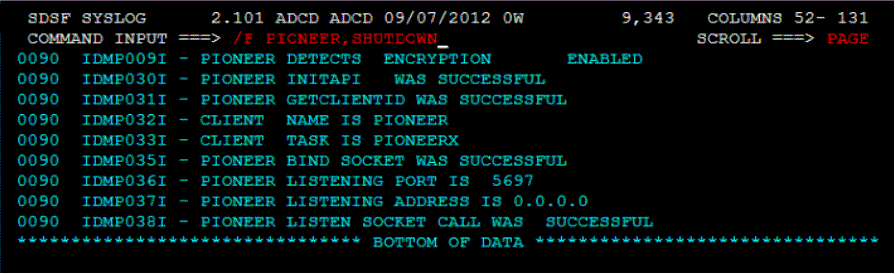

Table 2-6 lists Voyager Commands via Operator Interface:
Table 2-6 Voyager Commands via Operator Interface
| Voyager commands | Description |
|---|---|
|
F VOYAGER,SHUTDOWN |
Shuts Down Voyager |
|
F VOYAGER,STATUS |
Heartbeat message |
|
F VOYAGER,DEBUG=Y |
Turns on Debugging |
|
F VOYAGER,DEBUG=N |
Turns off Debugging |
|
F VOYAGER,IPAD=999.999.999.999,PORT=99999 |
Swaps LDAP Gateway |
Note:
The commands in the following screen shots are not required if DNS is used.
