3 Connector Deployment on the Mainframe
You deploy the Reconciliation Agent and Provisioning Agent on the mainframe. These agents communicate with the LDAP Gateway during connector operations.
The following section summarizes the procedure to deploy the Reconciliation Agent and Provisioning Agent:
Section 3.7, "Summary of the Deployment Procedure"
The following sections describe each deployment step in detail:
-
Section 3.2, "Deploying the Reconciliation Agent and Provisioning Agent"
-
Section 3.4, "Installing or Integrating the Reconciliation Agent Exit"
-
Section 3.5, "Set APF Authorization for Pioneer and Voyager"
-
Section 3.6, "Creating a CA Top Secret Account for Connector Operations"
-
Section 3.10, "Starting Up and Shutting Down the Reconciliation Agent"
See the following section if you want to remove the Reconciliation Agent exit:
Section 3.11, "Removing the Exit"
3.1 Reviewing Deployment Requirements
The following is a summary of the deployment requirements:
-
The Reconciliation Agent and Provisioning Agent need a CA Top Secret ACID. This ACID that has administrative privileges to run functions such as Create, Change, List, and Replace.
Note:
APF Authorization: The executable code for Pioneer, Voyager and the TSSINSTX exit must execute from a APF authorized library. The APF authorization is required to make calls to the CA Top-Secret Security SubSystem. The APF authorized library can be in the z/OS Link List or a Steplib. -
The Reconciliation agent uses ECSA storage to store Top-Secret events. These events are the primary Top-Secret type commands which are 32 bytes in length. The subpool (231), which is allocated above the 16M line, requires from 200K to 7500K of ECSA memory for storage of CA Top Secret events. The range of the number of messages store range from 6400 to 240000.
-
The Reconciliation Agent is fed by using a modified CA Top Secret exit. The exit (TSSINSTX) runs as part of CA Top Secret in the IBM z/OS operating system environment. Various exits points within the exit capture various CA Top-Secret events, primarily the Top-Secret commands to create, change, modify an ACID as well as the permits for various resources. If the exit fails, then the command fails and returns an error message. If the subpool allocated is full, for example; the LDAP is down, messages will be lost without risk to the Operating System. Maintaining a specific password format is an example of the objective for which you use custom exits, such as the one used by the Reconciliation Agent. The Reconciliation Agent exit is engineered to be the last exit called in sequence. This allows existing exits to function normally.
3.2 Deploying the Reconciliation Agent and Provisioning Agent
To deploy the Reconciliation Agent and Provisioning Agent (whether a new installation or an update, the process is the same):
-
Extract the contents of the following file from the installation media to a temporary directory on any computer:
etc/Provisioning and Reconciliation Connector/Mainframe_TS.zip
Table 3-1 lists the JES2 XMIT files that are included in the Mainframe_TS.zip file.
File Name Description linklib.xmi
Executable library for all modules.
parmlib.xmi
PROG member for dynamically authorizing IDF.LINKLIB.
proclib.xmi
Contains all the STC (Started Task Procedures).
clistlib.xmi
Contains LDAP search Rexx clists.
jcllib.xmi
Contains product installation JCL.
rexxlib.xmi
Contains the system Rexx library to be added to the AXR member.
-
Log in to the TSO environment of the mainframe. In this guide, a 3270 terminal emulator program called QWS3270P is used.
-
Perform the following steps either from the TSO Ready prompt or by using ISPF Option #6 using a TN3270 or TN3270E emulator:
-
Note:
Each file must be uploaded in binary format without any file conversion. You can also use FTP to upload the files.-
Use the IND$FILE command to upload each of the files to the mainframe. The QWS3270P program has an upload option that will enter a properly formatted command. The upload options are:
File Conversion: Nothing selected (No ASCII/EBCDIC translation and no CRLF).
Host Type: TSO selected.
Record Format: Default selected.
Sizes: LRECL and BLKSIZE are left blank.
Note:
Alternatively, the record format can be "Fixed" with the LRECL set to "80" and the BLKSIZE set to "3120". -
When prompted for dataset names, use the information given in Table 3-2.
-
-
-
Use the RECEIVE command to extract the files or Partition Datasets (PDS) in each XMIT file.
For each file, enter the following command:
receive inda('filename')For example, to extract the LINKLIB.XMIT file, enter the following command:
receive inda('linklib.xmit')Note:
The mainframe is case insensitive. You can enter linklib.xmit or LINKLIB.XMIT.When prompted to enter restore parameters or 'DELETE' or 'END' +", enter the following:
dataset('prefix.XMIT library name')Use single quotes to specify a user name on the system as the prefix of the library. If you do not use single quotes, then the PDS will be created with a prefix of the user name with which you logged in.
Table 3-3 lists XMIT file names and corresponding sample PDS names.
-
The following screen images show the output from a TSO RECEIVE command where the "IDF.PROD.LINKLIB" dataset is entered at the prompt.
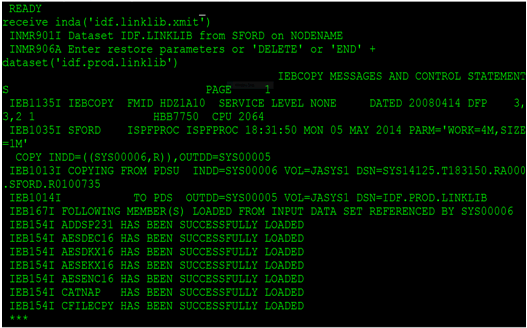

Note:
The IDF.LINKLIB, once RECEIVED, can be either a STEPLIB or added to the environment's existing Linklist. This library must be APF authorized.The following is the list of required authorization for REXXCLST (REXXC) and IDCALIAS (IDCAMSC):
-
Both jobs must have access to the BATCH facility.
-
Both jobs need access to UPDATE the dataset PIONEER.ALIAS.LSTOUT.
-
Both jobs need access to UPDATE the dataset PIONEER.RECON.FILE.
-
Both jobs need access to UPDATE the Master Catalog (that is ability to create/delete an alias for an ID).
-
Both jobs need access to UPDATE the User-Catalog.
-
3.3 Editing the Mainframe Batch Job Files
The PDS IDF.JCLLIB file contains the CREATDSN, IEBCOPYL, IEBCOPYP, IEBCPYRP, and LOADDSN members, which must be edited to change file names, volsers, and job names to match your installation specifications. For each batch job, you must modify the job card to meet your installation specifications. The examples shown are non-SMS, these files can be SMS managed also.
-
Use the Data Set List Utility (ISPF option 3.4) to view the members in the PDS. To search for a PDS, enter the dataset name (or prefix) in the "Dsname Level" field.
-
Place an E (for Edit) to the left of the IDF.JCLLIB PDS.
-
Press Enter to edit the members in the PDS.
-
Place the cursor to the left of the member that you wish to edit.
Table 3-4 lists the JCLLIB member names and the corresponding description.
Table 3-4 JCLLIB members and their description
| Member Name | Description |
|---|---|
|
CREATDSN |
Creates Pioneer and Voyager datasets. |
|
CREATEXP |
Creates EXPORTIN dataset for CFILE imports and output file for CFILECPYs and CONV2XML programs. |
|
IDCAMSC |
Input into LOADDSN step, this member is the JCL for IDCAMS alias functions. |
|
LOADDSN |
Loads INJCLR - jobstream for ALIAS support and loads RECONJCL. |
|
IEBCOPYL |
Copies TSSINSTX and IDFCACHE modules to the CA Top-Secret load library. |
|
IEBCOPYP |
Copies PROG01 to installation Parmlib. |
|
KEYMODR |
JCL stream to AMASZAP the encryption key, so the user can create their own encryption key. |
|
PSAMCTL1/2 |
Pioneer Sample control file members |
|
VSAMCTL1/2 |
Voyager Sample control file members |
|
TSSCFILEV |
CFILE execute stream for RECFM=VB CFILE. |
|
TSSCFLEF |
CFILE execute stream for RECFM=FB CFILE. |
|
IEBCPYPR |
Copies the STC procedures and other procedures used by the connector to the target system procedure library. |
|
IEBCPYRX |
Copies the connector Rexx clists to the target system libraries. |
|
REXXCL |
Used in LOADDSN to create a dataset skeleton for Pioneer. |
The CREATDSN member is an IEFBR14 file creation stream that builds the files required for Pioneer and Voyager. For more information on each of the Pioneer and Voyager DDs see table Table 3-5 and Table 3-6.
Table 3-5 Pioneer DDs and their corresponding CREATDSN DD entries
| Pioneer DD | CREATDSN DD |
|---|---|
|
RECONJCL |
//INDD1 DD DSN=PIONEER.RECON.LIBRARY, // DCB=(DSORG=PS,RECFM=F,LRECL=80,BLKSIZE=80), // UNIT=SYSDA,SPACE=(TRK,5),DISP=(NEW,CATLG), // VOL=SER=XXXXXX |
|
RECONOUT |
//INDD2 DD DSN=PIONEER.RECON.FILE, // DCB=(DSORG=PS,RECFM=FB,LRECL=90,BLKSIZE=27000), // UNIT=SYSDA,SPACE=(CYL,50),DISP=(NEW,CATLG), // VOL=SER=XXXXXX |
|
INJCLR |
//INDD3 DD DSN=PIONEER.INJCL.LIBRARY, // DCB=(DSORG=PS,RECFM=F,LRECL=80,BLKSIZE=80), // UNIT=SYSDA,SPACE=(TRK,5),DISP=(NEW,CATLG), // VOL=SER=XXXXXX |
|
LISTINR |
//INDD4 DD DSN=PIONEER.ALIAS.LSTOUT, // DCB=(DSORG=PS,RECFM=VBA,LRECL=133,BLKSIZE=26300), // UNIT=SYSDA,SPACE=(CYL,5),DISP=(NEW,CATLG), // VOL=SER=XXXXXX |
|
PARMFLE |
//INDD6 DD DSN=PIONEER.ORACLE.CTLFLE, // DCB=(DSORG=PS,RECFM=F,LRECL=80,BLKSIZE=80), // UNIT=SYSDA,SPACE=(TRK,5),DISP=(NEW,CATLG), // VOL=SER=XXXXXX |
|
SYSTSPRT |
//INDD7 DD DSN=PIONEER.REXXOUT.FILE, // DCB=(DSORG=PS,RECFM=FB,LRECL=121,BLKSIZE=27951), // UNIT=SYSDA,SPACE=(CYL,80),DISP=(NEW,CATLG), // VOL=SER=XXXXXX |
|
SYSEXEC |
//INDD8 DD DSN=PIONEER.REXX.CLISTS, // DCB=(DSORG=PO,RECFM=FB,LRECL=80,BLKSIZE=0), // UNIT=SYSDA,SPACE=(CYL,(5,5,1)),DISP=(NEW,CATLG), // VOL=SER=XXXXXX |
Table 3-6 Voyager DDs and their corresponding CREATDSN DD entries
| Voyager DD | CREATDSN DD |
|---|---|
|
CACHESAV |
//INDD7 DD DSN=VOYAGER.CACHESAV, // DCB=(DSORG=PS,RECFM=FB,LRECL=32,BLKSIZE=32000), // UNIT=SYSDA,SPACE=(CYL,10),DISP=(NEW,CATLG), // VOL=SER=?????? |
|
PARMFLE |
//INDD9 DD DSN=VOYAGER.CONTROL.FILE, // DCB=(DSORG=PS,RECFM=F,LRECL=80,BLKSIZE=80), // UNIT=SYSDA,SPACE=(TRK,1),DISP=(NEW,CATLG), // VOL=SER=?????? |
To update the CREATDSN member perform the following steps:
-
Modify the jobcard information (usually the first three lines of the batch file) to meet your installation specifications.
-
For each dataset name (DSN), "PIONEER" is used as the high-level qualifier (HLQ) for PIONEER files. "VOYAGER" is the HLQ used for VOYAGER files. You must change the HLQ for each DSN to meet your individual installation standards.
-
For each DSN, change the VOL=SER= field to point to the installation dasd volumes.
-
Submit the job and review the output. Successful return code (RC) is 0000.
The LOADDSN member loads the files created by CREATDSN to the defined load area.
Table 3-7 lists the LOADDSN steps and the corresponding file contents.
Table 3-7 LOADDSN steps and file contents loaded into Pioneer Datasets
| LOADDSN Step | File Contents |
|---|---|
|
Step #1 |
//STEP1 EXEC PGM=IEBGENER //SYSUT1 DD DSN=IDF.PROD.JCLLIB(REXXCL),DISP=SHR //SYSUT2 DD DSN=PIONEER.RECON.LIBRARY,DISP=SHR //SYSPRINT DD SYSOUT=* //SYSIN DD DUMMY |
|
Step #2 |
//STEP2 EXEC PGM=IEBGENER //SYSUT1 DD DSN=IDF.PROD.JCLLIB(ALIASLST),DISP=SHR //SYSUT2 DD DSN=PIONEER.INJCL.LIBRARY,DISP=SHR //SYSPRINT DD SYSOUT=* //SYSIN DD DUMMY |
|
Step #3 |
//STEP3 EXEC PGM=IEBGENER //SYSUT1 DD DSN=IDF.PROD.JCLLIB(PSAMPLE),DISP=SHR //SYSUT2 DD DSN=PIONEER.CONTROL.FILE,DISP=SHR //SYSPRINT DD SYSOUT=* //SYSIN DD DUMMY |
|
Step #4 |
//STEP4 EXEC PGM=IEBGENER //SYSUT1 DD DSN=IDF.PROD.JCLLIB(VSAMPLE),DISP=SHR //SYSUT2 DD DSN=VOYAGER.CONTROL.FILE,DISP=SHR //SYSPRINT DD SYSOUT=* //SYSIN DD DUMMY |
-
Modify the jobcard information to meet your installation standards.
-
For each DSN, "PIONEER" is the HLQ for PIONEER files, and "VOYAGER" is the HLQ for VOYAGER files. You are encouraged to change the HLQ to meet you individual installation standards.
-
For each DSN, edit the SYSUT1 value to define the member to be loaded.
-
For each DSN, edit the SYSUT2 value to define the sequential or flat file into which the member will be loaded.
-
Submit the job and review the output. Successful RC is 0000.
The IEBCOPYL member copies the Top Secret exit and caching module (TSSINSTX and LOGCACHE) into the installation Top Secret Load library.
Table 3-8 lists the IEBCOPYL variables and the corresponding sample value.
Table 3-8 IEBCOPYL Variables and Sample Values
IEBCOPYL Variable Sample Value Jobcard Information
//IEBCOPYL JOB SYSTEMS,MSGLEVEL=(1,1),
// MSGCLASS=X,CLASS=A,PRTY=8,
// NOTIFY=&SYSUID,REGION=4096K
INDD
DSN=IDF.PROD.LINKLIB
OUTDD
DSN=YOUR.LPALIB
Note:
If your host mainframe has the TSSINSTX exit already in place, then it is your responsibility to integrate the exit. The TSSINSTX exit is loaded through the Top-Secret STC (TSS) or by command.-
Modify the jobcard information to meet your installation standards.
-
Review and modify the INDD DSN to meet your installation standards.
-
Review and modify the OUTDD DSN to match the LPALIB in your installation.
-
Submit the job and review the output. Successful RC is 0000.
The IEBCOPYP member is an IEBCOPY file copy stream that copies a PROG member to an installation-defined parameter library.
Table 3-9 lists the IEBCOPYP variables and the corresponding sample values.
Table 3-9 IEBCOPYP Variables and Sample Values
IEBCOPYP Variable Sample Value Jobcard Information
//IEBCOPYP JOB SYSTEMS,MSGLEVEL=(1,1),
// MSGCLASS=X,CLASS=A,PRTY=8,
// NOTIFY=&SYSUID,REGION=4096K
INDD1
DSN=IDF.PROD.PARMLIB
OUTDD1
DSN=YOUR.PARMLIB
-
Modify the jobcard information to meet your installation standards.
-
Review and modify the INDD1 DSN to meet your installation standards.
-
Review and modify the OUTDD1 DSN to match the destination installation parameter library name (Parmlib) for the PROG member. The member PROGID sets APF authorization dynamically for IDF.LINKLIB. This can be added to an existing PROGxx member, if desired.
-
Submit the job and review the output. Successful RC is 0000
The IEBCPYPR member is an IEBCOPY file copy stream for the STC procedures and other procedures used by the product. PIONEER, VOYAGER, STARTUP and WRAPUP are Started Tasks (STC) procedures. The STARTUP and WRAPUP procedures allocate the subpool (231) cache (STARTUP) and delete the subpool (231) cache (WRAPUP) for Voyager. Startup must be run prior to Voyager to allocate the subpool (231) area used by VOYAGER. WRAPUP is to be executed after VOYAGER completes processing to free the subpool (231) area allocated by STARTUP and utilized by VOYAGER. See Section 3.1, "Reviewing Deployment Requirements" for further information.
Table 3-10 lists the IEBCPYPR variables and the corresponding sample values.
Table 3-10 IEBCPYPR Variables and Sample Values
IEBCPYPR Variable Sample Value Jobcard Information
//IEBCPYPR JOB SYSTEMS,MSGLEVEL=(1,1),
// MSGCLASS=X,CLASS=A,PRTY=8,
// NOTIFY=&SYSUID,REGION=4096K
INDD2
DSN=IDF.PROD.PROCLIB
OUTDD2
DSN=YOUR.HLQ.PROCLIB
-
Modify the jobcard information to meet your installation standards.
-
Review and modify the INDD2 DSN to meet your installation standards.
-
Review and modify the OUTDD2 DSN to match the installation procedure library name.
-
Submit the job and review the output. Successful RC is 0000.
Note:
Files should not be shared in a SYSPLEX. Each Pioneer and Voyager must have their own set of files.Table 3-11 CREATEXP (Optional CFILE) Variables and Values
CREATEXP Variable Below Values as Shipped //INDD1
DD DSN=YOURHLQ.CFILE.FILE,DCB=(DSORG=PS,RECFM=( <FB|VB> ). This DD is only for customers who do not have a CFILE. It can be created as a RECFM=FB or RECFM=VB.
//INDD2
DD DSN=YOURHLQ.CFILE.OUT,DCB=(DSORG=PS,RECFM=FB,LRECL=320,BLKSIZE=0),UNIT=your-UNIT-name,SPACE=(CYL,???),DISP=(NEW,CATLG), this file is required whether the CFILE is RECFM=FB or RECFM=VB.
//INDD3
DD DSN=YOURHLQ.EXPORTIN.FILE,DCB=(DSORG=PS,RECFM=FB,LRECL=320,BLKSIZE=0),
UNIT=your-UNIT-name,SPACE=(CYL,???),DISP=(NEW,CATLG), this file is required whether the CFILE is RECFM=FB or RECFM=VB.
-
Modify the jobcard information to meet your installation standards.
-
Review and modify the INDD1,2,3 to meet your installation standards.
-
Submit the job and review the output. Successful RC is 0000.
Note:
Files should not be shared in a SYSPLEX. Each Pioneer and Voyager must have their own set of files. -
3.4 Installing or Integrating the Reconciliation Agent Exit
After copying TSSINSTX and LOGCACHE to the installation CA Top-Secret Load Library (using the IEBCOPYL job stream), the Reconciliation Top-Secret exit has to be activated. If the destination Load Library is a Linklist, then an IPL is required to complete installation or integration of the Reconciliation Agent exit.
To allow the LDAP Gateway to fully capture events, the Reconciliation Agent and its exit must be installed on each LPAR that shares the authentication repository.
The following are the guidelines on using the Reconciliation Agent exit:
-
The Reconciliation Agent is installed in a z/OS Load Library for execution.
-
The exit (TSSINSTX) must be accessible by the operating system after the IPL is started.
-
The exit must be active and the subpool that contains TSS events must be active. If the exit is not active or if the subpool is not activated (by executing STARTUP), then CA Top Secret events are not captured and sent to the LDAP Gateway.
-
In a single-LPAR environment, the Reconciliation Agent is required for real-time reconciliation event capture and the Provisioning Agent is required for provisioning.
-
In a multiple-LPAR environment where the CA Top Secret database is shared, a master LPAR runs the Reconciliation Agent and Provisioning Agent. In addition, TSSINSTX must be installed and the subpool must be active.
All CA Top Secret events from other LPARs are sent through the CPF to the master.
If the CPF is not installed, then events are not captured and the Reconciliation Agent and Provisioning Agent are required on each LPAR.
The procedure that you must perform depends on whether or not other exits have already been installed:
-
See Section 3.4.1, "Installing the Reconciliation Agent Exit" if there are no other exits installed on the mainframe.
-
See Section 3.4.2, "Integrating the Reconciliation Agent Exit" if there are other exits installed on the mainframe.
3.4.1 Installing the Reconciliation Agent Exit
Note:
Perform the procedure described in this section only if there are no other exits installed on the mainframe. See Section 3.4.2, "Integrating the Reconciliation Agent Exit" if there are other exits installed on the mainframe.To install the Reconciliation Agent exit:
-
Use the IEBCOPYL job stream to copy the TSSINSTX exit to the CA Top-Secret Load Library.
-
Perform an IPL on IBM z/OS.
-
To activate the exit code, perform any one of the following steps:
-
Run the following command from the IBM z/OS operator's console:
F TSS,EXIT(ON)
-
Modify the parmlib member (for example, TSSPARM0) of CA Top Secret by changing
EXIT(OFF)toEXIT(ON). After you change the parameter, run theP TSSz/OS command and then run theS TSScommand.
-
Note:
There is only one exit within a CA Top Secret environment. Typically, a production deployment has its own custom changes already written into the exit. The exit supplied with the connector differs from the CA Top Secret supplied exit with the addition of three calls to external programs.To verify that the exit loaded successfully, run the following command:
-
From z/OS master console
F TSS,MODIFY,STATUS -
From TSO
TSS MODIFY STATUS
To deactivate the exit, run the following command:
F TSS,EXIT(OFF)
3.4.2 Integrating the Reconciliation Agent Exit
Note:
Perform the procedure described in this section only if there are other exits installed on the mainframe. See Section 3.4.1, "Installing the Reconciliation Agent Exit" if there are no other exits installed on the mainframe.If one or more third-party modules have been installed with the CA Top Secret (TSSINSTX) exit, then integration is required. This integration can be accomplished through code modification of either the Reconciliation Agent exit or the third-party exit. This should be done by qualified personnel well versed in MVS Assembler Language. If Oracle/IDF source is required for integration then an SR must be opened up with Oracle Support. This will then be reviewed.
3.5 Set APF Authorization for Pioneer and Voyager
The executable code (IBM z/OS loadlibs) of Pioneer and Voyager must be APF authorized. This can be achieved by running a dynamic set command (T PROD=ID) or by placing the installation loadlib containing Pioneer and Voyager in the IBM z/OS link list.
Note:
IBM® provides the PROGxx parmlib member as an alternative to IEAAPFxx, which allows you to update the APF list dynamically and specify an unlimited number of APF-authorized libraries. IBM suggests that you use PROGxx to specify the APF list (regardless of whether you plan to take advantage of the dynamic update capability). The system will process IEAAPFxx and PROGxx if both parameters are specified. If you decide to use PROGxx only, remove APF=xx system parameters from IEASYSxx and IEASYS00.
3.6 Creating a CA Top Secret Account for Connector Operations
The Reconciliation Agent and Provisioning Agent require a CA Top Secret ACID to which the permissions required for connector operations are applied. The following is an example of the commands to be run:
Note:
In these sample steps, VOYAGER and PIONEER are ACIDs. This ID must be an administrator ID and with the permissions required to perform operations such as Create, Add, Addto, Replaces, and Changes. The following definitions are only an example in a test type environment. The installation may have more or less restrictions depending on the overall security policy of the installation.
CREATE(VOYAGER) TYPE(USER) NAME('VOYAGER ACID') PASSWORD(NOPW,0) FAC(STC)
ADD(VOYAGER) GROUP(OMVSGRP)
ADD(VOYAGER) DFLTGRP(OMVSGRP)
ADD(VOYAGER) GID(1)
PERMIT(VOYAGER) DSNAME(yourhlq.CACHESAV) ACCESS(UPDATE
PERMIT(VOYAGER) DSNAME(yourhlq.CONTROL.FILE) ACCESS(READ)
Note:
The Provisioning Agent is a TYPE(SCA) CA Top Secret full function Admin ID.
CREATE(PIONEER) TYPE(SCA) NAME('PIONVGR') PASSWORD(NOPW) FACILITY(BATCH,STC)
ADD(PIONEER) UID(0) GROUP(OMVSGRP) DFLTGRP(OMVSGRP) HOME(/) OMVSPGM(/BIN/SH)
ADDTO(STC) PROCNAME(PIONEER) ACID(PIONEER)
PERMIT(PIONEER) IBMFAC(BPX.*) ACCESS(READ)
PERMIT(PIONEER) IBMFAC(IRR.RADMIN.*) ACCESS(READ)
PERMIT(PIONEER) DSNAME(yourhlq.CONTROL.FILE) ACCESS(READ)
PERMIT(PIONEER) DSNAME(yourhlq.INJCL.LIBRARY) ACCESS(READ)
PERMIT(PIONEER) DSNAME(yourhlq.IDCAMS.LSTOUT) ACCESS(UPDATE)
PERMIT(PIONEER) DSNAME(yourhlq.RECON.LIBRARY) ACCESS(READ)
PERMIT(PIONEER) DSNAME(yourhlq.RECON.FILE) ACCESS(UPDATE)
PERMIT(PIONEER) DSNAME(yourhlq.EXPORT.FILE) ACCESS(UPDATE)
ADMIN(PIONEER) DATA(ALL)
ADMIN(PIONEER) ACID(ALL)
ADMIN(PIONEER) MISC2(ALL)
ADMIN(PIONEER) MISC8(ALL)
ADMIN(PIONEER) MISC9(ALL)
ADMIN(PIONEER) FAC(ALL)
Note:
The preceding Top-Secret authorities and permissions are a starting point, each Top-Secret environment is different in regards to access.Pioneer needs access to OMVS because of the TCPIP socket usage. This is normal for any Socket Server or Client. The ACCESS(UPDATE) on the above datasets is required for Pioneer to read and then clear (delete) the records in the files.
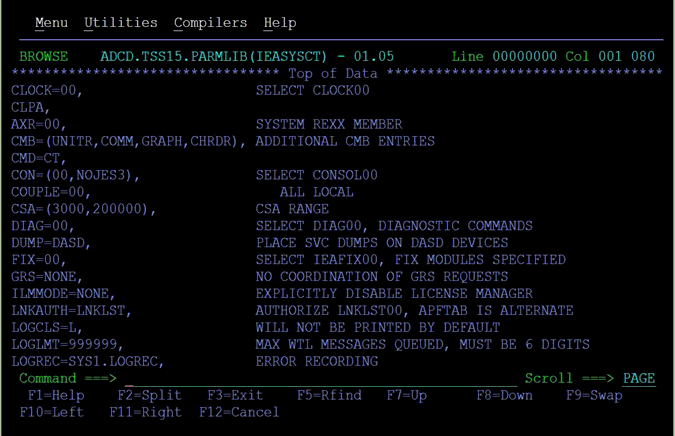
To extract the long FDTNAMES, Pioneer and Voyager use IBM's System Rexx product. The following screenshot of sys1.parmlib(ieasysct) shows the requirement of this product:
The following screenshot of sys1.parmlib(AXR00) shows the requirement of this product and lists the dataset DCB attributes:
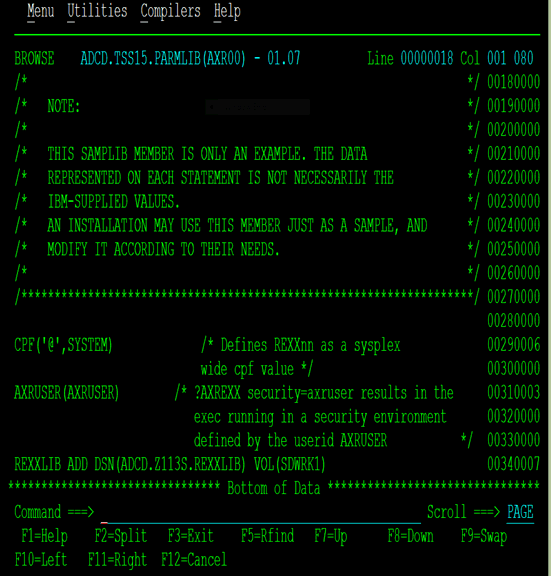
CPF('@',SYSTEM) /* Defines REXXnn as a sysplex wide cpf value */
AXRUSER(AXRUSER) /* ?AXREXX security=axruser results in the exec running in a security environment defined by the userid AXRUSER */

Note: As a reminder the active (SYS1.PARMLIB(IEASYSnn)) will need to contain:
AXR=  provides the name of the parmlib member in use (AXRxx) that specifies the System REXX options,REXXLIB ADD DSN(ADCD.Z113S.REXXLIB) VOL(SDWRK1)
Refer to "IBM Knowledge Center" for more information about IEASYSxx parameters.

The supplied REXXLIB is "sys1.saxrexec". This separates the RACF connector Rexx clists from the IBM Rexx clist.
IBM Shipped "AXRNN" STC Procedure:
//AXRNN    PROC
//EXEC PGM=AXRRXTSS
For the interface with IBM System Rexx:
-
Define AXRUSER
CREATE(AXRUSER) TYPE(USER) NAME('IBM-SYSTEM-REXX') PASSWORD(NOPW,0) FAC(STC,BATCH) ADD(AXRUSER) GROUP(OMVSGRP) ADD(AXRUSER) DFLTGRP(OMVSGRP) ADD(AXRUSER) GID(??) ADD(STC) PROC(AXR) ACID(AXRUSER) ADD(AXRUSER) HOME(/) OMVSPGM(/???????) PERMIT(AXRUSER) SURROGAT(SYSREXX.AXRUSER) ACCESS(UPDATE) -
Define AXRPSTRT
CREATE(AXRPSTRT) TYPE(USER) NAME('IBM-SYSTEM-REXX') PASSWORD(NOPW,0)FAC(STC,BATCH) ADD(AXRPSTRT) GROUP(OMVSGRP) ADD(AXRPSTRT) DFLTGRP(OMVSGRP) ADD(AXRPSTRT) GID(??) ADD(STC) PROC(AXR) ACID(AXRPSTRT) ADD(AXRPSTRT) HOME(/) OMVSPGM(/???????) PERMIT(AXRUSER) SURROGAT(SYSREXX.AXRUSER) ACCESS(UPDATE) -
IBM References for IBM System Rexx
MVS Programming: Authorized Assembler Services Guide
SA22-7608-17
Note:
The installation where IBM System Rexx is being used may require more or different CA-Top Secret Security Definitions.
3.7 Summary of the Deployment Procedure
The following steps summarize the procedure to deploy the connector components on the target system:
-
Review and address the deployment requirements.
-
Extract the deployment files from the distribution .zip archive file.
-
Upload the files with an .xmi extension to the z/OS host.
-
Extract all mainframe XMIT files.
-
Modify the mainframe batch job files to match the settings of your target system installation.
-
Submit batch job streams to z/OS for execution and verify jobs completed successfully.
-
Activate and load the exits.
-
Create a CA Top Secret ACID for reconciliation and provisioning operations.
-
Add Pioneer/Voyager to the Facility Class Profiles (BPX and IRR).
-
Test the installation.
3.8 Configuring the Started Tasks
The JCL for the Pioneer Started Task (STC):
//PIONEER  EXEC PGM=PIONEERX,REGION=0M,TIME=1440
//JCLOUTP   DD SYSOUT=*
//PARMOUT   DD SYSOUT=*
//AUDTLOG   DD SYSOUT=*
//EXPTLOG   DD SYSOUT=*
//SYSOUT    DD SYSOUT=*
//DEBUGOUT  DD SYSOUT=*
//PARMFLE   DD DISP=SHR,DSN=PIONEER.CONTROL.FILE
//INJCLR    DD DISP=SHR,DSN=PIONEER.INJCL.LIBRARY
//LISTINR   DD DISP=SHR,DSN=PIONEER.ALIAS.LSTOUT,
//             DCB=(RECFM=VB,LRECL=137)
//RECONJCL  DD DISP=SHR,DSN=PIONEER.RECON.LIBRARY
//RECONOUT  DD DISP=SHR,DSN=PIONEER.RECON.FILE
//EXPORTIN  DD DISP=SHR,DSN=PIONEER.EXPORTIN.FILE
//SYSPUNCH DD SYSOUT=(*,INTRDR)
//SYSPRINT DD SYSOUT=*
//SYSUDUMP DD SYSOUT=X
Pioneer Control File Parameter (DD:PARMFLE) Explanations
Table 3-12 lists the parameters of Pioneer control file.
Table 3-12 Pioneer Control File Parameters
| Parameter | Sample Value | Description |
|---|---|---|
|
TCPN= |
TCPIP |
Name of the TPCIP STC where Pioneer is executing. This is required for socket allocations. The limit is 8 characters. |
|
ESIZE= |
16 |
This option controls encryption during provisioning operations. Do not change the value of this parameter. |
|
IPAD= |
0.0.0.0 |
This is the only value supported. |
|
PORT= |
5198 |
The port used for communication between the LDAP Gateway and the Mainframe. |
|
LPAR= |
ZOS-112 |
The name of the LPAR defined for the Provisioning Agent. The name can be up to 20 characters long. |
|
JWAIT= |
010 |
Wait time from 001-999 seconds used for ALIAS submission. |
|
RWAIT= |
015 |
Wait time from 001-999 seconds used for Search Batch submissions. |
|
POST_PROCESS_ALIAS= |
|
T = True honor Alias requests. F = False do not honor Alias requests. |
|
DEBUGOUT= |
SYSOUT,CLASS(Y) |
This parameter is used only when DEBUG=Y. Enter where to send DEBUG output and the JES2 output class that should be used. |
|
DEBUG= |
|
Whether to turn on debugging. Note: Setting to Y generates a large amount of output. |
|
IDLEMSG= |
|
"Y", show an IDLE message if Pioneer IDLE more than 60 minutes. "N" do not show. |
|
SPIN_CLASS= |
X is JES2 or JES3 class |
Used with DEBUGOUT when a close is issued from modify command to Pioneer. |
|
QUEUE_DSN= |
??????????????? |
Temporary dataset that is used for batch search submissions. This dataset is "created" and "deleted" by Rexx Batch clists. |
|
EXPORT_MON= |
|
Used for CFILE XML EXPORT. "NO" for no EXPORTS, "YES,REC=01000", for EXPORTS and provide a status process message for every 1000 ACIDS. |
|
AUDIT_LOG= |
|
Whether to turn on the audit log. AUDIT log will log LDAP and Pioneer processing requests. Output goes to AUDTLOG ddname of Pioneer. |
|
LONG_FDTNAMES= |
|
Pioneer will process FDTNAMES that are long (over 255 bytes), where DSN= a temporary file that contains the listed output. The DSN is preallocated through the System Rexx clists. |
The following is the JCL for the Voyager STC (Started Task procedure):
//VOYAGER  PROC
//STEP1    EXEC PGM=VOYAGERX,REGION=0M,TIME=1440
//STEPLIB  DD DISP=SHR,DSN=IDF.LINKLIB <--- IF NOT IN LINKLIST
//CACHESAV DD DSN=VOYAGER.CACHESAV,DISP=SHR
//DEBUGOUT DD SYSOUT=*
//SYSOUT   DD SYSOUT=*
//AUDTLOG  DD SYSOUT=*
//PARMOUT  DD SYSOUT=*
//PARMFLE  DD DISP=SHR,DSN=VOYAGER.CONTROL.FILE
//SYSPRINT DD SYSOUT=*
//SYSUDUMP DD SYSOUT=X
//
Sample Voyager Control file:
* comment                                   this is a comment
TCPN=TCPIP                                  same parameter as Pioneer
IPAD=100.100.100.100                        LDAP address
PORT=5190                                   LDAP listening port
DEBUG=Y                                     DEBUGGING is on
ESIZE=16                                    AES128 encryption (key size in bytes)
VOYAGER_ID=TESTVOY1                         Voyager identifier used by LDAP
CACHE_DELAY=002
AUDIT_LOG=YES                               AUDIT log desired
CONNECT_MSGS=Y
MSGID01=YES,IDMV602E,02
CONNECT_RETRY=999
CONNECT_INTV=10
LONG_FDTNAMES=Y,DSN=<yourhlq.datasetname>
Voyager Control File Parameter (Configuring DD: PARMFLE) Explanations
Table 3-13 lists parameters of Voyager control file.
Table 3-13 Voyager Control File Parameters
| Parameter | Sample Value | Description |
|---|---|---|
|
* |
Comment |
|
|
TCPN= |
|
Name of the TPCIP STC where Voyager is executing. This is required for socket allocations. The maximum limit is 8 characters. |
|
ESIZE= |
|
This option controls encryption during reconciliation operations. Do not change the value of this parameter. |
|
IPAD= |
|
IP address or hostname of the LDAP Gateway Host computer. |
|
PORT= |
|
The outgoing connection port for the Reconciliation Agent to connect to the LDAP Gateway. |
|
DEBUG= |
|
Whether to turn on debugging. Note: Setting to Y generates a large amount of output which goes to DEBUGOUT. |
|
VOYAGER_ID= |
|
An 8 character unique identifier that will be passed to the LDAP each time a reconciliation event occurs. The ID is used to identify the RACF database from which the reconciliation event was generated. If 8 LPARS, for example, are sharing 1 RACF database, all 8 LPARS must have the same VOYAGER_ID.The parameter value must match the file name of the corresponding VOYAGER_ID.properties located in the LDAP gateway installation. |
|
CACHE_DELAY= |
This must be a three-position numeric value. Examples: For no delay, use 000. This is adequate for most installations. For a two-second delay, use 002. |
The number of seconds that Voyager waits between issuing a write socket to the LDAP gateway. This parameter is only used for installations running Oracle Identity Manager. |
|
CONNECT_INTV=nn |
Must be a two-digit value. Example 05 = Five Seconds |
Number of seconds between retries to connect to LDAP if failure occurs. Use this parameter with the following entry: CONNECT_RETRY= |
|
CONNECT_MSGS |
|
Display LDAP connect messages. |
|
CONNECT_RETRY=nnn |
Must be a three-digit value. 001-998: Indicates the number of retries 999: Indicates unlimited retries |
Number of times to retry the LDAP Connection prior to AbEnd. Use this parameter with the following entry: CONNECT_INTV= |
|
MSGID01= |
|
Displays the "LDAP cannot connect" message according to the number of times configured in this parameter. |
|
AUDIT_LOG= |
|
This parameter logs LDAP and Voyager processing requests. |
|
LONG_FDTNAMES= |
|
Used with FDTNAMES over 255 bytes. The DSN= segment is a temporary file that contains the listed output. |
3.9 Pioneer and Voyager Operator Commands
The operator interface for Voyager and Pioneer, Polloper has been enhanced. Both STCs are single threaded. Table 3-14 lists the commands that are supported through the standard modify (F) interface.
Table 3-14 Pioneer and Voyager Operator Commands
| Command | Description |
|---|---|
|
F VOYAGER,SHUTDOWN |
Shuts down Voyager |
|
F VOYAGER,DEBUG=N |
Turns off DEBUG |
|
F VOYAGER,DEBUG=Y |
Turns on DEBUG |
|
F VOYAGER,STATUS |
Voyager Status |
|
F PIONEER,SHUTDOWN |
Shuts down Pioneer |
|
F PIONEER,STATUS |
Pioneer Status |
|
F PIONEER,DEBUG=Y |
Turns DEBUG on |
|
F PIONEER,DEBUG=N |
Turns DEBUG off |
3.10 Starting Up and Shutting Down the Reconciliation Agent
To start or stop the Voyager Agent:
-
VOYAGER as of 9.0.4.19 incorporates all the features of STARTUP and WRAPUP.
-
If you are starting a fresh run of Reconciliation Agent VOYAGER, first issue a "S STARTUP" to allocate the subpool (231) area used by VOYAGER.
-
Start the VOYAGER agent by running "S Voyager" from the console or SDSF in TSO.
-
To quiesce VOYAGER while leaving the subpool intact, stop VOYAGER by running "F VOYAGER.SHUTDOWN" from the console.
-
To quiesce VOYAGER and destroy the subpool, issue a "F VOYAGER,SHUTDOWN" and also issue a WRAPUP by running "S WRAPUP" from the console. User of WRAPUP will cause any messages stored in the subpool to be lost.
-
VOYAGER polls storage for events when they enter through TSO, BATCH or through Pioneer(LDAP) connection. VOYAGER reads all the available messages and processes them.
Note:
-
Events detected by the Voyager Agent through the TSSINSTX installation exit are built into messages and passed to the LDAP Gateway.
-
The messages are securely sent to the LDAP Gateway using AES128 encryption. If the LDAP Gateway is not running, then messages are held until the LDAP Gateway is returned to service and also secured in an AES-encrypted file on the mainframe. The messages are sent when the Gateway resumes running.
3.11 Removing the Exit
To remove the TSSINSTX exit, run the following command from the IBM z/OS operator's console:
F TSS,EXIT(OFF)