4 Extending the Functionality of the Connector
After you deploy the connector, you can configure it to meet your requirements. This chapter discusses the following optional configuration procedures:
Note:
If you are using Oracle Identity Manager 11.1.2 or later and modify the parent form (add or delete an attribute), then edit the application instance in usage and create a new form and make it active.-
Section 4.1, "Adding New Attributes for Target Resource Reconciliation"
-
Section 4.2, "Adding New Multivalued Attributes for Target Resource Reconciliation"
-
Section 4.3, "Adding New Attributes for Trusted Source Reconciliation"
-
Section 4.5, "Adding New Attributes for Provisioning Groups and Roles"
-
Section 4.6, "Adding New Multivalued Attributes for Provisioning"
-
Section 4.7, "Adding Custom Object Classes for Provisioning"
-
Section 4.8, "Adding New Object Classes for Provisioning and Reconciliation"
-
Section 4.10, "Configuring Transformation of Data During Reconciliation"
4.1 Adding New Attributes for Target Resource Reconciliation
Note:
This section describes an optional procedure. Perform this procedure only if you want to add new attributes for target resource reconciliation.You must ensure that new attributes you add for reconciliation contain only string-format data. Binary attributes must not be brought into Oracle Identity Manager natively.
By default, the attributes listed in Section 1.6, "Connector Objects Used During Target Resource Reconciliation and Provisioning" are mapped for reconciliation between Oracle Identity Manager and the target system. If required, you can add new attributes for target resource reconciliation.
To add a new attribute for target resource reconciliation, perform the following procedure:
-
Log in to the Oracle Identity Manager Design Console.
-
Add the new attribute on the OIM User process form as follows:
-
Expand Development Tools.
-
Double-click Form Designer.
-
Search for and open the eDirectory User.
-
Click Create New Version.
-
In the Label field, enter the version name. For example,
version#1. -
Click the Save icon.
-
Select the current version created in Step e from the Current Version list.
-
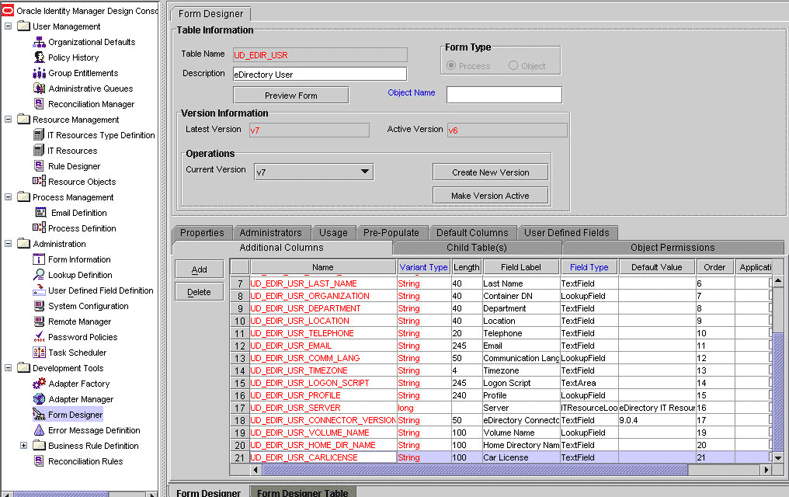
Click Add to create a new attribute, and provide the values for that attribute.
For example, if you are adding the Car License attribute, then enter the following values on the Additional Columns tab:
Field Value Name Car License Variant Type String Length 100 Field Label Car License Order 20 The following screenshot shows this form:
-
Click the Save icon.
-
Click Make Version Active.
-
-
Add the new attribute to the list of reconciliation fields in the resource object as follows:
-
Expand Resource Management.
-
Double-click Resource Objects.
-
Search for and open the eDirectory User resource object.
-
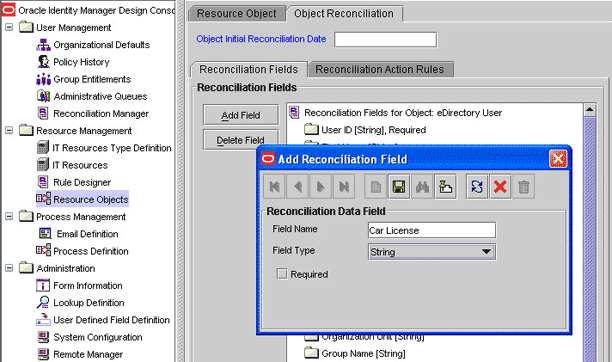
On the Object Reconciliation tab, click Add Field, and then enter the following values:
Field Name:
Car LicenseField Type:
StringThe following screenshot shows this form:
-
If you are using Oracle Identity Manager release 11.1.x, then click Create Reconciliation Profile. This copies changes made to the resource object into the MDS.
-
Click the Save icon.
-
-
Create a reconciliation field mapping for the new attribute in the process definition as follows:
-
Expand Process Management.
-
Double-click Process Definition.
-
Search for and open the eDirectory User PD process definition.
-
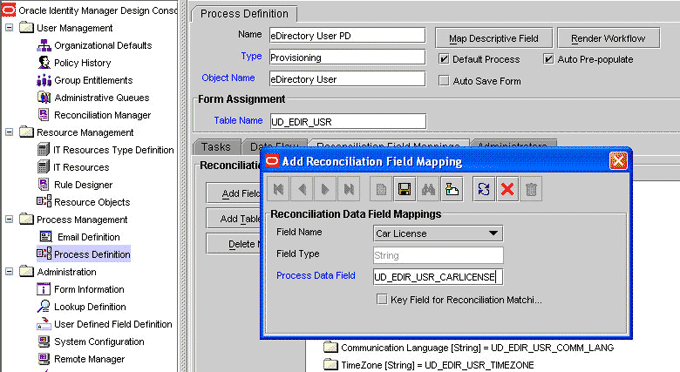
On the Reconciliation Field Mappings tab, click Add Field Map, and then select the following values:
Field Name:
Car LicenseField Type:
StringProcess Data Field:
carLicenseThe following screenshot shows this form:
-
Click the Save icon.
-
-
Create an entry for the attribute in the lookup definition for reconciliation as follows:
-
Expand Administration.
-
Double-click Lookup Definition.
-
Search for and open the AttrName.Recon.Map.EDIR lookup definition.
-
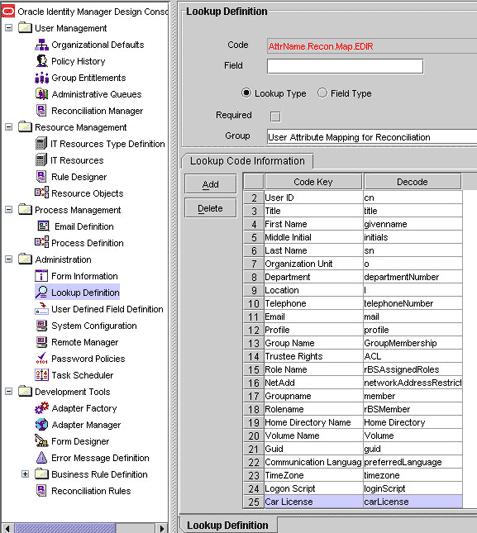
Click Add and enter the Code Key and Decode values for the attribute. The Code Key value must be the name of the attribute given in the resource object. The Decode value is the name of the attribute in the target system.
For example, enter
Car Licensein the Code Key field and then entercarLicensein the Decode field.The following screenshot shows this form:
-
Click the Save icon.
-
-
If you are using Oracle Identity Manager release 11.1.2 or later, create a new UI form and attach it to the application instance to make this new attribute visible. See Section 2.3.1.3, "Creating a New UI Form" and Section 2.3.1.7, "Updating an Existing Application Instance with a New Form" for the procedures.
4.2 Adding New Multivalued Attributes for Target Resource Reconciliation
Note:
This section describes an optional procedure. Perform this procedure only if you want to add new multivalued fields for reconciliation. This procedure can be applied to add user, group, or role attributes.You must ensure that new attributes you add for reconciliation contain only string-format data. Binary attributes must not be brought into Oracle Identity Manager natively.
By default, only the UserGroup, UserRole, Trustee Rights, and Network Address Restriction multivalued attributes are mapped for user reconciliation between Oracle Identity Manager and the target system. If required, you can add new multivalued attributes for user reconciliation.
By default, no multivalued attributes are mapped for reconciliation between Oracle Identity Manager and the target system for groups and roles. If required, you can add new multivalued attributes for reconciliation of groups or roles.
To add a new multivalued attribute for target resource reconciliation:
-
Log in to the Oracle Identity Manager Design Console.
-
Create a form for the multivalued attribute as follows:
-
Expand Development Tools.
-
Double-click Form Designer.
-
Create a form by specifying a table name and description, and then click Save.
-
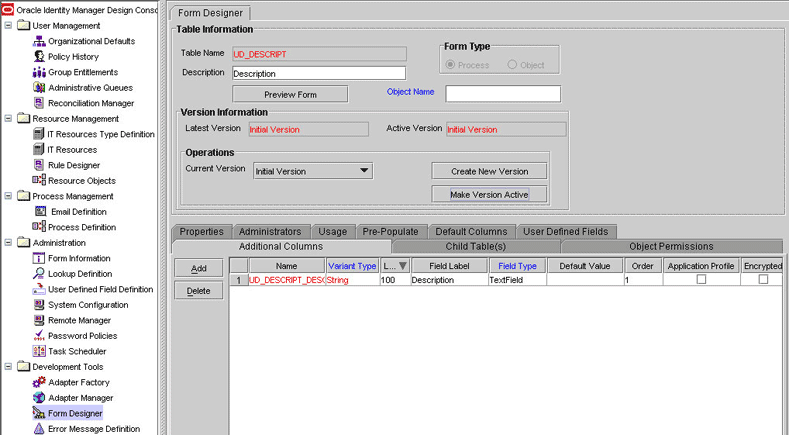
Click Add and enter the details of the attribute.
The following screenshot shows this form:
-
Click Save and then click Make Version Active.
-
-
Add the form created for the multivalued attribute as a child form of the process form as follows:
-
Perform one of the following steps:
-
For users, search for and open the UD_EDIR_USR process form.
-
For groups, search for and open the UD_EDIR_GR process form.
-
For roles, search for and open the UD_EDIR_RL process form.
-
-
Click Create New Version.
-
Click the Child Table(s) tab.
-
Click Assign.
-
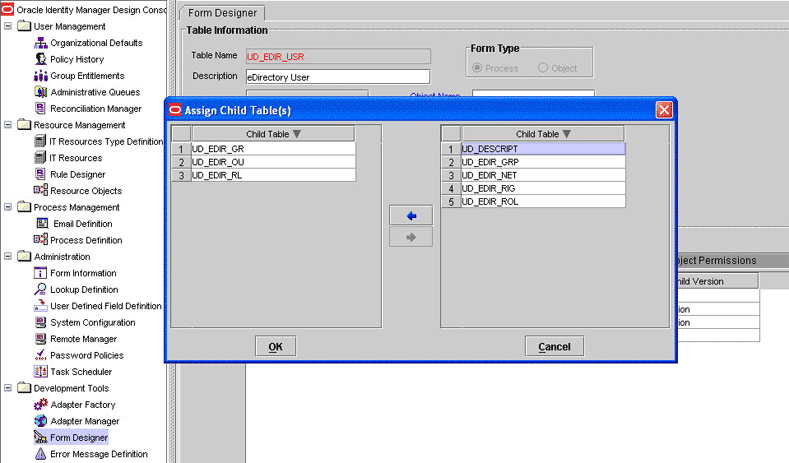
In the Assign Child Tables dialog box, select the newly created child form, click the right arrow, and then click OK.
The following screenshot shows this form:
-
Click Save and then click Make Version Active.
-
-
Add the new attribute to the list of reconciliation fields in the resource object as follows:
-
Expand Resource Management.
-
Double-click Resource Objects.
-
Perform one of the following steps:
-
For users, search for and open the eDirectory User resource object.
-
For groups, search for and open the eDirectory Group resource object.
-
For roles, search for and open the eDirectory Role resource object.
-
-
On the Object Reconciliation tab, click Add Field.
-
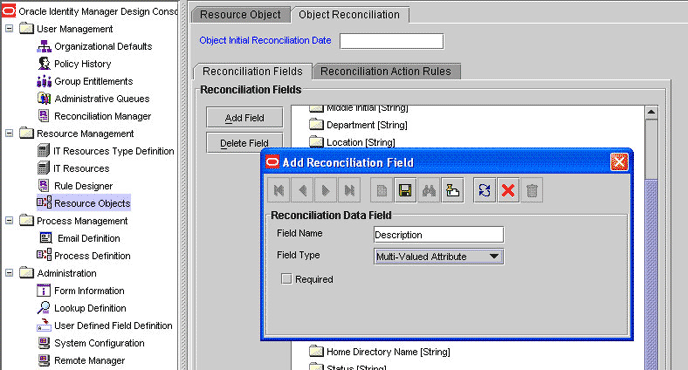
In the Add Reconciliation Fields dialog box, enter the details of the attribute.
For example, enter
Descriptionin the Field Name field and select Multi Valued Attribute from the Field Type list.The following screenshot shows this form:
-
Click Save and then close the dialog box.
-
Right-click the newly created attribute.
-
Select Define Property Fields.
-
In the Add Reconciliation Fields dialog box, enter the details of the newly created field.
For example, enter
Descriptionin the Field Name field and select String from the Field Type list. -
Click Save, and then close the dialog box.
-
If you are using Oracle Identity Manager release 11.1.x, then click Create Reconciliation Profile. This copies changes made to the resource object into the MDS.
-
-
Create a reconciliation field mapping for the new attribute as follows:
-
Expand Process Management.
-
Double-click Process Definition.
-
Perform one of the following steps:
-
For users, search for and open the eDirectory User PD process form.
-
For groups, search for and open the eDirectory Group process form.
-
For roles, search for and open the eDirectory Role process form.
-
-
On the Reconciliation Field Mappings tab of the process definition, click Add Table Map.
-
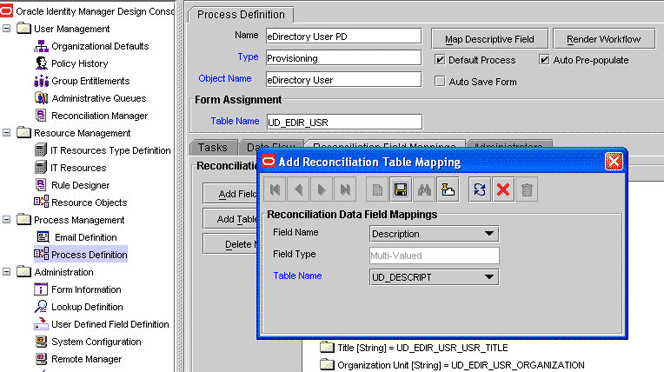
In the Add Reconciliation Table Mapping dialog box, select the field name and table name from the list, click Save, and then close the dialog box.
The following screenshot shows this form:
-
Right-click the newly created field, and select Define Property Field Map.
-
In the Field Name field, select the value for the field that you want to add.
-
Double-click the Process Data Field field, and then select the required data field.
-
Select the Key Field for Reconciliation Mapping check box, and then click Save.
-
-
Create an entry for the attribute in the lookup definition for reconciliation as follows:
-
Expand Administration.
-
Double-click Lookup Definition.
-
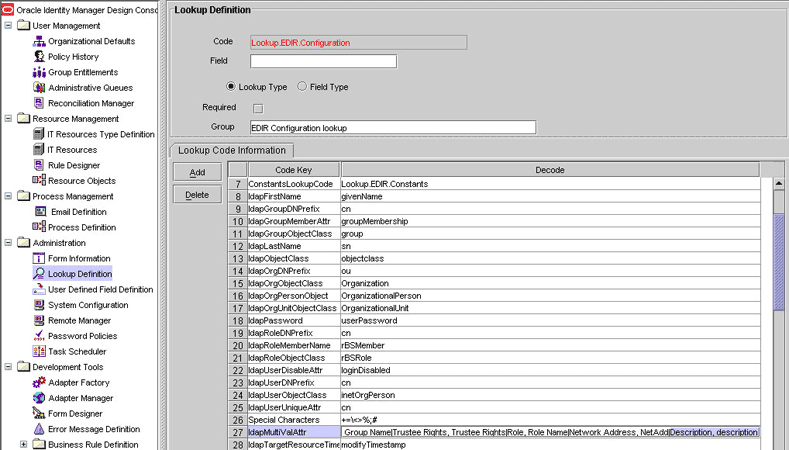
For a user attribute, search for and open the Lookup.EDIR.Configuration lookup definition. Then, search for the
ldapMultiValAttrCode Key value.If you do not want to reconcile multivalued attributes, then accept the default Decode value
[NONE].If you want to reconcile a multivalued attribute, then enter a Decode value in the following format:
RECONCILIATION FIELD NAME OF ATTRIBUTE,PROPERTY NAME OF THE RECONCILIATION FIELD
For example:
Description,descriptionIf you want to reconcile more than one multivalued attribute, then enter a Decode value in the following format:
RECONCILIATION FIELD NAME OF ATTRIBUTE 1,PROPERTY NAME OF THE RECONCILIATION FIELD 1| RECONCILIATION FIELD NAME OF ATTRIBUTE 2,PROPERTY NAME OF THE RECONCILIATION FIELD 2| . . .
For example:
Description,description|group,groupnameThe following screenshot shows this form:
-
If you are adding a group or role multivalued attribute, then perform one of the following steps:
-
For groups, search for and open the AttrName.ReconGroup.Map.EDIR lookup definition.
-
For roles, search for and open the AttrName.ReconGroup.Map.EDIR lookup definition.
-
-
In the lookup definition, add an entry for the multivalued attribute:
-
Code Key: Enter the name of the attribute that you add on the process form.
-
Decode: Enter the name of the attribute displayed on the target system, which you recorded earlier in this procedure.
-
-
Perform one of the following steps:
-
For users, search for and open the AttrName.Prov.Map.EDIR lookup definition.
-
For groups, search for and open the AttrName.ProvGroup.EDIR.Map lookup definition.
-
For roles, search for and open the AttrName.ProvRole.EDIR.Map lookup definition.
-
-
In the lookup definition, add an entry for the attribute that you want to add:
-
Code Key: Enter the name of the attribute that you add on the process form.
-
Decode: Enter the name of the attribute displayed on the target system, which you recorded earlier in this procedure.
-
-
-
If you are using Oracle Identity Manager release 11.1.2 or later, create a new UI form and attach it to the application instance to make this new attribute visible. See Section 2.3.1.3, "Creating a New UI Form" and Section 2.3.1.7, "Updating an Existing Application Instance with a New Form" for the procedures.
If you have added multivalued group or role attributes, then you must specify the Decode values of the newly added attributes as a value of the Multivalue Attribute attribute of the scheduled task. See Section 3.3.4.2, "Group and Role Reconciliation Scheduled Task" for more information.
4.3 Adding New Attributes for Trusted Source Reconciliation
Note:
This section describes an optional procedure. Perform this procedure only if you want to add new multivalued attributes for target resource reconciliation.You must ensure that new attributes you add for reconciliation contain only string-format data. Binary attributes must not be brought into Oracle Identity Manager natively.
By default, the attributes listed in Section 1.7.1, "User Attributes for Trusted Source Reconciliation" are mapped for reconciliation between Oracle Identity Manager and the target system. If required, you can add new attributes for trusted resource reconciliation as follows:
-
Log in to the Oracle Identity Manager Design Console.
-
Add the new attribute on the Xellerate User process form as follows:
-
Expand Administration.
-
Double-click User Defined Field Definition.
-
Search for and open the Users form.
-
Click Add.
-
In the User Defined Fields dialog box, enter the details of the attribute.
For example, if you are adding the Title attribute, then enter the following details in the User Defined Fields dialog box:
-
In the Label field, enter
Title. -
From the Data Type list, select String.
-
From the Field Type list, select Text Field.
-
In the Column Name field, enter
USR_UDF_TITLE. -
In the Field Size field, enter
100.
The following screenshot shows this form:

-
-
Click Save.
-
-
Add the new attribute to the list of reconciliation fields in the resource object as follows:
-
Expand Resource Management.
-
Double-click Resource Objects.
-
Search for and open the Xellerate User resource object.
-
On the Object Reconciliation tab, click Add Field.
-
Enter the details of the attribute.
For example, enter
Titlein the Field Name field and select String from the Field Type list.The following screenshot shows this form:

-
If you are using Oracle Identity Manager release 11.1.x, then click Create Reconciliation Profile. This copies changes made to the resource object into the MDS.
-
Click Save.
-
-
Create a reconciliation field mapping for the new attribute in the process definition as follows:
-
Expand Process Management.
-
Double-click Process Definition.
-
Search for and open the Xellerate User process definition.
-
On the Reconciliation Field Mappings tab, click Add Field Map.
-
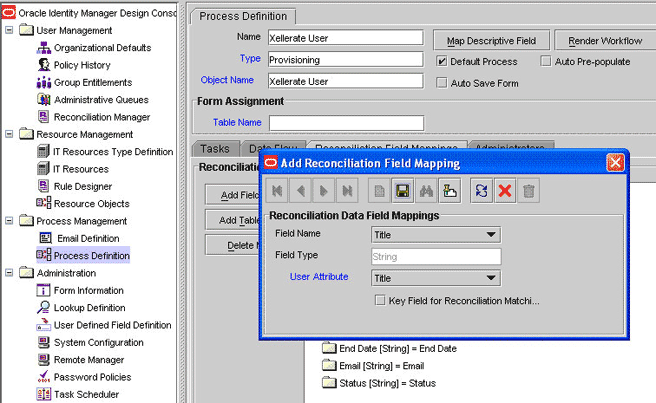
In the Field Name field, select the value for the attribute that you want to add.
For example, select
Title = Title.The following screenshot shows this form:
-
Click Save.
-
-
Create an entry for the attribute in the lookup definition for reconciliation as follows:
-
Expand Administration.
-
Double-click Lookup Definition.
-
Search for and open the AttrName.Recon.Map.EDIR lookup definition.
-
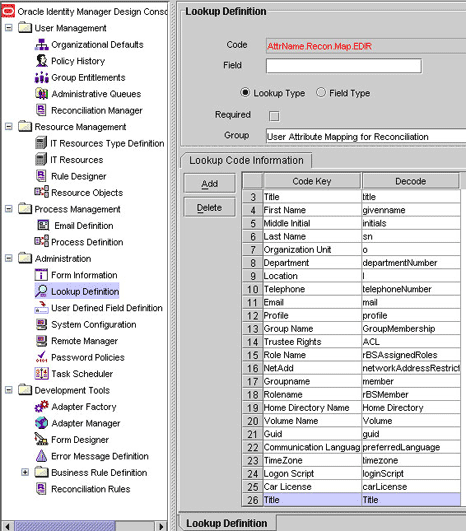
Click Add and enter the Code Key and Decode values for the attribute. The Code Key value must be the name of the attribute given in the resource object. The Decode value is the name of the attribute in the target system.
For example, enter
Titlein the Code Key field and then enterTitlein the Decode field.The following screenshot shows this form:
-
Click Save.
-
-
If you are using Oracle Identity Manager release 11.1.2 or later, create a new UI form and attach it to the application instance to make this new attribute visible. See Section 2.3.1.3, "Creating a New UI Form" and Section 2.3.1.7, "Updating an Existing Application Instance with a New Form" for the procedures.
4.4 Adding New Attributes for Provisioning Users
Note:
-
This section describes an optional procedure. You need not perform this procedure if you do not want to add new user attributes for provisioning.
-
Before starting the following procedure, perform Steps 1 and 2 as described in Section 4.1, "Adding New Attributes for Target Resource Reconciliation." If these steps have been performed while adding new attributes for target resource reconciliation, then you need not repeat the steps.
By default, the attributes listed in Section 1.6.1, "User Attributes for Target Resource Reconciliation and Provisioning" are mapped for provisioning between Oracle Identity Manager and the target system. If required, you can map additional attributes for provisioning.
To add a new attribute for provisioning users:
-
Create an entry for the attribute in the lookup definition for provisioning as follows:
-
Expand Administration.
-
Double-click Lookup Definition.
-
Search for and open the AttrName.Prov.Map.EDIR lookup definition.
-
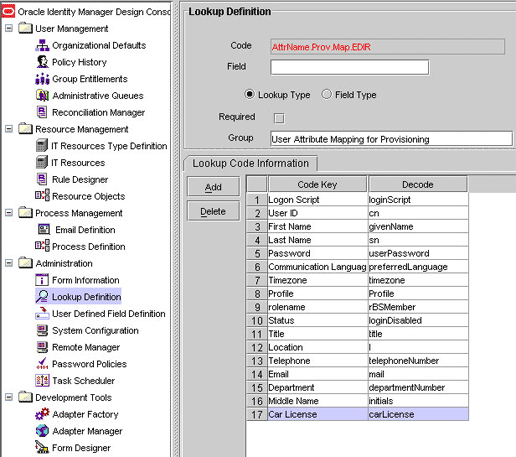
Click Add and enter the Code Key and Decode values for the attribute. The Code Key value must be the name of the attribute given in the resource object. The Decode value is the name of the attribute on the target system.
For example, enter
Car Licensein the Code Key field and then entercarLicensein the Decode field.The following screenshot shows this form:
-
Click the Save icon.
-
-
To enable the update of a new attribute for provisioning a user, create a process task for the new attribute as follows:
-
Expand Process Management.
-
Double-click Process Definition and open the eDirectory User PD process definition.
-
In the process definition, add a new task for updating the field as follows:
-
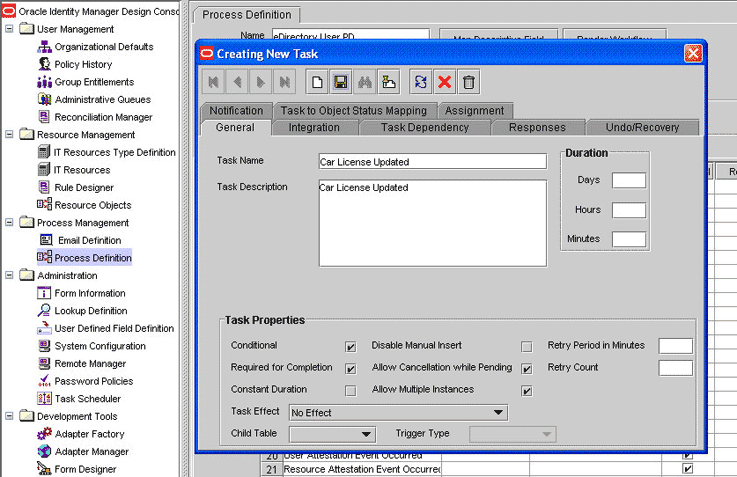
Click Add and enter the task name (for example,
Car License Updated) and the task description. -
In the Task Properties section, select the following fields:
Conditional
Required for Completion
Allow Cancellation while Pending
Allow Multiple Instances
The following screenshot shows this form:
-
Click the Save icon.
-
-
On the Integration tab, click Add and then click Adapter.
-
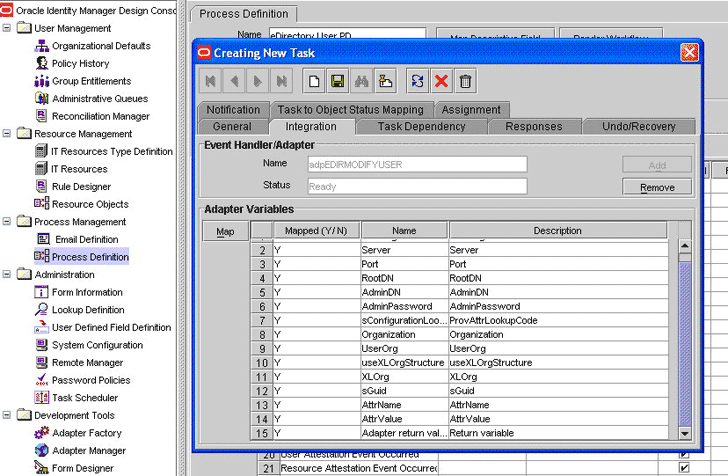
Select the adpEDIRMODIFYUSER adapter, click Save, and then click OK in the message that is displayed.
-
To map the adapter variables listed in this table, select the adapter, click Map, and then enter the data given in the following table:
Note:
Some of the values in this table are specific to Organization (the valueoin Novell eDirectory). These values must be replaced with values relevant to the attributes that you require.Variable Name Data Type Map To Qualifier IT Asset Type IT Asset Property Adapter return value Object Response code NA NA NA UserID String Process Data User ID NA NA SGuid String Process Data Guid NA NA AttrName String Literal String Literal value :carLicense
NA AttrValue String Process Data Car License Note: This is the name of the attribute on the process form.
NA NA SSL FLag String IT Resources Server LDAP Server SSL Server String IT Resources Server LDAP Server Server Address RootDN String IT Resources Server LDAP Server RootDN useXLOrgStructure String IT Resources Server LDAP Server Use XL Org Structure AdminDN String IT Resources Server LDAP Server Admin ID AdminPassword String IT Resources Server LDAP Server Admin Password Port String IT Resources Server LDAP Server Port Organization String Literal String LiteralValue:null NA sConfigurationLookup String Literal String LiteralValue: Lookup.EDIR.Configuration NA UseOrg String Process Data Container DN NA NA XLOrg String User Definition Organization NA NA The following screenshot shows this form:
-
Click the Save icon and then close the dialog box.
-
-
Update the request dataset.
Note:
Perform steps 3 through 5 only if you want to perform request-based provisioning.When you add an attribute on the process form, you also update the XML file containing the request dataset definitions. To update a request dataset:
-
In a text editor, open the XML file located in the OIM_HOME/DataSet/file directory for editing.
-
Add the AttributeReference element and specify values for the mandatory attributes of this element.
See Also:
The "Configuring Requests" chapter of the Oracle Fusion Middleware Developer's Guide for Oracle Identity Manager guide for more information about creating and updating request datasetsFor example, if you added Car License as an attribute on the process form, then enter the following line:
<AttributeReference
name = "Car License"
attr-ref = "Car License"
type = "String"
widget = "text"
length = "100"
available-in-bulk = "false"/>
In this AttributeReference element:
-
For the name attribute, enter the value in the Name column of the process form without the tablename prefix.
For example, if UD_EDIR_USR_CARLICENSE is the value in the Name column of the process form, then you must specify
Car Licenseas the value of the name attribute in the AttributeReference element. -
For the attr-ref attribute, enter the value that you entered in the Field Label column of the process form.
-
For the type attribute, enter the value that you entered in the Variant Type column of the process form.
-
For the widget attribute, enter the value that you entered in the Field Type column of the process form.
-
For the length attribute, enter the value that you entered in the Length column of the process form.
-
For the available-in-bulk attribute, specify
trueif the attribute must be available during bulk request creation or modification. Otherwise, specifyfalse.
If you add more than one attribute on the process form, then repeat this step for each attribute that you add.
-
-
Save and close the XML file.
-
-
Run the PurgeCache utility to clear content related to request datasets from the server cache.
See Oracle Fusion Middleware System Administrator's Guide for Oracle Identity Manager for more information about the PurgeCache utility.
-
If you are using Oracle Identity Manager release prior to 11.1.2, import into MDS, the request dataset definitions in XML format.
See Section 2.3.12.2, "Importing Request Datasets into MDS" for detailed information about the procedure.
-
If you are using Oracle Identity Manager release 11.1.2 or later, create a new UI form and attach it to the application instance to make this new attribute visible. See Section 2.3.1.3, "Creating a New UI Form" and Section 2.3.1.7, "Updating an Existing Application Instance with a New Form" for the procedures.
4.5 Adding New Attributes for Provisioning Groups and Roles
By default, the attributes listed in Section 1.6.2, "Group Attributes for Target Resource Reconciliation and Provisioning" are mapped for provisioning of groups between Oracle Identity Manager and the target system. Similarly, by default, the attributes listed in Section 1.6.3, "Role Attributes for Target Resource Reconciliation and Provisioning" are mapped for provisioning of roles between Oracle Identity Manager and the target system. If required, you can map additional attributes for provisioning groups and roles.
To add a new attribute for provisioning a group or role:
-
Log in to the Oracle Identity Manager Design Console.
-
Add the new attribute on the process form as follows:
-
Open the Form Designer form.
-
Perform one of the following steps:
Search for and open the UD_EDIR_GR form.
Search for and open the UD_EDIR_RL form.
-
Create another version of the form.
-
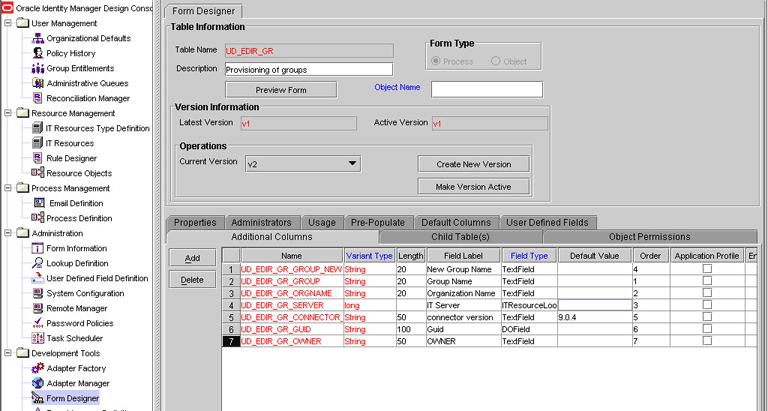
Add the new attribute on the form.
The following screenshot shows this form:
-
Save the form.
-
Make the version active, and then close the form.
-
-
In the lookup definition for provisioning, create an entry for the new attribute as follows:
-
Open the Lookup Definition form.
-
Perform one of the following steps:
-
Search for and open the AttrName.ProvGroup.EDIR.Map lookup definition.
-
Search for and open the AttrName.ProvRole.EDIR.Map lookup definition.
-
-
In the lookup definition, create an entry for the new attribute:
-
Code Key: Enter the name of the attribute that you add on the process form.
-
Decode: Enter the name of the attribute displayed on the target system, which you recorded earlier in this procedure.
The following screenshot shows this form:

-
-
-
To test whether or not you can use the newly added attribute for provisioning, log in to the Oracle Identity Manager Administrative and User Console and perform a provisioning operation in which you specify a value for the newly added attribute.
-
To create a process task for the new multivalued attribute:
-
Log in to the Oracle Identity Manager Design Console.
-
Expand Process Management.
-
Perform one of the following steps:
-
Double-click Process Definition and open the eDirectory Group process definition.
-
Double-click Process Definition and open the eDirectory Role process definition.
-
-
In the process definition, add a task for setting a value for the attribute:
-
Click Add, enter the name of the task for adding multivalued attributes, and then enter the task description.
-
In the Task Properties section, select the following fields:
Conditional
Required for Completion
Allow Cancellation while Pending
Allow Multiple Instances
Select the child table from the list.
For the example described earlier, select Mailing Address from the list.
-
On the Integration tab, click Add, and then click Adapter.
-
Select the adpEDIRMODIFYGROUPORROLE adapter, click Save, and then click OK in the message.
-
To map the adapter variables listed in this table, select the adapter, click Map, and then enter the data given in the following table:
Variable Name Data Type Map To Qualifier IT Asset Type IT Asset Property Adapter return value Object Response code NA NA NA UserID String Process Data User ID NA NA SGuid String Process Data Guid NA NA AttrName String Literal String Literal value :carLicense
NA AttrValue String Process Data Owner Note: The name of the attribute in the process form
NA NA SSL FLag String IT Resources Server LDAP Server SSL Server String IT Resources Server LDAP Server Server Address RootDN String IT Resources Server LDAP Server RootDN useXLOrgStructure String IT Resources Server LDAP Server Use XL Org Structure AdminDN String IT Resources Server LDAP Server Admin ID AdminPassword String IT Resources Server LDAP Server Admin Password Port String IT Resources Server LDAP Server Port Organization String Literal String LiteralValue:null NA sConfigurationLookup String Literal String LiteralValue: Lookup.EDIR.Configuration NA UseOrg String Process Data Container DN NA NA XLOrg String User Definition Organization NA NA 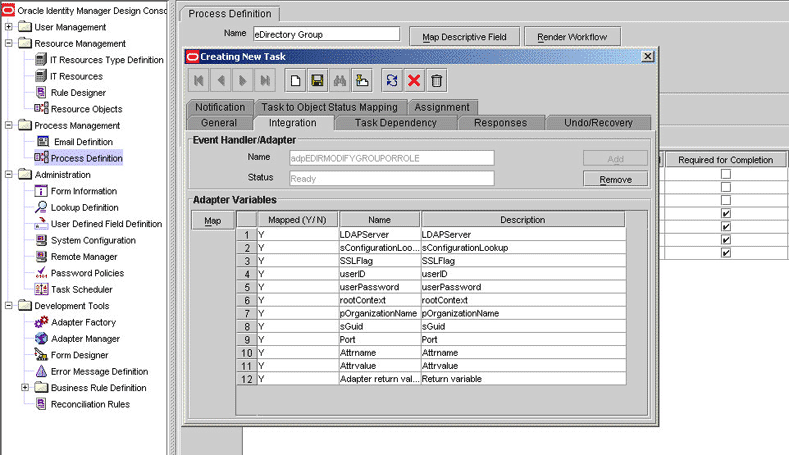
-
Click the Save icon and then close the dialog box.
Note:
Perform steps 6 through 8 only if you want to perform request-based provisioning. -
-
-
Update the request dataset.
When you add an attribute on the process form, you also update the XML file containing the request dataset definitions. To update a request dataset:
-
In a text editor, open the XML file located in the OIM_HOME/DataSet/file directory for editing.
-
Add the AttributeReference element and specify values for the mandatory attributes of this element.
See Also:
The "Configuring Requests" chapter of the Oracle Fusion Middleware Developer's Guide for Oracle Identity Manager guide for more information about creating and updating request datasetsFor example, while performing Step 2 of this procedure, if you added Owner as an attribute on the process form, then enter the following line:
<AttributeReference
name = "Owner"
attr-ref = "Owner"
type = "String"
widget = "text"
length = "50"
available-in-bulk = "false"/>
In this AttributeReference element:
-
For the name attribute, enter the value in the Name column of the process form without the tablename prefix.
For example, if UD_EDIR_GR_OWNER is the value in the Name column of the process form, then you must specify
Owneras the value of the name attribute in the AttributeReference element. -
For the attr-ref attribute, enter the value that you entered in the Field Label column of the process form while performing Step 2.
-
For the type attribute, enter the value that you entered in the Variant Type column of the process form while performing Step 2.
-
For the widget attribute, enter the value that you entered in the Field Type column of the process form, while performing Step 2.
-
For the length attribute, enter the value that you entered in the Length column of the process form while performing Step 2.
-
For the available-in-bulk attribute, specify
trueif the attribute must be available during bulk request creation or modification. Otherwise, specifyfalse.
While performing Step 2, if you added more than one attribute on the process form, then repeat this step for each attribute added.
-
-
Save and close the XML file.
-
-
Run the PurgeCache utility to clear content related to request datasets from the server cache.
See Oracle Fusion Middleware System Administrator's Guide for Oracle Identity Manager for more information about the PurgeCache utility.
-
If you are using Oracle Identity Manager release prior to 11.1.2, import into MDS, the request dataset definitions in XML format.
See Section 2.3.12.2, "Importing Request Datasets into MDS" for detailed information about the procedure.
-
If you are using Oracle Identity Manager release 11.1.2 or later, create a new UI form and attach it to the application instance to make this new attribute visible. See Section 2.3.1.3, "Creating a New UI Form" and Section 2.3.1.7, "Updating an Existing Application Instance with a New Form" for the procedures.
4.6 Adding New Multivalued Attributes for Provisioning
Note:
This section describes an optional procedure. Perform this procedure only if you want to add new multivalued fields for provisioning. This procedure can be applied to add user, group, or role attributes.By default, only the UserGroup, UserRole, User Profile, and Network Address Restriction multivalued attributes are mapped for provisioning between Oracle Identity Manager and the target system. If required, you can add new multivalued attributes for provisioning.
By default, no multivalued attributes are mapped for provisioning between Oracle Identity Manager and the target system for groups and roles. If required, you can add new multivalued group or role attributes for reconciliation and provisioning.
To add a new multivalued attribute for provisioning:
Note:
If you have already performed Steps 1 through 3 of Section 4.2, "Adding New Multivalued Attributes for Target Resource Reconciliation," then you need not repeat the steps in the following procedure. Perform only the remaining steps of this procedure.-
Log in to the Oracle Identity Manager Design Console.
-
Create a form for the multivalued attribute as follows:
-
Expand Development Tools.
-
Double-click Form Designer.
-
Create a form by specifying a table name and description, and then click Save.
-
Click Add and enter the details of the attribute.
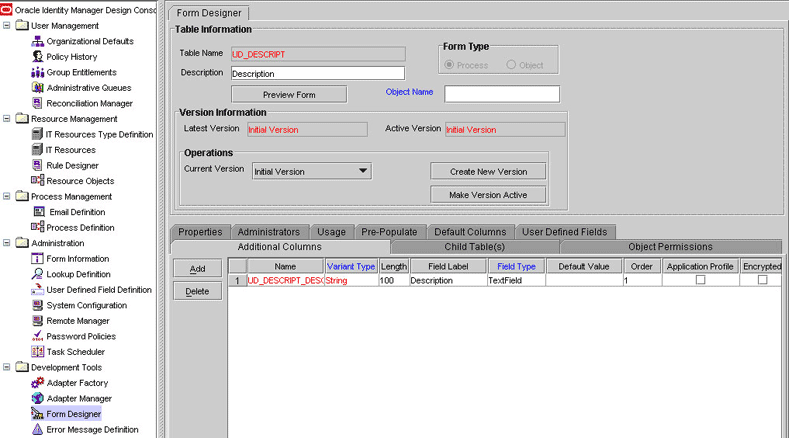
-
Click Save and then click Make Version Active.
-
-
Add the form created for the multivalued attribute as a child form of the process form as follows:
-
Perform one of the following steps:
-
For users, search for and open the UD_EDIR_USR process form.
-
For groups, search for and open the UD_EDIR_GR process form.
-
For roles, search for and open the UD_EDIR_RL process form.
-
-
Click Create New Version.
-
Click the Child Table(s) tab.
-
Click Assign.
-
In the Assign Child Tables dialog box, select the newly created child form, click the right arrow, and then click OK.
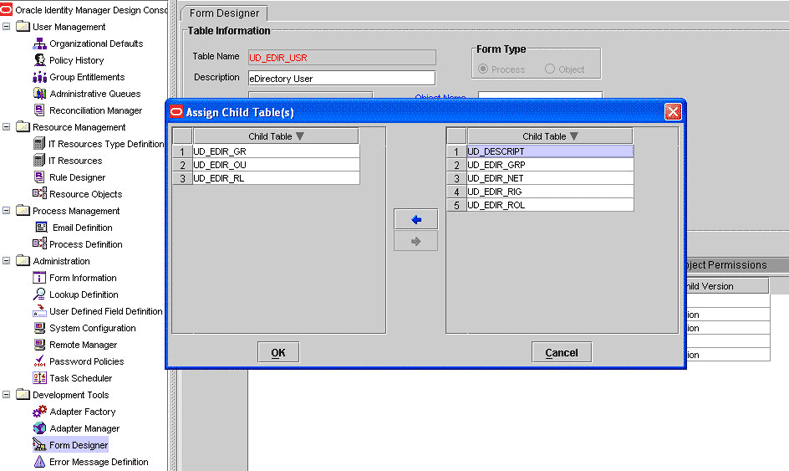
-
Click Save and then click Make Version Active.
-
-
To create a process task for the new multivalued attribute:
-
Expand Process Management.
-
Double-click Process Definition, and then perform one of the following steps:
-
For users, open the eDirectory User PD process definition.
-
For groups, open the eDirectory Group process definition.
-
For roles, open the eDirectory Role process definition.
-
-
In the process definition, add a task for setting a value for the attribute:
-
Click Add, enter the name of the task for adding multivalued attributes, and enter the task description.
-
In the Task Properties section, select the following fields:
Conditional
Required for Completion
Allow Cancellation while Pending
Allow Multiple Instances
Select the child table from the list.
For the example described earlier, select Description from the list.
Select Insert as the trigger type for adding multivalued data. Alternatively, select Delete as the trigger type for removing multivalued data.
-
On the Integration tab, click Add, and then click Adapter.
-
Select the adpEDIRADDMULTIVALATTR adapter, click Save, and then click OK in the message.
-
To map the adapter variables listed in this table, select the adapter, click Map, and then enter the data given in the following table:
Note:
Some of the values in this table are specific to the Mailing Address/Postal Address example. These values must be replaced with values relevant to the multivalued attributes that you require.Variable Name Data Type Map To Qualifier IT Asset Type IT Asset Property Adapter return value Object Response code NA NA NA UserID String Process Data User ID NA NA SGuid String Process Data Guid NA NA pAttrName String Literal String Literal value :description
NA pAttrValue String Process Data Description Note: the name of the attribute in the process form
NA NA SSL FLag String IT Resources Server LDAP Server SSL Server String IT Resources Server LDAP Server Server Address RootDN String IT Resources Server LDAP Server RootDN useXLOrgStructure String IT Resources Server LDAP Server Use XL Org Structure AdminDN String IT Resources Server LDAP Server Admin ID AdminPassword String IT Resources Server LDAP Server Admin Password Port String IT Resources Server LDAP Server Port Organization String Literal String LiteralValue:null NA sConfigurationLookup String Literal String LiteralValue: Lookup.EDIR.Configuration NA UseOrg String Process Data Container DN NA NA XLOrg String User Definition Organization NA NA 
-
Click the Save icon and then close the dialog box.
-
-
In the process definition, add a task for removing the value of the attribute by performing Step c. While performing Step c, select the adpEDIRREMOVEMULTIVALATTR adapter.
-
In the process definition, add a task for updating the value of the attribute by performing Step c.
While performing Step c, select the adpEDIRUPDATEMULTIVALUEATTRIBUTE adapter. Map the Adapter return Value attribute for this update task by providing the values described in the preceding table.
Note:
Perform steps 5 through 7 only if you want to perform request-based provisioning. -
-
Update the request dataset.
When you add an attribute on the process form, you also update the XML file containing the request dataset definitions. To update a request dataset:
-
In a text editor, open the XML file located in the OIM_HOME/DataSet/file directory for editing.
-
Add the AttributeReference element and specify values for the mandatory attributes of this element.
See Also:
The "Configuring Requests" chapter of the Oracle Fusion Middleware Developer's Guide for Oracle Identity Manager guide for more information about creating and updating request datasetsFor example, while performing Step 2 of this procedure, if you added Description as an attribute on the process form, then enter the following line:
<AttributeReference
name = "Description"
attr-ref = "Description"
type = "String"
widget = "text"
length = "100"
available-in-bulk = "false"/>
In this AttributeReference element:
-
For the name attribute, enter the value in the Name column of the process form without the tablename prefix.
For example, if UD_DESCRIPT_DESCRIPTION is the value in the Name column of the process form, then you must specify
Descriptionas the value of the name attribute in the AttributeReference element. -
For the attr-ref attribute, enter the value that you entered in the Field Label column of the process form while performing Step 2.
-
For the type attribute, enter the value that you entered in the Variant Type column of the process form while performing Step 2.
-
For the widget attribute, enter the value that you entered in the Field Type column of the process form while performing Step 2.
-
For the length attribute, enter the value that you entered in the Length column of the process form while performing Step 2.
-
For the available-in-bulk attribute, specify
trueif the attribute must be available during bulk request creation or modification. Otherwise, specifyfalse.
While performing Step 2, if you add more than one attribute on the process form, then repeat this step for each attribute that you add.
-
-
Save and close the XML file.
-
-
If you are using Oracle Identity Manager release prior to 11.1.2, import into MDS, the request dataset definitions in XML format.
See Section 2.3.12.2, "Importing Request Datasets into MDS" for detailed information about the procedure.
-
If you are using Oracle Identity Manager release 11.1.2 or later, create a new UI form and attach it to the application instance to make this new attribute visible. See Section 2.3.1.3, "Creating a New UI Form" and Section 2.3.1.7, "Updating an Existing Application Instance with a New Form" for the procedures.
4.7 Adding Custom Object Classes for Provisioning
Note:
Perform the procedure described in this section only if you want to add custom object classes for provisioning organizational units, groups, or roles.By default, newly created organizational units, groups, and roles on the target system are assigned to the organizational unit, group, and role object classes, respectively.
The organizational unit object class is the value of the ldapOrgUnitObjectClass attribute in the Lookup.EDIR.Configuration lookup definition. Similarly, the group and role object classes are the values of the ldapGroupObjectClass and ldapRoleObjectClass attributes in the Lookup.EDIR.Configuration lookup definition, respectively.
If you want to assign new organizational units, groups, or roles to additional object classes, then enter the list of object classes in the Decode column for their respective attributes in the lookup definition. Use the vertical bar (|) to separate the object class names in the value that you specify.
The following are sample values for the ldapGroupObjectClass entry:
-
group -
mygroup -
group|mygroup
To add object classes for organizational units, groups, or roles:
-
On the Design Console, expand Administration, and then double-click Lookup Definition.
-
Search for and open the Lookup.EDIR.Configuration lookup definition.
-
Perform one of the following:
Note:
In the Decode column, use the vertical bar (|) as a delimiter when you add the object class name to the existing list of object class names.-
To add an object class for an organizational unit, enter the object class name in the Decode column of the ldapOrgUnitObjectClass Code Key.
-
To add an object class for a group, add the object class name to the Decode column value of the ldapGroupObjectClass Code Key.
-
To add an object class for a role, add the object class name to the Decode column value of the ldapRoleObjectClass Code Key.
-
-
Click the Save icon.
4.8 Adding New Object Classes for Provisioning and Reconciliation
To add a new object class for provisioning and reconciliation:
-
Section 4.8.1, "Adding the Attributes of the Object Class to the Process Form"
-
Section 4.8.3, "Adding the Attributes of the Object Class to the Resource Object"
-
Section 4.8.4, "Adding Attributes of the Object Class to the Provisioning Process".
-
Section 4.8.5, "Adding Custom Object Classes for Provisioning Organization, Groups, and Roles"
4.8.1 Adding the Attributes of the Object Class to the Process Form
To add the attributes of the object class to the process form:
-
Open the Oracle Identity Manager Design Console.
-
Expand the Development Tools folder.
-
Double-click Form Designer.
-
Search for and open the UD_EDIR_USR process form.
-
Click Create New Version, and then click Add.
-
Enter the details of the attribute.
For example, if you are adding the Associated Domain attribute, enter UD_EDIR_USR_ASSOCIATEDDOMAIN in the Name field and then enter the other details of this attribute.

-
Click the Save icon, and then click Make Version Active.
4.8.2 Adding the Object Class and its Attributes to the Lookup Definition for Provisioning
To add the object class and its attributes to the lookup definition for provisioning:
-
Expand the Administration folder.
-
Double-click Lookup Definition.
-
Search for and open the Lookup.EDIR.Configuration lookup definition.
-
Add the object class name to the Decode value of the ldapUserObjectClass Code Key.
Note:
In the Decode column, use the vertical bar (|) as a delimiter when you add the object class name to the existing list of object class names.For example, if you want to add
domainRelatedObjectin the Decode column then enter the value as follows:top|inetorgperson|NovellUser|domainRelatedObject
-
Expand the Administration folder.
-
Double-click Lookup Definition.
-
Search for and open the AttrName.Prov.Map.EDIR lookup definition.
-
Click Add and then enter the Code Key and Decode values for an attribute of the object class. The Code Key value must be the name of the field on the process form and Decode value must be the name of the field on the target system.
For example, enter
Associated Domainin the Code Key column and then enterassociatedDomainin the Decode column.Note:
You must perform this step for all the mandatory attributes of the object class. You can also perform this step for the optional attributes.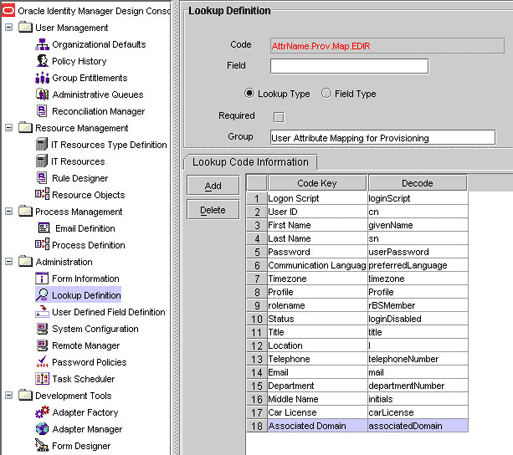
-
Click Save.
4.8.3 Adding the Attributes of the Object Class to the Resource Object
To add the attributes of the object class to the resource object:
Note:
You must perform this step for all the mandatory attributes of the object class. You can also perform this step for the optional attributes.-
Expand the Resource Management folder.
-
Double-click Resource Objects.
-
Search for and open the eDirectory User resource object.
-
For each attribute of the object class:
-
On the Object Reconciliation tab, click Add Field.
-
Enter the details of the field.
For example, enter
Associated Domainin the Field Name field and select String from the Field Type list.
-
-
Click the Save icon and then close the dialog box.
-
If you are using Oracle Identity Manager release 11.1.x, then click Create Reconciliation Profile. This copies changes made to the resource object into the MDS.
4.8.4 Adding Attributes of the Object Class to the Provisioning Process
To add the attributes of the object class to the provisioning process:
Note:
You must perform this step for all the mandatory attributes of the object class. You can also perform this step for the optional attributes.-
Expand the Process Management folder.
-
Double-click Process Definition.
-
Search for and open the eDirectory User PD provisioning definition.
-
On the Reconciliation Field Mappings tab, click Add Field Map.
-
In the Field Name field, select the value for the field that you want to add.
For example, select
Associated Domain = UD_EDIR_USR_ASSOCIATEDDOMAIN
-
In the Field Type field, select the field type.
-
Click the Save icon.
4.8.5 Adding Custom Object Classes for Provisioning Organization, Groups, and Roles
Note:
Perform the procedure described in this section only if you want to add custom object classes for provisioning organizational units, groups, or roles.By default, newly created organizational units, groups, and roles on the target system are assigned to the Organizational Unit, group, and RBS:Role object classes, respectively.
The Organizational Unit object class is the value of the ldapOrgUnitObjectClass attribute in the Lookup.EDIR.Configuration lookup definition. Similarly, the group and RBS:Role object classes are the values of the ldapGroupObjectClass and ldapRoleObjectClass attributes in the Lookup.EDIR.Configuration lookup definition, respectively.
If you want to assign new organizational units, groups, or roles to additional object classes, then enter the list of object classes in the Decode column for their respective attributes in the lookup definition. Use the vertical bar (|) to separate the object class names in the value that you specify.
The following are sample values for the ldapGroupObjectClass entry:
-
group -
mygroup -
group|mygroup
To add object classes for organizational units, groups, or roles:
-
On the Design Console, expand Administration and then double-click Lookup Definition.
-
Search for and open the Lookup.EDIR.Configuration lookup definition.
-
Perform one of the following steps:
Note:
In the Decode column, use the vertical bar (|) as a delimiter when you add the object class name to the existing list of object class names.-
To add an object class for an organizational unit, enter the object class name in the Decode column of the ldapOrgUnitObjectClass Code Key.
-
To add an object class for a group, add the object class name to the Decode value of the ldapGroupObjectClass Code Key.
-
To add an object class for a role, add the object class name to the Decode value of the ldapRoleObjectClass Code Key.
-
-
Click the save icon.
Note:
If you want to reconcile a record (group or role) that is created with these object classes, then include these object classes in the SearchFilter attribute of the GrouporRole Recon Scheduled task. See Section 3.3.2, "Limited Reconciliation" for more information.
4.9 Linking the Home Directory Provisioning Operation with the Create User Provisioning Operation
By default, the Create Home Directory provisioning operation is not linked with the Create User provisioning operation. If you want to link the Create User and Create Home Directory operations, then:
-
If you are using Oracle Identity Manager release 9.0.1 through 9.0.3.2 or release 9.1.0.x, then copy the eDirRemote.jar and eDirRM.jar files from the lib directory on the installation media to the OIM_HOME\xellerate\JavaTasks directory.
-
If you are using Oracle Identity Manager release 11.1.x, then run the Oracle Identity Manager Upload JARs utility to post the eDirRemote.jar and eDirRM.jar files (located in the lib directory on the installation media) to the Oracle Identity Manager database. This utility is copied into the following location when you install Oracle Identity Manager:
Note:
Verify that the WL_HOME environment variable is set to the directory in which Oracle WebLogic Server is installed.For Microsoft Windows:
OIM_HOME/server/bin/UploadJars.bat
For UNIX:
OIM_HOME/server/bin/UploadJars.sh
When you run the utility, you are prompted to enter the login credentials of the Oracle Identity Manager administrator, URL of the Oracle Identity Manager host computer, context factory value, type of JAR file being uploaded, and the location from which the JAR file is to be uploaded. Specify
1as the value of the JAR type.See Also:
Oracle Fusion Middleware Developer's Guide for Oracle Identity Manager for detailed information about the Upload JARs utility -
Log in to the Design Console.
-
In the Lookup.EDIR.Volume lookup definition, enter the names of volume objects created on the target system. Home directories that you provision are created on these volume objects.
To create entries in the Lookup.EDIR.Volume lookup definition:
-
On the Design Console, expand Administration and then double-click Lookup Definition.
-
Search for and open the Lookup.EDIR.Volume lookup definition.
-
Click Add.
-
The Lookup.EDIR.Volume lookup definition does not contain any entries by default. You must create entries in this lookup definition based on the volumes defined on the target system.
The following is a sample entry:
Code key: mph_vol_10
Decode: mph_vol_10
Note:
As shown in this sample value, Code Key and Decode values in this lookup definition must be the same. -
Click the Save icon to save the entries that you create.
-
-
Modify the process task for the Create User operation as follows:
-
Expand Process Management, and open the eDirectory User PD process definition.
-
Search for and open the process task for the Create User operation.
-
On the Responses tab, and select the response with the status C.
-
In the Tasks To Generate region, click Assign.
-
Select the Create Home Directory task from the list, and then click the right arrow.
-
Click OK.
The following screenshot shows this form:

-
Click the Save icon.
-
-
Reconciliation of Home directories involves the use of the transformation feature. See Section 1.4.8, "Support for Transformation of Data During Reconciliation" for information about this feature.
Note:
Perform this step only if you want to configure reconciliation of Home directory values.To enable this feature, set the UseTransformMapping attribute of the eDirectory User Target Recon Task scheduled task to
yes. See Section 3.3.4, "Reconciliation Scheduled Tasks" for more information.
4.10 Configuring Transformation of Data During Reconciliation
Note:
This section describes an optional procedure. Perform this procedure only if you want to configure transformation of data during reconciliation.The default entry in the Lookup.EDIR.Transformation lookup definition is used for reconciliation of Home directories. Do not modify or remove this entry.
You can configure transformation of reconciled data according to your requirements. For example, you can automate the look up of the field name from an external system and set the value based on the field name.
To configure transformation of data:
-
Incorporate the required logic in a Java class.
This transformation class must implement the com.thortech.xl.schedule.tasks.AttributeTransformer interface and the transform method.
The following is one such sample class:
package com.thortech.xl.schedule.tasks; public class AppendTransformer implements AttributeTransformer { /** * @param inValue: This is the input string to be transformed. * @return String: This is the string that is returned. */ public String transform(String value) { return value; } -
Create a JAR file to hold the Java class.
-
If you are using Oracle Identity Manager release 9.0.1 through 9.0.3.2 or release 9.1.0.x, then copy the JAR file into the following directory:
OIM_HOME/xellerate/ScheduleTask
-
If you are using Oracle Identity Manager release 11.1.x, then run the Oracle Identity Manager Upload JARs utility to post the JAR file to the Oracle Identity Manager database. This utility is copied into the following location when you install Oracle Identity Manager:
Note:
Verify that the WL_HOME environment variable is set to the directory in which Oracle WebLogic Server is installed.For Microsoft Windows:
OIM_HOME/server/bin/UploadJars.bat
For UNIX:
OIM_HOME/server/bin/UploadJars.sh
When you run the utility, you are prompted to enter the login credentials of the Oracle Identity Manager administrator, URL of the Oracle Identity Manager host computer, context factory value, type of JAR file being uploaded, and the location from which the JAR file is to be uploaded. Specify
2as the value of the JAR type.See Also:
Oracle Fusion Middleware Developer's Guide for Oracle Identity Manager for detailed information about the Upload JARs utility -
Add an entry in the Lookup.EDIR.Transformation lookup definition.
Code Key: Enter the name of the attribute on which you want to apply the transformation. For example:
FirstNameDecode: Enter the name of the class file. For example:
com.thortech.xl.schedule.tasks.AppendTransformer -
Enter
yesas the value of the Use Transform Mapping attribute of the eDirectory User Trusted Recon Task and eDirectory User Target Recon Task scheduled tasks. See Section 3.3.4, "Reconciliation Scheduled Tasks" for more information.