2 Deploying the IDF Advanced Adapter for IBM RACF
The IDF mainframe adapter is composed of the following main components:
Pioneer: As discussed in one of the earlier chapters, Pioneer (also known as the Provisioning Agent) receives native mainframe identity and authorization change events from the LDAP Gateway. These events are processed against the mainframe authentication repository, in which all provisioning updates from the LDAP Gateway are stored. The response is parsed and returned to the LDAP Gateway.
Voyager: This component is also known as the Reconciliation Agent. The Voyager captures native mainframe events by using System Exits. The Voyager transforms these events into LDAPv3 protocol notification messages through the LDAP Gateway.
System Exits: These are programs that are run after system events in IBM RACF have been detected. System Exits capture these events in real time. They are events occurring from the TSO logins, the command prompt, batch jobs, and other native mainframe events.
Note:
Before you install the mainframe components of the RACF Advanced Adapter on a Production environment, Oracle recommends that you install the product on a Test and/or Development environment for testing, prior to installing on a Production environment.The following sections discuss more about deploying the IDM Advanced Adapter for IDB RACF:
2.1 IDF Mainframe Adapters Functional Characteristics
Following are the IDF mainframe adapters functional characteristics:
2.1.1 Pioneer
Pioneer is the Provisioning Agent running on z/OS. It is a socket based server. The messages that are received from the LDAP gateway are encrypted. Pioneer receives the message, decrypts the message and then converts it to EBCDIC. The received message is validated for the following validation functions:
-
RACF commands (all)
-
LISTUSER, LISTGRP, LISTDSD, RLIST, and SEARCH are executed through MYRADMIN that does not require SECURE-ID usage.
-
ADDUSER, ALTUSER, DELUSER, PERMIT, CONNECT, and REMOVE are executed through the new programs IDFRADMN (For SMF=N) and IDFRADMS (For SMF=Y).
-
-
Define, Delete, and List MVS Aliases
-
LDAP can submit DEFINE, DELETE, or LISTC to Pioneer. Pioneer will allocate the SYSIN for IDCAMS using the Pioneer ddname = IDCAMSD. Pioneer then writes the IDCAMS control records to it. Once completed, Pioneer invokes IDCAMS and uses alternate ddnames for processing. The alternate ddnames permits Pioneer to call SYSIN a ddname of IDCAMSD and sysprint a ddname of LISTINR. Once 'IDCAMS' completes, the output is built into messages and routed back to LDAP. Upon completion, the two files are cleared by Pioneer.
-
The Alias processing is controlled by the usage of a Pioneer parameter in its control file. The parameter is POST_PROC_ALIAS, if this is set to 'T' or true, then it enables post-processing. If set to 'F' or false, then it disables post-processing.
-
-
Post-Processing
Pioneer can Post-Process. Post-processing is invoked by using an entry in the control file.For example, C=ADDUSER,M=IDCAMS,L=TEST.CNTL.LIB Pioneer will dynamically allocate 'TEST.CNTL.LIB', member = IDCAMS and reads and punchs it to the MVS INTRDR. The RACF command for the ADDUSER will also occur. This process will occur for every ADDUSER.
The following RACF commands are supported for Post-Processing.
-
ADDUSER,ALTUSER,DELUSER,CONNECT,REMOVE
-
DELUSER has an additional parameter, DEL=Y or DEL=N. C=DELUSER,M=DELIT,L=TEST.CNTL.LIB,DEL=N
Pioneer will dynamically allocate 'TEST.CNTL.LIB', member = DELIT and reads and punchs it to the MVS INTRDR. This process will occur for 'every' DELUSER. The DEL=N tells Pioneer not to actually perform the RACF DELUSER. If the parameter was coded as 'DEL=Y', then the actual RACF Delete will occur.If Pioneer finds no 'C=' commands in the control file, then Post-Processing will not occur.
-
-
Searches
Pioneer can perform any of the following Searches that are LDAP initiated:
-
SEARCH CLASS (GROUP) - Full Recon by RACF Group
User submitted job stream creates full extract of all RACF groups and builds a QSAM file. This file is pointed to by the Pioneer ddname = FULLIMPG. Once created, the LDAP initiates a SEARCH CLASS (GROUP) to retrieve the data.
-
SRCHLU - Full Recon by RACF Userid
User submitted job stream creates full extract of all RACF userids and builds a QSAM file. This file is pointed to by the Pioneer ddname = FULLIMPU. Once created, the LDAP initiates a SRCHLU to retrieve the data.
-
EXTRACTU - Full user Extract of all RACF segments
LDAP submits a EXTRACTU userid to Pioneer. Pioneer invokes REXX via IRXJCL. It must also have a '//SYSEXEC' JCL statement as well as a '//SYSTSPRT'. The IRXJCL invokes RACFUSRP Rexx clist which does a REXX 'address LINK MVS RACFUSRP'. The RACFUSRP is a RACF assembler program that performs an extract of the passed userid and places the output into the ddname = SYSTSPRT. When completed, Pioneer reads the 'SYSTSPRT ddname and sends the output back to the LDAP. The files are then cleared.
-
EXTRACTG - Full Group Extract
LDAP submits a 'EXTRACTU userid' to Pioneer. Pioneer invokes REXX via IRXJCL. It must also have a '//SYSEXEC' JCL statement as well as a '//SYSTSPRT'. The IRXJCL invokes RACFUSRP Rexx clist which does a REXX' address LINK MVS RACFUSRP'. The RACFUSRP is a RACF assembler program that performs an extract of all userids and places the output into the ddname = SYSTSPRT. When completed, Pioneer reads the 'SYSTSPRT ddname and sends the output back to LDAP. The files are then cleared.
-
SERCHDAT - All RACF dataset Profiles
LDAP submits a 'SERCHDAT' to Pioneer. Pioneer invokes REXX via IRXJCL. It must also have a '//SYSEXEC' JCL statement also as well as a '//SYSTSPRT'. The IRXJCL invokes RACFUSRD Rexx clist which does a REXX 'address LINK MVS RACFUSRD'. The RACFUSRD is a RACF assembler program that performs an extract of all RACF dataset profile and places the output into the ddname = SYSTSPRT. When completed, Pioneer reads the 'SYSTSPRT ddname and sends the output back to the LDAP. The files are then cleared.
-
SRCHRT - All RACF facilities pass SEARCH CLASS(FACILITY) through the MYRADMIN program.
-
2.1.2 Voyager
Voyager is the Reconciliation Agent running on z/OS. It is a Socket based client/server hybrid. Three exits feed RACF commands and userid information to Voyager via a established Subpool. The subpool using MVS subpool 231 is established using the supplied STC STARTUP or by coding 'SUBPOOL_SIZE=' in the Voyager Control file. Once established, the exits starts passively sending messages to the subpool for storage. Voyager polls the subpool and removes the messages. If there were 1000 message, Voyager will remove the 1000 messages and temporary store them in its own storage. Voyager executes RACF – LISTUSER or EXTRACT depending on the new Voyager parameter: EXTRACT=Y or EXTRACT=N.
The available exit is IRREVX01. The IRREVX01 exit uses an internal caching module 'LOGCACHE' to cache all the messages. The subpool size has to be planned based on number of RACF commands processed by each hour or day.
For example, if the SUBPOOL_SIZE =1000 K then the following is true:
The subpool will hold a maximum of 10240 message (1000 * 1024)/100, the message size is always 100 bytes. Voyager will poll every 200 millisecs.
2.2 Prerequisites
The prerequisites for installing the IDF Advanced adapter are as follows:
2.2.1 Message Transport Requirements
Between the LDAPv3 server and mainframe environments, the software supports TCP/IP. For the TCP/IP message transport layer, ports 5190 and 5790 are the default ports for the Voyager Agent and Pioneer Agent, respectively. You can change the ports for these agents. The procedures to configure these message transport layers are described later in this guide.
2.2.2 APF Authorization
Both Agents namely, Pioneer and Voyager require their executable modules residing in a standard Z/OS PDS Load Library be APF authorized. The authorization is required for the invocation of RACF functions through the RACF API or R_admin.
2.3 Mainframe Adapter Installation
The following sections of this chapter describe the procedure to install the adapter:
-
Section 2.3.1, "Extracting the Files for Deployment from the Distribution Zip Archive File"
-
Section 2.3.4, "Editing the Mainframe Batch Job Files to Match the Settings for the Customer's Site"
-
Section 2.3.7, "Creating a RACF UserID for Pioneer and Voyager with Permissions"
-
Section 2.3.8, "Adding Pioneer/Voyager to the Facility Class Profiles (IRR)"
2.3.1 Extracting the Files for Deployment from the Distribution Zip Archive File
To extract the files from the distribution zip file:
Extract the contents of the following file to a temporary directory, distribution zip archive file.
The following are the contents of the zip file:
Note:
The extension file such as .xmi or .xmit are available in the ZIP file.-
clistlib.xmi
-
jcllib.xmi
-
linklib.xmi or loadlib.xmi
-
parmlib.xmi
-
proclib.xmi
-
racf-readme.txt
2.3.2 Uploading Files
You must upload the files that are extracted with the .xmi extension to the computer that is hosting the mainframe. See Section 2.3.1, "Extracting the Files for Deployment from the Distribution Zip Archive File" for information about extracting the files for deployment.
You can upload the files either by using an emulator or FTP. The following is the procedure to upload files by using the emulator:
-
Log in to the TSO environment of the mainframe, type
ISPFat the READY prompt, and then press Enter. -
From the ISPF menu, on the Option line or at the TSO READY Prompt, enter
6.This may vary by user installation. The Command entry screen to enter TSO commands or through the TSO READY PROMPT directly is displayed.
-
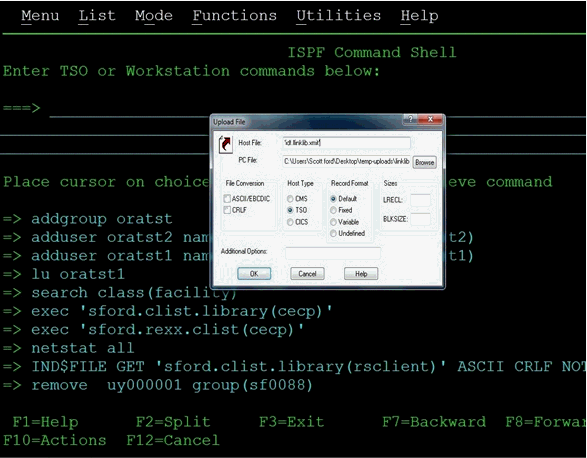
Use the IND$FILE command to upload .xmi files to the mainframe computer hosting using TN3270 emulator/transfer or FTP.
In the following example, the host file name is LINKLIB.XMI and the sending or local file name is as follows:
C:\Users\My_Name\Desktop\test-RACF\linklib.xmi
The .xmi files are binary in transfer - No ASCII/EBCDIC translation and no CRLF.
-
Click OK to initiate file upload.
The File Transfer Status dialog box with a message that the transfer was successfully completed is displayed.

-
Click Exit to dismiss the dialog box.
-
Repeat Steps 3 through 6 to upload the rest of the .XMI files.
Table 2-1 lists the uploaded files.
2.3.3 Extracting the XMIT Files
The files uploaded to the computer hosting the mainframe (by using the procedure described in Section 2.3.2, "Uploading Files") are XMIT files. An XMIT file is an archived file format used on the mainframe.
To extract the files or Partition Datasets (PDS) in the XMIT file:
-
Enter the RECEIVE command in the area designated to enter commands.
For example, enter the following command:
receive inda('linklib.xmit')Note:
Filenames in mainframe are case insensitive. -
When prompted, enter the following to complete running the RECEIVE command:
Enter restore parameters or "DELETE" or "END" +
-
Enter the name of the PDS that the XMIT file will expand into. In this case, enter the following:
dataset('USER_NAME.idf.FILE_NAME')In this command, replace:
-
USER_NAME with the user name on the system you have access to.
-
FILE_NAME with the name of the XMIT file to be extracted.
For example:
dataset('idf.test1.linklib')In this example, the prefix IDF is the user name that is being used in this section. In your environment, replace the prefix IDF with the user name on the system you have access to. If you specify the PDS name within single quotation marks, then the PDS name is specified with the TSO user's name prefix. That is the fully qualified name.
If single quotation marks are not used, then the PDS is created with a prefix of the user name that you are logged on with. In this case, the response is as follows:
dataset(idf.linklib)
Table 2-2 lists the XMIT file names and the corresponding PDS names.
-
Enter the response and follow the given steps:
-
Press Enter again for the RECEIVE command to continue.
The following screen shots shows the output from the execution of the RECEIVE command.
-
Press Enter for each screen displayed since the output stops when the screen is full.
The RECEIVE command completes when the Restore successful message has been displayed on the screen.
-
Press Enter one last time to bring back the command entry screen.
-
Enter the RECEIVE command for each of the uploaded files using the host files name you selected for them.
-
Enter the restore parameters in response to each RECEIVE command you enter.
Note:
The IDF.LINKLIB once "RECEIVED" can be either a STEPLIB or added to the environments existing Linklist. This library MUST be APF authorized. -
After all the files have been processed (extracted from the XMIT file with the Receive command), look at the members of each PDS using the Data Set List Utility which is ISPF option 3.4. on the command line to go there from the command entry screen.
-
In the Data Set List Utility Screen Enter:
'IDF.TEST1.*
in the Dsname Level field on the screen. This will display a list of the files that match.
Press Enter to bring up the list.
Here is the list of the files that matched what you entered.
-
Enter V (for view) to the left of one file names, and press Enter to view the members in the PDS.
-
Enter E (for edit) to edit the members in the list.
-
Place the cursor to the left of one of the member names on this screen to bring up the editor.
-
Click EDIT mode to make changes.
2.3.4 Editing the Mainframe Batch Job Files to Match the Settings for the Customer's Site
The PDS IDF.JCLLIB contains the CREATEDSN, IEBCOPYL, IEBCOPYP, IEBCPYRP, IEBCPYCL, and LOADDSN members, which will have to be edited to change file names, volsers, and job names to match your installation specifications. Modify the jobcard for each batch job to meet your installation specifications. The job card will usually be the first three lines of the batch file. To make changes to the batch job file will require TSO.
To make changes to the batch job files:
-
Logon to TSO.
-
Go to option ISPF 3.4.
-
Edit the dataset 'IDF.JCLLIB' member CREATDSN as shown below.
-
To change existing text in the file, type over the existing text with new text. The editor will respond and provide a line to enter the text.
-
To insert a line of text in the file. Enter I in the number area on the line that we want to start entering text after.

The editor will respond and provide a line that we can enter text into.
-
Press Enter before entering the text to remove the line.
-
Press Enter to add another line.
-
Press Enter to finish.

There are also variations to the insert line command. A common variation is to enter a number after the "I".
To indicate the number of lines to insert:
Use the arrow keys or the mouse to position the cursor to the line to enter text.
If you press Enter before you have finished entering text in your lines, then the lines that you did not enter text into will disappear.


To delete lines in the file:
-
Enter D in the number area on the line that you want to delete.
-
Press Enter to delete the line.
You can see that after entering a "D" in the first screen and in the second screen the line has been deleted.


There are variations of the delete line command. A common variation is to enter a number after D to indicate the number of lines to delete. For example:
Enter D3 to delete 3 lines.


To navigate through the file you need to use the function keys as follows:
-
Press F7 to scroll the edit screen up a screen to the beginning of the file.
-
Press F8 to scroll the edit screen down a screen to the end of the file.
-
Press F3 to finish editing the file.
This will display the exit options.

The following are the Members of PDS IDF.JCLLIB:
-
The CREATDSN member is an IEFBR14 file creation stream that will build the files required for Pioneer and Voyager. For each dataset name (DSN), PIONEER is used for the High-Level qualifier (HLQ) for Pioneer files and VOYAGER is used for the HLQ for Voyager files. The HLQ will have to be changed to meet installation standards. The VOL=SER= should be changed to point to the installation dasd volumes. The allocations are adequate. Once this member has been reviewed and changed, submit this job and review the output. The return code (RC) should be 0000.
-
The LOADDSN member loads the files created by CREATDSN to the defined load area. For each DSN, PIONEER is used for the HLQ for Pioneer files and VOYAGER is used for the HLQ for Voyager files. The HLQ will have to be changed to meet installation standards. The SYSUT1 value defines the member to be loaded and SYSUT2 value defines the sequential or flat file it is being loaded into. Submit the job and review the output. The RC should be 0000.
-
The IEBCOPYL member copies the RACF exits (LOGPWX01 and LOGRIX02) and the called caching routine IDFCACHE to an installation LPA library that RACF has access to. The exit modules are renamed during the copy process as ICHPWX01 and ICHRIX02. Review and change the LPA library name to meet installation standards. Submit the job and review the output. The RC should be 0000.
Note:
LOGPWX01 and LOGRIX02 exits are only required for password capture to send the trusted password to OIM.This feature is deprecated and this reference is only for comments at this time.
-
If your host mainframe has any of the following EXIT(s) in place (LOGPWX01, LOGRIX02, and LOGEVX01), then integration is necessary, contact Consulting Services as needed.
-
The IEBCOPYP member is an IEBCOPY file copy stream that copies the PROG members to an installation defined parameter library. Review and change the parameter library name in //OUTDD1 to point to the destination installation parameter library name (PARMLIB) for the two PROG members. These are required for activation any time a IPL of z/OS occurs. The member PROGID sets APF authorization dynamically for IDF.LINKLIB. This can be added to an existing PROGxx member if desired. The PROG75 member contains the dynamic exit definitions for activation of the LOGEVX01 exit as IRREVX01. The PROG76 member will deactivate it. Submit the JOB stream and review output. The RC should be 0000.
-
The IEBCPYPR member is an IEBCOPY file copy stream for the STC procedures and procedures used by the product. Pioneer and Voyager are STC procedures. Startup and Wrapup are the procedures to build the subpool (STARTUP) and delete the subpool (WRAPUP) for Voyager (See Note). Normally, when z/OS is shutdown the subpool storage area is released. Review the names and change to meet installation specifications. Change the procedure library name to the installation procedure library name. Submit the JOB stream and review the output. The RC should be 0000.
Remember that the jobcard for each of the above batch jobs will have to be changed to meet installation specifications.
Files must not be shared in a SYSPLEX. Each Pioneer and Voyager must have their own set of files.
The IEBCPYCL member is an IEBCOPY file copy stream for the Clists (Command lists) used by the product. Some of the commands are IDFRACFC, RACFUSRP, RACFUSRG, and RACFUSRD.
Table 2-3 lists the CREATDSN variables and corresponding sample values.
Table 2-3 Pioneer and Voyager CREATDSN Files
| CREATDSN Variables | Sample Values |
|---|---|
|
Jobcard |
//CREATDSN JOB SYSTEMS, MSGLEVEL(1,1), // MSGCLASS=X,CLASS=A,PRTY=8, // NOTIFY=&SYSUID,REGION=4096K |
|
VOL=SER= |
?????? or XXXXXX |
|
Pioneer HLQ |
DSN=PIONEER. |
|
Voyager HLQ |
DSN=VOYAGER. |
Table 2-4 lists the LOADDSN variables and corresponding sample values.
Table 2-4 Pioneer and Voyager LOADDSN Files
| LOADDSN Variables | Sample Values |
|---|---|
|
Jobcard |
//LOADDSN JOB SYSTEMS,MSGLEVEL=(1,1), //MSGCLASS=X,CLASS=A,PRTY=8, //NOTIFY=&SYSUID,REGION=4096K |
|
SYSUT1 |
DSN=IDF.PROD.xxxxxx |
|
SYSUT2 Pioneer HLQ |
DNS=PIONEER. |
|
SYSUT2 Voyager HLQ |
DNS=VOYAGER. |
|
Note: Each Step has a SYSUT1 and a SYSUT2. |
Table 2-5 lists the IEBCOPYL variables and corresponding sample values.
Table 2-5 Pioneer and Voyager IEBCOPYL Files
| IEBCOPYL Variables | Sample Values |
|---|---|
|
Jobcard |
//IEBCOPYL JOB SYSTEMS,MSGLEVEL=(1,1), // MSGCLASS=X,CLASS=A,PRTY=8, // NOTIFY=&SYSUID,REGION=4096K |
|
INDD |
DSN=IDF.PROD.LINKLIB |
|
OUTDD |
DSN=YOUR.LPALIB |
Table 2-6 lists the IEBCOPYP variables and corresponding sample values.
Table 2-6 Pioneer and Voyager IEBCOPYP Files
| IEBCOPYP Variables | Sample Values |
|---|---|
|
Jobcard |
//IEBCOPYP JOB SYSTEMS,MSGLEVEL=(1,1), // MSGCLASS=X,CLASS=A,PRTY=8, // NOTIFY=&SYSUID,REGION=4096K |
|
INDD1 |
DSN=IDF.PROD.PARMLIB |
|
OUTDD1 |
DSN=YOUR.PARMLIB |
Table 2-7 lists the IEBCPYPR variables and corresponding sample values.
Table 2-7 Pioneer and Voyager IEBCPYPR Files
| IEBCPYPR Variables | Sample Values |
|---|---|
|
Jobcard |
//IEBCPYPR JOB SYSTEMS,MSGLEVEL=(1,1), // MSGCLASS=X,CLASS=A,PRTY=8, // NOTIFY=&SYSUID,REGION=4096K |
|
INDD2 |
DSN=IDF.PROD.PROCLIB |
|
OUTDD2 |
DSN='YOUR HLQ.PROCLIB |
Table 2-8 lists the IEBCPYCL variables and corresponding sample values.
Table 2-8 Pioneer and Voyager IEBCPYCL Files
| IEBCPYPR Variables | Sample Values |
|---|---|
|
Jobcard |
//IEBCPYCL JOB SYSTEMS,MSGLEVEL=(1,1), // MSGCLASS=X,CLASS=A,PRTY=8, // NOTIFY=&SYSUID,REGION=4096K |
Table 2-9 lists the PIONEER & VOYAGER STC and corresponding sample values.
Table 2-9 Pioneer & Voyager STC Files
| PIONEER & VOYAGER STC | Sample values |
|---|---|
|
PARMFLE for Pioneer STC |
DSN=PIONEER.CONTROL.FILE |
|
PARMFLE for Voyager STC |
DSN=VOYAGER.CONTROL.FILE |
Table 2-10 lists the MISCELLANEOUS names and corresponding sample values.
Note:
<YOUR-HLQ> is the installation assigned High-Level Qualifier which in turn is assigned to the Pioneer datasets.See Appendix B, "Pioneer Datasets" for the information about the relationships between the DSNs in each step in the LOADDSN member and the file contents that are loaded into Pioneer's datasets.
2.3.5 Submitting Batch Job Streams
For submitting batch job streams to z/OS for execution and verify jobs completed successfully, after the jcl files have been edited to reflect the settings for the target environment, the jcl needs to be submitted for batch processing, perform the following steps:
-
Submit the jobs from the screen where the members of the JCLLIB were displayed.
-
Type SUBMIT to the left of the member you want to submit for processing.
-
Press Enter to verify that the jobs have completed successfully.
If there are any errors when submitting a job, fix the errors in the job and resubmit the job.
2.3.6 Activating and Loading the Exits
To activate and loading the Exits:
-
Submit the job IEBCOPYP, which copies the IDF PROGxx members to an installation defined parameter library. These members were PROGID, PROG75, and PROG76.
In the system defined parameter library, member PROG75 contains the following Dynamic Exit definition:
EXIT,ADD, EXITNAME=IRREVX01,MODNAME=LOGEVX01,DSNAME=IDF.LINKLIB
-
Activate the IRREVX01 exit by running the console command SET PROG=75 (or T PROG=75). When in SDSF use a / in front of the command (/T PROG=75), depending on whether the RACF has the proper authority and SDSF authority to issue these commands. IRREVX01 can also be activated via a AUTOCMD member in the SYS1.PARMLIB library. Verify that module LOGCACHE is contained in the same Load Library as the exit module IRREVX01. The distribution is shipped with both modules in the same Load Library.
-
To determine if the IRREVX01 exit is active, issue the command below:
When only one exit:
D PROG,EXIT,EXITNAME=IRREVX01
CSV461I 10.01.24 PROG,EXIT DISPLAY 867
EXIT MODULE STATE MODULE STATE MODULE STATE
IRREVX01 LOGEVX01
When more than one exit:
Note:
When more than one IRREVX01 exit is in use, LOGEVX01 must be first in the list.D PROG,EXIT,EXITNAME=IRREVX01 CSV461I 10.01.24 PROG,EXIT DISPLAY 867 EXIT MODULE STATE MODULE STATE MODULE STATE IRREVX01 LOGEVX01 A C4RMAIN A
-
Set APF authorization for Pioneer and Voyager with PROGID as follows:
-
Verify that the LPA library containing the exits are in the LPA and have been added to the LPALSTxx member of IEASYSXX.
-
Start member of Z/OS, usually contained within the SYS1.PARMLIB.
The executable code (IBM z/OS loadlibs) of Pioneer and Voyager must be APF authorized. This can be achieved by running a dynamic set command (T PROG=ID) or by placing the installation loadlib containing Pioneer and Voyager in the IBM z/OS link list. In order to refresh the LPA library, IPL the IBM z/OS system.
IBM® provides the PROGxx parmlib member as an alternative to IEAAPFxx, which allows you to update the APF list dynamically and specify an unlimited number of APF-authorized libraries. IBM suggests that you use PROGxx to specify the APF list (regardless of whether you plan to take advantage of the dynamic update capability). The system will process IEAAPFxx and PROGxx if both parameters are specified. If you decide to use PROGxx only, then remove APF=xx system parameters from IEASYSxx and IEASYS00.
-
2.3.7 Creating a RACF UserID for Pioneer and Voyager with Permissions
To create a RACF UserID for Pioneer and Voyager, perform the following procedure:
-
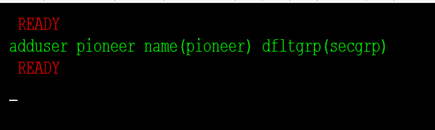
Add the RACF userid that will start Pioneer.
-
Modify the user to add all the other privileges and segment definitions.
-
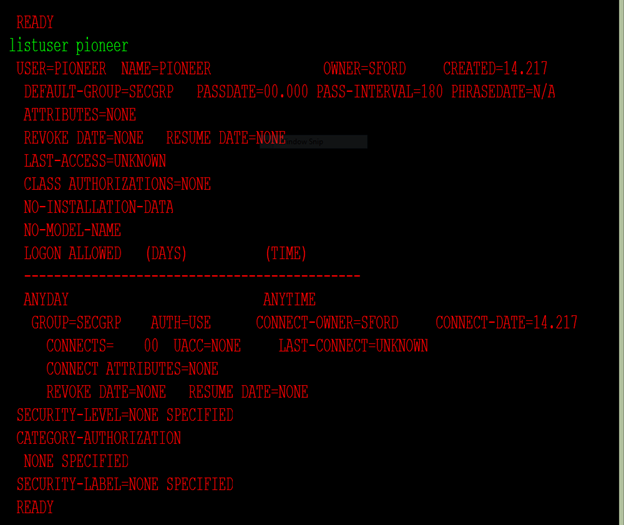
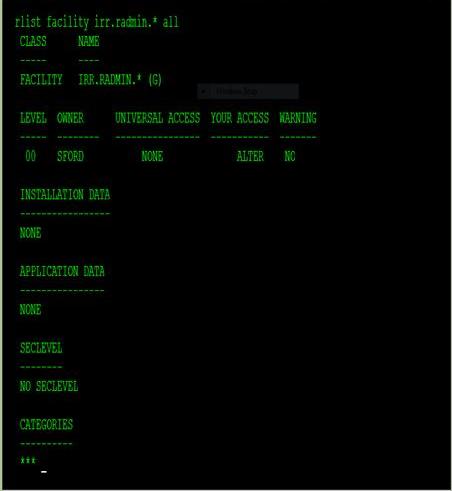
Display and check the RACF definition.
See Appendix G, "Voyager and Pioneer Control File Parameters" for examples on using the new SECURE_ID = parameter of Pioneer.
-
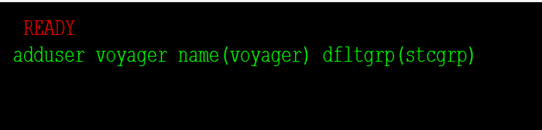
Add the RACF userid that will start Voyager.
-
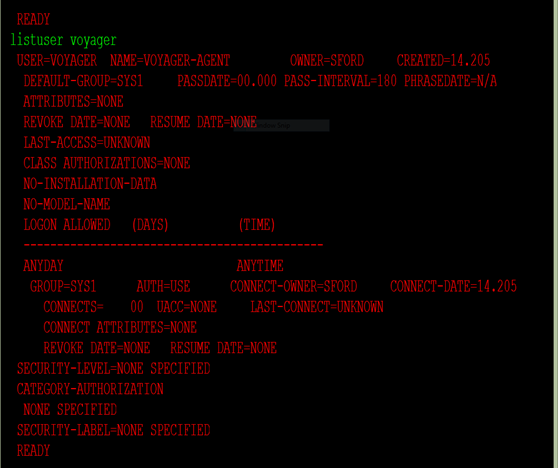
Display and check the RACF definition.
2.3.8 Adding Pioneer/Voyager to the Facility Class Profiles (IRR)
To add a Pioneer or Voyager to the facility class profiles, add the user (which runs the Pioneer/Voyager STCs) to the Facility class profiles. If the IRR.RADMIN profile does not exist, you need to define it with the RDEFINE command as follows:
RDEFINE FACILITY IRR.RADMIN.* UACC(NONE) <or>
RDEFINE FACILITY IRR.RADMIN.xxxxxxx UACC(NONE)
(Where the xxxxxxx is the RACF command, please see IBM's Security Server Manual for these commands and permissions)
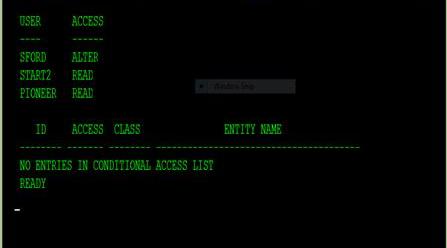
The userID must be authorized to use the new FACILITY class profiles with the PERMIT command.
PERMIT IRR.RADMIN.* CLASS(FACILITY) ID(PIONEER) ACCESS(READ)
<or>
PERMIT IRR.RADMIN.xxxxxx CLASS(FACILITY) ID(PIONEER) ACCESS(READ)
(where xxxxxx is the RACF command from the above rdefine command)
PERMIT IRR.RADMIN.* CLASS(FACILITY)  ID(VOYAGER)  ACCESS(READ)LIST command

Note:
-
From release 9.0.4.23 BPE onward of this connector, the SPECIAL attribute will not be set for the RACF userID. For more information, see Appendix H, "Configuring RACF Starter User ID and Access for Voyager Agent and Pioneer Agent Started Tasks."
-
The RACF userID must be able to perform all functions for IRR.RADMIN so you should use IRR.RADMIN.*.
-
Voyager requires access to IRR.RADMIN.LISTUSER only.
-
All IRR.RADMIN calls are through the standard IBM module IRRSEQ00.
-
To pass the IRR.RADMIN call to IRRSEQ00, the RACF API subsystem must be up to add it and activate it.
-
The following statements create or add to IEFSSN00 member of 'SYS1.PARMLIB':
-
SUBSYS SUBNAME(RACF)
-
INITRTN(IRRSSI00) INITPARM('#')
Then z/OS must be IPL'ed to activate this member. Most installations already have the RACF API activate.
-
2.3.9 Testing the Installation
Review this manual for the control file parameters for Voyager and Pioneer and change the configuration files (Pioneer and Voyager STC PARMFLE DDs) for the installation. Consult the Identity Manage Installation staff for TCPIP PORT addresses and TCPIP Addresses for both Voyager and Pioneer. Also consult the IDM staff for the VOYAGER_ID= variable explained later in this manual in the Voyager parameters section.
To test the installation:
-
IPL the system to bring in the new LPA library modules.
-
Check that the exit modules have been loaded.
The following are the list of the members in USER.PROCLIB.
Note:
-
The STARTUP and WRAPUP functions are contained within Voyager. These functions are not used directly anymore. Their functionality has been incorporated into Voyager.
-
The STARTUP and WRAPUP functions are executed ONLY in case of an emergency and then with the guidance of the product support team.
-
-
Execute Voyager:
-
Start the Voyager Agent by running "S VOYAGER" from the console or SDSF in TSO. By adding the STC procedure for VOYAGER inside a Job Scheduler is another way you can start the task. To quiesce VOYAGER, issue "F VOYAGER (if this is the STCNAME), SHUTDOWN. Voyager will close the TCPIP sessions, close any open files and delete the subpool that was allocated. To insure no message lost, issue only a "F VOYAGER,SHUTDOWN" to Voyager a "C VOYAGER" can cause messages to be lost. Voyager is a 'single thread' or "single task" application. A F or Modify command may take some time to take effect depending on Voyager activity.
-
If the parameter EXTRACT=Y is specified, Voyager executes "IRXJCL" internally and invokes IDFRACFC USER xxxxxxxx, where xxxxxxxx is the userid found from the subpool entry. The Rexx clist, IDFRACFC outputs the extracted data to the ddname: SYSTSPRT.
If the parameter EXTRACT=N is specified, Voyager uses the RACF standard LISTUSER xxxxxxxx command that is executed through MYRADMIN, which calls IRRSEQ00.
Voyager control file used for testing:
SUBPOOL_SIZE=1000K
TCPN=TCPIP
IPAD=54.198.236.129
* IPAD=54.80.0.108
PORT=5197
DEBUG=N
ESIZE=16
CSDATA=Y
EXTRACT=YES
VOYAGER_ID=AVOYAGTS
CACHE_DELAY=005
AUDIT_LOG=YES
CONNECT_RETRY=100
CONNECT_INTV=05
See Appendix G, "Voyager and Pioneer Control File Parameters" for description of the Voyager control file parameters.


-
-
Starting Pioneer:
Start the Pioneer Agent by running "S PIONEER" from the console or by running /S PIONEER in SDSF under TSO. Adding the STC procedure for PIONEER inside a Job Scheduler is another way you can start the task.
The following programs perform RACF validation during the startup of Pioneer:
-
IDFGETIF
-
DFCHKAU
-
IDFCHKIR
If all the RACF validations are correct then the following message prefixed messages will be displayed: IDMP206I–IDMP210I.
Pioneer Control file used for testing:
TCPN=TCPIP
IPAD=0.0.0.0
PORT=6001
DEBUG=N
ESIZE=16
LPAR=ZPDT-112
POST_PROC_ALIAS=F
IDLEMSG=N
DEBUGOUT=SYSOUT,CLASS(Y)
SPIN_CLASS=K
AUDIT_LOG=YES
SECURE_ID=YES,DEFAULT=NO,ENCRYPT=NO,ID=IDFSUGG
SMF=N  <or>  SMF=Y
See Appendix G, "Voyager and Pioneer Control File Parameters" for information about Pioneer control file parameter descriptions.
-
-
Stop the started tasks:
The operator interface is named POLLOPER in both Voyager and Pioneer. Both STCs are Single thread and commands are passed to them via a z/OS modify("F") command.
Pioneer can be controlled by commands via Operator Interface with the commands given in Table 2-11.
Table 2-12 lists Voyager Commands via Operator Interface.
Table 2-12 Voyager Commands via Operator Interface
| Voyager Commands | Description |
|---|---|
|
F VOYAGER,SHUTDOWN |
Shuts Down Voyager |
|
F VOYAGER,STATUS |
Heartbeat message |
|
F VOYAGER,DEBUG=Y |
Turns on Debugging |
|
F VOYAGER,DEBUG=N |
Turns off Debugging |
|
F VOYAGER,IPAD=999.999.999.999,PORT=99999 |
Swaps LDAP Gateway |
Note:
The commands in the following screen shots are not required if DNS is used.