| Oracle® Business Intelligence Publisher New Features Guide Release 10.1.3.4.2 Part Number E14667-02 |
|
|
View PDF |
| Oracle® Business Intelligence Publisher New Features Guide Release 10.1.3.4.2 Part Number E14667-02 |
|
|
View PDF |
This chapter describes features of BI Publisher that were introduced in Release 10.1.3.4.2. This chapter contains the following sections:
Section 2.1, "Display Scheduler Job Times in the User's Preferred Time Zone"
Section 2.3, "Control Initial Display of PDF Navigation Panel"
Section 2.6, "Support for "Comb of Characters" Option for Form Fields in PDF Templates"
Section 2.9, "Using LDAP Attribute Values as Bind Variables in Data Queries"
Previously when a user viewed Scheduled Report History, the Start Processing Time and End Processing Time values displayed in the server time zone. A new property in the Scheduler Configuration page, "Use Report Time Zone User Preference for Job times " enables the Administrator to configure the system so that processing times will display in the time zone preferred by each user, as defined in the user's Preference setting for Report Time Zone.
To enable this property:
Navigate to the Scheduler Configuration page: From the Admin tab, under System Maintenance, click Scheduler Configuration.
In the Scheduler Properties region, select checkbox for the Use Report Time Zone User Preference for Job times property. The new property is shown in Figure 2-1.
Note that the property is disabled by default.
A new Attachment Name field has been added to the Email delivery specification options in the Schedule Report and Send pages to enable you to define the file name of the report when it is attached to the email. The new field is shown in Figure 2-2:
You can enter a static name for the attachment, such as Sales Report (the .pdf extension will be added); or, you can also define a dynamic name using date expressions as follows:
Table 2-1 Supported Date Expressions
| Expression | Description |
|---|---|
|
%y |
Displays the year in four digits: Example: 2011 |
|
%m |
Displays the month in two digits: 01-12 (where 01 = January) |
|
%d |
Displays the date in two digits: 01-31 |
|
%H |
Displays the hour in two digits based on 24-hour day: 00-24 |
|
%M |
Displays the minute in two digits: 00 - 59 |
|
%S |
Displays the number of seconds in two digits: 00 - 59 |
|
%l |
Displays milliseconds in three digits: 000 - 999 |
To create a file name that appends the day, month, and year, such as:
Sales Report 07_11_2010.pdf
Enter the following in the Attachment Name field:
Sales Report %d_%m_%y.pdf
To create a file name that prefixes the day, month, and year and appends the hour and minute, such as:
07_11_2011 Sales Report 08_55.pdf
Enter the following:
%d_%m_%y Sales Report %H_%M.pdf
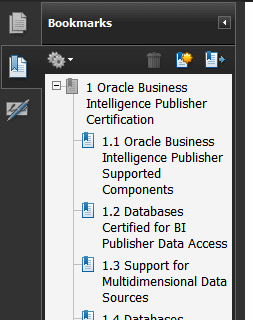
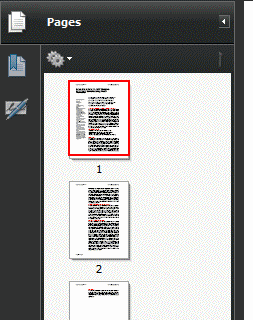
A new property added to the Runtime Configuration properties page enables you to control the navigation panel view that is presented when a user first opens a PDF report. The view can be set to one of the following:
Panels Collapsed - displays the PDF document with the navigation panel collapsed, as shown in the following figure:

Bookmarks Open (default) - displays the bookmark links for easy navigation as shown in the following figure:

Pages Open - displays each page of the PDF as a thumbnail that you can click to navigate to, as shown in the following figure:

The new property is located in the PDF Output group of properties and is shown in the following figure:

Previously when performing a divide function you had to check the value of the numeric values for a zero when doing a divide operation to avoid the "not a number" (NaN) error.
The safe divide function enables you to specify a value to be returned if the result of the divide function is not a number.
The syntax of the safe divide function is:<?xdoxslt:sdiv(num1,num2, string)?>where
num1 is the dividend
num2 is the divisor
string is the value to return when the result is not a number.
For example:
<?xdoxslt:sdiv(10,0, '0')?> would yield 0<?xdoxslt:sdiv(10,0, 'None')?> would yield None
If you are utilizing the PDF Bookbinder API to merge documents at runtime, you can use this new feature to create a hyperlink across the RTF or PDF templates that you are merging. The syntax described here enables you to declare a link ID in the linking template that you match in the target template so that at runtime when the documents are merged the intradocument hyperlink is created.
To create the hyperlink:
In the linking template (Template A), enter the following:
<?pdf-named-destination:true?>
<?link-source:'linkid';'link_displaytext';true>
where
'linkid' is a unique identifier of the target
'link_display_text' is the hyperlink text
For example:
<?link-source:'MyTarget';'This is a link';true>
In the target template (Template B), enter:
<?link-destination:'linkid';true?>
where 'linkid' matches the link-source 'linkid' in Template A.
For example:
<?link-destination:'MyTarget';true?>
At runtime, when the PDF Bookbinder API is called, the hyperlink will be created in the merged PDF document. Figure 2-3 illustrates the process:
The comb of characters option for a PDF form field in Adobe Acrobat spreads the text evenly across the width of the text field. Use this option when the form field requires the characters to be entered in specific positions, as the Routing number field shown in Figure 2-4:
To use this feature in a PDF template, perform the following:
In Adobe Acrobat Professional, add the form field as a text field. An example is shown in the following figure:

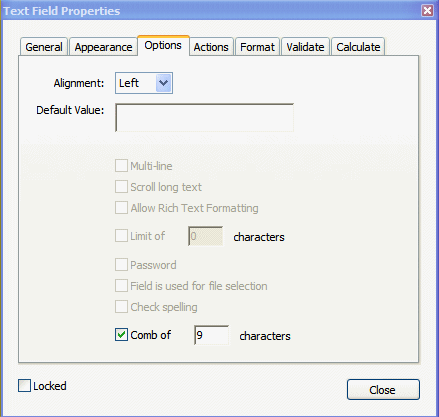
Open the Text Field Properties dialog and click the Options tab. Clear all check boxes and select the Comb of characters check box.
Note:
The Comb of characters option is only enabled when all other options are cleared.Enter the number of characters in the text field. For the routing number example, a value of 9 is entered as shown in the following figure: 
If your data may not contain the number of characters specified each time, you can set the Alignment option to specify whether the value will be aligned to the right, left, or center within the field.
When you run the report, the characters comprising the value for the routing field will be spread across the text field as shown in Figure 2-5:
Figure 2-6 shows how the data will display in the field when the data for the routing field does not contain the full nine characters and the Alignment option is set to Left:
For guidelines for creating PDF templates see "Creating a PDF Template" in the Oracle Business Intelligence Publisher Report Designer's Guide.
Two new fields enable you to define PL/SQL functions for BI Publisher to execute when a connection to a JDBC data source is created (preprocess function) or closed (postprocess function). The function must return a boolean value. This feature is supported for Oracle databases only. Figure 2-7 shows the new fields.
These two fields enable the administrator to set a user's context attributes before a connection is made to a database and then to dismiss the attributes after the connection is broken by the extraction engine.
The system variable :xdo_user_name can be used as a bind variable to pass the login username to the PL/SQL function calls. Setting the login user context in this way enables you to secure data at the data source level (rather than at the SQL query level).
For example, assume you have defined the following sample function:
FUNCTION set_per_process_username (username_in IN VARCHAR2)
   RETURN BOOLEAN IS
     BEGIN
     SETUSERCONTEXT(username_in);
     return TRUE;
   END set_per_process_username
To call this function every time a connection is made to the database, enter the following in the Pre Process Function field: set_per_process_username(:xdo_user_name)
Another sample usage might be to insert a row to the LOGTAB table every time a user connects or disconnects:
CREATE OR REPLACE FUNCTION BIP_LOG (user_name_in IN VARCHAR2, smode IN VARCHAR2)
RETURN BOOLEAN AS
   BEGIN
   INSERT INTO LOGTAB VALUES(user_name_in, sysdate,smode);
   RETURN true;
   END BIP_LOG;
In the Pre Process Function field enter: BIP_LOG(:xdo_user_name)
As a new connection is made to the database, it is logged in the LOGTAB table. The SMODE value specifies the activity as an entry or an exit. Calling this function as a Post Process Function as well returns results such as those shown in Figure 2-8.
Microsoft Active Directory supports the LDAP interface and therefore can be configured with BI Publisher using LDAP Security.
To configure active directory:
Add users who must access BI Publisher.
Add the users under "Users" or any other organization unit in the Domain Root.
Add the BI Publisher system groups. The Scope of the groups must be Domain Local.
Table 2-2 describes the BI Publisher system groups that must be added.
Table 2-2 BI Publisher System Groups
| BI Publisher System Group | Description |
|---|---|
|
XMLP_ADMIN |
The administrator role for the BI Publisher server. You must assign the Administrator account used to access your LDAP server the XMLP_ADMIN group. |
|
XMLP_DEVELOPER |
Allows users to create and edit reports and data models. |
|
XMLP_SCHEDULER |
Allows users to schedule reports. |
|
XMLP_ANALYZER_EXCEL |
Allows users to use the Excel Analyzer feature. |
|
XMLP_ANALYZER_ONLINE |
Allows users to use the online analysis feature (online analyzer). |
|
XMLP_TEMPLATE_BUILDER |
Allows users to connect to the BI Publisher server from the Template Builder for Word and to upload and download templates. |
Grant BI Publisher system groups to global groups or users.
You can grant BI Publisher system groups directly to users or through global groups.
Example 1: Grant Users the BI Publisher Administrator Role
Under the Active Directory User and Computers, open the XMLP_ADMIN group and click the Members tab.
Click Add to add users who need access to BI Publisher Administrator privileges.
Example 2: Grant Users Access to Scheduling Reports
A global group called "HR Manager" is defined under "Users".
All users in this group will need to schedule reports.
To achieve this, add "HR Manager" as a Member of the XMLP_SCHEDULER group.
To configure BI Publisher:
On the Admin tab, click Security Configuration.
Set up a Local Superuser if one has not been configured. This is highly recommended. If the security configuration fails you will still be able to log in to BI Publisher using the Superuser credentials.
In the Security Model region of the page, select LDAP from the Security Model list.
Enter the details for the Active Directory server, as described in the section "Integrating with LDAP" in the Oracle Business Intelligence Publisher Administrator's and Developer's Guide, noting the following specific information for Active Directory:
Set Group Search Filter objectclass to "group"
Set Member of Group Attribute Name to "memberOf" (Group Member Attribute Name can be left blank).
Set Attribute used for RDN to "sAMAccountName".
If your are using LDAP over SSL note the following:
the protocol is "ldaps"
the default port is 636
An example URL would be: ldaps://example.com:636/
Figure 2-9 shows an example configuration highlighting the recommendations stated above.
Restart the BI Publisher application.
If you are configuring BI Publisher to use LDAP over SSL, then you must also configure the Java keystore to add the server certificate to the JVM.
The User login name defined in Active Directory Users and Computers >User Properties >Account is used for the BI Publisher login name. Add the Domain to the user name to log in to BI Publisher. For example: "scott_tiger@domainname.com".
Note the following:
The Attribute used for RDN can be sAMAccountName instead of userPrincipalName.
You must use sAMAccountName for the Attribute used for RDN when the "User logon name (pre-Windows 2000)" is required to use for the BI Publisher login username.
User names must be unique across all organization units.
To assign data access and folder permissions to roles:
Log in to BI Publisher as a user assigned the XMLP_ADMIN role Active Directory.
On the Admin tab click Roles and Permissions.
You see the roles that you created in Active Directory to which you assigned the XMLP_ roles. Note the following:
The XMLP_ roles are not shown because these are controlled through the Active Directory interface.
The Users tab is no longer available under the Security Center because users are now managed through Active Directory.
Roles are not updatable in the BI Publisher interface, except for adding folders and data sources.
Click Add Data Sources to add BI Publisher data sources to the role. A role must be assigned access to a data source to run reports from that data source or to build data models from the data source. For more information see the topic "Assign Folders and Data Sources to Roles" in the Oracle Business Intelligence Publisher Administrator's and Developer's Guide.
Click Add Folders to add access to specific folders to the role. A role must be assigned access to a folder to run or edit the reports it contains. See the topic "Assign Folders and Data Sources to Roles" in the Oracle Business Intelligence Publisher Administrator's and Developer's Guide.
You can now use LDAP (and Microsoft Active Directory) attribute values as bind variables in data queries. To use this feature, specify the LDAP attribute values you want to use as bind variables, then use the syntax defined in this section in your data query.
The LDAP configuration page contains a new field Attribute Names for Data Query Bind Variables and is shown in Figure 2-10.
Enter the LDAP attribute names that you wish to use as bind variables; enter multiple attributes separated by a comma, for example: memberOf, primaryGroupID,mail
To use these attribute values as bind variables in a data query:
Reference the attribute names that you enter in the Attribute Names for Data Query Bind Variables field as follows:
xdo_<attribute name>
Assume that you have entered the sample attributes: memberOf, primaryGroupID, mail. These can then be used in a query as the following bind variables:
xdo_memberof
xdo_primaryGroupID
xdo_mail
Note that the case of the attribute is ignored; however, the "xdo_" prefix must be lowercase.
Use these in a data model as follows:
SELECT
:xdo_user_name AS USER_NAME ,
:xdo_user_roles AS USER_ROLES,
:xdo_user_ui_oracle_lang AS USER_UI_LANG,
:xdo_user_report_oracle_lang AS USER_REPORT_LANG,
:xdo_user_ui_locale AS USER_UI_LOCALE,
:xdo_user_report_locale AS USER_REPORT_LOCALE,
:xdo_memberof as MEMBER_OF,
:xdo_primaryGroupID as PRIMARY_GROUP_ID,
:xdo_mail as MAIL
FROM DUAL
The LDAP bind variables will return the values stored in the LDAP directory for the user that is logged in.
Release 10.1.3.4.2 adds support for IBM WebSphere 7.x as an application server. To deploy BI Publisher to IBM WebSphere 7.x, follow the instructions in the Oracle Business Intelligence Publisher Installation Guide for IBM WebSphere 6.1 deployment, adding the following step:
Navigate to the xmlp-server-config.xml file located at:
<bip_repository>/Admin/Configuration/xmlp-server-config.xml
Add the USE_HTTPONLY_SESSIONID property to the configuration file, setting it to "false" as shown:
<xmlpConfig xmlns="http://xmlns.oracle.com/oxp/xmlp">
...
<property name="USE_HTTPONLY_SESSIONID" value="false"/>
...
</xmlpConfig>
Restart the BI Publisher server.
Oracle recommends configuring IBM WebSphere to use HTTPOnly JSESSIONID cookie. Please refer to IBM WebSphere documentations for details.
Important:
See also the Oracle Business Intelligence Publisher Release Notes for the issue: "WebSphere 6.1: Class Loader Configuration Is Required When "HTTP 500 Internal Server Error" Prevents User Login."