| Oracle® Business Process Architect Quick Start Guide Release 10.1.3.3 E10030-01 |
|
 Previous |
 Next |
| Oracle® Business Process Architect Quick Start Guide Release 10.1.3.3 E10030-01 |
|
 Previous |
 Next |
This chapter describes how to develop BPEL processes in JDeveloper using process blueprints created in Oracle BPA.
|
Note: Before using the Blueprint Editor in JDeveloper, the business process must first be shared with IT, as described in the previous chapter. |
This chapter includes the following sections:
Creating a BPEL Process Using a Blueprint
Merging with Newer Versions of a Process Blueprint
Saving the BPEL Process and Deploying
In this section, the Order Booking BPEL process is created from a blueprint.
Define connections in to an Oracle BPA Server using the Connection Navigator in JDeveloper.
Select File > New then choose New BPA Server Connection from the General > Connections section of the New Gallery.
The BPA Server Connection dialog is displayed.
Enter the name you want to use for the BPA server connection in the Name field.
Select the Location of the server: Local Server or Remote Server. Note that if you want to use a local server (i.e. the BPA Repository in the Oracle BPA tool), that tool must be running.
If using a local server, enter the Directory in which your local BPA server is installed or browse to the directory.
If using a remote server, enter the hostname or IP address in the Host field.
Enter the Username and Password for the connection.
Click on the Test tab, and then click Test Connection.
Details of the test are displayed in the Connection Diagnostics area. If the test succeeds, a success message appears in the status text area. If the test does not succeed, an error appears.
When the test succeeds, click OK.
The new connection name appears under the Connections > BPA Server node in the Application Resources section of the Application Navigator.
You must create an application and a project to begin. Do not include any special characters in the project name (such as periods), as it will cause errors when you attempt to compile your project.
Select File > New from the main JDeveloper menu.
Double-click Application in the Items window.
Enter your application name in the Application Name field and accept the default path in the Directory Name field, then click OK.
Click Cancel on the Create Project window.
Right-click your new application node in the Application Navigator and choose New Project.
Double-click BPEL Process Project in the Items window to display the BPEL Project Creation Wizard window.
The Name field is automatically populated with the blueprint name. All other fields default to the correct values for creating an asynchronous BPEL process.
Select "Existing Blue Print" in the Type field.
Browse to the BPMN model you previously shared with IT, then click OK.
The project that is generated comprises a Process Blueprint and abstract BPEL code.
The Process Blueprint comprises business scopes with business annotations for IT to refer to when converting the abstract BPEL process into a concrete BPEL process.
The generated BPEL project contains the following:
BPEL process source (projectname.bpel)
Web services description language (WSDL) client interface (projectname.wsdl)
BPEL process deployment descriptor (bpel.xml)
Sensor definition, if defined in the BPD
Task Service and BPEL artifacts to invoke a workflow if a Human Workflow activity is contained in the BPD.
Decision Service and BPEL artifacts to invoke a Decision Service if a Business Rule activity is specified in the BPD.
Notification Service and BPEL artifacts to invoke a Notification Service if a Notification Service is specified in the BPD.
Partner Link and BPEL artifacts to invoke a Partner Link if an Automated activity is specified in the BPD.
Implementation details need to be added to the BPEL code to convert the abstract BPEL process into an executable process that can be deployed to the BPEL server.
For information on creating or defining an executable BPEL process in JDeveloper, see the Oracle BPEL Process Manager documentation available on the Oracle BPEL Process Manager site at Oracle Technology Network (OTN):
http://www.oracle.com/technology/bpel/
Newer versions of the Process Blueprint generated in the BPA Repository can be merged with the local Process Blueprint version in the JDeveloper project. The following steps show how to do this.
Drag the Notification Activity "Notify customer regarding credit check" to be after, or below, the Automated activity "Check Customer Credit Info".
Select SOA > Share Blueprint with IT from the main JDeveloper menu.
A newer version of the Process Blueprint is generated and saved in the BPA Repository.
Click the Blue Print View tab in the editor window to display the process blueprint.
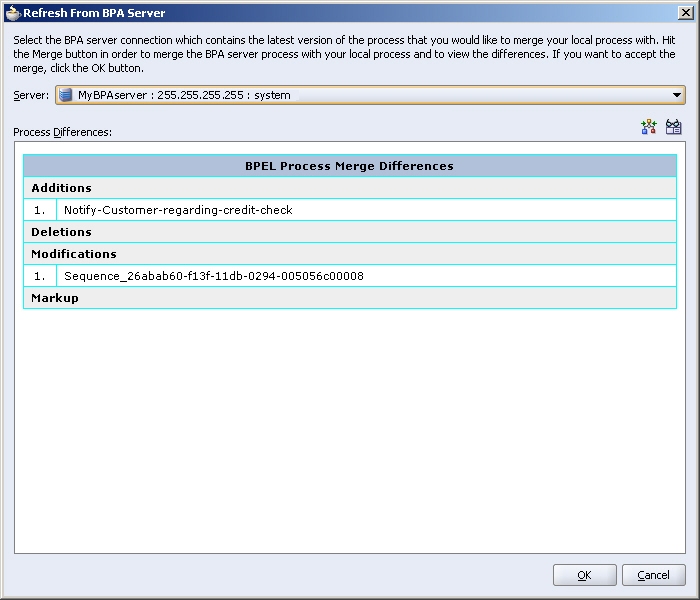
Right click on the background of the diagram then select Refresh from BPA Server. to display the Refresh from BPA Server dialog.
Choose BPA server from those available in the Server dropdown list.
Select Compute Differences with BPA Server Process link to analyze the differences between the local blueprint and the version on the BPA server.
Select the Visual Differences icon to display the differences between the local and server versions of the blueprint visually.
The differences between the local and server versions of the blueprint are displayed.
Figure 6-10 Merge Differences Between Process Blueprint in BPA Repository and Process Blueprint in Local JDeveloper Project

Click OK to refresh the blueprint from the BPA server.
When the changes to the BPEL process are complete, the process can be saved back to the Oracle BPA Repository.
Select the Blue Print View tab in the editor window.
Select Save to BPA Server.
Confirm the BPA Server to which you want to upload, and then click Save.
The model is now saved on the BPA Server, and is available to other business and IT users.