| Oracle® Warehouse Builder Transformation Guide 10g Release 1 (10.1) Part Number B12151-02 |
|
|
View PDF |
| Oracle® Warehouse Builder Transformation Guide 10g Release 1 (10.1) Part Number B12151-02 |
|
|
View PDF |
This appendix provides a brief introduction to the different types of Slowly Changing Dimensions. It also goes through a case study scenario to demonstrate how to use Warehouse Builder to design and deploy different types of Slowly Changing Dimensions. For additional information, refer to books that discuss data warehousing such as The Data Warehouse Toolkit by Ralph Kimball.
Note:
Warehouse Builder only supports Slowly Changing Dimensions with Oracle9i Release 2 or later database servers.This appendix contains the following topics:
A Slowly Changing Dimension (SCD) is a well-defined strategy to manage both current and historical data over time in a data warehouse. You must first decide which type of slowly changing dimension to use based on your business requirements. Table A-1 describes the three main types of SCDs.
Table A-1 Types of Slowly Changing Dimensions
| Type | Use | Description | Preserves History? |
|---|---|---|---|
|
Type 1 |
Overwriting |
Only one version of the dimension record exists. When a change is made, the record is overwritten and no historic data is stored. |
No |
|
Type 2 |
Creating Another Dimension Record |
There are multiple versions of the same dimension record, and new versions are created while old versions are still kept upon modification. |
Yes |
|
Type 3 |
Creating a Current Value Field |
There are two versions of the same dimension record: old values and current values, and old values are kept upon modification on current values. |
Yes |
After selecting the type of SCD, proceed with the following steps to create the dimensions:
Create new dimensions that store historic data.
Create mappings that extract, transform, and load data from the source system to the pre-defined dimension target.
Generate and deploy both dimensions and mappings to an Oracle9i Release 2 or later database.
Execute the mappings.
In order to use slowly changing dimensions, you must be using the following:
Warehouse Builder 9.0.4 or later
Oracle9i Release 2 Database or later
In this appendix, we will be demonstrating how to construct SCDs with the source and target systems described in the following sections. We will be using star schema to store data for all levels on the same dimension table target. This is one of the most commonly used strategy.
The geography data source table GEO_SRC will be used in our case study. Figure A-1 shows the attributes of the GEO_SRC table.
The target warehouse that will be created includes the following:
The sequence DIM_ID that will be used to populate surrogate keys
The dimension GEO_DIM that will be used as a Type 1 SCD
A mapping to load data from GEO_SRC to GEO_DIM
The dimension GEO_DIM_TYPE2 that will be used as a Type 2 SCD
A mapping to load data from GEO_SRC to GEO_DIM
The dimension GEO_DIM_TYPE3 that will be used as a Type 3 SCD
A mapping to load data from GEO_SRC to GEO_DIM_TYPE3
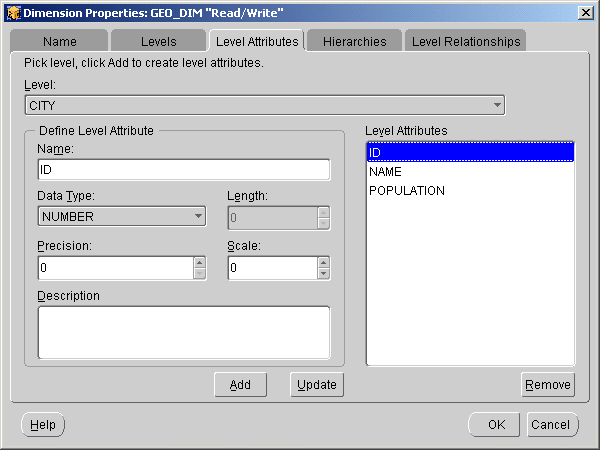
A geography dimension will be used as our case study for illustration. Typically a geography dimension has two levels: city and state. A city level is the lowest level among the geography hierarchy, while a state level is the higher level. A simplified city level, shown in Figure A-2, has the following attributes:
ID: The surrogate key for city level.
NAME: The natural key for city level.
POPULATION: The population of the city.
Figure A-2 City Level Dimension Properties

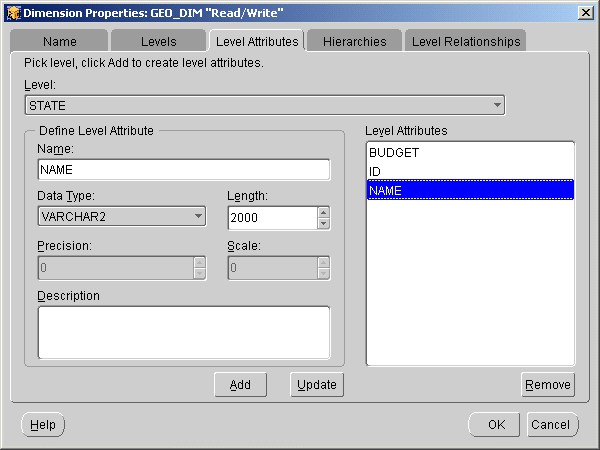
A simplified state level, as shown in Figure A-3, has the following attributes:
ID: The surrogate key for state level.
NAME: The natural key for state level.
BUDGET: The budget of the state.
Figure A-3 State Level Dimension Properties

With Type 1 SCDs, you keep no history and only store the latest value of the dimension record. Once you define the dimension GEO_DIM, you can use it in your mapping to load data into it. To load Type1 slowly changing dimensions, you extract data from the source and then directly load them into the target. GEO_SRC is the source table from which data will be loaded into the dimension GEO_DIM. Figure A-4 shows the mapping used in this example.
Use the following steps to finish creating the Type 1 SCD:
To ensure that unique numbers are assigned for surrogate keys for new dimension records, a sequence operator is used to map to the surrogate key column of GEO_DIM, which is CITY_ID (lowest level key).
You should configure the properties for GEO_DIM operator, as shown in Figure A-5, to ensure data loads properly. First, you need to configure the loading type of GEO_DIM to be 'UPDATE/INSERT'.
You also need to configure each mapped column.
CITY_ID is the surrogate key and is to be loaded only when inserting rows.
CITY_NAME is the natural key and is to be loaded only when inserting rows. It is also to be matched when updating rows.
CITY_POPULATION is to be loaded both when inserting and updating rows. STATE_NAME and STATE_BUDGET are configured in the same way.
If your target database type, which is configurable from warehouse module configuration properties, is set to Oracle9i, the MERGE feature is ensured for you when you generate code.
With Type 2 SCD, you always create another version of dimension record and mark the existing version as history. To accommodate this, you need to create extra metadata for your dimension table, including an effective date column and an expiration date column. These columns are used to differentiate a current version from a historical version as follows:
Effective date column stores the effective date of the version; also known as start date
Expiration date column stores the expiration date of the version; also known as end date
Expiration date value of the current version is always set to NULL or a default date value
You also need to decide which columns you want to store historic data for when the values are to be changed. These columns are defined as trigger columns and should be described as part of your metadata.
Once you define your dimension GEO_DIM_TYPE2, you can use it in your mapping to load data into it. GEO_SRC is the sample source table here from which data are to be loaded into GEO_DIM_TYPE2.
To load Type 2 slowly changing dimension, you need to transform data extracted from the source properly before you load them into the target. You achieve this by creating a mapping, such as the one displayed in Figure A-6. In this mapping, data is first extracted from GEO_SRC, transformed by a series of operators, and finally loaded into GEO_DIM_TYPE2.
You must be very curious about how data are actually transformed. Warehouse Builder supports all operators you would need for Type 2 slowly changing dimension. With Warehouse Builder, the whole ETL process of Type 2 slowly changing dimension can be done in one single mapping. Let us take a look at how data are transformed in a step-by-step fashion.
Use the following steps to create a Type 2 SCD:
First of all, for each source row from GEO_SRC, you need to figure out if it has matched a current dimension record in GEO_DIM_TYPE2. To do this, a Joiner is used to match GEO_SRC with GEO_DIM_TYPE2 exclusively using outer join by natural key columns as the join condition. Figure A-7 shows the expression used for this condition.
Also notice that GEO_SRC should only match current dimension records in GEO_DIM_TYPE2, rather than history dimension records. To do this, you apply a filter operator to filter out history records from matching.
After Joiner, the output data are now composing both the source data rows and the matched target rows. For each output row of Joiner, you need to categorize it into the following groups:
OPEN_SET is defined to create a new version or overwrite a current version
CLOSE_SET is defined to mark a current version as historical
Do this categorizing by splitting the Joiner output into OPEN_SET and CLOSE_SET groups using a Splitter.
A Joiner output row will be put into OPEN_SET group if it comes from a row in GEO_SRC that is either matching with any current version in GEO_DIM_TYPE2, or matching with no version. Do this by specifying the splitter condition for OPEN_SET group.
A Joiner output row will be put into CLOSE_SET group if both the following two condition are true:
If it comes from a row in GEO_SRC that is matching with any current version in GEO_DIM_TYPE2, and
If any trigger column from GEO_DIM_TYPE2 does not equal to that from GEO_SRC
Specify the splitter condition for CLOSE_SET group to AND the earlier two condition clauses.
With OPEN_SET and CLOSE_SET, you compute the following two delta sets with which GEO_DIM_TYPE2 is to be loaded:
From CLOSE_SET to update GEO_DIM_TYPE2; also known as UPDATE_DELTA_ROW
From OPEN_SET to update/insert GEO_DIM_TYPE2; also known as MERGE_DELTA_ROW
You use Expressions to accomplish both tasks. UPDATE_DELTA_ROW and MERGE_DELTA_ROW are created as two separate Expression operators from output of CLOSE_SET and OPEN_SET, respectively. The output groups of both Expression operators are then UNION by utilizing a SetOp operator, whose output row set is ready to be mapped to GEO_DIM_TYPE2 directly.
UPDATE_DELTA_ROW represents the row set that the final target row is to be overwritten from in order to mark a current matched version as historical. Specifically, the target expiration timestamp need be updated with current system date value. This operation is also known as to close the current version. To accomplish this, you specify the expression of attribute DATE_EXP to be SYSDATE.
For the rest of the columns, you do not need to update them such that the original target column values are specified for the corresponding expressions.
MERGE_DELTA_ROW represents the row set that the final target row is to be overwritten from in order to:
Create another current version if there is either no current version matched in target, or the matched version has a different value in any of the trigger columns.
Otherwise, update the matched version directly.
Specifically, you need to build the expression for each final target column to differentiate between the earlier two scenarios by instantiating a CASE expression, that is, 'Case When (...) Then (...) Else (...) End'. Fortunately, Warehouse Builder supports a user-friendly expression builder to accomplish this easily.
For DATE_EFF or any effective timestamp column, you specify the expression to:
Either preserve the current system time (or SYSDATE) if it is to create another version,
Or otherwise, preserve the effective timestamp value derived from target (that is, it is to update the matched version)
Figure A-8 shows an example of how you specify the expression for DATE_EFF or any effective timestamp column.
For DATE_EXP or any expiration timestamp column, you specify the expression to:
Either preserve a default value (such as NULL or some future timestamp 01/01/2004) to mark any version as the current if it is to create another version,
Or otherwise, preserve the expiration timestamp value derived from target (that is, it is to update the matched version)
Figure A-9 shows an example of how you specify the expression for DATE_EXP or any expiration timestamp column.
For CITY_NAME or any natural key column, you always overwrite with natural key value derived from source. Figure A-10 shows an example of how you specify the expression for CITY_NAME or any natural key column.
For CITY_ID_KEY or any surrogate key column, you need to preserve the surrogate key value derived from target in order to:
Match with the final target row to perform updating if it were to update the matched version.
The derived target surrogate key would be NULL if it were to create a new version; a sequence number would be introduced later to ensure a unique surrogate key value is assigned for creating a dimension record.
Figure A-11 shows an example of how you specify the expression for CITY_ID_KEY or any surrogate key column.
For STATE_NAME or any non-trigger column, you always overwrite with the value derived from source.
For CITY_POPULATION or any trigger column, you always overwrite with the value derived from source.
To ensure that unique numbers are assigned as surrogate keys for new dimension records, a sequence operator is used to insert the surrogate key column of GEO_DIM_TYPE2, which is CITY_ID.
The derived target surrogate key from UNION would be used to match with the final target surrogate key during loading. To achieve this, you create an additional attribute MATCHING for the final target and then map from the derived target surrogate key CITY_ID_KEY to it.
MATCHING attribute stands for the unique key of the final target that is chosen to be the matching criteria to ensure data loads properly. Here you should use the final target surrogate key column CITY_ID as MATCHING attribute. You achieve this by setting the bound name to be the same as CITY_ID:
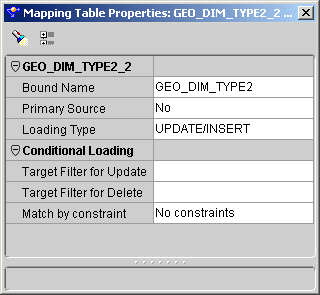
Figure A-12 shows an example of how you can configure the properties for GEO_DIM_TYPE2 operator to ensure that data loads properly. First of all, you need to configure the loading type of GEO_DIM_TYPE2 to be UPDATE/INSERT.
Figure A-12 Configuration using UPDATE/INSERT

You also need to configure each mapped column.
CITY_ID is the surrogate key and is to be loaded only when inserting rows.
CITY_NAME is the natural key and is to be loaded only when inserting rows.
CITY_POPULATION is to be loaded both when inserting and updating rows. STATE_NAME, EFFECTIVE_DATE and EXPIRATION_DATE are configured in the same way.
MATCHING is to be matched when updating rows.
If your target database type (configurable from warehouse module configuration properties) is set to Oracle9i, the MERGE feature is ensured for you when you generate code.
With Type 3 SCD; you create a current value field to keep the current value of dimension record apart from its previous value. To achieve this, you need to create two columns for each data field, one for current value and the other for keeping previous value, respectively.
Once you define your dimension GEO_DIM_TYPE3, you can use it in your mapping to load data into it. GEO_SRC is the sample source table here from which data are to be loaded into GEO_DIM_TYPE3.
To load Type 3 slowly changing dimension, you extract data from the source and then transform them before directly load them into the target. You achieve this by the following mapping graph where data are first extracted from GEO_SRC, transformed by a series of operators, and finally loaded into GEO_DIM_TYPE3. Figure A-13 shows an example of this mapping.
Use the following steps to create a Type 3 SCD:
First of all, for each source row from GEO_SRC, you need to figure out if it has matched a current dimension record in GEO_DIM_TYPE3. To do this, a Joiner is used to match GEO_SRC with GEO_DIM_TYPE3 exclusively (using outer join) by natural key columns as the join condition.
For Type 3 SCD, you always overwrite current value columns of the target with that of the source. You accomplish this by creating mapping lines from Joiner output directly into the target, GEO_DIM_TYPE3.
For Type 3 SCD, it matters to you when and how to overwrite previous value columns of the target, including CITY POPULATION_OLD, CITY STATE_BUDGET_OLD, and CITY STATE_NAME_OLD.
Specifically you need to:
Overwrite previous value column with current value column of the target, if current value of the target is different from that of the source; or
Otherwise, no change is required for the previous value column.
To achieve this, build an Expression from the previous Joiner result and instantiate the expression using a CASE expression. Figure A-14 shows an example of how to instantiate the expression using a CASE expression.
This is similar to what you have done for Type 1 SCDs. Refer to "Step 1: Populate the Surrogate Key" for details.
This is also similar to what you have done for Type 1 SCDs.
You need to configure the loading type of GEO_DIM_TYPE3 to be UPDATE/INSERT.
CITY_ID is the surrogate key and is to be loaded only when inserting rows.
CITY_NAME is the natural key and is to be loaded only when inserting rows. It is also to be matched when updating rows.
Others are to be loaded both when inserting and updating rows.
If your target database type (configurable from warehouse module configuration properties) is set to Oracle9i, the MERGE feature is ensured for you when you generate code.
Once you have constructed dimensions and mappings, you proceed to deploy and execute them through Deployment Manager. Run mappings using set-based mode with an Oracle9i database as your target to ensure optimal performance.