| Oracle® Warehouse Builder Transformation Guide 10g Release 1 (10.1) Part Number B12151-02 |
|
|
View PDF |
| Oracle® Warehouse Builder Transformation Guide 10g Release 1 (10.1) Part Number B12151-02 |
|
|
View PDF |
The Warehouse Builder Mapping Editor includes a selection of pre-built transformation operators. These operators enable you to define common transformations when you define how the data will move from source to target.
Transformation Operators are pre-built PL/SQL functions, procedures, package functions, and package procedures. They take input data, perform operations on it, and produce output data.
This chapter contains the following topics:
For related information, see the Oracle Warehouse Builder User's Guide.
SQL is a powerful mechanism to extract and transform data. You can use SQL to join disparate sources into one data stream, transform the joined data, and then split it into multiple streams output to multiple targets. Warehouse Builder enables these activities by using regular SQL operations.
In a large number of cases the source data contains duplicate values. For example, higher levels within a dimension are duplicated in the source because they are at a lower level of granularity. When selecting these rows, the goal is to only select one row for each level record, not multiple ones.
This can be achieved by adding a deduplicator operator to a mapping, as shown in Figure 2-1. All rows that are required by the target must pass through the deduplicator. No row set can bypass the deduplicator and hit the target directly.
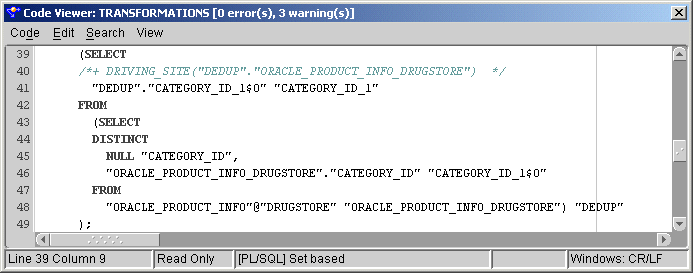
A deduplicator results in a DISTINCT keyword in the generated extraction query, as shown in Figure 2-2.
Figure 2-2 Translation to DISTINCT Keyword
A filter enables you to restrict the data set selected from the query source. Filtering limits the number of rows to be extracted or processed based on a clause applied to a set of data. This filter clause can be based on all supported data types and can contain constants.
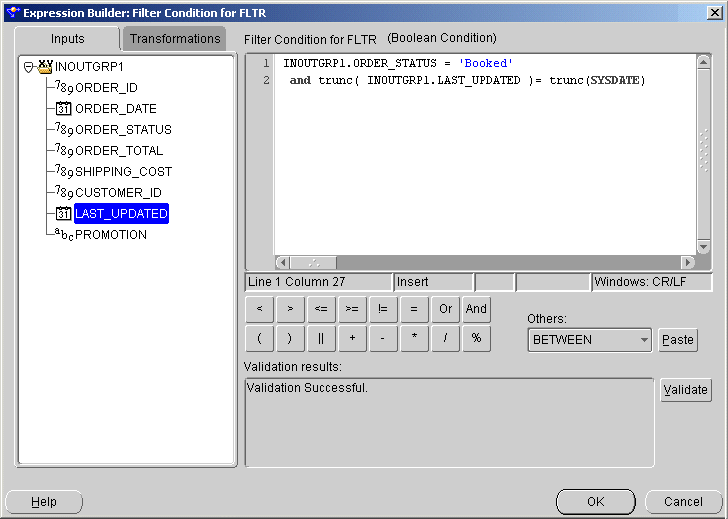
In Figure 2-3, the orders are restricted using the order status. The orders must be booked and the last updated date must be the date of extraction. The result is truncated to ensure that matches are done on the date without the timestamp. Therefore, the result only loads the booked orders that were modified (or set to ÒbookedÓ) on the day of loading. This is an easy way of implementing change data capture.
All rows that are required at the target must pass through the filter operator. No row set can bypass the filter and hit the target directly.
After defining a filter in the mapping, you must specify the filter clause using the Expression Builder, as shown in Figure 2-4. Because filter conditions can be complex, you can use the Expression Builder to validate the filter clause before deploying it to any target system.
Figure 2-4 Expression Builder with the Filter Clause Defined
Warehouse Builder translates the filter clause into a WHERE clause in the extraction program, as shown in Figure 2-5.
Figure 2-5 The Generated Code for Join operator

The generated extraction code contains the physical column names of the objects whereas the Expression Builder shows you the relative names. If you are using business names in the logical modeling phase, Warehouse Builder automatically translates them into physical names of actual database objects.
A join is a query that combines rows from two or more tables, views, or materialized views. Oracle performs a join whenever multiple tables appear in the query's FROM clause. The query's select list can select any columns from any of these tables.
Most join queries contain WHERE clause conditions that compare two columns, each from a different table. To execute a join, Oracle combines pairs of rows, each containing one row from each table, for which the join condition evaluates to TRUE. In addition to join conditions, the WHERE clause of a join query can also contain other conditions that refer to columns of only one table. These conditions can further restrict the rows returned by the join query.
The joiner in Warehouse Builder also supports inner joins, outer joins, self joins, equijoins, and non-equijoins. When run on Oracle9i, Warehouse Builder supports full outer joins. The Key Lookup operator is an example of an outer join used in Warehouse Builder. For more information on joins, see the Oracle SQL Reference.
Figure 2-6 Joining Two Related Tables Into a Single Result Set

If the metadata in the Warehouse Builder repository already contains a primary to foreign key relationship, Warehouse Builder pre-populates the join condition based on that information. In Figure 2-6, two source tables are joined to combine the data from a set of normalized order tables into one table. Because the order lines are typically of a higher cardinality (there are more records for each order in the lines table), the result set is also of that higher cardinality.
If two tables in a join query have no join condition, Warehouse Builder returns their Cartesian product and combines each row of one table with each row of the other table. Because a cartesian product always generates many rows, it may not be useful. For example, the Cartesian product of two tables each with 100 rows has 10,000 rows. You must always include a join condition unless you need a Cartesian product.
Figure 2-7 The Join Condition Based on the PK - FK Relationship
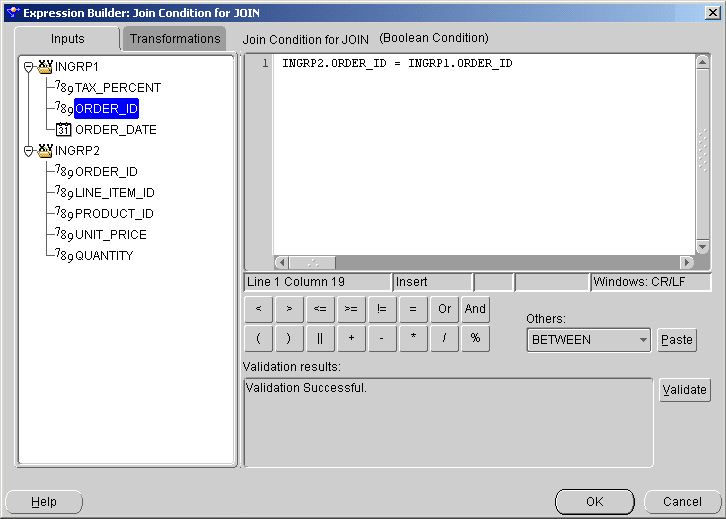
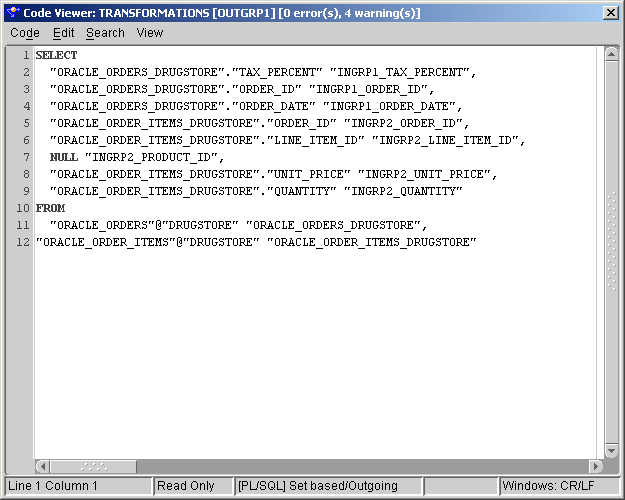
Using the Expression Builder, as shown in Figure 2-7, you can define infinitely complex join clauses. Warehouse Builder translates these clauses into WHERE clauses in the generated SQL code, as shown in Figure 2-8. In this example, the FROM clause contains both source tables and the WHERE clause joins these tables on the order_id columns.
Figure 2-8 The Generated Code for Join operator
A common design decision in a data warehouse is the use of surrogate keys. These keys, typically integers, are used to replace larger logical identifiers taken from the source systems. You can use surrogate keys to reduce the space used by tables linking to a primary key or to substitute source specific identifiers with common identifiers to enable reporting. For information on creating numerical surrogate keys, see "Sequence (CURRVAL, NEXTVAL)".
When you use surrogate keys, there is a mismatch between the primary identifier of a record in the source and in the target. To ensure that joins in the target are performed on the correct data, a key lookup needs to be performed. The key lookup transforms the logical key into its surrogate equivalent. Figure 2-9 shows an example of a key lookup in a mapping.
Warehouse Builder provides two ways of performing a key lookup: you can use pre-defined PL/SQL transformations or you can use a SQL operator. The SQL operator joins a lookup object, such as a table, view, materialized view, or dimension, to the table containing the original identifier.
For lookup conditions, you do not need to manually create the join clauses. A specialized UI enables you to specify these clauses, as shown in Figure 2-10. For each output attribute on the key lookup operator, you can specify a default.
To avoid over-restriction (and missing source rows), the lookup table is outer joined by the operator to ensure that all source rows are part of the query. If no lookup value is available, the operator returns a NULL value. You can substitute this with a default value that uses NVL in the query to substitute the NULL with the default.
Figure 2-11 Generated Code With OUTER JOIN And NVL
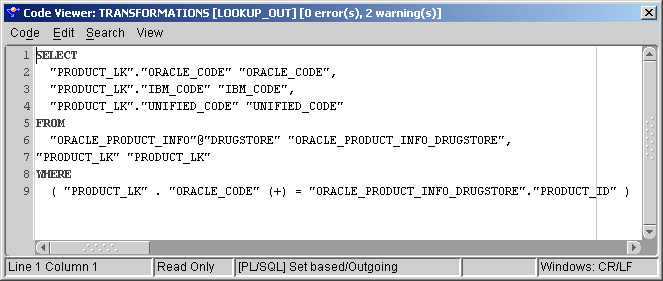
In Figure 2-11, the outer join is performed on the PRODUCT_LK table which is the lookup table. Rows returning NULL for the UNIFIED_CODE are substituted through use of the NVL function to reflect a -1 value. Thus, the default value does not interfere with the system-generated codes. For details, see NVL.
The pivot operator enables you to transform a single row of attributes into multiple rows. Use this operator in a mapping when you want to transform data that is contained across attributes instead of rows. For example, when you extract data from non-relational data sources, such as data in a crosstab format.
The external table SALES_DAT contains data from a flat file. This data contains one row for each sales representative and separate columns for each month. For more information about external tables, see Oracle Warehouse Builder User's Guide. Figure 2-12 shows the data in SALES_DAT in a crosstab format.
Table 2-1 shows a sample of the data after Warehouse Builder has performed a pivot operation. The data that was formerly contained across multiple columns (M1, M2, M3...) is now contained in a single attribute (MONTHLY_SALES). A single ID row in SALES_DAT corresponds to 12 rows in pivoted data.
Table 2-1 Pivoted Data
| REP | MONTH | MONTHLY_SALES | REGION |
|---|---|---|---|
|
|
|
|
|
|
|
|
|
|
|
|
|
|
|
|
|
|
|
|
|
|
|
|
|
|
|
|
|
|
|
|
|
|
|
|
|
|
|
|
|
|
|
|
|
|
|
|
|
|
|
|
|
|
|
|
|
|
|
|
To perform the pivot transformation in this example, you can create a mapping as shown in Figure 2-13.
In this mapping, Warehouse Builder reads the data from the external table, pivots the data, aggregates the data, and writes it to a target in set-based mode. It is not necessary to load the data to a target directly after pivoting it. You can use the pivot operator in a series of operators before and after directing the data into the target operator. You can place operators such as a FILTER, JOIN, and SET OPERATION before the pivot operator. Because pivoted data in Warehouse Builder is not a row-by-row operation, you can also execute the mapping in set-based mode.
A sequence enables you to generates sequential numbers from the database. It also enables you to create identifiers without a real semantic meaning. These identifiers are often called surrogate keys. You can then use Key Lookup within Warehouse Builder to deduce this generated key through a lookup on the original value.
When a sequence number is generated, the sequence is incremented independent of whether you commit or rollback the transaction. If two users concurrently increment the same sequence, the sequence numbers each user acquires may have gaps because the sequence numbers are also being generated by the another user. One user can never acquire the sequence number generated by the other user. After a user generates a sequence value, that user can continue to access that value whether the sequence is incremented by another user or not.
Because sequence numbers are generated independently of tables, the same sequence can be used for one or multiple tables. Individual sequence numbers may appear to be skipped if they are generated and used in a transaction that is later rolled back. Additionally, a single user may not realize that other users are drawing from the same sequence.
You can access the sequence values in SQL statements with the CURRVAL pseudocolumn (which returns the current value of the sequence) or the NEXTVAL pseudocolumn (which increments the sequence and returns the new value).
Note:
To use theCURRVAL functionality, a NEXTVAL call has to be made first.Figure 2-14 shows you how to use sequences in a Warehouse Builder mapping.
In this example, the pseudocolumns CURRVAL and NEXTVAL are available in the sequence object in Warehouse Builder and you can choose the appropriate column to map. The NEXTVAL column is commonly used to generate the insert statement, as shown in Figure 2-15.
Figure 2-15 Generated Code for Sequence Operator
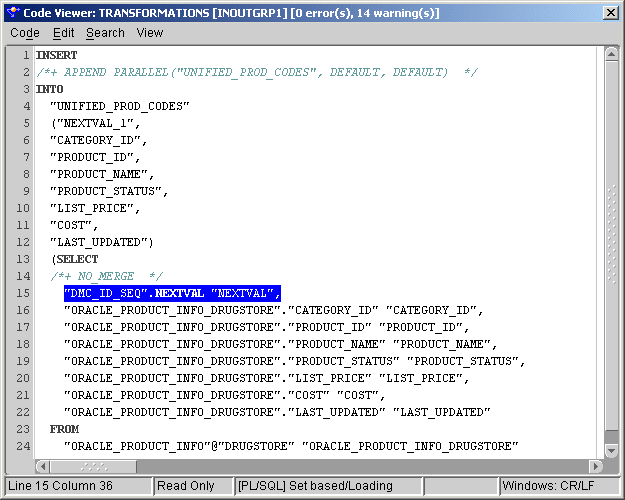
Because sequences can be used by multiple sessions, you cannot depend on the numbers being consecutive. A sequence also caches a specific number of values, for example a range of 20 values, that are lost when you terminate the session.
Set operators combine the results of two component queries into a single result. Unlike a joiner, set operators do not require WHERE clauses to tie result sets together. In set based operators, although the data is added to one output, the column lists are not mixed together to form one combined column list. While a joiner combines separate rows into one row, set operators combine all data rows in their universal row as shown in Figure 2-16.
Figure 2-16 Applying a Set-Based Transformation
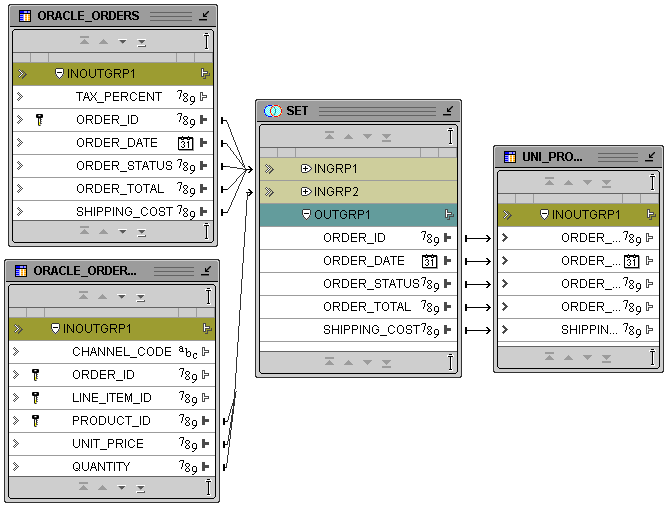
Warehouse Builder supports UNION, UNION ALL, INTERSECT, and MINUS as modes for this operator. Table 2-2 shows the returns for the operator for all the modes. For details, see the Oracle SQL Reference.
Table 2-2 Set Operator Returns
| Operator | Returns |
|---|---|
|
|
|
|
|
|
|
|
|
|
|
|
The UNION (or UNION ALL) operator is most commonly used to combine, for example, product or customer lists from disparate sources. If the tables (often staging tables) match in format, a UNION can combine the records to one unified list of products. These than can be loaded into a warehouse or cleansed before storage in the warehouse. Figure 2-17 shows an example of a union on two product tables.
Figure 2-17 Performing a Union on Two Product Tables
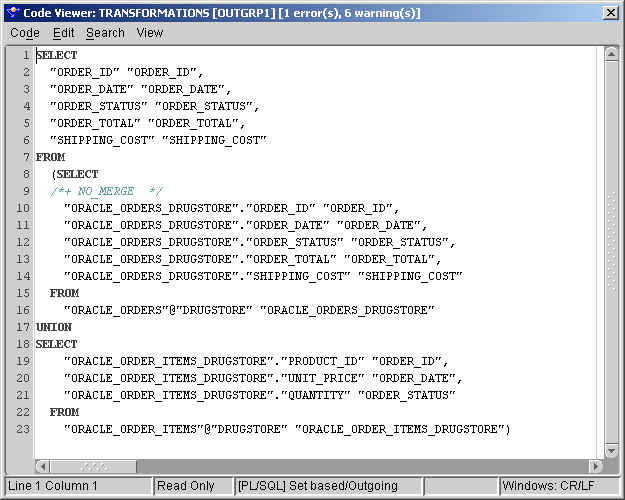
If you change the mode on the operator (each operator can only perform one action), the generated code changes and the UNION keyword is substituted with the one you have chosen.
Because most data in a data warehouse is typically loaded in batches, there can be problems in the loading routines. For example, a batch of orders might contain a single order number multiple times with each order line representing a different state of the order. The order might have gone from status "CREATED" to "UPDATED" to "BOOKED" during the day.
Because a SQL select statement does not guarantee any ordering by default, the inserts and updates on the target table can take place in the wrong order. If the "UPDATED" row is processed last, it becomes the final value for the day although the result should be status "BOOKED",
Warehouse Builder enables you to solve this problem by creating an ordered extraction query using the Sorter operator.
The sorter creates an ORDER BY clause in the SQL statement allowing ordering on the columns in the ORDER BY clause. Columns listed first in the ORDER BY clause take precedent over the ones listed later in the list. The first ordering is done on the order number, and within each group of order numbers, the ordering is done on the last updated date, as shown in Figure 2-18. The last change is the last update on the target reflecting the correct final status of the order in the target.
Figure 2-19 Determining Sorting and Sort Order
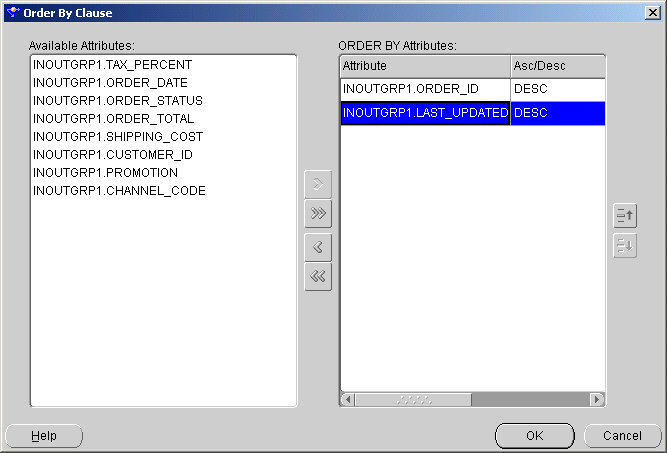
Ordering within the GROUP BY clauses can be done either in an ASCENDING or DESCENDING order. The default is DESCENDING order, as shown in Figure 2-19.
Figure 2-20 ORDER BY Clause in the Generated SQL
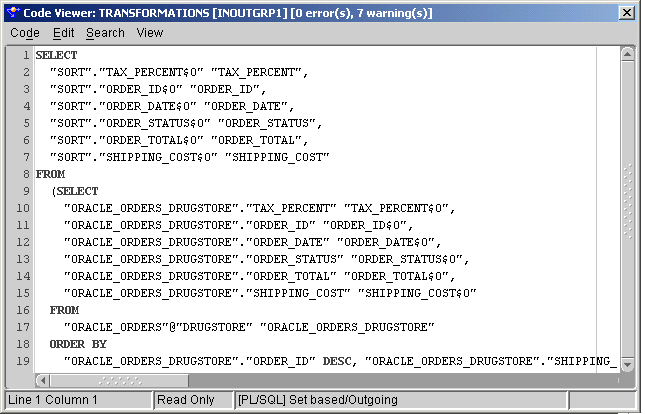
If you change the order of the attributes in the ORDER BY clause, it changes the order in the generated SQL and also the behavior of the mapping, as shown in Figure 2-20.
In a warehouse environment, you may require data to be moved to different targets based on a data driven condition. Instead of moving the data through multiple filters, Warehouse Builder enables you to use a splitter. This operator takes input data and outputs multiple flows of data based on the split conditions you specify.
For example, if you want to split the CUSTOMER table into addresses and pure customer information, then one row must be inserted in two tables as shown in Figure 2-21.
Figure 2-21 Performing an Unconditional Split
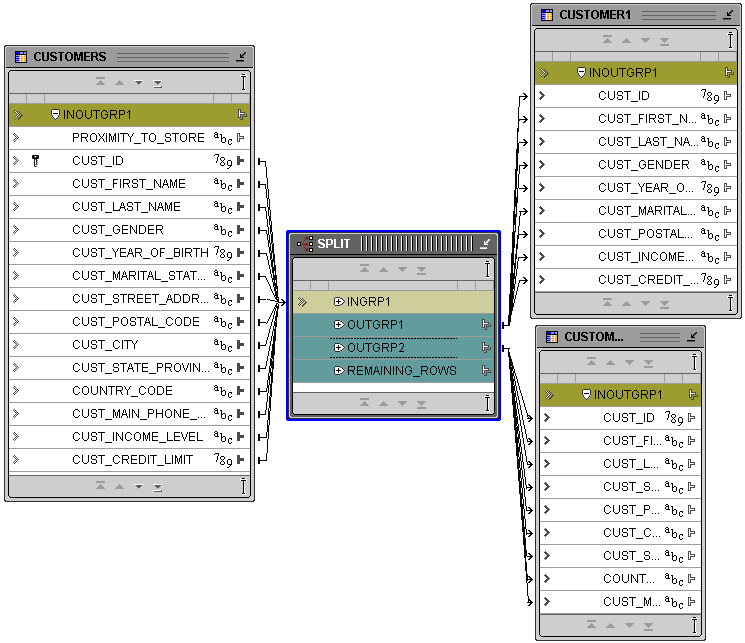
In this example, no split conditions are added to the splitter. Although OUTGRP1 and OUTGRP2 have no condition, a set of columns in OUTGRP1 are mapped to one target while a set of columns in OUTGRP2 are mapped to a different target. If you want to reduce the number of customers (based on the assumption that one customer has more addresses), you can add a deduplicator to the upper flow to obtain only one customer for each address. By mapping the cust_id to both targets, a relationship is maintained at all times.
Currently, the code generated is two separate streams of data. Each target is treated as a data recipient. If the data is inserted, two insert statements are generated in one package, as shown in Figure 2-22 and Figure 2-23.
In the following example, the addresses may be split to hold only the billing addresses in the address table. You can add a condition to OUTGRP2 to select only these addresses. In such a case, a WHERE clause is added to the code, as shown in Figure 2-24.
If none of the clauses is met on the output groups, the data is added to the default group containing all data not held in any of the regular output groups.
Figure 2-24 Inserting Only ÒBill ToÓ Addresses
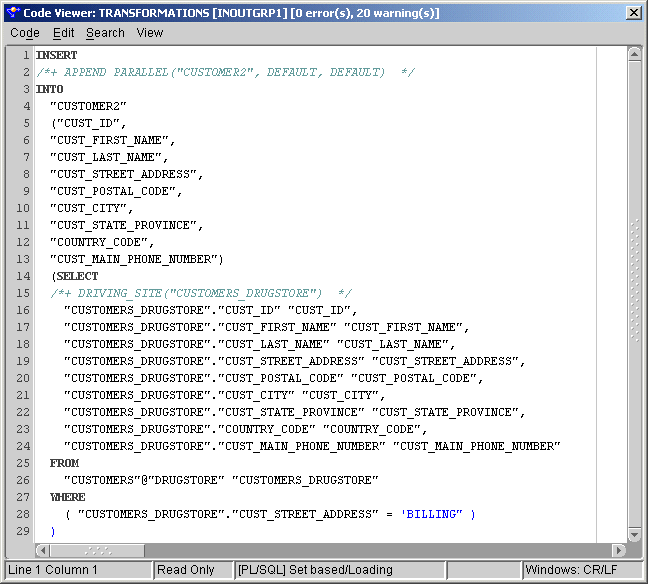
You can also use the splitter for conditional filtering. For example, you can use it split erroneous data from the main branch into separate error tables.
While a regular function only works on one row at a time, a table function enables you to apply the same complex PL/SQL logic on a set of rows and increase your performance.
In Warehouse Builder, you can add a table function operator to a mapping and input a set of rows into it. This row set is then transformed using PL/SQL logic within the table function before it is output to the next operator.
In Figure 2-25, the Time dimension is loaded from a table function. This table function is added to the FROM clause of the select statement. The table function plays the role of a row set provider allowing complex calendar data generation and loading to be done in a single "insert as select" statement.
The unpivot operator converts multiple input rows into one output row. It also enables you to extract once from a source, and then produce one row from a set of source rows that are grouped by attributes in the source data. Like the pivot operator, you can place the unpivot operator anywhere in a mapping.
Table 2-3 shows a representative sample of data from a relational table, SALES. In the crosstab format, the 'MONTH' column has 12 possible character values, one for each month of the year. And all sales figures are contained in one column, 'MONTHLY_SALES'.
Table 2-3 Data in Crosstab Format
| REP | MONTH | MONTHLY_SALES | REGION |
|---|---|---|---|
|
|
|
|
|
|
|
|
|
|
|
|
|
|
|
|
|
|
|
|
|
|
|
|
|
|
|
|
|
|
|
|
|
|
|
|
|
|
|
|
|
|
|
|
|
|
|
|
|
|
|
|
|
|
|
|
|
|
|
|
Figure 2-26 shows data from the relational table 'SALES' after Warehouse Builder unpivots the table. The data formerly contained in the 'MONTH' column, for example Jan, Feb, Mar, corresponds to12 separate attributes (M1, M2, M3...). The sales figures formerly contained in the 'MONTHLY_SALES' are now distributed across the 12 attributes for each month.
Figure 2-26 Data Unpivoted from Crosstab Format

Aggregation of fact data is a common transformation operation. In Warehouse Builder, you can add one aggregator to a mapping to perform multiple aggregations. Warehouse Builder provides a separate editor to enable you to create complex aggregations. Although you can call a different aggregation function for each attribute in an aggregator, each aggregator supports only one GROUP BY and one HAVING clause. For example, you may want to aggregate orders over the Channel, Product, and Orders dimension, as shown in Figure 2-27.
Figure 2-27 Aggregating Order Information

If the target table in this example is allowed to take inserts and updates (updates are matched on the dimension key values or the aggregation points), then the following query is generated by Warehouse Builder, as shown in Figure 2-28.
The statement can be created using the properties on the aggregator. Each attribute holds its own aggregation type, and the HAVING and GROUP BY clauses are modified on the operator, as shown in Figure 2-29, Figure 2-30, and Figure 2-31.
Figure 2-30 Aggregation Function Per Attribute
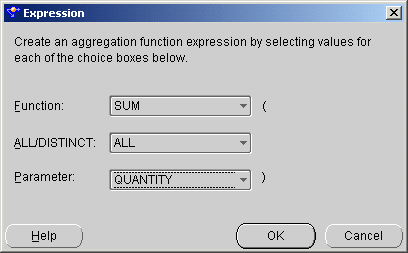
The Aggregator can use the following functions:
Syntax
avg::=AVG(expr)
Purpose
AVG returns the average value of expr using the GROUP BY clause as specified on the operator. In Warehouse Builder, this means that the aggregator returns the average value of the data flowing into the operator as an output group attribute.
Example
The following example calculates the average salary of all employees in the OE.EMPLOYEES table:
SELECT AVG(salary) "Average" FROM employees;

Average
--------
6425
Syntax
count::=COUNT(expr)
Purpose
COUNT returns the number of rows in the query using the GROUP BY clause as specified on the operator. If you specify an expr, COUNT returns the number of rows where expr is not null. You can count all rows or only distinct values of expr. If you specify the asterisk (*), this function returns all rows, including duplicates and nulls. COUNT never returns null as a value on its own.
Example
The following example uses COUNT as an aggregate function:
SELECT COUNT(commission_pct) "Count" FROM employees;

Count
----------
35
Syntax
max::=MAX(attribute)
Purpose
MAX returns the maximum value of attribute using the GROUP BY clause as specified on the operator. This means that the aggregator returns the maximum value of the data flowing into the operator attribute as an output group attribute.
Example
The following example determines the highest salary in the HR.EMPLOYEES table:
SELECT MAX(salary) "Maximum" FROM employees;

Maximum
----------
24000
Syntax
min::= MIN(attribute)
Purpose
MIN returns the maximum value of attribute using the GROUP BY clause as specified on the operator. This means that the aggregator returns the maximum value of the data flowing into the operator attribute as an output group attribute.
Example
The following statement returns the earliest hiredate in the HR.EMPLOYEES table:
SELECT MIN(hire_date) "Earliest" FROM employees;

Earliest
---------
17-JUN-87
Syntax
none::=Group By (attribute)
Purpose
NONE is used to identify the action used to aggregate on the attribute when this attribute is added to the GROUP BY clause. Specifying NONE in the aggregation operator for attribute automatically adds it to the Group By clause (and vice-versa). Using NONE does not lead to an aggregation in the SQL statement as the other functions do.
Example
Figure 2-31 shows the GROUP BY attributes on the right side. Moving an attribute from the left side to the right side automatically switches the aggregation action to NONE.
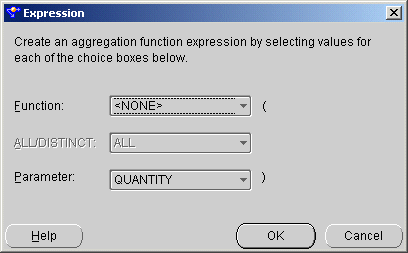
Conversely (as with the aggregation function dialog), selecting NONE moves the attribute to the GROUP BY clause and it appears on the right side.
Figure 2-32 Selecting No Aggregation for the Attribute
Syntax
stddev::= STDDEV(attribute)
Purpose
STDDEV returns sample standard deviation of attribute: a set of numbers. The attributes in Warehouse Builder typically consist of a row fed into the aggregator.
STDDEV differs from STDDEV_SAMP because STDDEV returns zero when it has only one row of input data, and STDDEV_SAMP returns a null. Oracle calculates the standard deviation as the square root of the variance defined for the VARIANCE aggregate function.
Example
The following example returns the standard deviation of salary values in the sample HR.EMPLOYEES table:
SELECT STDDEV(salary) "Deviation"
FROM employees;

Deviation
----------
3909.36575
Syntax
stddev_pop::=STDDEV_POP(sttribute)
Purpose
STDDEV_POP computes the population standard deviation and returns the square root of the population variance into the output attribute of the aggregator.
The attribute is a number expression, and the function returns a value of type NUMBER.
This function is the same as the square root of the VAR_POP function. When VAR_POP returns null, this function also returns null.
Example
The following example returns the population and sample standard deviations of amount of sales in the sample table SH.SALES.
SELECT STDDEV_POP(amount_sold) "Pop",
STDDEV_SAMP(amount_sold) "Samp"
FROM sales;

Pop          Samp
---------- ----------
944.290101 944.290566
Syntax
stddev_samp::=STDDEV_SAMP(attribute)
Purpose
STDDEV_SAMP computes the cumulative sample standard deviation and returns the square root of the sample variance into the output attribute of the aggregator.
The attribute is a number expression and the function returns a value of type NUMBER. This function is same as the square root of the VAR_SAMP function. When VAR_SAMP returns NULL, this function also returns NULL.
Example
The following example returns the population and sample standard deviations of amount of sales in the sample table SH.SALES.
SELECT STDDEV_POP(amount_sold) "Pop",
STDDEV_SAMP(amount_sold) "Samp"
FROM sales;

Pop         Samp
---------- ----------
944.290101 944.290566
Syntax
sum::=SUM(attribute)
Purpose
SUM returns the summary of the values of attribute. The attribute in Warehouse Builder is typically a row set fed into the aggregator. It can contain expressions from previous transformations or from the source system.
Example
The following example calculates the sum of all salaries in the sample HR.EMPLOYEES table below:
SELECT SUM(salary) "Total"
FROM employees;

Total
----------
691400
Syntax
var_pop::= VAR_POP(attribute)
Purpose
After discarding the nulls in this set, VAR_POP returns the population variance of a set of numbers to the output attribute in the aggregator. The attribute is a number expression and the function returns a value of type NUMBER. If the function is applied to an empty set, it returns NULL.
The function makes the following calculation:
(SUM(attribute² ) - SUM(attribute)² / COUNT(attribute)) / COUNT(attribute)
Example
The following example returns the population variance of the salaries in the HR.EMPLOYEES table:
SELECT VAR_POP(salary) FROM employees;

VAR_POP(SALARY)
---------------
15140307.5
Syntax
var_samp::= VAR_SAMP(attribute)
Purpose
After discarding the nulls in this set, VAR_SAMP returns the sample variance of a set of numbers to the output attribute in the aggregator. The expression is a number expression and the function returns a value of type NUMBER. If the function is applied to an empty set, it returns NULL.
The function makes the following calculation:
(SUM(attribute² ) - SUM(attribute)² / COUNT(attribute)) / (COUNT(attribute) - 1)
This function is similar to VARIANCE, except that given an input set of one element, VARIANCE returns 0 and VAR_SAMP returns null.
Example
The following example returns the sample variance of the salaries in the sample HR.EMPLOYEES table.
SELECT VAR_SAMP(salary) FROM employees;

VAR_SAMP(SALARY)
----------------
15283140.5
Syntax
variance::=VARIANCE(attribute)
Purpose
VARIANCE returns the variance of attribute and delivers the result to the output attribute in the aggregator. Warehouse Builder calculates the variance of attribute as follows:
0 if the number of rows in attribute = 1
VAR_SAMP if the number of rows in attribute > 1
Example
The following example calculates the variance of all salaries in the sample HR.EMPLOYEES table:
SELECT VARIANCE(salary) "Variance"
FROM employees;

Variance
----------
15283140.5
Many transformations require constant values. Warehouse Builder provides some constants as direct functions. You can use the Expression Builder to create constants in Warehouse Builder. The constants delivered as special functions are described in the following sections.
Syntax
sysdate::=SYSDATE
Purpose
SYSDATE returns the current date and time and requires no arguments. In distributed SQL statements, this function returns the date and time on your local database. You cannot use this function in the condition of a CHECK constraint.
Example
The following example returns the current date and time:
SELECT TO_CHAR (SYSDATE, 'MM-DD-YYYY HH24:MI:SS')"NOW"
FROM DUAL;

NOW
-------------------
04-13-2001 09:45:51
Syntax
systimestamp::=SYSTIMESTAMP
Purpose
The SYSTIMESTAMP function returns the system date, including fractional seconds and time zone of the database. The return type is TIMESTAMP WITH TIME ZONE.
Example
The following example returns the system date:
SELECT SYSTIMESTAMP FROM DUAL;

SYSTIMESTAMP
------------------------------------------------------------------
28-MAR-00 12.38.55.538741 PM -08:00
The Warehouse Builder Mapping Editor includes operators that perform data cleansing transformations. This section describes these operators.
Warehouse Builder includes an operator that enables name and address cleansing (as of the 9.0.2.56.0 version). The name and address operator supports parsing, standardization, postal matching, and geocoding of name and address data. Name and Address parsing is the breakdown of non-discrete input into discrete name or address components. For example, an input address of:
Mr. Joe A. Smith Sr.
8500 Normandale Lake Blvd Suite 710
Bloomington MN 55438
is parsed into the following abbreviated list of address components:
Pre name: MR
First name: JOE
First name standardized: JOSEPH
Post name: SR
Street name: NORMANDALE LAKE
Primary address: NORMANDALE LAKE BLVD
Secondary address: STE 710
Last Line: BLOOMINGTON MN  55437-3813
Latitude: 44.854876
Name and address standardization includes modification of components to a standard version acceptable to a postal service or suitable for record matching. In the preceding example, Suite is standardized to STE and Joe is standardized to JOSEPH.
Postal matching involves matching an input address with postal database entries to either verify an address or correct an address. In the preceding example, the postal code was corrected to 55437-3813.
Geocoding (only available for the US) involves the collection of census and locational data. Latitude and Longitude are currently available in Warehouse Builder. Census data such as minor census district, metropolitan statistical area, and FIPS code will be available in later versions.
The Match-Merge operator is a data quality operator that you can use to first match and then merge data.
When you match records, you determine through business rules which records in a table refer to the same data. When you merge records, you consolidate into a single record the data from the matched records.
This section includes information and examples on how to use the Match-Merge operator in a mapping. The Match-Merge operator together with the Name-Address operator support householding, the process of identifying unique households in name and address data.
Consider how you could utilize the Match-Merge operator to manage a customer mailing list. Use matching to find records that refer to the same person in a table of customer data containing 10,000 rows. For example, you can define a match rule that screens records that have similar first and last names. Through matching you may discover that 5 rows refer to the same person. You can merge those records into one new record. For example, you can create a merge rule to retain the values from the one of the five matched records with the longest address. The newly merged table now contains one record for each customer.
Table 2-4 shows records that refer to the same person prior to using the Match-Merge operator.
Table 2-4 Sample Records
| Row | FirstName | LastName | SSN | Address | Unit | Zip |
|---|---|---|---|---|---|---|
|
1 |
Jane |
Doe |
NULL |
123 Main Street |
NULL |
22222 |
|
2 |
Jane |
Doe |
111111111 |
NULL |
NULL |
22222 |
|
3 |
J. |
Doe |
NULL |
123 Main Street |
Apt 4 |
22222 |
|
4 |
NULL |
Smith |
111111111 |
123 Main Street |
Apt 4 |
22222 |
|
5 |
Jane |
Smith-Doe |
111111111 |
NULL |
NULL |
22222 |
Table 2-5 shows the single record for Jane Doe after using the Match-Merge operator. Notice that the new record retrieves data from different rows in the sample.
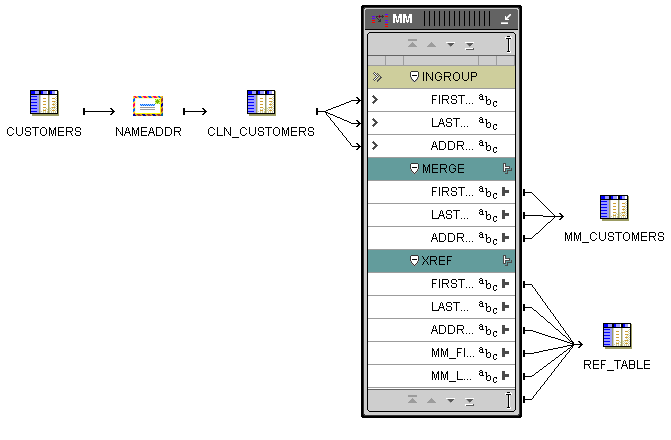
Figure 2-34 shows a mapping you can design using a Match-Merge operator. Notice that the Match-Merge operator is preceded by a Name-Address operator, NAMEADDR, and a staging table, CLN_CUSTOMERS. You can design your mapping with or without a Name-Address operator. Preceding the Match-Merge operator with a Name-Address operator is desirable when you want to ensure your data is clean and standardized before launching time consuming match and merge operations.
Figure 2-34 Match-Merge Operator in a Mapping
Whether you include a Name-Address operator or not, be aware of the following considerations as you design your mapping:
PL/SQL output: The Match-Merge operator can generate two outputs, both PL/SQL outputs only. The MERGE group includes the merged data. The XREF group is an optional group you can design to document the merge process.
Row based operating mode: When the Match-Merge operator matches records, it compares each row with the subsequent row in the source and generates row based code only. These mappings, therefore, can only run in row based mode.
SQL based operators before Match-Merge: The Match-Merge operator generates only PL/SQL outputs. If you want to include operators that generate SQL code only, you must design the mapping such that they precede the Match-Merge operator. For example, operators such as the Join, Key Lookup, and Set operators must precede the Match-Merge operator. A mapping designed with operators that generate set based code after a Match-Merge operator is invalid and Warehouse Builder does not generate code for such mappings.
SQL input: With one specific exception, the Match-Merge operator requires SQL input. If you want to precede a Match-Merge with an operator that generates only PL/SQL output such as the Name-Address operator, you must first load the data to a staging table.
Refining Data from Match-Merge operators: To achieve greater data refinement, map the XREF output from one Match-Merge operator into another Match-Merge operator. This scenario is the one exception to the SQL input rule for Match-Merge operators. With additional design elements, the second Match-Merge operator accepts PL/SQL.
For more information on the Match Merge operator, see the Oracle Warehouse Builder User's Guide.