| Oracle® Audit Vault Administrator's Guide Release 10.2.3 Part Number E11059-03 |
|
|
View PDF |
| Oracle® Audit Vault Administrator's Guide Release 10.2.3 Part Number E11059-03 |
|
|
View PDF |
Once you have configured and started collection agents and their collectors and set up the sources to be audited as described in Chapter 2, you may need to perform some additional configuration tasks and also begin to manage Audit Vault.
This chapter includes the following sections:
Some additional Audit Vault configuration tasks may include performing the following tasks as needed or as indicated previously in Chapter 2:
Adding Sources, Altering Source Attributes, and Dropping Sources
Adding Collectors, Altering Collector Attributes, and Dropping Collectors
Collection agents can only be added or dropped.
See Section 1.4 for information about Audit Vault Collection Agent deployment options and see Oracle Audit Vault Collection Agent Installation Guide for information about adding and installing an Audit Vault Collection Agent.
Collection agents can be dropped from Oracle Audit Vault. Since the AVCA drop_agent command does not delete the collection agent from Oracle Audit Vault, you should only drop an agent when it is no longer needed to collect audit trail records from a source. The AVCA drop_agent command disables the collection agent. Therefore, you can neither add a collection agent by the same name as the one that was dropped nor enable a collection agent that has been dropped.
To drop a collection agent, use the AVCA drop_agent command. For example:
avca drop_agent -agentname OC4JAgent1
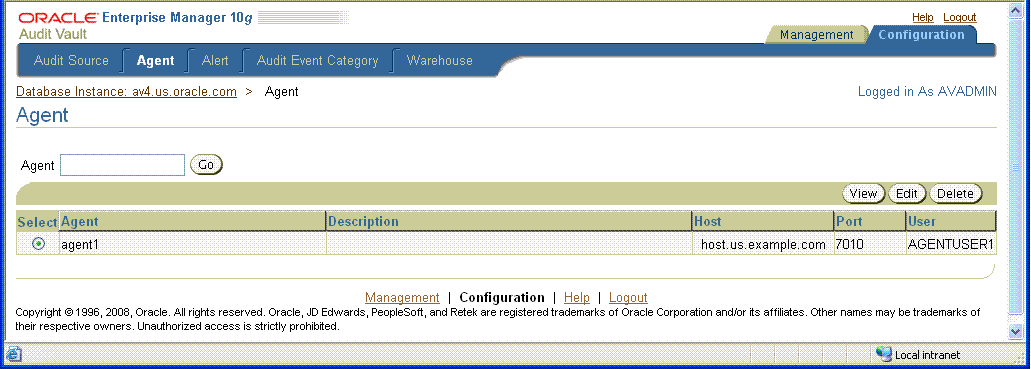
To use the Audit Vault Console to manage collection agents, log in to the Audit Vault Console as the user with AV_ADMIN role granted. Using the tabs, click Configuration, then Agent to display the Agent page (see Figure 3-1).
Figure 3-1 Agent Configuration Management Page
From the Agent page, you can:
Enter a collection agent name in the Agent field and then click Go to view information about that collection agent.
Select a collection agent, then click View to view the properties for the collection agent. After viewing the collection agent properties on the View Agent page, click OK to return to the Agent page.
Select a collection agent, then click Edit to edit the properties for a collection agent. On the Edit Agent page, edit the desired properties for the collection agent. Click OK to save your changes and return to the Agent page.
Select a collection agent, then click Delete to delete that collection agent. Once you delete that collection agent, its name cannot be used again to create another collection agent.
Click Help on any of these collection agent pages for more information.
Sources are databases from which audit trail data is being collected and managed by Oracle Audit Vault. Before adding a source, the Audit Vault Collection Agent, which manages the collectors to extract the audit trail data, must exist or be installed. This section describes adding sources, altering source attributes, and dropping sources.
When a source is added or registered in Audit Vault, information must be provided using the following arguments in the AVORCLDB add_source command, or the AVMSSQLDB add_source command:
-src <host:port:service> – For an Oracle Database source, the source connection information consisting of the host name:port number:service name, separated by a colon.
-src <host:port> – For SQL Server database sources, the source connection information consisting of the host name:port number, separated by a colon.
[-srcusr <usr>/<pwd>] - For backward compatibility with previous releases of Audit Vault Agents with Audit Vault Server and using Oracle Database sources, the credentials of the user on the source database to collect audit data. For password handling security, do not specify this argument on the command line nor use the environment variable when using Oracle source databases. Instead, for all database sources, let the command prompt you for the source user name and password, which is the default behavior for Audit Vault release 10.2.3.0.0 and higher.
-srcname <srcname> – Source name. This argument is required for Microsoft SQL Server source databases. This argument is optional for Oracle source databases. If this argument is not specified for Oracle source databases, the global database name of the source will be used.
[-desc <desc>] – Optional brief description of the source.
[-agentname <agentname>] – For Oracle Database sources, optional collection agent name; however, this parameter must be specified to configure policy management for Oracle Database sources using the AVORCLDB add_source command.
The -agentname <agentname> parameter is not supported for the AVMSSQLDB add_source command.
See Section 2.2 for an example of adding an Oracle Database source.
See Section 2.3 for an example of adding a Microsoft SQL Server source.
This section describes changing attributes for a source that are modifiable. Source attributes are described in this section by the source to which they are associated.
Oracle Database Source Attributes
Some Oracle Database source attributes are modifiable after creation by using the optional <attrname>=<attrvalue> argument on the command-line and separating multiple pairs by a space using the AVORCLDB alter_source command. See Table C-5 for a list of modifiable attributes using the alter_source command.
To alter an Oracle Database source's attribute, use the following AVORCLDB alter_source command. For example:
avorcldb alter_source -srcname ORCLDBSrc DESCRIPTION="new desc"
Microsoft SQL Server Source Attributes
Some Microsoft SQL Server Database source attributes are modifiable by using the optional [<attrname>=<attrvalue>] argument on the command-line and separating multiple pairs of entries by a space using the AVMSSQLDB alter_source command. See Table D-3 for a list of modifiable attributes using the alter_source command.
To alter a Microsoft SQL Server Database source's attribute, use the following AVMSSQLDB alter_source command. For example:
avmssqldb alter_source -srcname MSSQLDBSrc DESCRIPTION="new desc"
The Audit Vault drop_source command is not a true drop. The drop_source command, disables the source.
Therefore, once you have dropped a source, you can neither add a new source by the same name nor enable a source that has been dropped. Audit data for a dropped source will no longer be collected once the source has been dropped, but information for a dropped source is maintained in Oracle Audit Vault with a status of dropped. Therefore you should only drop a source if you no longer want to collect audit data or the source has moved to a new host. For attributes of a source that can be modified, see the alter_source commands in Appendix C and Appendix D.
To drop an Oracle Database source, use the AVORCLDB drop_source command. For example:
avorcldb drop_source -srcname ORCLDB.DOMAIN.COM
To drop a Microsoft SQL Server Database source, use the AVMSSQLDB drop_source command. For example:
avmssqldb drop_source -srcname mssqldb4
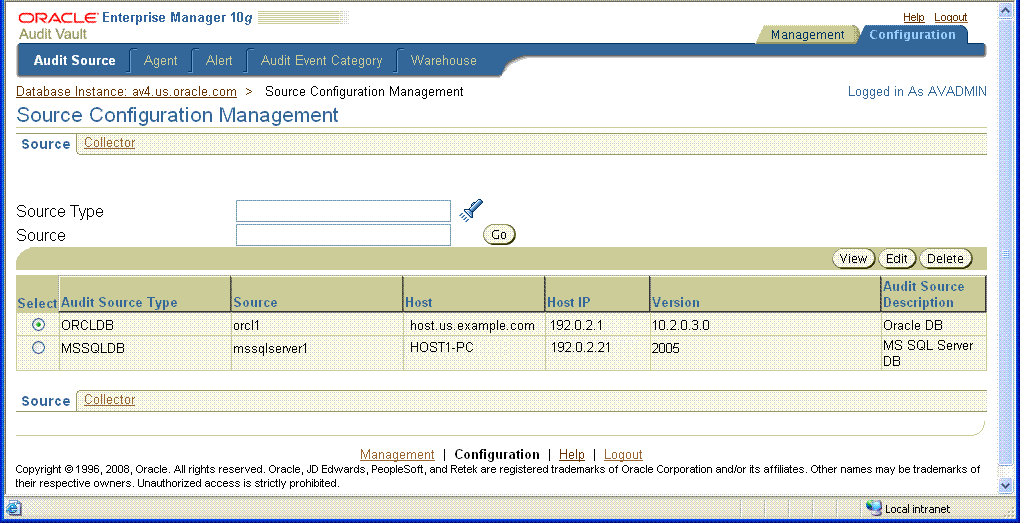
To use the Audit Vault Console to manage sources, log in to the Audit Vault Console as the user with AV_ADMIN role granted. Using the tabs, click Configuration, then Audit Source to display the Source Configuration Management page (see Figure 3-2).
Figure 3-2 Source Configuration Management Page
From the Source Configuration Management page, you can:
Enter a source type in the Source Type field and optionally enter a name of a source in the Source field, and then click Go to search for sources of that source type or a specific source of that source type.
Select a source, then click View to view the properties and attributes for the source. After viewing the source properties and attributes on the View Source Details page, click OK to return to the Source Configuration Management page.
Select a source, then click Edit to edit the mutable properties and attributes for a source. On the Edit Source Details page, edit the desired properties and attributes for the source. Click OK to save your changes and return to the Source Configuration Management page.
Select a source, then click Delete to delete that source. Once you delete that source, its name cannot be used again to create another source.
Click Help on any of the Source Configuration Management pages for more information and view the alter_source commands in Appendix C and Appendix D for more information on the attributes that may be modified.
Audit Vault collectors are responsible for the collection of audit data from a source. Collectors extract and transform audit records from their source audit trails and send them to Audit Vault to be stored in the Audit Vault repository. Before you can add a collector, you must first install the Agent (see Section 3.1.1) and then add or register its source with Audit Vault (see Section 3.1.2). This section describes adding collectors, altering collector attributes, and dropping collectors.
This section describes adding collectors and supplying information for arguments on the command line. Each collector is described in this section by the collector group to which it is associated.
Oracle Database OSAUD, DBAUD, and REDO Collectors
When a collector is added or registered in Audit Vault, information must be provided using the following arguments in the AVORCLDB add_collector command, and the AVMSSQLDB add_collector command:
-srcname <srcname> – The source name from which this collector will collect audit data. This is the source name returned upon adding a database audit source to Audit Vault as described in Section 3.1.2.1. See Example 2-5 and Example 2-13.
-agentname <agentname> – The name of the collection agent to which this collector is associated.
-colltype [OSAUD,DBAUD,REDO] – For Oracle Database collectors, the type of collector this collector is: OSAUD, DBAUD, or REDO.
[-orclhome <orclhome>] – For Oracle Database OSAUD collectors, the Oracle home of the source database. This argument is required if the -colltype argument value is OSAUD.
[-collname <collname>] – Optional unique name of the collector.
[-desc <desc>] – Optional brief description of the collector.
[-av <host:port:service>] – For Oracle Database REDO collectors, the connection information for Audit Vault used for the database link from the source database to Audit Vault. This argument is required if the -colltype argument value is REDO.
[-instname <instname>] – Instance name of Audit Vault Oracle Real Application Clusters (Oracle RAC) installation. This argument must be used to add multiple OSAUD collectors (one for each instance).
See Section 2.2 for an example of adding an Oracle Database OSAUD, DBAUD, and REDO collector.
Note:
There is a 2 GB audit file size limit for the OSAUD collector to be able to collect audit records from audit trails stored in files, which includes theSYSLOG, .AUD, and .XML files. If a file size greater than 2 GB is encountered, the OSAUD collector will ignore all audit records beyond 2 GB. To control the size of the operating system audit trail and select the audit trail type to set, set the DBMS_AUDIT_MGMT.OS_FILE_MAX_SIZE property and the DBMS_AUDIT_MGMT.AUDIT_TRAIL_TYPE type by using the DBMS_AUDIT_MGMT.SET_AUDIT_TRAIL_PROPERTY PL/SQL procedure. See Section 4.4 for tutorial information and Appendix G for reference information.When a collector is added or registered in Audit Vault, information must be provided using the following arguments in the AVMSSQLDB add_collector command:
-srcname <srcname> – The source name from which this collector will collect audit data.
-agentname <agentname> – The name of the collection agent to which this collector is associated.
[-collname <collname>] – Optional unique name of the collector.
[-desc <desc>] – Optional brief description of the collector.
See Section 2.3 for an example of adding a Microsoft MSSQLDB collector.
This section lists collector properties and describes changing collector attributes for collectors. Collector attributes are described in this section by the collector to which they are associated.
Oracle Database OSAUD, DBAUD, and REDO Collector Properties and Attributes
Some Oracle Database collector attributes are modifiable by using the optional [<attrname>=<attrvalue>] argument on the command-line and separating multiple pairs by a space using the AVORCLDB alter_collector command. See Table C-2, Table C-3, and Table C-4 for a list of attributes that are modifiable using the alter_collector command.
You can modify one or more attributes for a collector at a time using the AVORCLDB alter_collector command. See the AVORCLDB alter_collector command for more information.
To alter a collector, use the following AVORCLDB alter_collector command:
avorcldb alter_collector -collname testColl -srcname testSrc DESCRIPTION="new desc"
Microsoft MSSQLDB Collector Attributes
Some Microsoft SQL Server Database collector attributes are modifiable using the optional [<attrname>=<attrvalue>] argument on the command-line and separating multiple pairs by a space using the AVMSSQLDB alter_collector command. See Table D-2 for a list of attributes that are modifiable using the alter_collector command.
To alter a collector, use the following AVMSSQLDB alter_collector command:
avmssqldb alter_collector -collname MSSQLCollector -srcname testSrc DESCRIPTION= "new desc"
To drop a collector, specify its name in an AVORCLDB drop_collector command, or in a AVMSSQLDB drop_collector command.
The drop_collector command does not delete the collector from Oracle Audit Vault. The drop_collector command disables the collector. Therefore, you can neither add a collector by the same name as the one that was dropped nor enable a collector that has been dropped.
To drop an Oracle Database collector, use the AVORCLDB drop_collector command to drop a collector. For example:
avorcldb drop_collector -srcname ORCL.DOMAIN.COM -collname STREAMSCOLLECTOR
To drop a Microsoft SQL Server Database collector, use the AVMSSQLDB drop_collector command to drop a collector. For example:
avmssqldb drop_collector -srcname mssqldb4 -collname MSSQLCollector_2
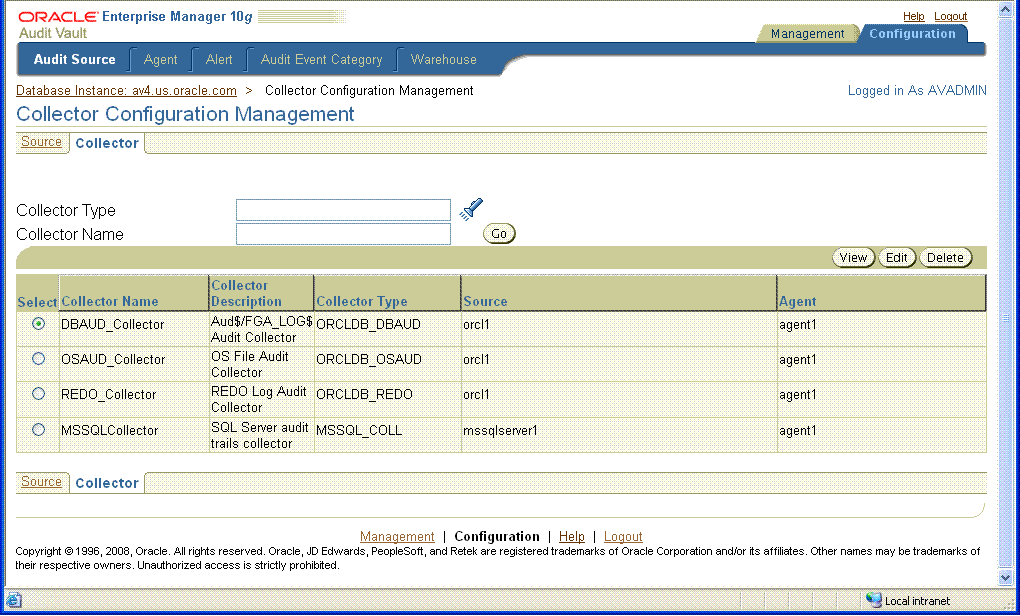
To use the Audit Vault Console to manage collectors, log in to the Audit Vault Console as the user with AV_ADMIN role granted. Using the tabs, click Configuration, Audit Source, then Collector to display the Collector Configuration Management page (see Figure 3-3).
Figure 3-3 Collector Configuration Management Page
From the Collector Configuration Management page, you can:
Enter a collector type in the Collector Type field and optionally enter a name of a collector in the Collector field, and then click Go to search for collectors of that collector type or a specific collector of that collector type.
Select a collector, then click View to view the properties and attributes for the collector. After viewing the collector properties and attributes on the View Collector Details page, click OK to return to the Collector Configuration Management page.
Select a collector, then click Edit to edit the mutable properties and attributes for a collector. On the Edit Collector Details page, edit the desired properties and attributes for the collector. Click OK to save your changes and return to the Collector Configuration Management page.
Select a collector, then click Delete to delete that collector. Once you delete that collector, its name cannot be used again to create another collector.
Click Help on any of the Collector Configuration Management pages for more information or see the alter_collector command for AVORCLDB in Appendix C or for AVMSSQLDB in Appendix D.
Audit data moves to the data warehouse according to a specified schedule known as the warehouse schedule. After audit data is transferred from the source to the Audit Vault raw audit data store, an Oracle DBMS_SCHEDULER job runs an extract, transformation and load (ETL) process to normalize the raw audit data into the data warehouse. By default, the default DBMS_SCHEDULER job runs every 24 hours. Audit data is retained in the data warehouse for a specified period of time. Audit data can be refreshed in the data warehouse according to a schedule.
Audit Vault provides statistics of the ETL process to update the warehouse as shown in Figure 3-4. By utilizing the information provided in the Duration in Minutes and CPU Used columns, you can estimate how often the job may be run to update the data warehouse infrastructure.
Figure 3-4 Refresh Activity Page Showing Statistics of the ETL Process
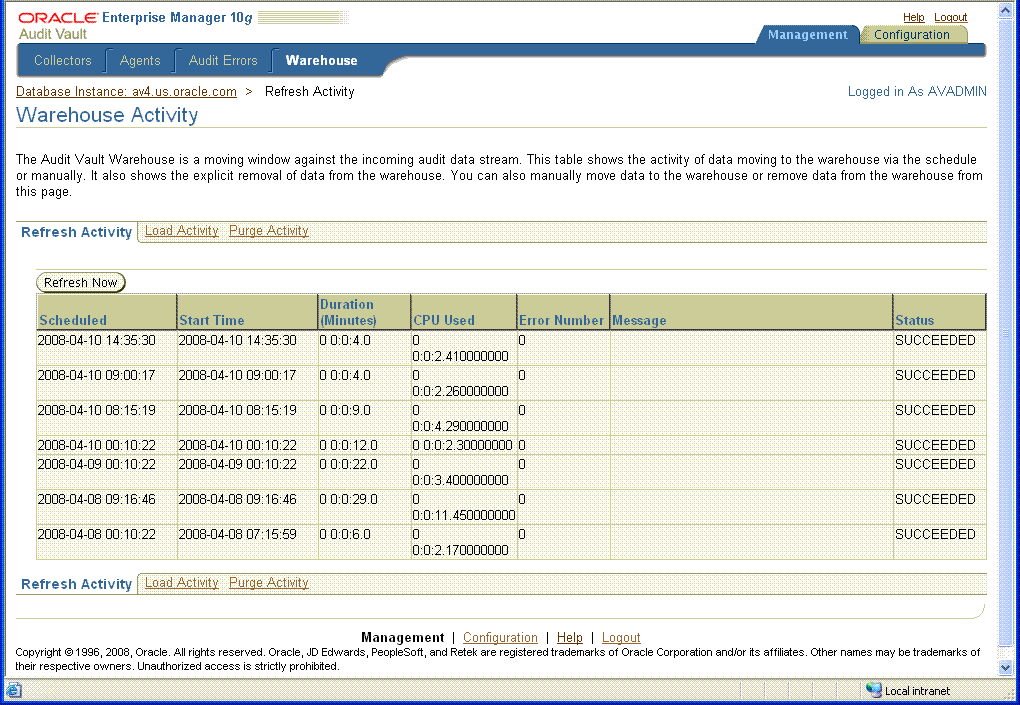
Regarding the loading of archived audit data that is shown on the Load Activity page, alert processing must be disabled when audit data is reloaded from an archive so that alerts are not reissued again and then enabled again when the warehouse is refreshed with fresh audit data. After running reports against this data, you can then purge the data and this activity is reported on the Purge Activity page.
By default, the warehouse job runs once every 24 hours. There are a number of ways to change the frequency in which the ETL job will run.
One way is to create a new schedule using the DBMS_SCHEDULER package that will reflect the frequency in which you wish the ETL process to occur. After you have created a new schedule, then you access the warehouse settings page and change the schedule name from the default to the new schedule name that you just created.
Another way is to use the standard option on the warehouse settings page where you can then set the frequency manually in which you want the job to run. (You can copy any DVD section below on the warehouse settings page, where you have described the different fields for the standard option.)
Also on the warehouse settings page, there is a section titled Retention Time. The Retention Time specifies how long you want to maintain your audit trail data online for reporting purposes. By default, this is one year. The minimum time, you can specify it is one month. While you may have business requirements to maintain audit trail data for a longer period of time, the Retention Time is a way to specify how long do you want to maintain data in the warehouse for analysis and reporting.
You can implement a lifecycle management process with the audit trail data to maintain it for a longer period of time. See Section 4.4 for more information on managing audit trail data.
To use the Audit Vault Console to set these warehouse settings, log in to the Audit Vault Console as the user with AV_ADMIN role granted. Using the tabs, click Configuration, then Warehouse to display the Warehouse Settings page (see Figure 3-5).
On the Warehouse Settings page, specify a standard schedule by selecting a Schedule Type of type Standard. Then specify the following frequency settings to move new audit data to the warehouse:
Frequency Type by minutes, by hours, by days, weekly, monthly, or yearly
Interval (Days) indicates the time between moving audit data to the warehouse
Time Zone indicates the local time zone of the warehouse
Start Date indicates the beginning day in which to move audit data to the warehouse
Start time indicates the beginning time in which to move audit data to the warehouse
You can also specify a predefined schedule by selecting a Schedule Type of Use Pre-defined Schedule and then selecting the schema in the Schema field where the schedule is located and selecting the name of the schedule in the Schedule field.
Next, specify the retention time or length of time to retain the audit data in the warehouse in the Retention Time field.
Check your settings, then click Apply to save your warehouse settings.
Click Help on the Warehouse Settings page for more information.
Use the AVCA set_warehouse_schedule command to refresh data from the raw audit data store by setting values for the following arguments:
-schedulename <schedule name> – The schedule name
-startdate <start date> – The start date
-rptintrv <repeat interval> – The repeat interval
[-dateformat <date format>] – Optional date format for the -startdate argument
The AVCA set_warehouse_schedule command is overloaded and can be used to either specify a schedule name created using DBMS_SCHEDULER.create_schedule procedure or specify a start date and repeat interval and optionally specify a particular date format. For example, the following AVCA set_warehouse_schedule command uses a start date and repeat interval argument to set the schedule for refreshing data from the raw audit data store to the star schema.
avca set_warehouse_schedule -startdate 01-JUL-06 -rptintrv 'FREQ=DAILY;BYHOUR=0'
Use the AVCA set_warehouse_retention command to control the amount of data kept online in the data warehouse fact table by setting values for the year month interval.
The following example controls the amount of data kept online in the data warehouse table for a time interval of one year.
avca set_warehouse_retention -intrv +01-00
To use the Audit Vault Console to globally disable alert processing, log in to the Audit Vault Console as the user with AV_ADMIN role granted. Using the tabs, click Configuration, then Alert to display the Alert Settings page (see Figure 3-6).
On the Alert Settings page, at the Alert Processing Status field, click the Disable option to globally disable alert processing, then click Apply.
Click Help on the Alert Settings page for more information.
Note:
Before loading audit data into the data warehouse that has been archived for long-term storage, you must disable alert processing so that alerts are not reissued again.Alerts should not be disabled unless directed by Oracle Support or there is an issue with the alerts table.
Audit event category management consists of viewing the Audit Vault audit event categories, their attributes, and their audited events.
To use the Audit Vault Console to view the audit event categories, log in to the Audit Vault Console as the user with AV_ADMIN role granted. Using the tabs, click Configuration, then Audit Event Category to display the Audit Event Category Management page (see Figure 3-7).
Figure 3-7 Audit Event Category Management Page
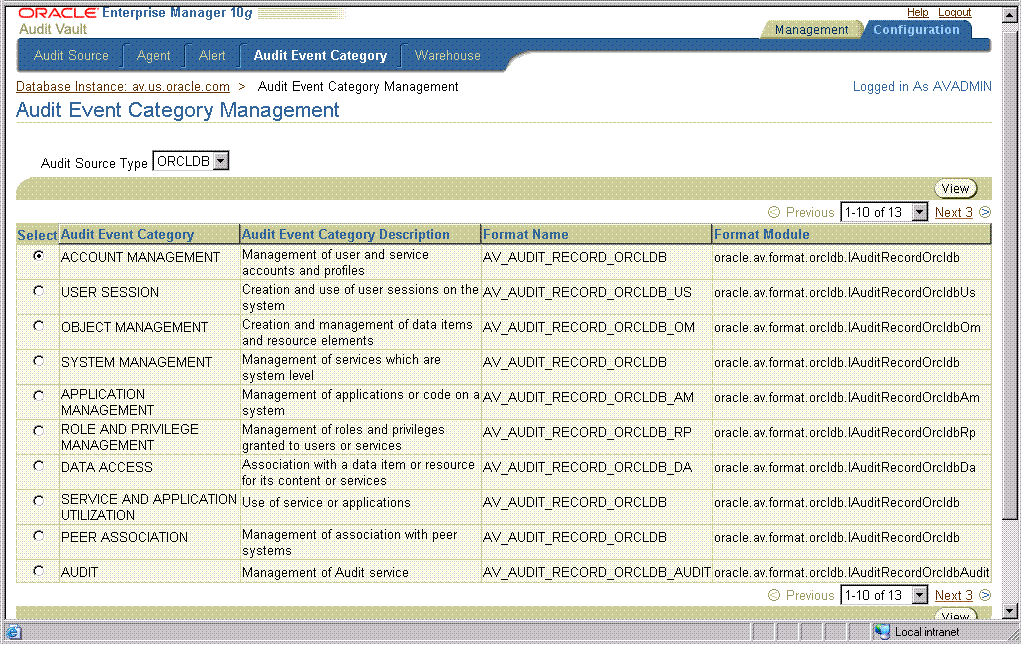
On the Audit Event Category Management page, audit event categories appear in tabular format, showing the following columns:
Audit Event Category
Audit Event Category Description
Format Name
Format Module
From the Audit Event Category Management page, you can select an audit source type from the Audit Source Type field and then view the audit event categories for that audit source type. The audit source types available in this release are ORCLDB and MSSQLDB.
From the Audit Event Category Management page, you can select an audit event category, then click View to view its attributes and audit events on the View Audit Event Category page. From the View Audit Event Category page, the Attributes tab appears by default, showing the attributes for the selected audit event category. Click the Audit Events tab to display the audit events that are audited for the selected audit event category.
Click Help on any of the Audit Event Category Management pages for more information.
Managing Audit Vault consists of performing the following tasks as needed or as indicated in Chapter 2:
On occasion, you might need to shut down Audit Vault Console, for example, as part of the process of removing Audit Vault Console from the system.
To shut down Audit Vault Console, use the AVCTL stop_av command, which executes an emctl stop dbconsole command. For example:
avctl stop_av
To check the status of Audit Vault Console, use the AVCTL show_av_status command.
avctl show_av_status
To start the Audit Vault Console, use the AVCTL start_av command, which executes an emctl start dbconsole command. For example:
avctl start_av
The collection agent OC4J process might terminate abnormally, and you might need to restart it manually. However, first you might want to check its status.
To check the status of collection agent OC4,use the AVCTL show_oc4j_status command.
avctl show_oc4j_status
To start the collection agent OC4J, use the AVCTL start_oc4j command. For example:
avctl start_oc4j
If the collection agent OC4J process must be halted, for example, as one of steps for removing the Audit Vault Collection Agent software from a system, use the AVCTL stop_oc4j command. For example:
avctl stop_oc4j
A collection agent manages audit data collectors on behalf of the Audit Vault Server.
To manage a collection agent, use the AVCTL utility. When an AVCTL start_agent command is issued for a collection agent and that command is successful, the collection agent and its set of collectors are put into a RUNNING state. To check the collection agent status, issue the show_agent_status command. The AVCTL stop_agent command is issued to stop a collection agent so that you can perform maintenance on it.
The following AVCTL start_agent command starts the collection agent:
avctl start_agent -agentname OC4JAGENT1
The following AVCTL show_agent_status command checks the collection agent status.
avctl show_agent_status -agentname OC4JAGENT1
The following AVCTL stop_agent command stops the collection agent:
avctl stop_agent -agentname OC4JAGENT1
See Appendix B for reference information about each of these commands.
To manage collection agent metadata, use the AVCA utility. See Section 2.4 for tutorial information and see Appendix A for reference information.
To use the Audit Vault Console to manage collection agents, log in to the Audit Vault Console as the user with the AV_ADMIN role granted. Using the tabs, click Management, then Agents to display the Agents page (see Figure 3-8).
On the Agents page, you can view collection agent information and start and stop agents. Collection agent information includes:
Agent – Name of the collection agent
Host – The host name where the collection agent is installed
Port – The port number of the host system where the collection agent is installed
HTTPS – Whether or not the collection agent is communicating with the Audit Vault Server using a secure communication channel (HTTPS)
Status – The current running status of the collection agent: an up green arrow indicates the collection agent is running; a down red arrow indicates the collection agent is not running, or error indicates the collection agent is in an error state
To start a collection agent, select the collection agent and click Start. To stop a collection agent, select the collection agent and click Stop.
Click Help for more information.
Once a collection agent is installed, deployed, and started so that it is in a RUNNING state, you can set up collectors on the sources where the collection agent resides and manage them, which is described in Section 3.2.4.1 and Section 3.2.4.2.
The following AVCTL start_collector command starts the collector named REDO_Collector in Oracle Audit Vault:
avctl start_collector -collname REDO_Collector
-srcname ORCL.REGRESS.RDBMS.DEV.US.ORACLE.COM
The following AVCTL show_collector_status command checks the collector status of the REDO_Collector collector.
avctl show_collector_status -collname REDO_Collector
                            -srcname ORCL.REGRESS.RDBMS.DEV.US.ORACLE.COM
The following AVCTL stop_collector command stops the collector named REDO_Collector in Oracle Audit Vault:
avctl stop_collector -collname REDO_Collector
-srcname ORCL.REGRESS.RDBMS.DEV.US.ORACLE.COM
See Appendix B for reference information about each of these commands. See Section 2.4.2 for tutorial information.
To use the Audit Vault Console to manage collectors, log in to the Audit Vault Console as the user with AV_ADMIN role granted. Using the tabs, click Management, then Collectors to display the Collectors page (see Figure 3-9).
On the Collectors page, you can view collector information and start and stop collectors. Collector information includes:
Collector – Name of the collector
Agent – The name of the collection agent for this collector
Audit Source – The name of the audit data source
Status – The current running status of the collector: an up green arrow indicates the collector is running, a down red arrow indicates the collector is not running, an error indicates that the collector is in an error state
Records Per Second – The number of records per second being collected for the current time period
Bytes Per Second – The number of bytes per second in audit records being collected for the current time period
To start a collector, select the collector and click Start. To stop a collector, select the collector and click Stop.
Click Help for more information.
The Audit Vault reports utilize the audit trail data after it is normalized in the warehouse repository. If you expected to see data in a report and it is not there, you can view the Refresh Activity page to determine when the last time the refresh warehouse job ran. Use the Audit Vault Console to manage or view the history of refreshing, purging, and loading the data warehouse.
Use the AVCA command-line utility to populate the star schema with data from the raw audit data store, to refresh the data warehouse dimensions and fact tables with the data in the raw audit data store since the last refresh operation, and to remove audit data from the data warehouse. See the AVCTL load_warehouse, purge_warehouse, and refresh_warehouse commands for reference information.
For example, once audit records are collected and sent to the raw audit data store, refresh the warehouse to populate the warehouse with this fresh set of collected audit records for analysis. In the Audit Vault Server home shell, issue an AVCTL refresh_warehouse command specifying the -wait argument, as shown in Example 3-1.
Example 3-1 Refreshing the Warehouse
avctl refresh_warehouse -wait
AVCTL started
Refreshing warehouse...
Waiting for refresh to complete...
done.
See Appendix B for reference information about each of these commands.
To use the Audit Vault Console to view warehouse history information, log in to the Audit Vault Console as the user with the AV_ADMIN role granted. Using the tabs, click Management, then Warehouse to display the Warehouse Load History page. From this page, you can select the History of Refreshing page (see Figure 3-10), the History of Loading page, or the History of Purging page.
Figure 3-10 Warehouse Load History: History of Refreshing Page
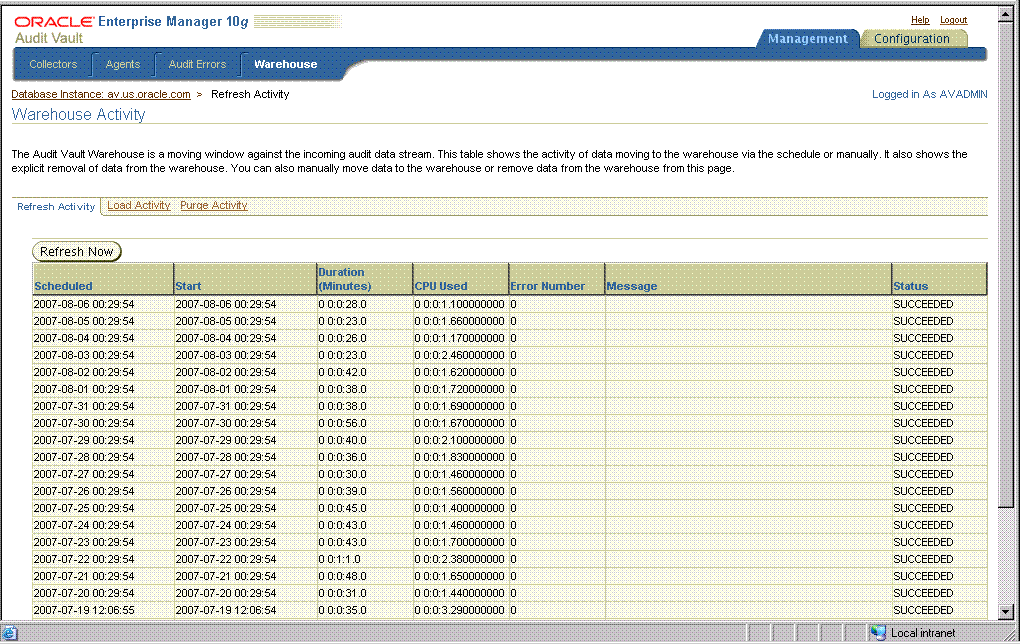
On the History of Refreshing page, you can view warehouse refresh history information in tabular format that includes the following column headings:
Scheduled – The scheduled time to perform a refresh operation
Start – The start time when a refresh operation started
Duration (minutes) – The total time required to complete a refresh operation
CPU Used – The amount of time used to complete a refresh operation
Error Number – The Oracle ORA- error number, if any, resulting from a refresh operation
Message – Any error messages, if any, resulting from a refresh operation
Status – The current status of a refresh operation: STOPPED or SUCCEEDED
Click Refresh Now to refresh the warehouse with audit data.
From the Warehouse Load History page, click History of Loading to display the History of Loading page. This page displays information about archived warehouse information that is reloaded into the warehouse. The column headings in tabular format that appear are identical to those in the History of Refreshing page described previously.
Click Load Now to load the warehouse with archived warehouse audit data.
From the Warehouse Load History page, click History of Purging to display the History of Purging page. This page displays information about warehouse audit data removed from the warehouse. The column headings in tabular format that appear are identical to those in the History of Refreshing page described previously.
Click Purge Now to purge the current warehouse audit data from the warehouse.
Click Help on any of the warehouse history pages for more information.
Audit Vault errors are logged in to an error table. You can view these errors using the Audit Vault Console.
To use the Audit Vault Console to view Audit Vault errors, log in to the Audit Vault Console as the user with AV_ADMIN role granted. Using the tabs, click Management tab, then Audit Errors to display the Audit Errors page (see Figure 3-11).
On the Audit Errors page, you can search for audit errors for a given time period. To do this, select one of the Error Time field options: Last 24 Hours, Last One Week, or Last One Month, and then click Go.
You can also search for audit errors for a given time period by selecting The Period field option and in the From field, enter a date and time or click the calendar icon to select a date and time, in the To field, enter a date and time or click the calendar icon to select a date and time, and then click Go.
On the Audit Errors page, you can view the error information in tabular format with the following column headings:
Error Time – Local time when the audit error was generated
Audit Source – The audit source on which the audit error originated
Collector – The collector on which the audit error originated
Module – The module name involved in the audit error
Message – The content of the audit error message
Click Help for more information.