| Oracle® VM Template Builder Installation and User's Guide Release 2.1 Part Number E14391-01 |
|
|
View PDF |
| Oracle® VM Template Builder Installation and User's Guide Release 2.1 Part Number E14391-01 |
|
|
View PDF |
This Chapter discusses creating and managing Oracle VM templates. This Chapter contains:
To perform the actions discussed in this Chapter, select the Templates tab. The Template Projects screen is displayed.
The Template Projects screen is shown in Figure 6-1, "Template Projects Screen".
You can create a new template by clicking the New Template Project button.
You can search for a template by entering part or all of the template name in the Template Name field, and clicking Search. Similarly, you can display a list of templates for an operating system by selecting the operating system in the JeOS Image drop down and clicking Search. Or use both search criteria together to search for a template.
You can manage templates using the buttons at the top left of the Template Projects table. The buttons related to this table are:
Edit: Edits a template.
Copy: Copies the selected template and lists it in the Templates Projects table.
Build: Builds the selected template.
Delete: Deletes the selected template.
Clean Up: Removes the selected template image file and tarball. The template definition is not deleted.
Oracle VM Template Builder uses JeOS to facilitate building an operating system instance with only the absolute minimum packages you need for a template. The operating systems you can select in Oracle VM Template Builder are derived from the available JeOS images. See Section 4.3, "JeOS Images" in Chapter 4, "Managing Resources"for more information on JeOS images.
To create an Oracle VM template, click New Template Project on the Template Projects screen. A template creation wizard guides you through the steps to create a template. The steps are:
Each step of the wizard and the fields on each screen are discussed in this section.
The first step in creating a template is to enter descriptive information about the template in the Template Description Screen.
This section of the wizard gives you fields to enter information to describe the template, manage version control, and manage End User Licence Agreements (EULAs). When you have completed this screen, click Next to continue.
Template Name
Enter a name for the template, for example, MyTemplate.
Template Version
Enter a version number for the template.
Vendor
Enter the name of the template vendor, for example, MyCompany.
JeOS Image
Select a JeOS image from the drop down list. This image is used to create the operating system for the guest virtual machine in the template. The list of operating systems is derived from the operating systems supported by JeOS. You cannot add to this list.
Description
Enter a description of the template.
End User License Agreement
If required, enter an End User License Agreement (EULA) to be included in the template.
To add an EULA, click Load EULA from file. The Add EULA screen is displayed. Enter the location for the EULA. The EULA location must be on your local machine. Click Save to load the EULA.
To remove an EULA, click Clear EULA. The EULA is removed from the template.
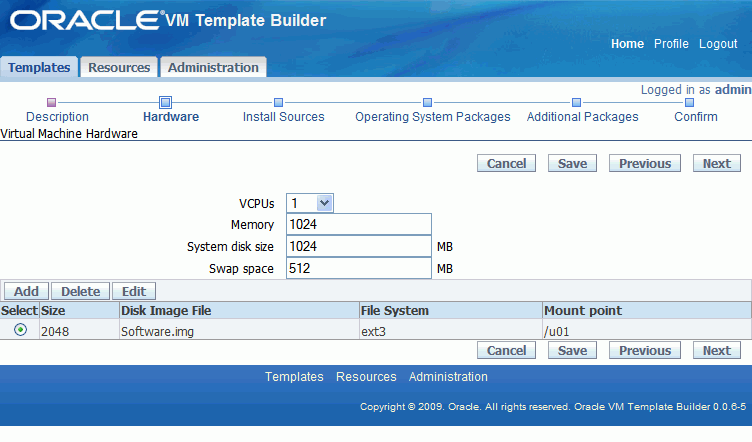
The next step in creating a template is to enter the virtual machine hardware information for the template in the Virtual Machine Hardware screen.
Figure 6-3 Virtual Machine Hardware Screen

When you have completed this screen, click Next to continue.
VCPUs
Enter the number of virtual CPUs (VCPUs) for the guest virtual machine in the template.
Memory
Enter the amount of memory, in MBs, for the guest virtual machine in the template.
System Disk Size
Enter the amount, in MBs, of free space to be made available on the system disk, after the installation of the operating system.
Swap Space
Enter the size in MBs for the swap space.
Additional Disks
To add additional disks to the guest virtual machine in the template, click Add. A set of fields are displayed to enter information about the additional disk. Enter or select:
Size: The size of the disk in MB, for example, 1024 for 1GB.
Mount point: The mount point for the disk, for example, /u01.
Disk image file: A name for the disk image, for example, Software.img.
Click Save to save the disk and return to the Virtual Machine Hardware screen. The new disk is listed in the table.
To edit a disk, select the disk in the table and select the Edit button. Edit the disk and click Save to save the disk. The Virtual Machine Hardware screen is displayed.
To remove additional disks from the template, select the disk in the table and click Delete.
Note:
Due to a known issue, only one additional disk image can be added in this release. See Appendix C, "Only One Additional Disk Is Included In a Template".The next step in creating a template is to enter the virtual operating system installation source for the template in the Virtual Machine - OS Installation Sources screen.
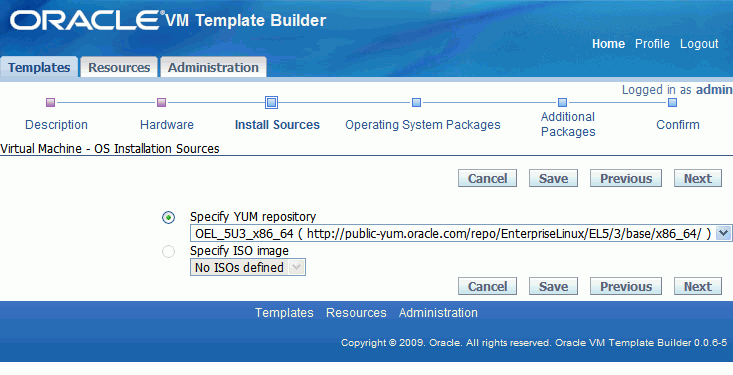
Figure 6-4 Virtual Machine - OS Installation Sources

This section of the wizard gives you fields to select the location for the operating system installation files to be used for the guest virtual machine in the template. The operating system source may be from a DVD ISO file, or a Yum repository. You can configure the available Yum repositories or DVD ISOs using the Resources tab. See Chapter 4, "Managing Resources" for more information on configuring resources. Select one option:
Specify Yum repository: The Yum repository for the operating system.
Specify ISO Image: The DVD ISO image for the operating system.
Click Next. The Virtual Machines - Operating System Packages screen is displayed.
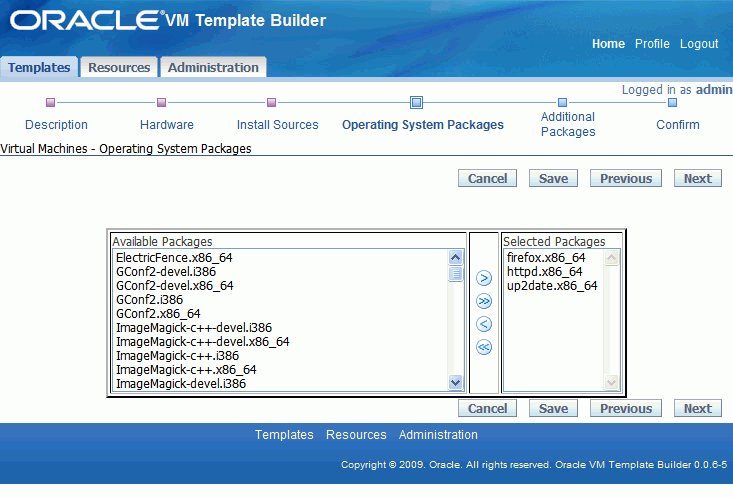
The next step in creating a template is to select the installation groups and operating system packages to include in the template in the Virtual Machine - Operating System Packages screen.
Figure 6-5 Virtual Machine - Operating System Packages Screen

This section of the wizard gives you fields to select installation groups and additional software packages from the Yum repository or DVD ISO.
When you have completed this screen, click Next to continue
Available Groups
Select the installation group(s) for the guest virtual machine, for example, web-server and authoring-and-publishing. If there are no installation groups included in the Yum repository or DVD ISO, this option is not displayed.
Available Packages
Select any additional operating system packages required for the installation from the Available Packages column, for example, firefox. Click the shuttle arrow to move the packages into the Selected Packages column. Any dependent packages are not immediately marked to be added, but are installed when the template is built.
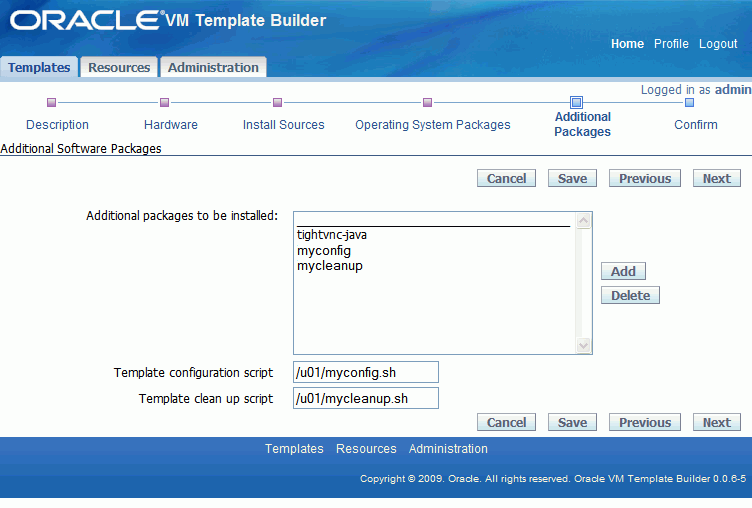
The next step in creating a template is to upload any additional software packages that are not included in the Yum repository. You can also set template configuration and clean up scripts. These actions are performed on the Additional Software Packages screen
Figure 6-6 Additional Software Packages Screen

This section of the wizard enables to you add any additional software packages or applications, for example, the Oracle Database 10g Express Edition RPM, or application software configuration and clean up script RPMs. This screen also enables you to add the location of template configuration and clean up scripts in the guest virtual machine created by the template. When you have completed this screen, click Next to continue.
Additional Software Packages
To add an RPM, click Add. The Add Package screen is displayed. Select URL and enter an HTTP or FTP location for the RPM, or select Package file and enter the location on your local machine for the RPM. Click Save to add the RPM and return to the Additional Software Packages screen. The RPM is added to the guest virtual machine template.
To delete an RPM, select it in the box and click Delete. The RPM is removed from the guest virtual machine template.
Template Scripts
To include your own template configuration script, enter the script location in the Template configuration script field, for example, enter /u01/myconfig.sh.
To include your own template clean up script, enter the script location in the Template clean up script field, for example, enter /u01/mycleanup.sh.
Both scripts must be on the guest virtual machine running Oracle VM Template Builder. For information on creating template scripts, see Chapter 7, "Creating Template Scripts".
The final step in creating a template is to confirm the content and build the template. This is performed on the Confirm Information screen.
This section of the wizard enables you to review and confirm the set up of the guest virtual machine to be created in the template, and to initiate a build of the project. A summary of the template is displayed in the Confirm Information screen showing:
The template name
The JeOS image on which to base the template
The amount of virtual memory
The number of virtual CPUs
The disk(s) to be included in the template, including the disk name, size, file system type and mount point
The operating system packages to be installed
The additional packages to be installed
Select Save to save the template and return to the Template Projects screen. You can build the template from the Template Projects screen.
Select Save and Build to save and build the template. The Template build screen is displayed. Click Refresh to display the latest information from the build log. Click Return to Template Projects page to return to the Template Projects screen. You can exit the build screen at any time and the build continues.
To build a template, select the template from the Template Projects table on the Template Projects screen and click Build. The Template build screen is displayed and shows the status of the template build process.
Click Refresh to display the latest information from the build log. Click Return to Template Projects page to return to the Template Projects screen. You can exit the build screen at any time and the build continues.
When you have created and built a template, Oracle VM Template Builder creates an archive (in .tar.gz format) of the template, and also creates a directory in which the system.img and vm.cfg file are located. You can access templates using the links in the Download column of the Template Projects table on the Templates screen.
To edit a template, select the template from the Template Projects table and click Edit. Alternatively, click the link for the template in the Template Name column of the Template Projects table. The create template wizard is started. Edit the template as required.
To copy a template, select the template from the Template Projects table and click Copy. A copy of the template is displayed in the table.
To delete a template, select the template from the Template Projects table and click Delete. The template is deleted from the table.
You can remove template images and tarballs you may no longer require. The template definition remains, so you can rebuild the template image and tarball if and when required. Cleaning up templates makes available disk space for new templates to be built.
To clean up a template, select the template from the Templates Projects table and click Clean Up. The template image and tarball is deleted.