B Screenshots of the Step 3: Modify Connector Configuration Page
The screenshots presented in this appendix show the outcome of various actions performed on the Step 3: Modify Connector Configuration page. See Table 3-2 for information about the context in which these pages are displayed.
Screenshots for the following actions are described in this appendix:
-
Summary of Changes That You See After Configuring Target Resource Reconciliation
-
Summary of Changes That You See After Configuring Trusted Source Reconciliation
B.1 Using the Data Type List and Required Check Box
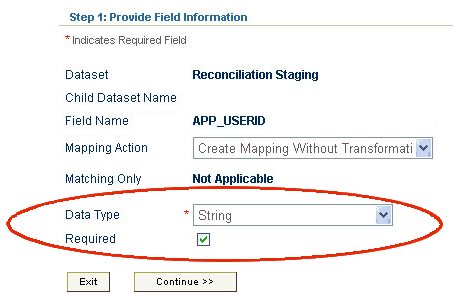
Figure B-1 shows the Step 1: Provide Field Information page that is displayed when you click the Edit icon of any field in the Reconciliation Staging data set. The name of the field whose Edit icon you click (in this example, APP_USERID) is displayed on this page.
Figure B-1 Data Type List and Required Check Box
Description of ''Figure B-1 Data Type List and Required Check Box''
You use the Data Type list to set the data type for the fields that are detected through metadata detection. The connector will not work correctly if you do not perform this action for all the fields of the Reconciliation Staging and OIM - Account data sets. For example, date format validation and conversion will not take place if you do not set the Date data type for date fields of the Reconciliation Staging and OIM - Account data sets.
You use the Required check box to specify that the field must contain a value during reconciliation. In other words, you designate the field as a mandatory field.
B.2 Specifying a Literal Value As Input for a Field
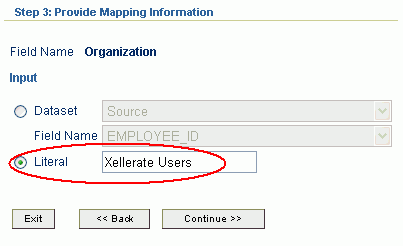
Figure B-2 shows the Step 3: Provide Mapping Information page. On this page, you can either select an input field for the mapping or enter a literal value. This page is displayed if you select Create Mapping Without Transformation from the Mapping Action list on the Step 1: Provide Field Information page.
Figure B-2 Literal Value As Input for a Field
Description of ''Figure B-2 Literal Value As Input for a Field''
B.3 Encrypting the Storage and Display of Field Values
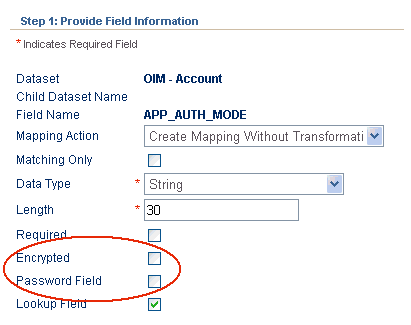
Figure B-3 shows the Step 1: Provide Field Information that is displayed when you click the Edit icon of any field in the OIM - Account data set. You use the Encrypted and Password Field check boxes to specify that you want to encrypt the storage, display, or both storage and display of fields that store confidential data.
Figure B-3 Encrypted and Password Field Check Boxes
Description of ''Figure B-3 Encrypted and Password Field Check Boxes''
B.4 Configuring Account Status Reconciliation: Step 1
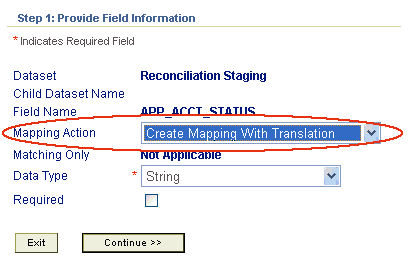
Figure B-4 shows the start of the second step for configuring account status reconciliation. You open this page by clicking the Edit icon for the status field in the Reconciliation Staging data set. On this page, you select Create Mapping with Translation from the Mapping Action list. The procedure to configure account status reconciliation is described in the following guides:
-
For Oracle Identity Manager release 9.1.0.x: Oracle Identity Manager Administrative and User Console Guide
-
For Oracle Identity Manager release 11.1.1 and 11.1.2.x: Oracle Fusion Middleware Developer's Guide for Oracle Identity Manager
Figure B-4 Translation Transformation Option
Description of ''Figure B-4 Translation Transformation Option''
B.5 Configuring Account Status Reconciliation: Step 2
Figure B-5 shows the outcome of the input that you provide on the page shown in Figure B-4.
Figure B-5 Source Field and Lookup Definition Containing Translated Values
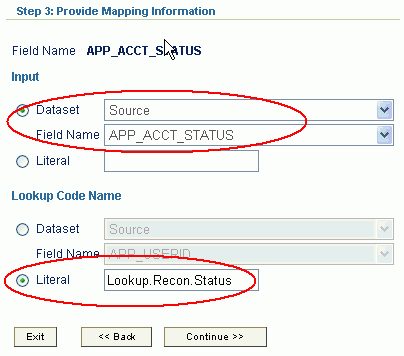
Description of ''Figure B-5 Source Field and Lookup Definition Containing Translated Values''
In the Input region of this page, you select Source from the Dataset list and then select the name of the status field from the Field Name list. In the Lookup Code Name region, you select Literal and then enter the name of the lookup definition that maps target system status values with Oracle Identity Manager status values.
B.6 Summary of Changes That You See After Configuring Target Resource Reconciliation
Figure B-6 shows the Step 3: Modify Connector Configuration page that is displayed after you configure the connector for target resource reconciliation.
Figure B-6 Actions Performed for Configuring Target Resource Reconciliation
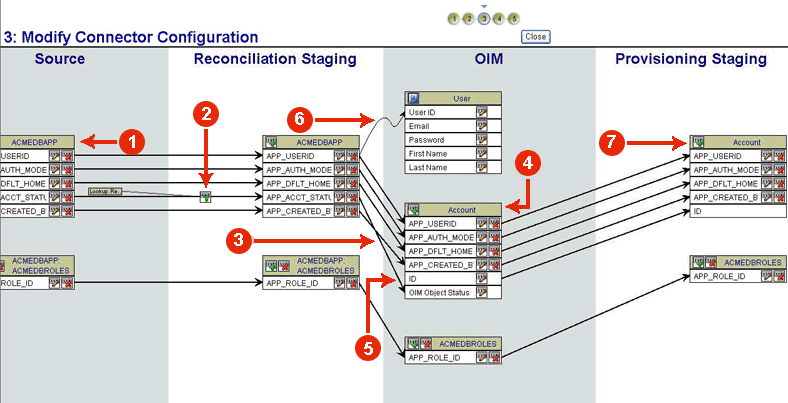
Description of ''Figure B-6 Actions Performed for Configuring Target Resource Reconciliation''
The following are some of the changes seen on this page after you configure the connector for target resource reconciliation:
Note:
The effect of certain actions, such as setting the attributes of fields in the Reconciliation Staging data set, cannot be seen on this page.-
1. You removed the APP_CREATED_ON, APP_UPDATED_BY, and APP_UPDATED_ON fields from all the data sets, starting with the Source data set.
-
You configured account status reconciliation by:
-
2. Using the Translation Transformation provider to create a transformation mapping between the APP_ACCT_STATUS fields of the Source and Reconciliation Staging data sets.
-
3. Creating a mapping between the APP_ACCT_STATUS field of the Reconciliation Staging data set and the OIM Object Status field of OIM - Account data set.
-
4. Removing the APP_ACCT_STATUS field from the OIM - Account data set.
-
-
5. You ensured that there are no mappings between the ID field of the OIM - Account data set and any field of the Reconciliation Staging data set.
-
6. You created the reconciliation rule by creating a matching-only mapping between the APP_USERID field of the Reconciliation Staging data set and the User ID field of the OIM - User data set.
-
7. As part of the procedure to configure account status provisioning, you removed the APP_ACCT_STATUS field from the Provisioning Staging data set.
B.7 Summary of Changes That You See After Configuring Trusted Source Reconciliation
Figure B-7 shows the Step 3: Modify Connector Configuration page that is displayed after you configure the connector for trusted source reconciliation.
Figure B-7 Actions Performed for Configuring Trusted Source Reconciliation
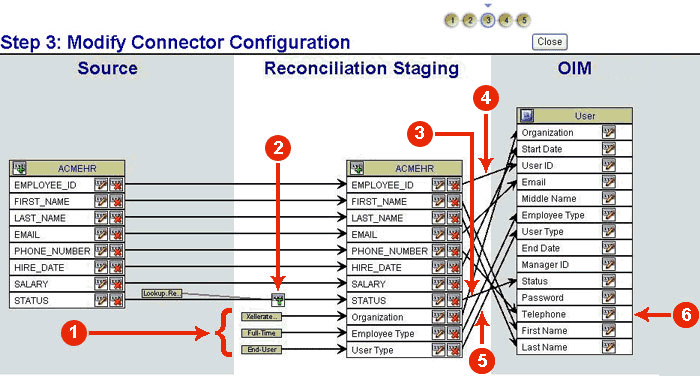
Description of ''Figure B-7 Actions Performed for Configuring Trusted Source Reconciliation''
The following are some of the changes seen on this page after you configure the connector for trusted source reconciliation:
Note:
The effect of certain actions, such as setting the attributes of fields in the Reconciliation Staging data set, cannot be seen on this page.-
1. You added the Organization, Employee Type, and User Type fields to the Reconciliation Staging data sets, and then set up literal values as the input sources for these fields.
-
You configured account status reconciliation by:
-
2. Using the Translation Transformation provider to create a transformation mapping between the STATUS fields of the Source and Reconciliation Staging data sets.
-
3. Creating a mapping between the STATUS field of the Reconciliation Staging data set and the Status field of the OIM - User data set. This change is represented by the arrow between the STATUS and Status fields.
-
-
4. You created the reconciliation rule by creating a matching-only mapping between the EMPLOYEE_ID field of the Reconciliation Staging data set and the User ID field of the OIM - User data set.
-
5. You mapped fields of the Reconciliation Staging data set with corresponding fields of the OIM - User data set.
-
6. You created the Telephone UDF to map the PHONE_NUMBER field of the target system.