3 Using the Connector
This chapter is divided into the following sections:
-
Performing Provisioning Operations in Oracle Identity Manager Release 9.1.0.x and 11.1.1.x
-
Performing Provisioning Operations in Oracle Identity Manager Release 11.1.2 or Later
3.1 Guidelines on Using the Connector
This section discusses the following topics:
3.1.1 Guidelines on Configuring Reconciliation
The following are guidelines that you must apply while configuring reconciliation:
Note:
In Oracle Identity Manager release 11.1.1 and 11.1.2.x, a scheduled job is an instance of a scheduled task. In this guide, the term scheduled task used in the context of Oracle Identity Manager release 9.1.0.x is the same as the term scheduled job in the context of Oracle Identity Manager release 11.1.1.See Oracle Fusion Middleware Administrator's Guide for Oracle Identity Manager for more information about scheduled tasks and scheduled jobs.
-
Before a target resource reconciliation run is performed, lookup definitions must be synchronized with the lookup fields of the target system. In other words, scheduled tasks for lookup field synchronization must be run before user reconciliation runs.
-
The scheduled task for user reconciliation must be run before the scheduled task for reconciliation of deleted user data.
-
In the identity reconciliation mode, if you want to configure group reconciliation, then note that group reconciliation does not cover reconciliation of updates to existing groups on the target system. If you modify the name of a group on the target system, then it is reconciled as a new group in Oracle Identity Manager.
-
In the identity reconciliation mode, if you want to configure organization reconciliation, then note that:
-
Organization reconciliation does not cover reconciliation of updates to existing organizations on the target system. If you modify the name of an organization on the target system, then it is reconciled as a new organization in Oracle Identity Manager.
-
Organization reconciliation events created by the scheduled task for organization reconciliation (AD Organization Recon) must be successfully processed before the scheduled task for trusted source reconciliation (AD User Trusted Recon) is run. In other words, organization reconciliation must be run and the organization records reconciled from the target system must be successfully linked in Oracle Identity Manager.
-
On the target system, users are created in specific organizations. During trusted source reconciliation of user data, if you want OIM Users to be created in the same organizations on Oracle Identity Manager, then you must set the MaintainHierarchy attribute of the trusted source reconciliation scheduled task to
yes. In addition, you must configure organization reconciliation to run before trusted source reconciliation. -
In Oracle Identity Manager, the organization namespace is a flat namespace although it allows parent-child hierarchical relationships between organizations. Therefore, two Microsoft Active Directory OUs with the same name cannot be created in Oracle Identity Manager, even if they have different parent OUs on the target system.
-
The name of an organization in Oracle Identity Manager cannot contain special characters, such as the equal sign (=) and comma (,). However, these special characters can be used in the name of an organization on the target system.
-
During reconciliation, child organization records cannot be created in Oracle Identity Manager before the corresponding parent organization records are created.
Suppose you create an organization on the target system and then create child organizations under the organization. During the next organization reconciliation run, you would expect to see the parent and child organizations created in Oracle Identity Manager. This might not happen if the reconciliation engine receives the child organization records before the parent organization record. However, the parent organizations are created in Oracle Identity Manager because they do not have any dependency.
This would be automatically resolved during the next reconciliation run. At that time, parent organizations already exist in Oracle Identity Manager and child organizations can be created and linked to the parent.
Note:
The alternative is to manually link child organization records with parent organization records after the reconciliation run. -
The synchronization of organization lookup fields is independent of whether or not you configure organization reconciliation.
-
-
While configuring batched reconciliation, leave the value of the Start Record attribute as 1.
During a reconciliation run, the time stamp attribute (ADCS TimeStamp) of the scheduled task is updated at the end of a reconciliation run. If the reconciliation run fails, then reconciliation resumes from the time stamp captured at the end of the previous reconciliation run. If you set the value of the Start Record attribute to an integer other than 1, then some reconciliation-ready records on the target system might not be fetched to Oracle Identity Manager. Therefore, it is recommended that you leave the value of the Start Record attribute as 1.
After you configure batched reconciliation, if reconciliation fails during a batched reconciliation run, then you only need to rerun the scheduled task without changing the values of the task attributes.
-
If a user in Microsoft Active Directory has not been assigned values for the First Name or Last Name fields, then these fields in Oracle Identity Manager are updated with the cn field value at the end of the reconciliation run. This is because First Name and Last Name are mandatory fields in Oracle Identity Manager.
-
If you are going to configure Microsoft ADAM as the trusted source, then you must ensure that a value (either
trueorfalse) is set for the msDS-UserAccountDisabled field of each user record on the target system. In Microsoft ADAM, the msDS-UserAccountDisabled field does not have a default value. -
You must configure batched reconciliation if you want to reconcile Terminal Services Profile fields.
3.1.2 Guidelines on Performing Provisioning Operations
The following are guidelines that you must apply while performing provisioning operations:
-
Before you perform provisioning operations, lookup definitions must be synchronized with the lookup fields of the target system. In other words, scheduled tasks for lookup field synchronization must be run before provisioning operations.
-
If you want to use the E-mail Redirection feature, then note that:
Note:
The E-Mail Redirection feature is not supported in Microsoft ADAM.-
E mail and Redirection Mail ID are two of the fields on the process form. During a provisioning operation, if you enter an e-mail address in the Redirection Mail ID field, then e-mail is sent to that account. This is regardless of whether or not you enter an address in the E mail field. At the end of the provisioning operation, the address in the Redirection Mail ID field becomes the primary SMTP address of the user.
During the next reconciliation run, the E mail field is updated with the primary SMTP address. In other words, the E mail and Redirection Mail ID fields hold the same address at the end of the reconciliation run.
-
The E-mail Redirection feature involves the use of Microsoft Exchange. Therefore, the target Microsoft Active Directory installation must have Microsoft Exchange configured. However, a user for whom you set a redirection e-mail address need not have a Microsoft Exchange mailbox. In other words, you need not provision a Microsoft Exchange mailbox for the user.
-
-
During a provisioning operation, if you do not specify an organization for the user, then the user is provisioned to the cn=Users organization.
-
Passwords for user accounts provisioned from Oracle Identity Manager must adhere to the password policy set in Microsoft Active Directory.
Note:
If you install Microsoft ADAM in a domain controller then it acquires all the policies of Microsoft Active Directory installed in the same domain controller. If you install Microsoft ADAM in a workgroup, then the local system policies are applied.In Microsoft Active Directory, password policies are controlled through password complexity rules. These complexity rules are enforced when passwords are changed or created. While changing the password of a Microsoft Active Directory account by performing a provisioning operation on Oracle Identity Manager, you must ensure that the new password adheres to the password policies on the target system.
If the password specified during a provisioning operation on Oracle Identity Manager is not accepted by the target system, then a message stating that the password could not be set is displayed on the Administrative and User Console.
See Also:
For more information about password guidelines applicable on the target system, visit the Microsoft TechNet Web site at -
Some Asian languages use multibyte character sets. If the character limit for fields on the target system is specified in bytes, then the number of Asian-language characters that you can enter in a particular field may be less than the number of English-language characters that you can enter in the same field. The following example illustrates this point:
Suppose you can enter 50 characters of English in the User Last Name field of the target system. If you have configured the target system for the Japanese language, then you would not be able to enter more than 25 characters in the same field.
-
The character length of target system fields must be taken into account when specifying values for the corresponding Oracle Identity Manager fields.
-
On the target system, the Manager Name field accepts only DN values. Therefore, when you set or modify the Manager Name field on Oracle Identity Manager, you must enter the DN value.
For example:
cn=abc,ou=lmn,dc=corp,dc=com -
By default, the cn field of the target system is mapped to the UD_ADUSER_COMMONNAME field of Oracle Identity Manager. This mapping information is stored in the AtMap.AD (and AtMap.ADAM) lookup definition, and it can be modified by renaming the code key value for the cn field.
For example, the code key for the cn field can be changed to UD_ADUSER_UID. This is the User ID field on the process form.
-
During a provisioning operation, the ExecuteRemoteScript process task is run even when you do not select the Remote Manager IT resource on the Administrative and User Console.
The following response is displayed at the end of the provisioning operation:
Task completed
Response: Remote Manager Not Selected during provisioning
Response Description: Remote Manager is not selected while provisioning the user
3.2 Setting Up Lookup Definitions in Oracle Identity Manager
The following sections discuss lookup definitions that you must manually configure in Oracle Identity Manager:
3.2.1 Configuring the Lookup.AD.Configuration Lookup Definition
When you deploy the connector, the Lookup.AD.Configuration lookup definition is created in Oracle Identity Manager. The entries in this lookup definition are used during both reconciliation and provisioning.
To configure the Lookup.AD.Configuration lookup definition:
-
Log in to the Design Console.
-
Expand Administration, and double-click Lookup Definition.
-
Search for and open the Lookup.AD.Configuration lookup definition.
-
Enter decode values for each of the parameters listed in Table 3-1.
Table 3-1 Entries in the Lookup.AD.Configuration Lookup Definition
Code Key Description Default Decode Value LdapUserObjectClass
Enter the name of the object class to which newly created users on the target system are assigned.
By default, newly created users on the target system are assigned to the user object class. If you want to assign new users to additional object classes, then enter the list of object classes in the Decode column.
The character that you use to separate the names of object classes in the list must be entered as the value of the UserObjectClassDelimiter entry, which is described later in this table.
The following are sample values for the LdapUserObjectClass entry:
-
user -
coperson -
user|coperson
In the third sample value, the vertical bar (|) is used as the delimiting character.
This parameter is used only during provisioning.
Note:
-
When you create an object class, set the
userobject class as the parent object class. -
You can provision users with user-defined object classes in addition to the user object class. However you cannot provision the user with object classes such as contact and computer because they are not treated as user objects by Microsoft Active Directory.
userUserObjectClassDelimiter
Enter the delimiter character that you have used to separate the list of object classes entered as the value of the LdapUserObjectClass property.
This parameter is used only during provisioning.
|
Note: This is the vertical bar character. You can use any character, such as the semicolon (;), as the delimiter.
LdapUserDNPrefix
Enter the LDAP attribute for forming the relative DN or user account DN. This value forms the logon attribute for creating the user.
This parameter is used only during provisioning.
Note: It is recommended that you do not change the default value of this code key.
cnLdapGroupMember
Target system field that stores the names of users who belong to a particular group
This parameter is used only during provisioning.
Note: You must not change the value of this parameter.
memberPagesize
Enter the page size of records fetched in each call to the target system during a reconciliation run.
This page size is used only if you do not configure batched reconciliation, which is described in "Batched Reconciliation".
This parameter is used only during reconciliation.
Note: If you do not want to configure batched reconciliation, then it is recommended that you set a page size between 100 and 1000.
100MultiValueAttributes
Specify all the multivalued attributes that are to be reconciled. The character that you use as a delimiter for the list of multivalued attributes must be entered as the value of the MultiValueAttributesDelimiter entry, which is described later in this table.
This parameter is used only during reconciliation.
Sample value:
memberOf,carLicenseThere are two multivalued attributes in this sample value.
memberOfMultiValueAttributesDelimiter
Enter the delimiter character that you have used in the list of multivalued attributes specified as the value of the MultiValueAttributes entry.
This parameter is used only during reconciliation.
,
Note: This is the comma character. You can use any character, such as the semicolon (;), as the delimiter.
ROUserID
If you create a copy of the process form, then specify the name of the attribute (column) in the new process form that holds the user ID value.
UD_ADUSER_UID
ROUserManager
If you create a copy of the process form, then specify the name of the attribute (column) in the new process form that holds the manager ID value.
UD_ADUSER_MANAGER
ROFormName
If you create a copy of the process form, then specify the name of the new process form.
UD_ADUSER
ROUserGUID
If you create a copy of the process form, then specify the name of the attribute (column) in the new process form that holds the objectGUID value.
UD_ADUSER_OBJECTGUID
TargetDateFormat
Enter the target system date format.
yyyyMMddHHmmss.0Z
AppendValueToDate
Enter the extension that you want add as a suffix to the date value in the TargetDateFormat parameter.
.0Z
LDAPManagerDNPrefix
If you want to use a custom RDN for reconciliation and provisioning operations, then enter the custom RDN value.
Sample value:
tcWorkerGUIDcn
LDAPConnectTimeOut
Enter the timeout interval (in milliseconds) for which the connector must wait for a response from the target system before switching to one of the backup servers listed in the BackupServerURL attribute of the Lookup.AD.Configuration lookup definition.
See Section 2.3.1.3, "Configuring High Availability of the Target System" for more information.
3000
UseFieldsValidation
Enter
yesif you want to enable validation of attribute values that are sent to the target system during user provisioning. Otherwise, enterno.See "Validating Data Sent to the Target System for Provisioning" for more information about this feature.
noValidationLookupCode
This entry holds the name of the lookup definition that lists the process form fields whose values you want to validate during provisioning operations.
See "Validating Data Sent to the Target System for Provisioning" for more information about this feature.
Lookup.AD.FieldsForValidationSpecialCharacters
Enter the list of special characters that must be sent without any modification to the target system during provisioning.
+,=#"OIMADAMUserID
If the target system is Microsoft ADAM, then enter the name of the target system field that you want to map to the User ID field of the Microsoft ADAM resource in Oracle Identity Manager.
UserPrincipalNameUseEnableRange
Enter
yesif you want to enable reconciliation of users or groups containing more than 1000 entries. Otherwise, enterno.noUserMultiValuedAttributeRangeSearchFilter
This entry is used in conjunction with the UseEnableRange entry. If you set the UseEnableRange entry to
yesand if you want to reconcile users belonging to more than one objectClass, then specify the names of the objectClasses as the value of the UserMultiValuedAttributeRangeSearchFilter entry.For example, if you want to reconcile users with more than 1000 entries from both the user and sampleclass objectClasses, then enter the following value:
(&(objectClass=user)(objectClass=sampleclass))Similarly, the following sample value can be used to reconcile users with more than 1000 entries from either class:
(|(objectClass=user)(objectClass=sampleclass))Note: The filter that you specify must be compatible with the filter that you specify by performing the procedure described in the "Limited Reconciliation vs. Regular Reconciliation" section.
(objectClass=user)GroupMultiValuedAttributeRangeSearchFilter
This entry is used in conjunction with the UseEnableRange entry. If you set the UseEnableRange entry to
yesand if you want to reconcile groups belonging to more than one objectClass, then specify the names of the objectClasses as the value of the GroupMultiValuedAttributeRangeSearchFilter entry.For example, if you want to reconcile groups with more than 1000 entries from both the group and sampleclass2 objectClasses, then enter the following value:
(&(objectClass=group)(objectClass=sampleclass2))Similarly, the following sample value can be used to reconcile groups with more than 1000 entries from either class:
(|(objectClass=group)(objectClass=sampleclass2))Note: The filter that you specify as the value must be compatible with the filter that you specify by performing the procedure described in the "Limited Reconciliation vs. Regular Reconciliation" section.
(objectClass=group)UserStatusEnabled
Enter either
ProvisionedorEnableddepending on the status that you want to set for accounts that are created through target resource reconciliation.EnabledBackupServerURL
Provides a list of backup servers that are being used. This value is used by the connector to switch between backup servers if the primary server is not working. See Section 2.3.1.3, "Configuring High Availability of the Target System" for more information.
[NONE] -
-
Click Save.
3.2.2 Configuring the Lookup.AD.Country Lookup Definition
The Lookup.AD.Country lookup definition is one of the lookup definitions that is created in Oracle Identity Manager when you deploy the connector. The values in this lookup definition are used to populate the Country lookup field on the process form.
The following are the default entries in the AD.Country lookup definition:
-
Brazil
-
Canada
-
China
-
France
-
Germany
-
India
-
Italy
-
Japan
-
Korea
-
Spain
-
United Kingdom
-
United States
Depending on your requirements, add or delete entries in the AD.Country lookup definition. See "Configuring the Lookup.AD.Configuration Lookup Definition" for information about modifying lookup definitions. Note that for each entry in the lookup definition, the Code Key value is the country code and the Decode value is the country name. For example, the Code Key value for Australia is AU and the Decode value is Australia.
Information about country codes is available at
http://www.iso.org/iso/home.htm
See Also:
The known issue tracked through Bug 7136085 documented in the "Known Issues" chapter3.3 Scheduled Tasks for Lookup Field Synchronization
The following are the scheduled tasks for lookup field synchronization:
Note:
The procedure to configure these scheduled tasks is described later in the guide.-
This scheduled task is used to synchronize group lookup fields in Oracle Identity Manager with group-related data in the target system.
-
This scheduled task is used to synchronize organization lookup fields in Oracle Identity Manager with organization-related data in the target system.
Table 3-2 describes the attributes of both scheduled tasks.
Table 3-2 Attributes of the Scheduled Tasks for Lookup Field Synchronization
| Attribute | Description |
|---|---|
|
Lookup Search Filter |
This attribute holds the filter or query condition for lookup synchronization.
Note: You must not change the value of this attribute. |
|
Search Base |
Enter the DN of the organization in which the search for the lookup field (group or organization) values must be performed during reconciliation. Sample values:
|
|
Recon Type |
Enter
Enter
Default value: Note: If you want to synchronize lookup definition values across domains, then you must set the value of the Recon Type attribute to |
|
IT Resource Name |
Enter the name of the IT resource that you configure by performing the procedure described in "Configuring the IT Resource for the Target System". Sample value: |
|
AttrName For Decode Value In Lookup |
This attribute holds the name of the target system field that is used to populate the Decode column of the lookup definition.
|
|
AttrName For Code Value In Lookup |
This attribute holds the name of the target system field that is used to populate the Code Key column of the lookup definition.
|
|
Lookup Code Name |
This attribute holds the name of the lookup definition that contains mappings between the lookup fields of the target system and corresponding lookup definitions created in Oracle Identity Manager. |
|
Configuration Lookup |
This attribute holds the name of the lookup definition containing values that are used during both reconciliation and provisioning: Value: Note: You must not change the value of this attribute. However, if you create a copy of this lookup definition, then you can enter the unique name of the new lookup definition as the value of the Configuration Lookup attribute. |
3.4 Configuring Reconciliation
When you run the Connector Installer, scheduled tasks for user reconciliation are automatically created in Oracle Identity Manager. Configuring reconciliation involves providing values for the attributes of these scheduled tasks.
The following sections provide information about the attributes of the scheduled tasks:
See Also:
The "Reconciliation" section in Oracle Identity Manager Connector Concepts for detailed information about these configuration options3.4.1 Limited Reconciliation vs. Regular Reconciliation
This section discusses the Search Filter attribute of the scheduled tasks for target resource reconciliation and trusted source reconciliation.
By default, all target system records that are added or modified after the last reconciliation run are reconciled during the current reconciliation run. You can specify the subset of newly added or modified target system records that must be reconciled. You do this by creating a query condition that is used as a filter during reconciliation runs.
To create a query condition, use a combination of target system fields and the following logical operators:
Note:
You can use any target system fields, even the ones that are not supported (by default) for reconciliation and provisioning. The default target system fields for reconciliation and provisioning are listed in "Features of the Connector".-
The AND operator represented by the ampersand (&)
-
The OR operator represented by the vertical bar (|)
-
The EQUAL operator represented by the equal sign (=)
-
The NOT operator represented by the exclamation point (!)
You must apply the following guidelines while creating the query condition:
-
The Search Filter attribute for each scheduled task has a default value. For example, the default value for user reconciliation is
(objectClass=user). When you create query, it is recommended that you retain the default value as one of the query conditions. For example:(&(objectClass=user)(sn=Doe)) -
You must independently verify that the query returns the objects that you want it to return. The scheduled task does not validate your query.
-
For the target system fields, you must use the same case (uppercase or lowercase) as given in "Features of the Connector". This is because the field names are case-sensitive.
-
You must not include special characters other than the equal sign (=), ampersand (&), and vertical bar (|) in the query condition.
The following are sample query conditions:
-
(&(objectClass=user)(sAMAccountName=John12)) -
(&(objectClass=user)(sn!=Doe)) -
(&(objectClass=user)(givenName=John)) -
(& (&(givenName=John)(sn=Doe)) (objectClass=user)) -
(|(|(sn=Doe)(givenName=John))(objectClass=user))
You must enclose the query condition in parentheses. For example:
-
(&(objectClass=user)(sn!=Doe))
While performing the procedure described in the "Scheduled Tasks for Target Resource Reconciliation" or "Scheduled Tasks for Trusted Source Reconciliation" section, set the value of the Search Filter attribute to the query condition that you create.
3.4.2 Batched Reconciliation
This section discusses the Start Record, Batch Size, and Number of Batches attributes of the scheduled tasks for target resource reconciliation (AD User Target Recon) and trusted source reconciliation (AD User Trusted Recon).
By default, all target system records that are added or modified after the last reconciliation run are reconciled during the current reconciliation run. Depending on the number of records to be reconciled, this process may require a large amount of time. In addition, if the connection breaks during reconciliation, then the process would take longer to complete.
You can configure batched reconciliation to avoid such problems.
Note:
You must configure batched reconciliation if you want to reconcile Terminal Services Profile fields.To configure batched reconciliation, specify values for the following attributes while performing the procedure described in the "Scheduled Tasks for Target Resource Reconciliation" or "Scheduled Tasks for Trusted Source Reconciliation" section:
-
Start Record: Use this attribute to specify the record number from which batched reconciliation must begin. The default value of this attribute is 1. To ensure that all newly created and modified records are reconciled, it is recommended that you accept the default value.
-
Batch Size: Use this attribute to specify the number of records that must be included in each batch. The default value of this attribute is 1.
-
Number of Batches: Use this attribute to specify the total number of batches that must be reconciled. The default value of this attribute is
All Available. If you do not want to implement batched reconciliation, then accept the default value. When you accept the default value, the values of the Start Record and Batch Size attributes are ignored.
After you configure batched reconciliation, if reconciliation fails during a batched reconciliation run, then you only need to rerun the scheduled task without changing the values of the task attributes.
3.4.3 Full Reconciliation vs. Incremental Reconciliation
This section discusses the Will Submit All Records attribute of the scheduled tasks for target resource reconciliation (AD User Target Recon) and trusted source reconciliation (AD User Trusted Recon).
After you deploy the connector, you first reconcile all the existing target system records into Oracle Identity Manager. This is a full reconciliation run. During the reconciliation run, the time stamp attribute (ADCS TimeStamp) of the scheduled task is updated at the end of the reconciliation run.
During the next reconciliation run, the value of the ADCS TimeStamp attribute is used to determine the time stamp from which the run must begin. User records added or modified after the time stamp are selected for reconciliation during the current run. This is incremental reconciliation.
Some user records may never be reconciled into Oracle Identity Manager during subsequent reconciliation runs. This may occur due to various reasons. To ensure that such records are reconciled into Oracle Identity Manager, you must run full reconciliation at periodic intervals.
While configuring the AD User Target Recon and AD User Trusted Recon scheduled tasks by performing the procedure described in "Reconciliation Scheduled Tasks":
3.4.4 Reconciliation Scheduled Tasks
When you run the Connector Installer, the following reconciliation scheduled tasks are automatically created in Oracle Identity Manager:
3.4.4.1 Scheduled Tasks for Target Resource Reconciliation
The following are the scheduled tasks for target resource reconciliation:
Note:
The procedure to configure these scheduled tasks is described later in the guide.The AD User Target Recon scheduled task is used to reconcile user data in the target resource (account management) mode of the connector. Table 3-3 describes the attributes of this scheduled task.
Table 3-3 Attributes of the Scheduled Task for Reconciliation of User Data from a Target Resource
| Attribute | Description |
|---|---|
|
Remote Manager Script Path |
Enter the full path and name of the Remote Manager script for reconciliation (ReconTerminalServiceAttr.vbs) on the target system host computer. You copy this file to the target system host computer while performing the procedure described in "Installing the Remote Manager". Enter Sample value: Default value: Note: For Microsoft ADAM, accept the default value. |
|
Delete Recon Task Scheduler Name |
This attribute holds the name of the scheduled task for reconciliation of deleted user data from the target system. Value: Note: For this scheduled task, you must not change the value of this attribute. However, if you create a copy of this scheduled task and the scheduled task for reconciliation of deleted user data, then you must enter the unique name of that new Delete reconciliation scheduled task as the value of the Delete Recon Task Scheduler Name attribute in the copy of this scheduled task. |
|
Target Resource Object |
This attribute holds the name of the resource object against which target resource reconciliation runs must be performed. Value: Note: For the resource object shipped with this connector, you must not change the value of this attribute. However, if you create a copy of the resource object, then you must enter the unique name of that resource object as the value of this attribute. |
|
IT Resource Name |
Enter the name of the IT resource that you configure by performing the procedure described in "Configuring the IT Resource for the Target System". If you want to enable cross-domain reconciliation and if your target system installation is running on Microsoft Windows 2003, then enter Sample value: |
|
Lookup For BLOB Attributes |
This attribute holds the name of the lookup definition that contains mappings for the Terminal Services Lookup fields. Value: Note: You must not change the value of this attribute. The "Adding New Fields for Target Resource Reconciliation" provides information about adding entries in the Lookup.AD.BLOBAttribute.Values lookup definition. |
|
This attribute holds the time stamp of the user record that was last created or updated on the target system. The reconciliation engine automatically enters a value in this attribute. Default value: Note: You must not change the value of this attribute. |
|
|
Task Scheduler Name |
This attribute holds the name of the scheduled task. Value: Note: For this scheduled task, you must not change the value of this attribute. However, if you create a copy of this scheduled task, then you must enter the unique name of that scheduled task as the value of the attribute in that scheduled task. |
|
Search Scope |
Enter Enter Note: If you want to enter Default value: |
|
Field Lookup Code |
This attribute holds the name of the lookup definition that contains mappings between the target system fields and the corresponding Oracle Identity Manager fields. |
|
Transform Lookup Code |
Enter the name of the lookup definition that you have created to link Microsoft Active Directory fields with the JAR files that must be run to transform each field. This attribute is valid only when the Use Transform Mapping attribute is set to Value:
Note: You must not change the value of this attribute. See "Transforming Data Reconciled Into Oracle Identity Manager" for detailed information about using the Transform Lookup Code attribute. |
|
Use Transform Mapping |
Enter Default value: See "Transforming Data Reconciled Into Oracle Identity Manager" for detailed information about using the Use Transform Mapping attribute. |
|
Start Record |
Enter the number of the target system record from which a batched reconciliation run must begin. Default value: This attribute is used in conjunction with the Batch Size and Number of Batches attributes. All three attributes are discussed in "Batched Reconciliation". As mentioned in that section, it is recommended that you accept the default value of the Start Record attribute. |
|
Batch Size |
Enter the number of records that must be included in each batch fetched from the target system. Default value: This attribute is used in conjunction with the Number of Batches and Start Record attributes. All three attributes are discussed in "Batched Reconciliation". |
|
Number of Batches |
Enter the number of batches that must be reconciled. Default value: Sample value: This attribute is used in conjunction with the Batch Size and Start Record attributes. All three attributes are discussed in detail in "Batched Reconciliation". If you accept the default value ( |
|
Will Submit All Records |
Enter Enter Default value: See "Full Reconciliation vs. Incremental Reconciliation" for detailed information about this attribute. |
|
Search Base |
Enter the DN of the organization in which the search for user records must be performed during reconciliation. Sample value: |
|
Search Filter |
Enter the query condition that is to be used during reconciliation for locating target system user accounts that meet certain criteria. Default value: Sample value: See "Limited Reconciliation vs. Regular Reconciliation" for detailed information about this attribute. |
|
Configuration Lookup |
This attribute holds the name of the lookup definition containing values that are used during both reconciliation and provisioning: Value: Note: You must not change the value of this attribute. However, if you create a copy of this lookup definition, then you can enter the unique name of the new lookup definition as the value of the Configuration Lookup attribute. |
The AD User Target Delete Recon scheduled task is used to reconcile data about deleted users in the target resource (account management) mode of the connector. During a reconciliation run, for each deleted user account on the target system, the AD User resource is revoked for the corresponding OIM User. Table 3-9 describes the attributes of this scheduled task.
Table 3-4 Attributes of the Scheduled Task for Reconciliation of Deleted User Data from a Target Resource
| Attribute | Description |
|---|---|
|
Target Resource Object |
This attribute holds the name of the resource object against which the reconciliation run is performed. Value: Note: For the resource object shipped with this connector, you must not change the value of this attribute. However, if you create a copy of the resource object, then you can enter the unique name of that resource object as the value of this attribute. |
|
This attribute holds the time stamp of the user record that was last deleted on the target system. In addition, the value of this attribute is updated when the scheduled task for target resource reconciliation of user accounts (AD User Target Recon) is run with its ADCS TimeStamp attribute set to 0. The reconciliation engine automatically enters a value in this attribute. Default value: 0 Note: You must not change the value of this attribute. |
|
|
IT Resource Name |
Enter the name of the IT resource that you configure by performing the procedure described in "Configuring the IT Resource for the Target System". Sample value: |
|
Search Filter |
This attribute holds the LDAP search filter that is used to locate deleted user accounts on the target system. Value: Note: You must not change the value of this attribute. |
|
Task Scheduler Name |
This attribute holds the name of the scheduled task. Value: Note: You must not change the value of this attribute. |
|
Configuration Lookup |
This attribute holds the name of the lookup definition containing values that are used during both reconciliation and provisioning: Value: Note: You must not change the value of this attribute. However, if you create a copy of this lookup definition, then you can enter the unique name of the new lookup definition as the value of the Configuration Lookup attribute. |
Note:
You cannot reconcile group data from the target system if you are using Oracle Identity Manager release 11.1.1 or 11.1.2.x. This issue has been mentioned in the "Known Issues" chapter.The AD Group Recon scheduled task is used to reconcile group data from the target system. Table 3-5 describes the attributes of this scheduled task.
Table 3-5 Attributes of the Scheduled Task for Reconciliation of Group Data from a Target Resource
| Attribute | Description |
|---|---|
|
MultiValued Attributes |
Enter a comma-separated list of multivalued group attributes that you want to reconcile. Sample value: |
|
Search Base |
Enter the DN of the organization in which the search for group records must be performed during reconciliation. Sample value: |
|
Search Scope |
Enter Enter Note: If you want to enter Default value: |
|
Search Filter |
Enter the query condition that is to be used during reconciliation for locating target system user accounts that meet certain criteria. Default value: Sample value: See "Limited Reconciliation vs. Regular Reconciliation" for detailed information about this attribute. |
|
Organization Name |
Enter one of the following values:
|
|
Use Organization Name |
Enter yes as the value of this attribute if you want all target system groups to be reconciled into a single organization. Enter no as the value of this attribute if you want each target system group to be reconciled into an organization of its own. |
|
IT Resource Name |
Enter the name of the IT resource that you configure by performing the procedure described in "Configuring the IT Resource for the Target System". Sample value: |
|
Resource Object |
This attribute holds the name of the resource object against which group reconciliation runs must be performed. Value: Note: For the resource object shipped with this connector, you must not change the value of this attribute. However, if you create a copy of the resource object, then you must enter the unique name of that resource object as the value of this attribute. |
|
ADCS TimeStamp |
This attribute holds the time stamp of the group record that was last created or updated on the target system. The reconciliation engine automatically enters a value in this attribute. Default value: Note: You must not change the value of this attribute. |
|
Task Scheduler Name |
This attribute holds the name of the scheduled task for reconciliation of group data from the target system. Value: Note: For this scheduled task, you must not change the value of this attribute. However, if you create a copy of this scheduled task, then you must enter the unique name of that scheduled task as the value of this attribute. |
|
Field Lookup Code |
Enter one of the following values:
|
|
Configuration Lookup |
This attribute holds the name of the lookup definition containing values that are used during both reconciliation and provisioning: Value: Note: You must not change the value of this attribute. However, if you create a copy of this lookup definition, then you can enter the unique name of the new lookup definition as the value of the Configuration Lookup attribute. |
|
Delete Recon Task Scheduler Name |
This attribute holds the name of the scheduled task for reconciliation of deleted Group data from the target system. Value: Note: For this scheduled task, you must not change the value of this attribute. However, if you create a copy of this scheduled task and the scheduled task for reconciliation of deleted group data, then you must enter the unique name of that new Delete reconciliation scheduled task as the value of the Delete Recon Task Scheduler Name attribute in the copy of this scheduled task. |
Note:
You cannot reconcile data about deleted Groups from the target system if you are using Oracle Identity Manager release 11.1.1 or 11.1.2.x. This issue has been mentioned in the "Known Issues" chapter.The AD Group Delete Recon scheduled task is used to reconcile data about deleted Groups in the target resource (account management) mode of the connector. During a reconciliation run, for each deleted group account on the target system, the AD Group resource is revoked for the corresponding OIM Group. Below Table describes the attributes of this scheduled task.
Table 3-6 Attributes of the Scheduled Task for Reconciliation of Deleted Group Data from a Target Resource
| Attribute | Description |
|---|---|
|
Target Resource Object |
This attribute holds the name of the resource object against which the reconciliation run is performed. Value: Note: For the resource object shipped with this connector, you must not change the value of this attribute. However, if you create a copy of the resource object, then you must enter the unique name of that resource object as the value of this attribute. |
|
ADCS TimeStamp |
This attribute holds the time stamp of the group record that was last deleted on the target system. In addition, the value of this attribute is updated when the scheduled task for Group Recon (AD Group Recon) is run with its ADCS TimeStamp attribute set to 0. The reconciliation engine automatically enters a value in this attribute. Default value: Note: You must not change the value of this attribute. |
|
IT Resource Name |
Enter the name of the IT resource that you configure by performing the procedure described in Section 2.2.1.3, "Configuring the IT Resource for the Target System." |
|
Search Filter |
This attribute holds the LDAP search filter that is used to locate deleted group accounts on the target system. Value: Note: You must not change the value of this attribute. |
|
Task Scheduler Name |
This attribute holds the name of the scheduled task. Value: Note: You must not change the value of this attribute. |
|
Configuration Lookup |
This attribute holds the name of the lookup definition containing values that are used during both reconciliation and provisioning: Value: Note: You must not change the value of this attribute. However, if you create a copy of this lookup definition, then you can enter the unique name of the new lookup definition as the value of the Configuration Lookup attribute. |
3.4.4.2 Scheduled Tasks for Trusted Source Reconciliation
The following are the scheduled tasks for trusted source reconciliation:
Note:
The procedure to configure these scheduled tasks is described later in the guide.Note:
You cannot reconcile data about organizations from the target system if you are using Oracle Identity Manager release 11.1.1 or 11.1.2.x. This issue has been mentioned in the "Known Issues" chapter.The AD Organization Recon scheduled task is used to reconcile data about organizations. Table 3-7 describes the attributes of this scheduled task.
Table 3-7 Attributes of the Scheduled Task for Reconciliation of Organization Data from a Trusted Source
| Attribute | Description |
|---|---|
|
Search Base |
Enter the DN of the organization in which the search for organization records must be performed during reconciliation. Sample values:
|
|
Resource Object |
This attribute holds the name of the resource object against which the reconciliation run must be performed. Value: Note: You must not change the value of this attribute. |
|
Search Filter |
This attribute holds the LDAP search filter that is used to locate organization accounts. Sample value: Note: If you want data about target system containers to be used to create OIM organizations, then set the value of this attribute to the following:
|
|
IT Resource Name |
Enter the name of the IT resource that you configure by performing the procedure described in "Configuring the IT Resource for the Target System". Sample value: |
|
Search Scope |
Enter Enter Note: If you want to enter Default value: |
|
ADCS TimeStamp |
This attribute holds the time stamp of the organization record that was last created or updated on the target system. The reconciliation engine automatically enters a value in this attribute. Default value: Note: You must not change the value of this attribute. |
|
Task Scheduler Name |
This attribute holds the name of the scheduled task. Value: Note: For this scheduled task, you must not change the value of this attribute. However, if you create a copy of this scheduled task, then you must enter the unique name of that scheduled task as the value of the attribute in that scheduled task. |
|
Configuration Lookup |
This attribute holds the name of the lookup definition containing values that are used during both reconciliation and provisioning: Value: Note: You must not change the value of this attribute. However, if you create a copy of this lookup definition, then you can enter the unique name of the new lookup definition as the value of the Configuration Lookup attribute. |
The AD User Trusted Recon scheduled task is used to reconcile user data. Table 3-8 describes the attributes of this scheduled task.
Table 3-8 Attributes of the Scheduled Task for Reconciliation of User Data from a Trusted Source
| Attribute | Description |
|---|---|
|
OIM Employee Type |
Enter the employee type that must be set for OIM Users created through reconciliation. You must select one of the following values:
Default value: |
|
OIM User Type |
Enter the role that must be set for OIM Users created through reconciliation. You must select one of the following values:
Default value: |
|
OIM Organization |
Enter the name of the Oracle Identity Manager organization in which reconciled users must be created. The OIM Organization attribute is taken into account only if you set the MaintainHierarchy attribute to Default value: |
|
Trusted Resource Object |
Enter the name of the resource object against which the trusted reconciliation run must be performed. Default value: Note: For this resource object, you must not change the value of this attribute. However, if you create a copy of the resource object, then you must enter the unique name of that resource object as the value of the attribute. |
|
Delete Recon Task Scheduler Name |
This attribute holds the name of the scheduled task for reconciliation of deleted user data from the target system. Value: Note: For this scheduled task, you must not change the value of this attribute. However, if you create a copy of this scheduled task and the scheduled task for reconciliation of deleted user data, then you must enter the unique name of that new Delete reconciliation scheduled task as the value of the Delete Recon Task Scheduler Name attribute in the copy of this scheduled task. |
|
IT Resource Name |
Enter the name of the IT resource that you configure by performing the procedure described in "Configuring the IT Resource for the Target System". Sample value: |
|
This attribute holds the time stamp of the user record that was last created or updated on the target system. The reconciliation engine automatically enters a value in this attribute. Default value: Note: You must not change the value of this attribute. |
|
|
Task Scheduler Name |
This attribute holds the name of the scheduled task. Value: AD User Trusted Recon Note: For this scheduled task, you must not change the value of this attribute. However, if you create a copy of this scheduled task, then you must enter the unique name of that scheduled task as the value of the attribute in that scheduled task. |
|
Search Scope |
Enter Enter Note: If you want to enter Default value: |
|
Field Lookup Code |
This attribute holds the name of the lookup definition that contains mappings between the target system fields and the corresponding Oracle Identity Manager fields. |
|
Enter If the MaintainHierarchy attribute is set to Default value: Note: If you set this attribute to |
|
|
Transform Lookup Code |
Enter the name of the lookup definition that you have created to link Microsoft Active Directory fields with the JAR files that must be run to transform each field. This attribute is valid only when the Use Transform Mapping attribute is set to yes. Value:
Note: You must not change the value of this attribute. See "Transforming Data Reconciled Into Oracle Identity Manager" for detailed information about using the Transform Lookup Code attribute. |
|
Use Transform Mapping |
Enter Default value: See "Transforming Data Reconciled Into Oracle Identity Manager" for detailed information about using the Use Transform Mapping attribute. |
|
Start Record |
Enter the number of the target system record from which a batched reconciliation run must begin. Default value: This attribute is used in conjunction with the Batch Size and Number of Batches attributes. All three attributes are discussed in "Batched Reconciliation". As mentioned in that section, it is recommended that you accept the default value of the Start Record attribute. |
|
Enter the number of records that must be included in each batch fetched from the target system. Default value: This attribute is used in conjunction with the Number of Batches and Start Record attributes. All three attributes are discussed in "Batched Reconciliation". |
|
|
Enter the number of batches that must be reconciled. Default value: Sample value: This attribute is used in conjunction with the Batch Size and Start Record attributes. All three attributes are discussed in detail in "Batched Reconciliation". If you accept the default value ( |
|
|
Enter Enter Default value: See "Full Reconciliation vs. Incremental Reconciliation" for detailed information about this attribute. |
|
|
Search Base |
Enter the DN of the organization in which the search for user records must be performed during reconciliation. Sample value: |
|
Ignored Chars Username |
Enter the list of characters that must be removed from user ID values reconciled from the target system. Use this attribute to prevent the reconciliation of characters that may cause errors in other target systems. The list that you enter must be a string of characters, without any delimiters. If you do not want to use this feature, then enter Sample value: # This sample value will remove the number sign (#) character from all user ID values that are reconciled from the target system. Default value: |
|
Search Filter |
Enter the query condition that is to be used during reconciliation for locating target system user accounts that meet certain criteria. Default value: Sample value: See "Limited Reconciliation vs. Regular Reconciliation" for detailed information about this attribute. |
|
Configuration Lookup |
This attribute holds the name of the lookup definition containing values that are used during both reconciliation and provisioning: Value: Note: You must not change the value of this attribute. |
The AD User Trusted Delete Recon scheduled task is used to reconcile data about deleted users. During a reconciliation run, for each deleted target system user account, the corresponding OIM User is deleted. Table 3-9 describes the attributes of this scheduled task.
Table 3-9 Attributes of the Scheduled Task for Reconciliation of Deleted User Data from a Trusted Source
| Attribute | Description |
|---|---|
|
IT Resource Name |
Enter the name of the IT resource that you configure by performing the procedure described in "Configuring the IT Resource for the Target System". Sample value: |
|
Search Filter |
This attribute holds the LDAP search filter that is used to locate deleted user accounts on the target system. Value: Note: You must not change the value of this attribute. |
|
This attribute holds the time stamp of the user record that was last deleted on the target system. In addition, the value of this attribute is updated when the scheduled task for trusted source reconciliation of user accounts (AD User Trusted Recon) is run with its ADCS TimeStamp attribute set to 0. The reconciliation engine automatically enters a value in this attribute. Default value: Note: You must not change the value of this attribute. |
|
|
Trusted Resource Object |
This attribute holds the name of the resource object against which the reconciliation run is performed. Value: |
|
Task Scheduler Name |
This attribute holds the name of the scheduled task. Value: Note: You must not change the value of this attribute. |
|
Configuration Lookup |
This attribute holds the name of the lookup definition containing values that are used during both reconciliation and provisioning: Value: Note: You must not change the value of this attribute. However, if you create a copy of this lookup definition, then you can enter the unique name of the new lookup definition as the value of the Configuration Lookup attribute. |
3.5 Configuring Scheduled Tasks
This section describes the procedure to configure scheduled tasks. You can apply this procedure to configure the scheduled tasks for lookup field synchronization and reconciliation.
Table 3-10 lists the scheduled tasks that you must configure.
Table 3-10 Scheduled Tasks for Lookup Field Synchronization and Reconciliation
| Scheduled Task | Description |
|---|---|
|
This scheduled task is used to synchronize the values of group lookup fields between Oracle Identity Manager and the target system. For information about this scheduled task and its attributes, see "Scheduled Tasks for Lookup Field Synchronization". |
|
|
This scheduled task is used to synchronize the values of organization lookup fields between Oracle Identity Manager and the target system. For information about this scheduled task and its attributes, see "Scheduled Tasks for Lookup Field Synchronization". |
|
|
This scheduled task is used to fetch user data during target resource reconciliation. For information about this scheduled task and its attributes, see "Scheduled Tasks for Target Resource Reconciliation". |
|
|
This scheduled task is used to fetch data about deleted users during target resource reconciliation. During a reconciliation run, for each deleted user account on the target system, the AD User resource is revoked for the corresponding OIM User. For information about this scheduled task and its attributes, see "Scheduled Tasks for Target Resource Reconciliation". |
|
|
This scheduled task is used to reconcile data about organizations. For information about this scheduled task and its attributes, see "Scheduled Tasks for Trusted Source Reconciliation". |
|
|
This scheduled task is used to fetch user data during trusted source reconciliation. For information about this scheduled task and its attributes, see "Scheduled Tasks for Trusted Source Reconciliation". |
|
|
This scheduled task is used to fetch data about deleted users during trusted source reconciliation. During a reconciliation run, for each deleted target system account, the corresponding OIM User is deleted. For information about this scheduled task and its attributes, see "Scheduled Tasks for Trusted Source Reconciliation". |
|
|
This scheduled task is used to fetch data about groups during target resource reconciliation. For information about this scheduled task and its attributes, see "Scheduled Tasks for Target Resource Reconciliation". |
|
|
AD Group Delete Recon |
This scheduled task is used to reconcile data about deleted groups in the target resource (account management) mode of the connector. For information about this scheduled task and its attributes, see "Scheduled Tasks for Target Resource Reconciliation". |
To configure a scheduled task:
-
Depending on the Oracle Identity Manager release you are using, perform one of the following steps:
-
For Oracle Identity Manager release 9.1.0.x:
-
Log in to the Administrative and User Console.
-
Expand Resource Management, and then click Manage Scheduled Task.
-
-
For Oracle Identity Manager release 11.1.1:
-
Log in to the Administrative and User Console.
-
On the Welcome to Oracle Identity Manager Self Service page, click Advanced in the upper-right corner of the page.
-
On the Welcome to Oracle Identity Manager Advanced Administration page, in the System Management region, click Search Scheduled Jobs.
-
-
For Oracle Identity Manager release 11.1.2.x:
-
Log in to Oracle Identity System Administration.
-
In the left pane, under System Management, click Scheduler.
-
-
-
Search for and open the scheduled task as follows:
-
If you are using Oracle Identity Manager release 9.1.0.x, then:
-
On the Scheduled Task Management page, enter the name of the scheduled task as the search criteria and then click Search.
Figure 3-1 shows the Scheduled Task Management page.
Figure 3-1 Scheduled Task Management Page
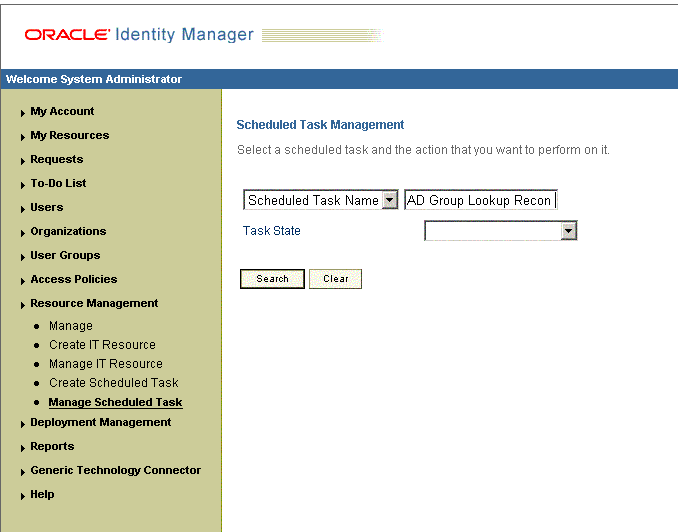
Description of ''Figure 3-1 Scheduled Task Management Page''
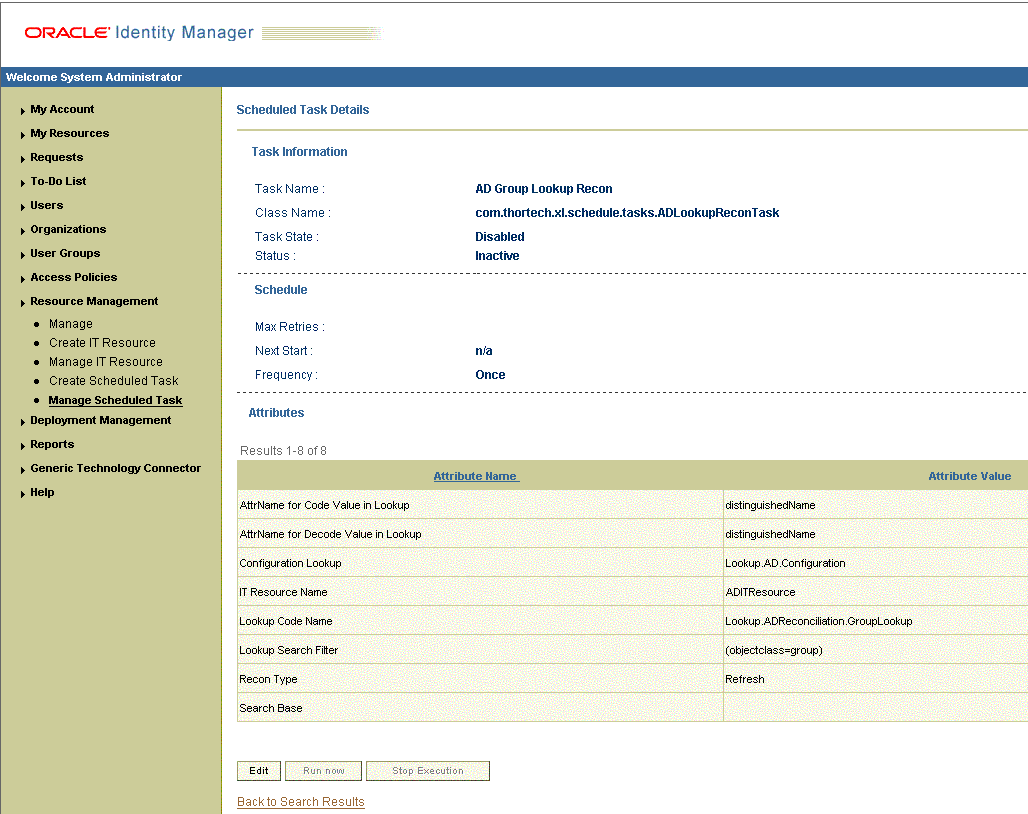
-
In the search results table, click the edit icon in the Edit column for the scheduled task. Figure 3-2 shows the Scheduled Task Details page.
-
-
If you are using Oracle Identity Manager release 11.1.1 or 11.1.2.x, then:
-
In the Search field, enter the name of the scheduled job as the search criterion. Alternatively, you can click Advanced Search and specify the search criterion.
-
In the search results table on the left pane, click the scheduled job in the Job Name column.
-
-
-
Modify the details of the scheduled task. To do so:
-
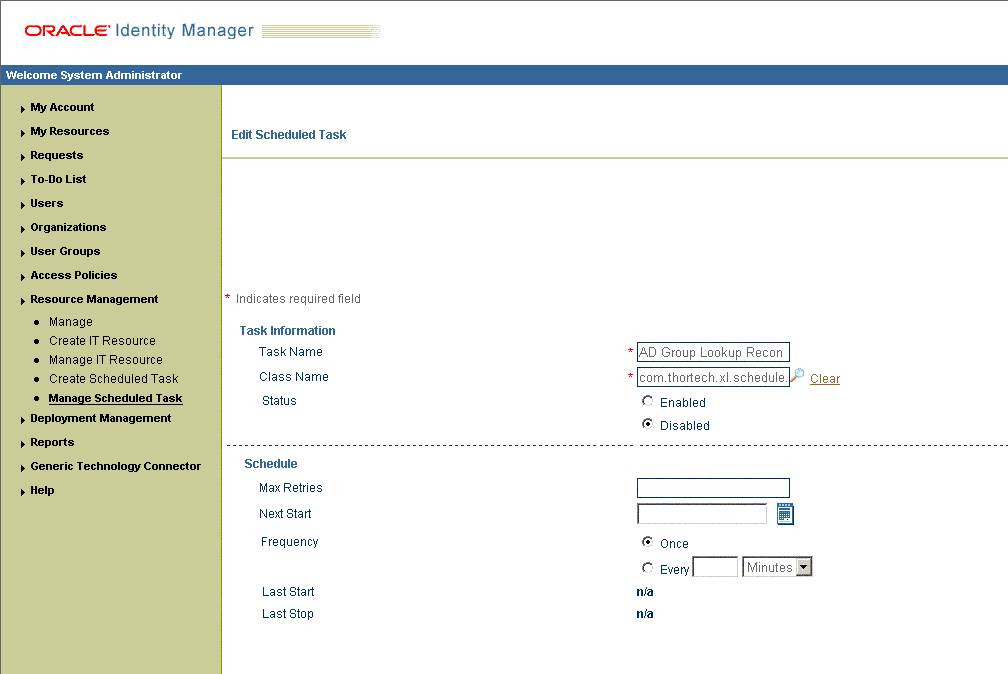
If you are using Oracle Identity Manager release 9.1.0.x, then on the Edit Scheduled Task page, modify the following parameters, and then click Continue:
-
Status: Specify whether you want to leave the task in the enabled state. In the enabled state, the task is ready for use.
-
Max Retries: Enter an integer value in this field. This number represents the number of times Oracle Identity Manager must attempt to complete the task before assigning the ERROR status to the task. The default value is 1.
-
Next Start: Use the date editor to specify the date when you want the task to run. After you select a date value in the date editor, you can modify the time value that is automatically displayed in the Next Start field.
-
Frequency: Specify the frequency at which you want the task to run.
When you click Edit, the Edit Scheduled Task page is displayed. Figure 3-3 shows this page.
-
-
If you are using Oracle Identity Manager release 11.1.1 or 11.1.2.x, then on the Job Details tab, you can modify the following parameters:
-
Retries: Enter an integer value in this field. This number represents the number of times the scheduler tries to start the job before assigning the Stopped status to the job.
-
Schedule Type: Depending on the frequency at which you want the job to run, select the appropriate schedule type.
Note:
See Oracle Fusion Middleware Administrator's Guide for Oracle Identity Manager for detailed information about schedule types.In addition to modifying the job details, you can enable or disable a job.
-
-
-
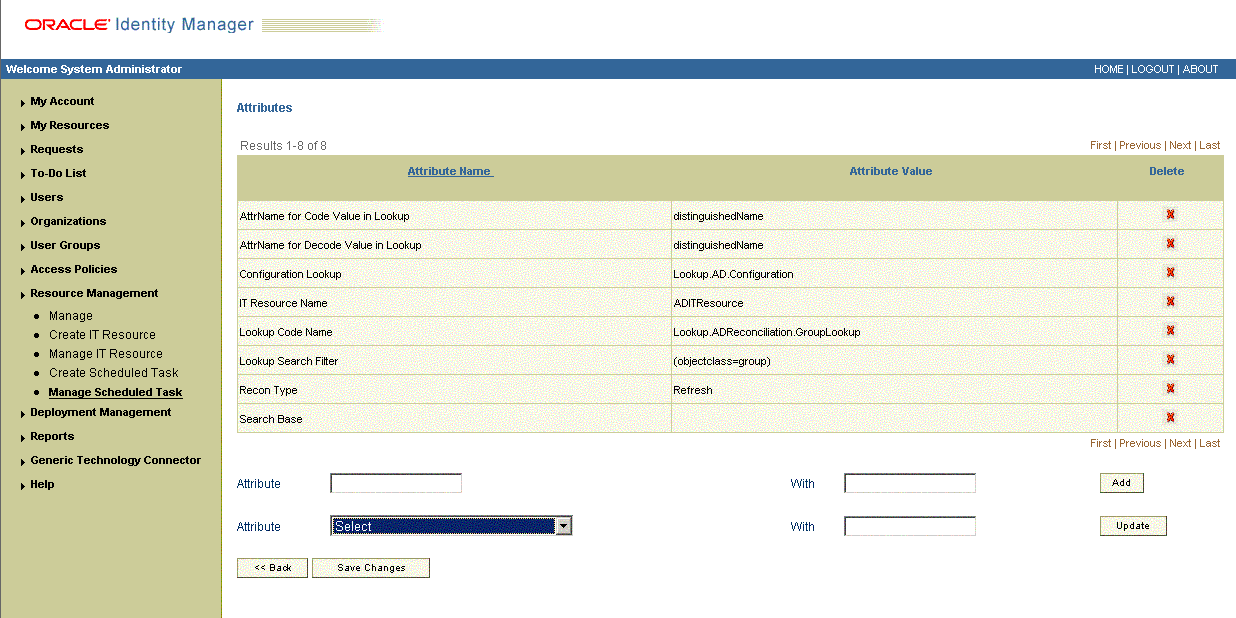
Specify values for the attributes of the scheduled task. To do so:
Note:
-
Attribute values are predefined in the connector XML file that you import. Specify values only for those attributes that you want to change.
-
Values (either default or user-defined) must be assigned to all the attributes. If even a single attribute value is left empty, then reconciliation is not performed.
-
See "Reconciliation Scheduled Tasks" for the list of scheduled tasks and their attributes.
-
If you are using Oracle Identity Manager release 9.1.0.x, then on the Attributes page, select the attribute from the Attribute list, specify a value in the field provided, and then click Update. Figure 3-4 shows the attribute details in the Attributes page.
-
If you are using Oracle Identity Manager release 11.1.1 or 11.1.2.x, then on the Job Details tab, in the Parameters region, specify values for the attributes of the scheduled task.
-
-
After specifying the attributes, do one of the following:
-
If you are using Oracle Identity Manager release 9.1.0.x, then click Save Changes to save the changes.
Note:
The Stop Execution option is not available in the Administrative and User Console. If you want to stop a task, then click Stop Execution on the Task Scheduler form of the Design Console. -
If you are using Oracle Identity Manager release 11.1.1 or 11.1.2.x, then click Apply to save the changes.
Note:
The Stop Execution option is available in the Administrative and User Console. You can use the Scheduler Status page to either start, stop, or re-initialize the scheduler.
-
3.6 Configuring Provisioning
As mentioned earlier in this guide, provisioning involves creating or modifying a user's account information on the target system through Oracle Identity Manager.
Note:
You must perform the procedure described in this section if you want to use the provisioning features of Oracle Identity Manager for this target system.3.6.1 Specifying the Object Class for User Provisioning
By default, newly created users on the target system are assigned to the user object class. While performing the Create User provisioning operation on Oracle Identity Manager, you may want to assign the user to other object classes, in addition to the user object class. The connector implements this feature through the Lookup.AD.Configuration lookup definition. See "Configuring the Lookup.AD.Configuration Lookup Definition" for more information.
3.7 Performing Provisioning Operations in Oracle Identity Manager Release 9.1.0.x and 11.1.1.x
Provisioning a resource for an OIM User involves using Oracle Identity Manager to create a Microsoft Active Directory account for the user.
When you install the connector on Oracle Identity Manager release 11.1.1, the direct provisioning feature is automatically enabled. This means that the process form is enabled when you install the connector.
If you configure the connector for request-based provisioning, then the process form is suppressed and the object form is displayed. In other words, direct provisioning is disabled when you configure the connector for request-based provisioning. If you want to revert to direct provisioning, then perform the steps described in "Switching Between Request-Based Provisioning and Direct Provisioning on Oracle Identity Manager Release 11.1.1".
This following are types of provisioning operations:
See Also:
Oracle Fusion Middleware User's Guide for Oracle Identity Manager for information about the types of provisioningThis section discusses the following topics:
3.7.1 Direct Provisioning
To provision a resource by using the direct provisioning approach:
-
Log in to the Administrative and User Console.
-
If you want to first create an OIM User and then provision a target system account, then:
-
If you are using Oracle Identity Manager release 9.1.0.x, then:
-
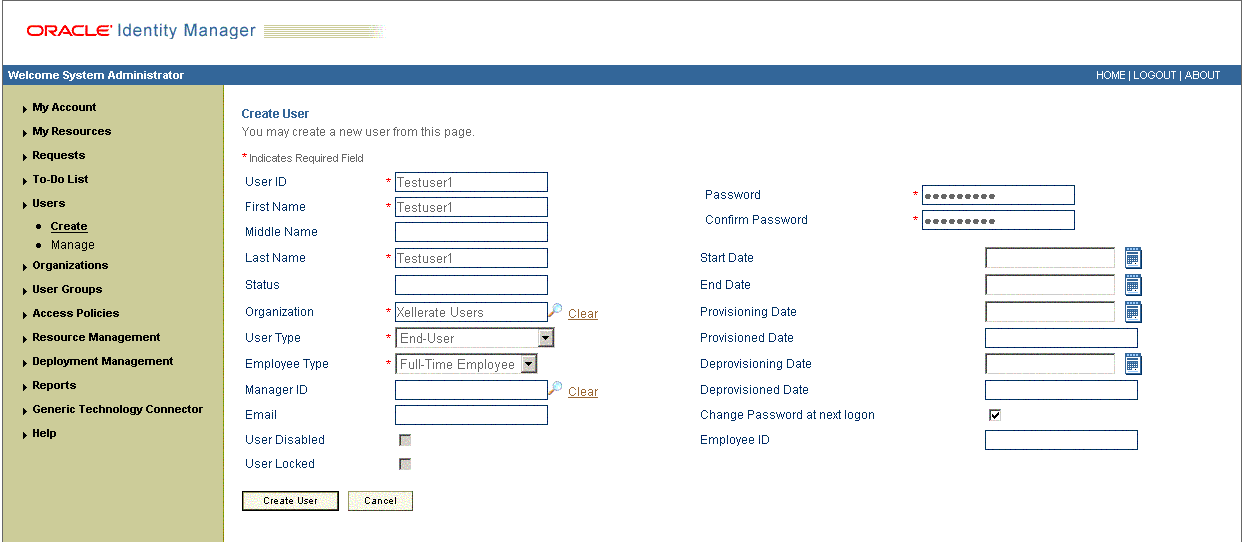
From the Users menu, select Create.
-
On the Create User page, enter values for the OIM User fields and then click Create User. Figure 3-5 shows the Create User page.
-
-
If you are using Oracle Identity Manager release 11.1.1, then:
-
On the Welcome to Identity Administration page, in the Users region, click Create User.
-
On the Create User page, enter values for the OIM User fields, and then click Save.
-
-
-
If you want to provision a target system account to an existing OIM User, then:
-
If you are using Oracle Identity Manager release 9.1.0.x, then:
-
From the Users menu, select Manage.
-
Search for the OIM User and select the link for the user from the list of users displayed in the search results
-
-
If you are using Oracle Identity Manager release 11.1.1, then:
-
On the Welcome to Identity Administration page, search for the OIM User by selecting Users from the list on the left pane.
-
From the list of users displayed in the search results, select the OIM User. The user details page is displayed on the right pane.
-
-
-
Depending on the Oracle Identity Manager release you are using, perform one of the following steps:
-
If you are using Oracle Identity Manager release 9.1.0.x, then:
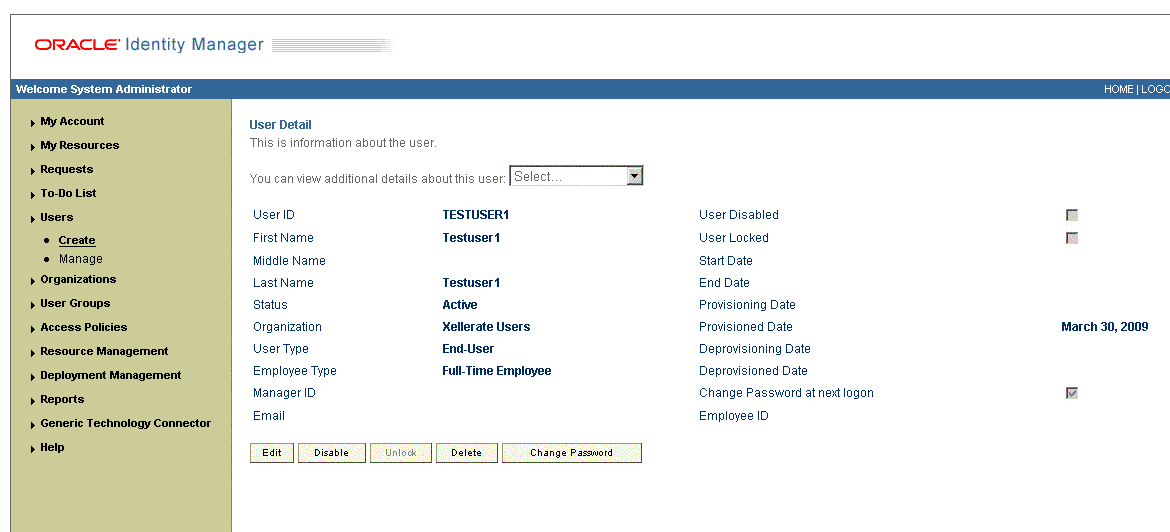
-
On the User Detail page, select Resource Profile from the list at the top of the page. Figure 3-6 shows the User Detail page.
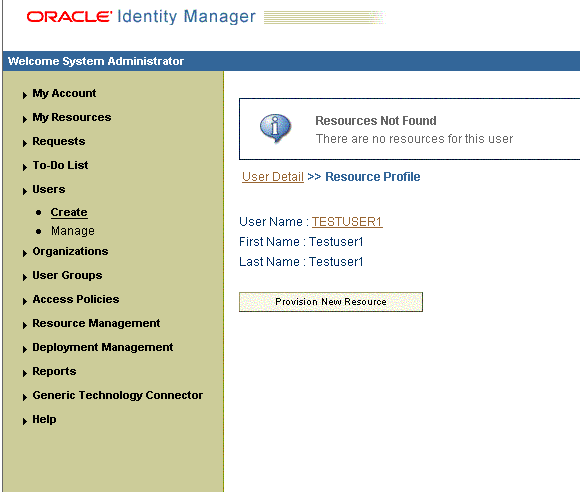
-
On the Resource Profile page, click Provision New Resource. Figure 3-7 shows the Resource Profile page.
-
-
If you are using Oracle Identity Manager release 11.1.1, then:
-
On the user details page, click the Resources tab.
-
From the Action menu, select Add Resource. Alternatively, you can click the add resource icon with the plus (+) sign. The Provision Resource to User page is displayed in a new window.
-
-
-
On the Step 1: Select a Resource page, select AD User from the list and then click Continue. Figure 3-8 shows the Step 1: Select a Resource page.
Figure 3-8 Step 1: Select a Resource Page
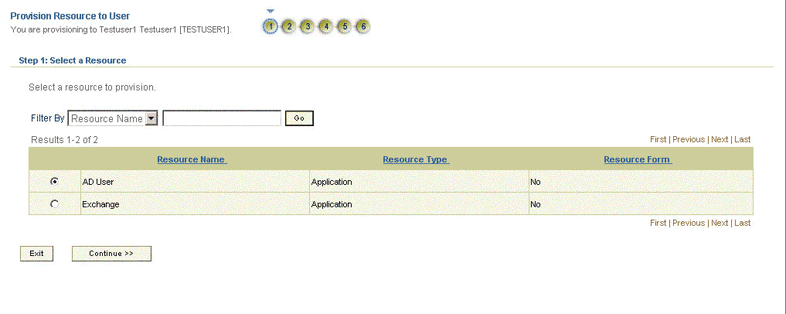
Description of ''Figure 3-8 Step 1: Select a Resource Page''
-
On the Step 2: Verify Resource Selection page, click Continue. Figure 3-9 shows the Step 2: Verify Resource Selection page.
Figure 3-9 Step 2: Verify Resource Selection Page
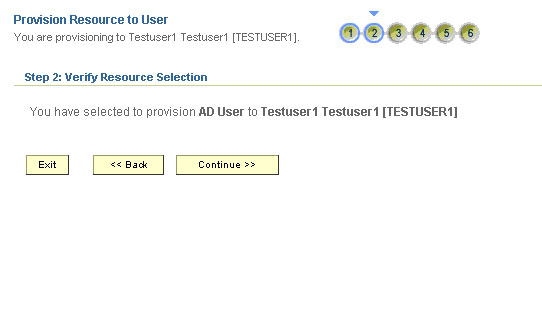
Description of ''Figure 3-9 Step 2: Verify Resource Selection Page''
-
On the Step 5: Provide Process Data for AD User Details page, enter the details of the account that you want to create on the target system and then click Continue. If you are setting values for the Terminal Services Profile fields, then you must select the Remote Manager IT resource. Figure 3-10 shows the user details added.
Figure 3-10 Step 5: Provide Process Data for AD User Details Page
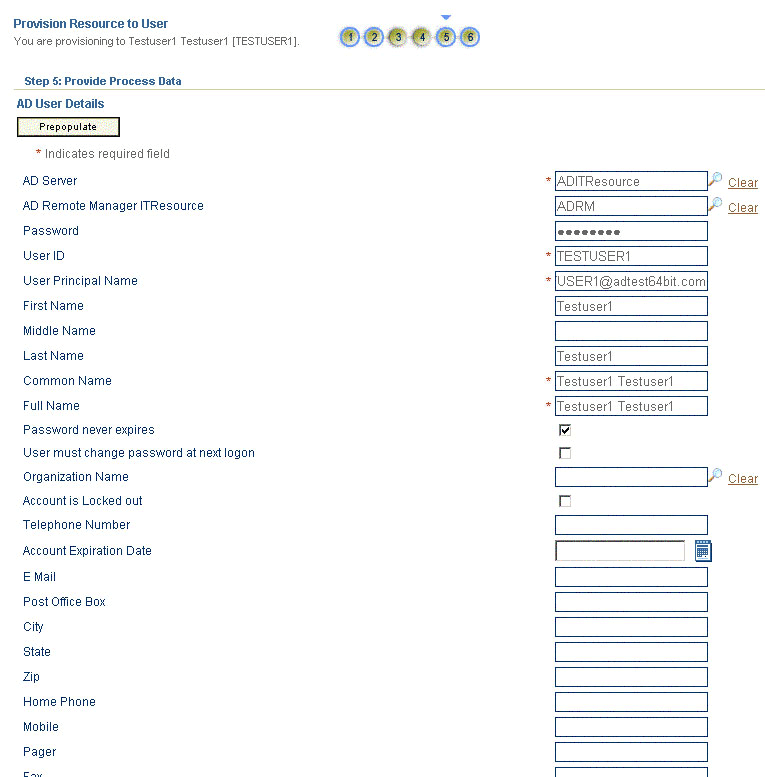
Description of ''Figure 3-10 Step 5: Provide Process Data for AD User Details Page''
-
On the Step 5: Provide Process Data for AD User Group Membership Details page, search for and select a group for the user on the target system and then click Continue. Figure 3-11 shows this page.
Figure 3-11 Step 5: Provide Process Data for AD User Group Membership Details Page
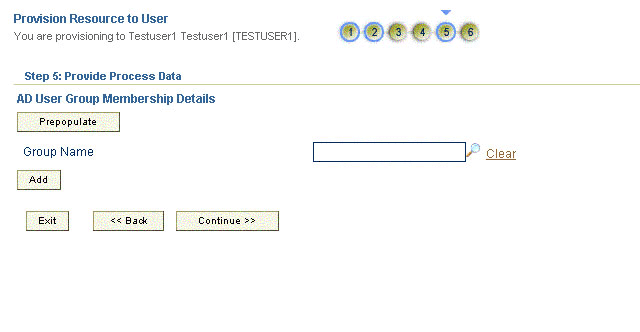
Description of ''Figure 3-11 Step 5: Provide Process Data for AD User Group Membership Details Page''
-
On the Step 6: Verify Process Data page, verify the data that you have provided and then click Continue. Figure 3-12 shows Step 6: Verify Process Data page.
Figure 3-12 Step 6: Verify Process Data Page
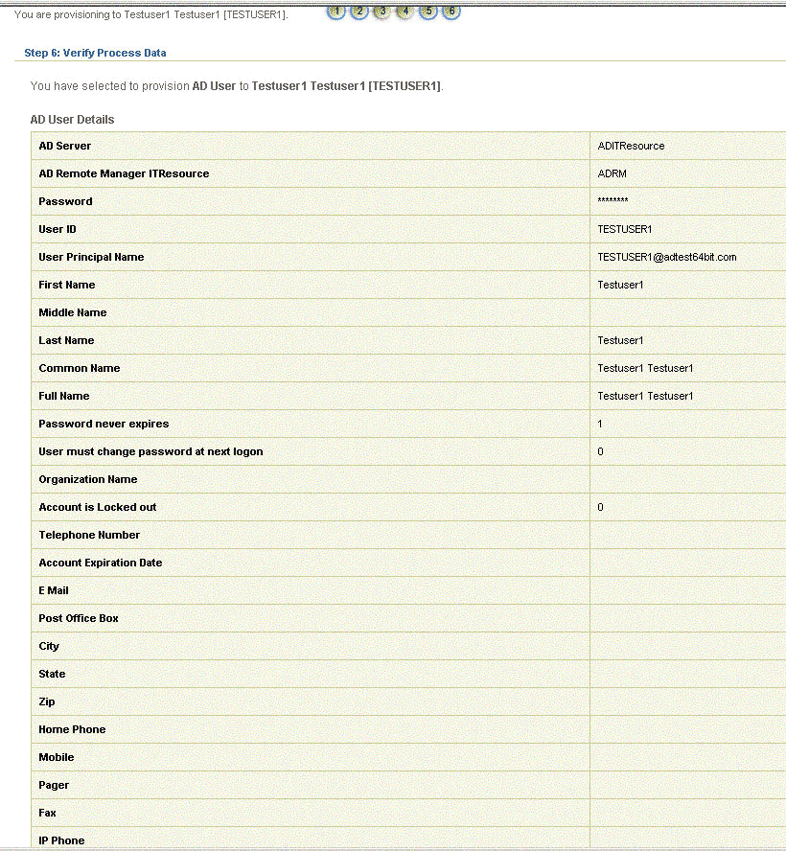
Description of ''Figure 3-12 Step 6: Verify Process Data Page''
-
The "Provisioning has been initiated" message is displayed. Perform one of the following steps:
-
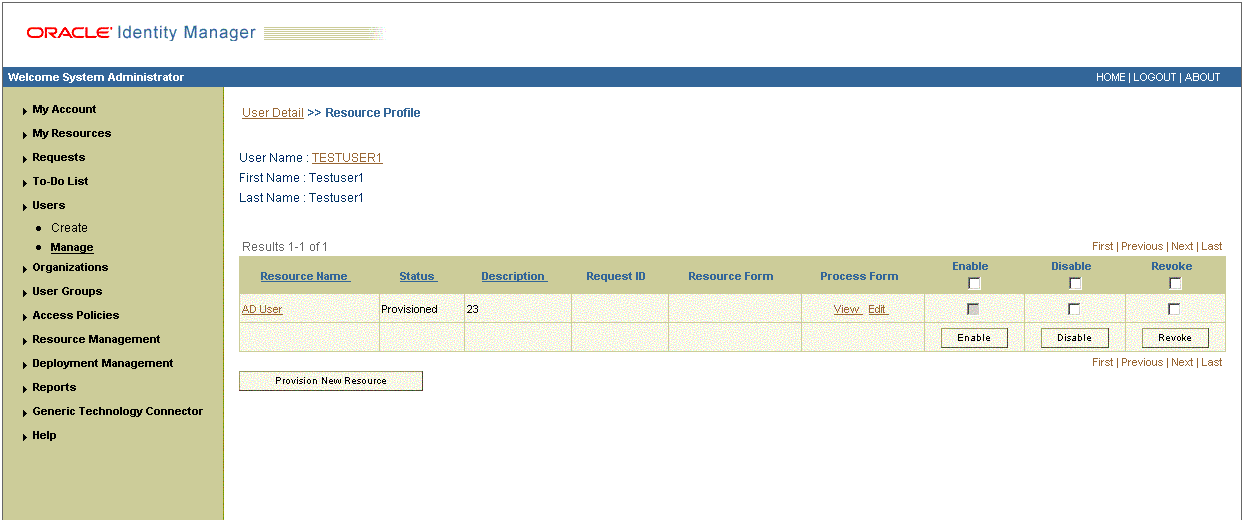
If you are using Oracle Identity Manager release 9.1.0.x, click Back to User Resource Profile. The Resource Profile page shows that the resource has been provisioned to the user. Figure 3-13 shows this page.
-
If you are using Oracle Identity Manager release 11.1.1, then:
-
Close the window displaying the "Provisioning has been initiated" message.
-
On the Resources tab, click Refresh to view the newly provisioned resource.
-
-
3.7.2 Request-Based Provisioning
Note:
The information provided in this section is applicable only if you are using Oracle Identity Manager release 11.1.1.A request-based provisioning operation involves both end users and approvers. Typically, these approvers are in the management chain of the requesters. The following sections discuss the steps to be performed by end users and approvers during a request-based provisioning operation:
Note:
The procedures described in these sections are built on an example in which the end user raises or creates a request for provisioning a target system account. This request is then approved by the approver.3.7.2.1 End User's Role in Request-Based Provisioning
The following steps are performed by the end user in a request-based provisioning operation:
See Also:
Oracle Fusion Middleware User's Guide for Oracle Identity Manager for detailed information about these steps-
Log in to the Administrative and User Console.
-
On the Welcome page, click Advanced on the top right corner of the page.
-
On the Welcome to Identity Administration page, click the Administration tab, and then click the Requests tab.
-
From the Actions menu on the left pane, select Create Request.
The Select Request Template page is displayed.
-
From the Request Template list, select Provision Resource and click Next.
-
On the Select Users page, specify a search criterion in the fields to search for the user that you want to provision the resource, and then click Search. A list of users that match the search criterion you specify is displayed in the Available Users list.
-
From the Available Users list, select the user to whom you want to provision the account.
If you want to create a provisioning request for more than one user, then from the Available Users list, select users to whom you want to provision the account.
-
Click Move or Move All to include your selection in the Selected Users list, and then click Next.
-
On the Select Resources page, click the arrow button next to the Resource Name field to display the list of all available resources.
-
From the Available Resources list, select AD User, move it to the Selected Resources list, and then click Next.
-
On the Resource Details page, enter details of the account that must be created on the target system, and then click Next.
If you are setting values for the Terminal Services Profile fields, then you must select the Remote Manager IT resource.
-
On the Justification page, you can specify values for the following fields, and then click Finish.
-
Effective Date
-
Justification
A message confirming that your request has been sent successfully is displayed along with the Request ID.
-
-
If you click the request ID, then the Request Details page is displayed.
-
To view details of the approval, on the Request Details page, click the Request History tab.
3.7.2.2 Approver's Role in Request-Based Provisioning
The following are steps performed by the approver in a request-based provisioning operation:
The following are steps that the approver can perform:
-
Log in to the Administrative and User Console.
-
On the Welcome page, click Self-Service in the upper-right corner of the page.
-
On the Welcome to Identity Manager Self Service page, click the Tasks tab.
-
On the Approvals tab, in the first section, you can specify a search criterion for request task that is assigned to you.
-
From the search results table, select the row containing the request you want to approve, and then click Approve Task.
A message confirming that the task was approved is displayed.
3.7.3 Switching Between Request-Based Provisioning and Direct Provisioning on Oracle Identity Manager Release 11.1.1
Note:
It is assumed that you have performed the procedure described in "Configuring Oracle Identity Manager for Request-Based Provisioning".On Oracle Identity Manager release 11.1.1, if you want to switch from request-based provisioning to direct provisioning, then:
-
Log in to the Design Console.
-
Disable the Auto Save Form feature as follows:
-
Expand Process Management, and then double-click Process Definition.
-
Search for and open the AD User process definition.
-
Deselect the Auto Save Form check box.
-
Click the Save icon.
-
-
If the Self Request Allowed feature is enabled, then:
-
Expand Resource Management, and then double-click Resource Objects.
-
Search for and open the AD User resource object.
-
Deselect the Self Request Allowed check box.
-
Click the Save icon.
-
On Oracle Identity Manager release 11.1.1, if you want to switch from direct provisioning back to request-based provisioning, then:
-
Log in to the Design Console.
-
Enable the Auto Save Form feature as follows:
-
Expand Process Management, and then double-click Process Definition.
-
Search for and open the AD User process definition.
-
Select the Auto Save Form check box.
-
Click the Save icon.
-
-
If you want to enable end users to raise requests for themselves, then:
-
Expand Resource Management, and then double-click Resource Objects.
-
Search for and open the AD User resource object.
-
Select the Self Request Allowed check box.
-
Click the Save icon.
-
3.8 Performing Provisioning Operations in Oracle Identity Manager Release 11.1.2 or Later
To perform provisioning operations in Oracle Identity Manager release 11.1.2 or later:
-
Log in to Oracle Identity Administrative and User console.
-
Create a user. See the "Managing Users" chapter in Oracle Fusion Middleware User's Guide for Oracle Identity Manager for more information about creating a user.
-
On the Account tab, click Request Accounts.
-
In the Catalog page, search for and add to cart the application instance created in "Creating an Application Instance" and then click Checkout.
-
Specify value for fields in the application form and then click Ready to Submit.
-
Click Submit.
-
If you want to provision entitlements, then:
-
On the Entitlements tab, click Request Entitlements.
-
In the Catalog page, search for and add to cart the entitlement, and then click Checkout.
-
Click Submit.
-