2 Deploying the Connector
The procedure to deploy the connector can be divided into the following stages:
Note:
Some of the procedures described in this chapter must be performed on the target system. To perform these procedures, you must use an SAP administrator account to which the SAP_ALL and SAP_NEW profiles have been assigned.2.1 Preinstallation
Preinstallation information is divided across the following sections:
2.1.1 Preinstallation on Oracle Identity Manager
This section contains the following topics:
-
Section 2.1.1.1, "Files and Directories on the Installation Media"
-
Section 2.1.1.2, "Determining the Release Number of the Connector"
-
Section 2.1.1.3, "Creating a Backup of the Existing Common.jar File"
2.1.1.1 Files and Directories on the Installation Media
Table 2-1 describes the files and directories on the installation media.
Table 2-1 Files and Directories On the Installation Media
2.1.1.2 Determining the Release Number of the Connector
You might have a deployment of an earlier release of the connector. While deploying the latest release, you might want to know the release number of the earlier release. To determine the release number of the connector that has already been deployed:
-
In a temporary directory, extract the contents of the connector JAR file that is in the OIM_HOME/xellerate/JavaTasks directory.
-
Open the Manifest.mf file in a text editor. The Manifest.mf file is one of the files bundled inside the connector JAR file.
In the Manifest.mf file, the release number of the connector is displayed as the value of the Version property.
2.1.1.3 Creating a Backup of the Existing Common.jar File
The Common.jar file is in the deployment package of each release 9.1.x connector. With each new release, code corresponding to that particular release is added to the existing code in this file. For example, the Common.jar file shipped with Connector Y on 12-July contains:
-
Code specific to Connector Y
-
Code included in the Common.jar files shipped with all other release 9.1.x connectors that were released before 12-July.
If you have already installed a release 9.1.x connector that was released after this release of the SAP User Management Engine connector, back up the existing Common.jar file, install the SAP User Management Engine connector, and then restore the Common.jar file. The steps to perform this procedure are as follows:
Caution:
If you do not perform this procedure, then your release 9.1.x connectors might not work.-
Determine the release date of your existing release 9.1.x connector as follows:
-
Extract the contents of the following file in a temporary directory:
OIM_HOME/xellerate/ScheduleTask/Common.jar
-
Open the Manifest.mf file in a text editor.
-
Note down the Build Date and Build Version values.
-
-
Determine the release date of this connector as follows:
-
On the installation media for the connector, extract the contents of the lib/Common.jar and then open the Manifest.mf file in a text editor.
-
Note down the Build Date and Build Version values.
-
-
If the Build Date and Build Version values for the SAP User Management Engine connector are less than the Build Date and Build Version values for the connector that is already installed, then:
-
Copy the OIM_HOME/xellerate/ScheduleTask/Common.jar to a temporary location.
-
After you perform the procedure described in Section 2.2, "Installation" overwrite the new Common.jar file in the OIM_HOME/xellerate/ScheduleTask directory with the Common.jar file that you backed up in the preceding step.
-
2.1.1.4 Copying OpenSPML Toolkit 2.0
The connector uses OpenSPML Toolkit 2.0. To download this toolkit:
-
In a Web browser, open the following Web page:
-
Download the SPMLv2 build 192-20100413 file.
-
Extract the openspml2-toolkit.jar file from the downloaded file.
-
Copy the openspml2-toolkit.jar file into the OIM_HOME/xellerate/ThirdParty directory.
2.1.2 Preinstallation on the Target System
Preinstallation on the target system involves performing the following procedure:
2.1.2.1 Creating a Target System User Account for Connector Operations
The connector uses a target system account to connect to and perform operations on the target system. To create this target system account:
-
Log in to SAP User Management Engine as the administrator.
-
Create a role and assign the Spml_Read_Action action to it as follows:
-
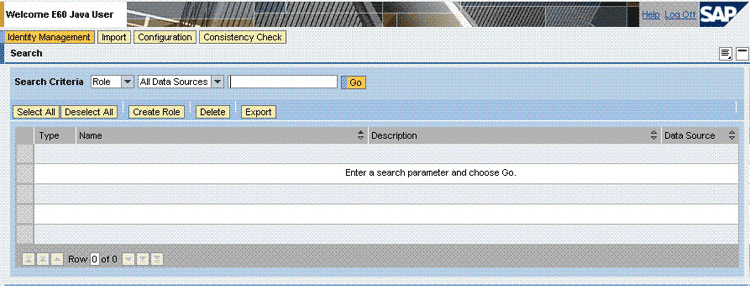
From the Search Criteria list, select Role and then click Create Role.
-
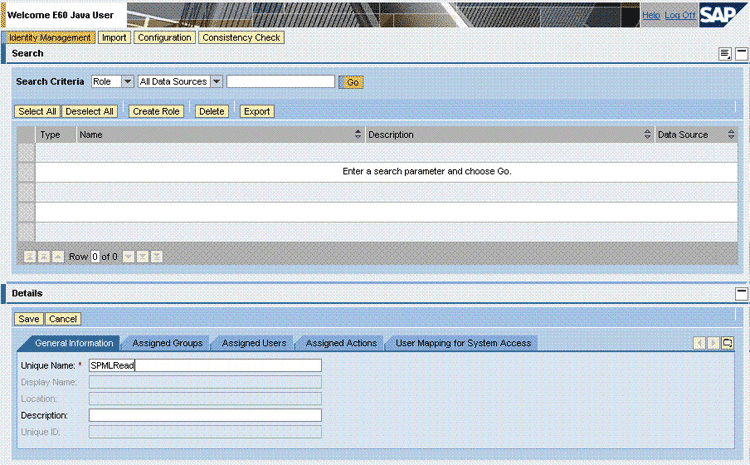
On the General Information tab of the Details region, enter a name for the role in the Unique Name field and then click Save.
-
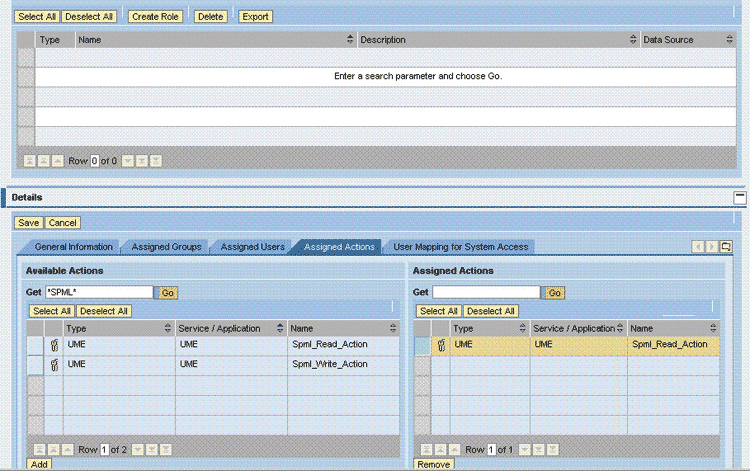
On the Assigned Actions tab, use the Get field to display the Spml_Read_Action action, select this action, and then click Add.
The Spml_Read_Action action is displayed in the Assigned Actions list.
-
Click Save in the Details region.
-
-
Create a user and assign the newly created role to the user as follows:
-
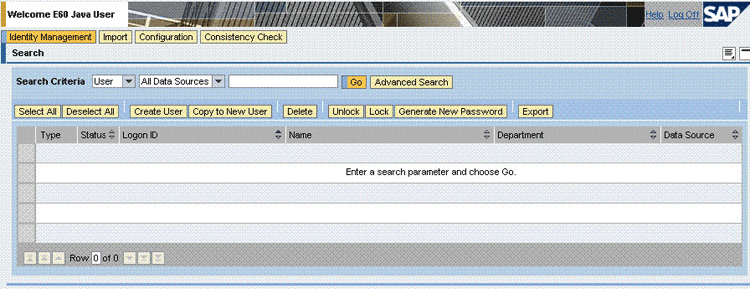
From the Search Criteria list, select User and then click Create User.
-
On the General Information tab of the Details region, enter values in the various fields and then select Technical User from the Security Policy list.

-
Click Save in the Details region.
-
On the Assigned Roles tab, assign the newly created role to the user and then click Save.

-
2.2 Installation
Note:
In this guide, the term Connector Installer has been used to refer to the Connector Installer feature of the Oracle Identity Manager Administrative and User Console.To run the Connector Installer:
-
Copy the contents of the connector installation media into the following directory:
OIM_HOME/xellerate/ConnectorDefaultDirectory
-
Log in to the Administrative and User Console by using the user account described in the "Creating the User Account for Installing Connectors" section of Oracle Identity Manager Administrative and User Console.
-
Click Deployment Management, and then click Install Connector.
-
From the Connector List list, select SAP UME RELEASE_NUMBER. This list displays the names and release numbers of connectors whose installation files you copy into the default connector installation directory:
OIM_HOME/xellerate/ConnectorDefaultDirectory
If you have copied the installation files into a different directory, then:
-
In the Alternative Directory field, enter the full path and name of that directory.
-
To repopulate the list of connectors in the Connector List list, click Refresh.
-
From the Connector List list, select SAP UME RELEASE_NUMBER.
-
-
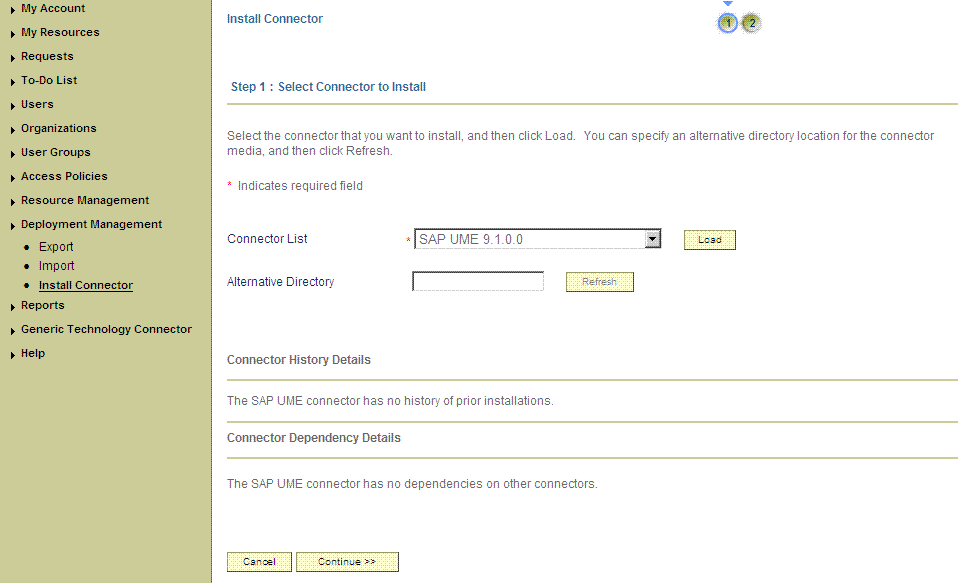
Click Load. The following screenshot shows this page:
-
To start the installation process, click Continue.
The following tasks are performed in sequence:
-
Configuration of connector libraries
-
Import of the connector XML files (by using the Deployment Manager)
-
Compilation of adapters
On successful completion of a task, a check mark is displayed for the task. If a task fails, then an X mark and a message stating the reason for failure are displayed. If a task fails, then make the required correction and perform one of the following steps:
-
Retry the installation by clicking Retry.
-
Cancel the installation and begin again from Step 3.
-
-
If all three tasks of the connector installation process are successful, then a message indicating successful installation is displayed.
In addition, a list of the steps that you must perform after the installation is displayed. These steps are as follows:
-
Ensuring that the prerequisites for using the connector are addressed
Note:
At this stage, run the PurgeCache utility to load the server cache with content from the connector resource bundle in order to view the list of prerequisites. See Section 2.3.3, "Clearing Content Related to Connector Resource Bundles from the Server Cache" for information about running the PurgeCache utility.There are no prerequisites for some predefined connectors.
-
Configuring the IT resource for the connector
Record the name of the IT resource displayed on this page. The procedure to configure the IT resource is described later in this guide.
-
Configuring the scheduled tasks that are created when you installed the connector
Record the names of the scheduled tasks displayed on this page. The procedure to configure these scheduled tasks is described later in this guide.
-
-
Restart Oracle Identity Manager.
Note:
When you run the Connector Installer, it copies the connector files and external code files to destination directories on the Oracle Identity Manager host computer. These files are listed in Table 2-1.
Installing the Connector in an Oracle Identity Manager Cluster
While installing Oracle Identity Manager in a clustered environment, you must copy all the JAR files and the contents of the connectorResources directory into the corresponding directories on each node of the cluster. Then, restart each node. See Section 2.1.1.1, "Files and Directories on the Installation Media" for information about the files that you must copy and their destination locations on the Oracle Identity Manager server.
If required, restore the Common.jar file that you had backed up by following the procedure described in Section 2.1.1.3, "Creating a Backup of the Existing Common.jar File".
2.3 Postinstallation
Postinstallation steps are divided across the following sections:
-
Section 2.3.1, "Setting Values in the Lookup.SAP.UME.Configuration Lookup Definition"
-
Section 2.3.3, "Clearing Content Related to Connector Resource Bundles from the Server Cache"
-
Section 2.3.5, "Setting Up the Lookup.SAP.UME.ExclusionList Lookup Definition"
-
Section 2.3.6, "Setting Up the Lookup.SAP.UME.System Lookup Definition"
-
Section 2.3.7, "Configuring the Compliant User Provisioning Feature of the Connector"
2.3.1 Setting Values in the Lookup.SAP.UME.Configuration Lookup Definition
Table 2-2 describes the entries in the Lookup.SAP.UME.Configuration lookup definition.
Note:
You must not change any of the Code Key values of this lookup definition.Table 2-2 Entries in the Lookup.SAP.UME.Configuration Lookup Definition
| Code Key | Description |
|---|---|
|
This entry holds the name of the lookup definition that stores values used by the connector. The connector development team can use this lookup definition to make minor configuration changes in the connector. Value: |
|
|
This entry holds the name of the lookup definition that stores configuration values for the Compliant User Provisioning feature. Value: |
|
|
This entry holds the name of the lookup definition in which you enter user IDs of target system accounts for which you do not want to perform reconciliation and provisioning. See Section 2.3.5, "Setting Up the Lookup.SAP.UME.ExclusionList Lookup Definition" for more information. Value: |
|
|
This entry holds the name of the lookup definition that you can use to configure transformation of attribute values fetched from the target system during reconciliation. See Section 4.2, "Configuring Transformation of Data During User Reconciliation" for more information. Value: |
|
|
Enter See Section 4.2, "Configuring Transformation of Data During User Reconciliation" for more information. Default value: |
|
|
Use Validation For Prov |
Enter yes if you want to configure validation of attribute values entered on the process form during provisioning operations. See Section 4.1, "Configuring Validation of Data During Reconciliation and Provisioning" for more information. Default value: |
|
Use Validation For Recon |
Enter See Section 4.1, "Configuring Validation of Data During Reconciliation and Provisioning" for more information. Default value: |
|
This entry holds the name of the lookup definition that you can use to configure validation of attribute values entered on the process form during provisioning operations. See Section 4.1, "Configuring Validation of Data During Reconciliation and Provisioning" for more information. Value: |
|
|
This entry holds the name of the lookup definition that you can use to configure validation of attribute values entered on the process form during reconciliation. See Section 4.1, "Configuring Validation of Data During Reconciliation and Provisioning" for more information. Value: |
2.3.2 Changing to the Required Input Locale
Note:
In a clustered environment, perform this procedure on each node of the cluster. Then, restart each node.Changing to the required input locale (language and country setting) involves installing the required fonts and setting the required input locale.
You may require the assistance of the system administrator to change to the required input locale.
2.3.3 Clearing Content Related to Connector Resource Bundles from the Server Cache
Note:
In a clustered environment, perform this procedure on each node of the cluster. Then, restart each node.During the connector deployment procedure, files are copied from the resources directory on the installation media into the OIM_HOME/xellerate/connectorResources directory. Whenever you add a new resource bundle in the connectorResources directory or make a change in an existing resource bundle, you must clear content related to connector resource bundles from the server cache.
To clear content related to connector resource bundles from the server cache:
-
In a command window, change to the OIM_HOME/xellerate/bin directory.
Note:
You must perform Step 1 before you perform Step 2. An exception is thrown if you run the command described in Step 2 as follows:OIM_HOME/xellerate/bin/batch_file_name
-
Enter one of the following commands:
-
On Microsoft Windows:
PurgeCache.bat ConnectorResourceBundle
-
On UNIX:
PurgeCache.sh ConnectorResourceBundle
Note:
You can ignore the exception that is thrown when you perform Step 2.In this command, ConnectorResourceBundle is one of the content categories that you can remove from the server cache. Refer to the following file for information about the other content categories:
OIM_HOME/xellerate/config/xlConfig.xml
-
2.3.4 Enabling Logging
Note:
In a clustered environment, perform this procedure on each node of the cluster. Then, restart each node.When you enable logging, Oracle Identity Manager automatically stores in a log file information about events that occur during the course of provisioning and reconciliation operations. To specify the type of event for which you want logging to take place, you can set the log level to one of the following:
-
ALL
This level enables logging for all events.
-
DEBUG
This level enables logging of information about fine-grained events that are useful for debugging.
-
INFO
This level enables logging of messages that highlight the progress of the application at a coarse-grained level.
-
WARN
This level enables logging of information about potentially harmful situations.
-
ERROR
This level enables logging of information about error events that may allow the application to continue running.
-
FATAL
This level enables logging of information about very severe error events that could cause the application to stop functioning.
-
OFF
This level disables logging for all events.
The file in which you set the log level and the log file path depend on the application server that you use:
-
IBM WebSphere Application Server
To enable logging:
-
Add the following lines in the OIM_HOME/xellerate/config/log.properties file:
log4j.logger.XELLERATE=log_level
log4j.logger.OIMCP.SAPU=log_level
-
In these lines, replace
log_levelwith the log level that you want to set.For example:
log4j.logger.XELLERATE=INFO
log4j.logger.OIMCP.SAPU=INFO
After you enable logging, log information is written to the following file:
WEBSPHERE_HOME/AppServer/logs/SERVER_NAME/SystemOut.log
-
-
JBoss Application Server
To enable logging:
-
In the JBOSS_HOME/server/default/conf/jboss-log4j.xml file, locate or add the following lines if they are not already present in the file:
<category name="XELLERATE">
   <priority value="log_level"/>
</category>
<category name="OIMCP.SAPU"> <priority value="log_level"/> </category> -
In the second XML code line of each set, replace
log_levelwith the log level that you want to set. For example:<category name="XELLERATE"> <priority value="INFO"/> </category>
<category name="OIMCP.SAPU">
   <priority value="INFO"/>
</category>
After you enable logging, log information is written to the following file:
JBOSS_HOME/server/default/log/server.log
-
-
Oracle Application Server
To enable logging:
-
Add the following lines in the OIM_HOME/xellerate/config/log.properties file:
log4j.logger.XELLERATE=log_level
log4j.logger.OIMCP.SAPU=log_level
-
In these lines, replace
log_levelwith the log level that you want to set.For example:
log4j.logger.XELLERATE=INFO
log4j.logger.OIMCP.SAPU=INFO
After you enable logging, log information is written to the following file:
ORACLE_HOME/opmn/logs/default_group~home~default_group~1.log
-
-
Oracle WebLogic Server
To enable logging:
-
Add the following lines in the OIM_HOME/xellerate/config/log.properties file:
log4j.logger.XELLERATE=log_level
log4j.logger.OIMCP.SAPU=log_level
-
In these lines, replace
log_levelwith the log level that you want to set.For example:
log4j.logger.XELLERATE=INFO
log4j.logger.OIMCP.SAPU=INFO
After you enable logging, the log information is written to the following file:
WEBLOGIC_HOME/user_projects/domains/DOMAIN_NAME/SERVER_NAME/SERVER_NAME.log
-
2.3.5 Setting Up the Lookup.SAP.UME.ExclusionList Lookup Definition
Note:
In a clustered environment, perform this procedure on each node of the cluster. Then, restart each node.In the Lookup.SAP.UME.ExclusionList lookup definition, enter the user IDs of target system accounts for which you do not want to perform reconciliation and provisioning:
-
On the Design Console, expand Administration and then double-click Lookup Definition.
-
Search for and open the Lookup.SAP.UME.ExclusionList lookup definition.
-
Click Add.
-
In the Code Key and Decode columns, enter the first user ID that you want to exclude. You must enter the same value in both columns.
Note:
You must enter the user ID in the same case (uppercase and lowercase) in which it is stored on the target system. -
Repeat Steps 3 and 4 for all the user IDs that you want to exclude.
-
Click the Save icon.
2.3.6 Setting Up the Lookup.SAP.UME.System Lookup Definition
The Lookup.SAP.UME.System lookup definition is used to hold system IDs of applications that use the data source with which SAP User Management Engine is linked. To create entries in this lookup definition:
-
On the Design Console, expand Administration and then double-click Lookup Definition.
-
Search for and open the Lookup.SAP.UME.System lookup definition.
-
Click Add.
-
In the Code and Decode columns, enter the system ID of the application.
-
Repeat Steps 3 and 4 to create entries for the remaining applications that use the data source.
-
Click the Save icon.
2.3.7 Configuring the Compliant User Provisioning Feature of the Connector
Oracle Identity Manager can be configured as the medium for sending provisioning requests to SAP GRC Compliant User Provisioning. A request from Oracle Identity Manager is sent to Compliant User Provisioning, which forwards the provisioning data contained within the request to the target system. The outcome is the creation of or modification to the user's account on the target system.
The following sections provide information about configuring the Compliant User Provisioning feature:
-
Section 2.3.7.1, "Specifying Values for the SAP GRC IT Resource IT Resource"
-
Section 2.3.7.2, "Setting Up the Link with the Web Services for SAP GRC Compliant User Provisioning"
-
Section 2.3.7.3, "Configuring Request Types and Workflows on SAP GRC Compliant User Provisioning,"
-
Section 2.3.7.4, "Setting Values in the Lookup.SAP.CUP.Configuration Lookup Definition,"
2.3.7.1 Specifying Values for the SAP GRC IT Resource IT Resource
The SAP GRC IT Resource IT resource holds information that is used during communication with SAP GRC Compliant User Provisioning. To set values for the parameters of this IT resource:
-
Log in to the Administrative and User Console.
-
Expand Resource Management.
-
Click Manage IT Resource.
-
In the IT Resource Name field on the Manage IT Resource page, enter
SAP GRC IT Resourceand then click Search. -
Click the edit icon for the IT resource.
-
From the list at the top of the page, select Details and Parameters.
-
Specify values for the parameters of the IT resource. Table 2-3 describes each parameter.
Note:
Entries in this table are sorted in alphabetical order of parameter names.Table 2-3 Parameters of the SAP GRC IT Resource IT Resource
-
To save the values, click Update.
2.3.7.2 Setting Up the Link with the Web Services for SAP GRC Compliant User Provisioning
To set up the link with the Web services for SAP GRC Compliant User Provisioning:
-
Search for and download the axis-bin-1_4.zip file from the following Web site:
-
Extract the contents of the axis2-1.4-bin.zip file to a temporary directory.
-
The following files are in the TEMPORARY_DIRECTORY/axis-1_4/lib directory:
wsdl4j-1.5.1.jar
axis.jar
jaxrpc.jar
saaj.jar
commons-discovery-0.2.jar
commons-logging-1.0.4.jar
Copy these JAR files into the OIM_HOME/xellerate/ext directory and one of the following directories:
-
For IBM Websphere Application Server: WEBSPHERE_HOME/lib
-
For JBoss Application Server: JBOSS_HOME/server/default/lib
-
For Oracle Application Server: ORACLE_HOME/j2ee/home/lib
-
For Oracle WebLogic Server: WEBLOGIC_DOMAIN_HOME/lib
-
-
Copy the deploy/SAPCUP.jar file from the installation media to one of the directories mentioned in the preceding step. If you are using Oracle WebLogic Server, then you must also copy the SAPCUP.jar file to the WEBLOGIC_HOME/wlserver_10.3/server/lib directory.
-
If Oracle Identity Manager is running on Oracle Application Server, then perform the following additional steps:
-
In the temporary directory, extract the contents of the ORACLE_HOME/j2ee/home/oc4j.jar file.
-
In a text editor, open the boot.xml file. This file is bundled in the oc4j.jar file.
-
In the boot.xml file, add the following lines under the <system-class-loader> tag:
<code-source path="lib/wsdl4j-1.5.1.jar"/>
<code-source path="lib/log4j-1.2.8.jar"/>
<code-source path="lib/saaj.jar"/>
<code-source path="lib/axis.jar"/>
<code-source path="lib/commons-discovery-0.2.jar"/>
<code-source path="lib/commons-logging-1.0.4.jar"/>
<code-source path="lib/jaxrpc.jar"/>
<code-source path="lib/SAPCUP.jar"/>
-
Save and close the boot.xml file.
-
Re-create the oc4j.jar file with the updated boot.xml file bundled inside.
-
Copy the log4j-1.2.8.jar file from the OIM_HOME/xellerate/ext directory into the ORACLE_HOME/j2ee/home/lib directory.
-
2.3.7.3 Configuring Request Types and Workflows on SAP GRC Compliant User Provisioning
You must create and configure request types and workflows on SAP GRC Compliant User Provisioning for provisioning operations.
The following sections describe these procedures in detail:
2.3.7.3.1 Creating Request Types
In SAP GRC Compliant User Provisioning, a request type defines the action that is performed when a request is processed. Oracle Identity Manager is a requester. It works with request types defined in SAP GRC Compliant User Provisioning. The Lookup.SAP.CUP.Configuration lookup definition maps request types to provisioning operations submitted through Oracle Identity Manager.
You can create request types in SAP GRC Compliant User Provisioning. Compliant User Provisioning also allows you to set default values for some user attributes. You can define these user defaults and then create user default mappings that specify conditions under which the user defaults must be applied.
To create a request type:
-
Log in to SAP GRC Access Control as an administrator.
-
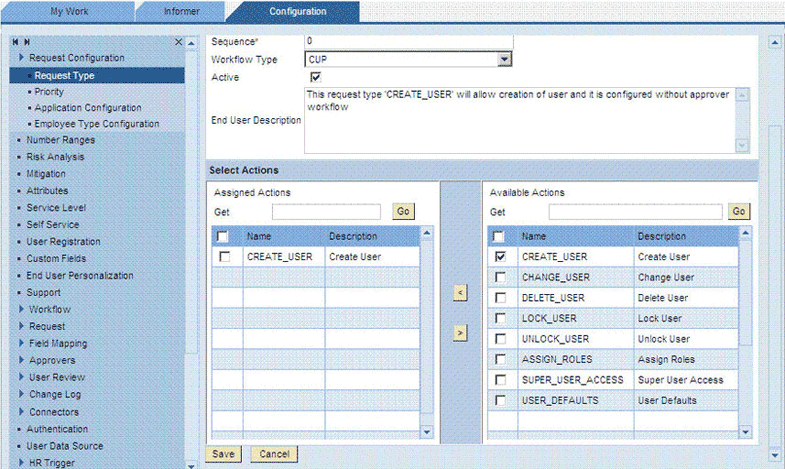
On the Configuration tab, expand Request Configuration, click Request Type, and then click Create.
The following screenshot shows this page:

-
Enter the following information about the request type:
-
Type: Enter a unique name for the request type. The name must be in uppercase.
-
Short Description: Enter a short description for the request type.
-
Description: Enter a description for the request type.
-
Sequence: Enter a numeric value for the sequence in which this request type must be displayed on the Request Access page. If you assign 0, then the request type does not appear on the Request Access page. However, if the request type is Active, then it appears in the Request Type list throughout SAP GRC Compliant User Provisioning.
-
Workflow Type: Select CUP as the workflow type.
-
Active: Select the check box to make the request type active.
-
End User Description: Enter a description for display to users.
-
-
The Select Actions region displays assigned actions and available actions. Assigned actions are actions that will be performed during provisioning. Available actions are actions that are available to be performed during provisioning. You can use the arrow icons to move actions from the Available Actions list to the Assigned Actions list.
Select an action, and then click the left arrow to assign the action.
-
Click Save.
2.3.7.3.2 Creating Workflows
A workflow defined in SAP GRC Compliant User Provisioning acts upon a particular type of request. A workflow consists of an initiator, stage, and path. You can set up one workflow that contains all the request types. Alternatively, you can create a separate workflow for each request type.
An initiator is a combination of a request type and the workflow designed to handle that request type. Initiators and workflows function as matched pairs. A particular initiator can call only one workflow.
To create the initiator:
-
Log in to the SAP GRC Access Control as an administrative user.
-
On the Configuration tab, click Workflow, select Initiator, and then click Create.
-
Enter the following information about the initiator:
-
Name: Enter a name for the initiator. The name must be in uppercase. For example, enter
CHANGE_USER. -
Short Description: Enter a short description for the initiator.
-
Description: Enter a description for the initiator.
-
Workflow Type: Select CUP as the workflow type.
-
Select attribute information for the initiator:
-
Condition: Select AND, NOT, or OR as the condition. For this example, the OR condition is selected.
-
Attribute: Select Request Type as the attribute.
-
Value: Select a request type.
-
-
Click Add Attribute, and then repeat Step 3 for each request type that you create.
-
Click Save.
The following screenshot shows this page:

A stage is a decision point in a workflow. At each stage in a workflow, an approver must approve or deny the request. The stage also specifies the action to be taken based on the decision of the approver. The request process proceeds beyond a stage only after the approver responds by approving or rejecting the request.
To create the stage:
-
Click Workflow, select Stage, and then click Create.
-
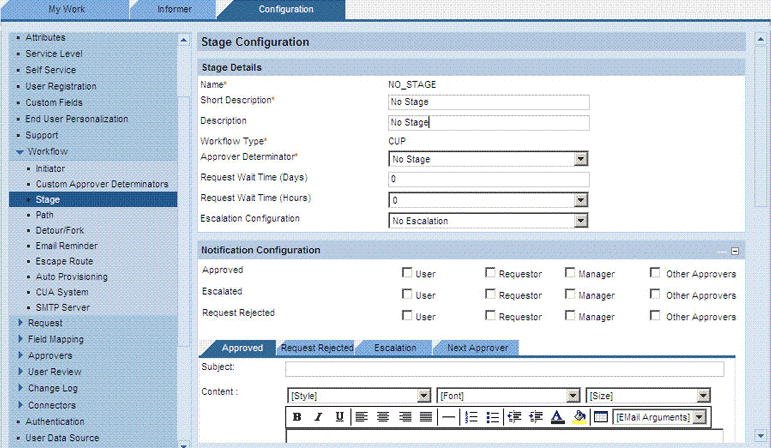
Enter the following information about the stage:
-
Name: Enter a name for the initiator. The name must be in uppercase, and it must not contain spaces. For example, enter
NO_STAGE. -
Short Description: Enter a short description for the initiator.
-
Description: Enter a description for the initiator.
-
Workflow Type: Select CUP as the workflow type.
-
Approver Determinator: Select a value according to your requirements.
The following screenshot shows this page:
-
Request Wait Time (Days): Enter the number of days for which Compliance User Provisioning must wait for an approver to respond to a request before escalating the request. In this example it is 0, because no escalation is configured.
-
Request Wait Time (Hours): Enter the number of hours for which Compliance User Provisioning must wait for an approver to respond to a request before escalating the request. In this example it is 0, because no escalation is configured.
-
Escalation Configuration: From the list, select No Escalation.
-
Notification Configuration: Specify whether and to whom the system notifies about actions taken at this point in the stage.
-
Additional Configuration: Define any additional functionality required at this stage.
-
Additional Security Configuration: Specify whether or not approvers must reaffirm their actions by entering their password.
The following actions can be configured to require password reaffirmation:
-
Approve
-
Reject
-
Create User (automatic creation of a user record)
-
-
-
Click Save.
A path defines the sequence of stages in a workflow. The stages in a workflow are related to other stages by the path.
To create the path:
-
Click Workflow, select Path, and then click Create.
-
Enter the following information about the path:
-
Name: Enter a name for the path. The name must be in uppercase, and it must not contain spaces.
-
Short Description: Enter a short description for the path.
-
Description: Enter a description for the path.
-
Workflow Type: Select CUP as the workflow type.
-
Number of Stages: Enter the number of stages that you want to include in the path.
-
Initiator: From the list, select the initiator that you created earlier.
-
Active: Select Active to make the path active.
-
-
Click Save to create the path.
The following screenshot shows this page:

You can define a set of user defaults and also create user default mappings that define conditions under which the user defaults must be applied.
To define user defaults:
-
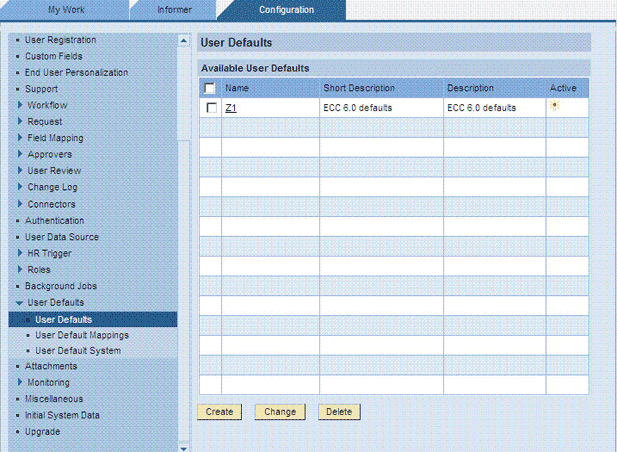
On the Configuration tab, expand User Defaults and then click User Defaults.
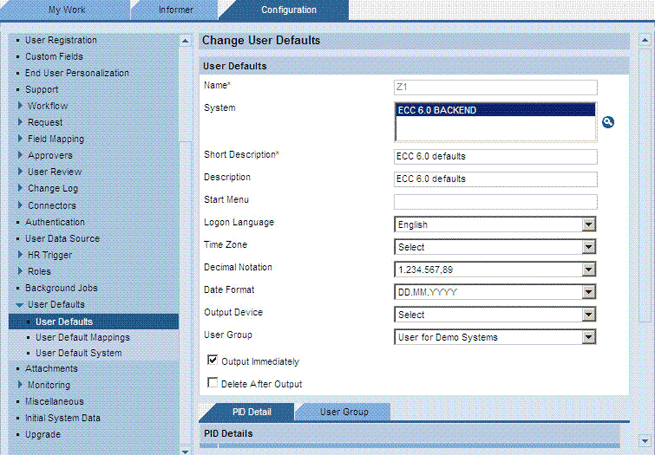
The following screenshot shows this page:
-
Enter values in the following fields:
-
Name: Enter a name for this set of user defaults.
-
System: Select the application with which the SAP User Management Engine data source is linked.
-
Short Description: Enter a short description for this set of user defaults.
-
Description: Enter a description for this set of user defaults.
-
-
Specify default values for the Logon Language, Time Zone, Decimal Notation, Date Format, Output Device, and User Group attributes.
The following screenshot shows this page:
-
Click Save.
To define a user default mapping:
-
On the Configuration tab, expand User Defaults and then click User Default Mappings.
-
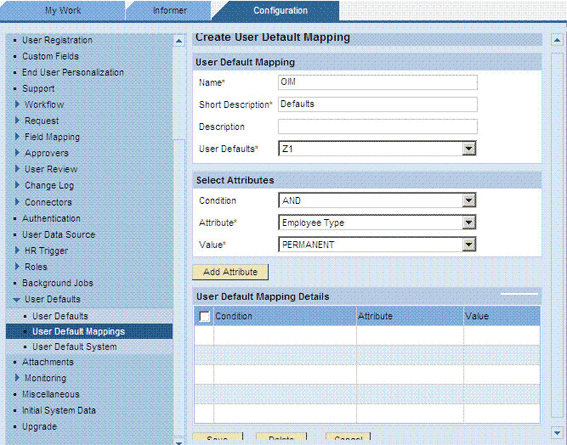
Enter values in the following fields:
-
Name: Enter a name for this set of user defaults.
-
Short Description: Enter a short description for this set of user defaults.
-
Description: Enter a description for this set of user defaults.
-
User Defaults: Select the default that you create.
-
-
In the Select Attributes region, use the Condition, Attribute, and Value lists to specify the attributes (conditions) under which the defaults must be applied.
For example, suppose you select the following attributes:
Request Type: New
Functional Area: Finance
A request that has these two attributes is automatically assigned the user defaults.
-
Click Save.
The following screenshot shows this page:
2.3.7.4 Setting Values in the Lookup.SAP.CUP.Configuration Lookup Definition
Table 2-4 describes the entries in the Lookup.SAP.CUP.Configuration lookup definition.
Note:
You must not change any of the Code Key values of this lookup definition.Table 2-4 Entries in the Lookup.SAP.CUP.Configuration Lookup Definition
| Code Key | Description |
|---|---|
|
Application |
Enter the name of the system or application that is using the SAP User Management Engine data source. Sample value: |
|
Assign Role |
Enter the name of the request type that you create for Modify User provisioning operations. See Section 2.3.7.3.1, "Creating Request Types" for more information. Sample value: |
|
This entry holds the name of the lookup definition that stores child form attribute mappings for the Compliant User Provisioning feature. Value: |
|
|
This entry holds the name of the lookup definition that stores values used by the connector in the Compliant User Provisioning feature. The connector development team can use this lookup definition to make minor configuration changes in the connector. Value: |
|
|
Create User |
Enter the name of the request type that you create for Create User provisioning operations. See Section 2.3.7.3.1, "Creating Request Types" for more information. Sample value: |
|
Delete User |
Enter the name of the request type that you create for Delete User provisioning operations. See Section 2.3.7.3.1, "Creating Request Types" for more information. Sample value: |
|
Ignore OPEN status |
Use this entry to specify that new requests can be sent for a particular user, even if the last request for the user is in the Open status. If you set this entry to If you set this entry to Default value: Note: If Ignore OPEN status is set to |
|
Ignore User Created Check For Add Role |
When an Add Role request is submitted through Oracle Identity Manager, the connector first checks if the specified user exists on the target system. If an approver is defined for the Create User request type and if the Add Role request is sent immediately after the Create User request is sent, then the process task for adding the role might be rejected. This is because the user is not created on the target system until SAP GRC Compliant User Provisioning clears the Create User request. If you want the connector to skip the check for the user on the target system during Add Role operations, then enter Enter Default value: |
|
IT Resource |
This entry holds the name of the SAP GRC IT resource. Default value: |
|
Lock User |
Enter the name of the request type that you create for Modify User provisioning operations. See Section 2.3.7.3.1, "Creating Request Types" for more information. Sample value: |
|
Modify User |
Enter the name of the request type that you create for Modify User provisioning operations. See Section 2.3.7.3.1, "Creating Request Types" for more information. Sample value: |
|
This entry holds the name of the lookup definition that stores process form attribute mappings for the Compliant User Provisioning feature. Value: |
|
|
Priority |
Enter the priority level at which SAP GRC Compliant User Provisioning must process requests sent from Oracle Identity Manager:
|
|
Unlock User |
Enter the name of the request type that you create for Modify User provisioning operations. See Section 2.3.7.3.1, "Creating Request Types" for more information. Sample value: |
2.3.8 Configuring SSL to Secure Communication Between the Target System and Oracle Identity Manager
To configure SSL between the target system and Oracle Identity Manager:
-
Generate the certificate on the target system.
See the target system documentation for detailed instructions.
-
To import the certificate on Oracle Identity Manager:
Note:
All application server releases supported by Oracle Identity Manager release 9.1.0.2 BP 04 and later are supported.In a clustered environment, you must perform this procedure on all the nodes of the cluster.
-
Copy the target system certificate to the Oracle Identity Manager host computer.
-
In a command window, change to the directory where you copy the certificate file and then enter a command similar to the following:
keytool -import -alias ALIAS -file CER_FILE -keystore MY_CACERTS -storepass PASSWORD
In this command:
-
ALIASis the alias for the certificate (for example, the server name). -
CER_FILEis the full path and name of the certificate (.cer) file.Table 2-5 shows the location of the certificate store for each of the supported application servers.
Table 2-5 Certificate Store Locations
Application Server Certificate Store Location Oracle WebLogic Server
-
If you are using Oracle jrockit_R27.3.1-jdk, then copy the certificate into the following directory:
JROCKIT_HOME/jre/lib/security
-
If you are using the default Oracle WebLogic Server JDK, then copy the certificate into the following directory:
WEBLOGIC_HOME/java/jre/lib/security/cacerts
IBM WebSphere Application Server
-
For a nonclustered configuration of any supported IBM WebSphere Application Server release, import the certificate into the following certificate store:
WEBSPHERE_HOME/java/jre/lib/security/cacerts
-
For IBM WebSphere Application Server 6.1.x, in addition to the
cacertscertificate store, you must import the certificate into the following certificate store:WEBSPHERE_HOME/AppServer/profiles/SERVER_NAME/config/cells/CELL_NAME/nodes/NODE_NAME/trust.p12
For example:
C:\Program Files\IBM\WebSphere\AppServer\profiles\AppSrv02\config\cells\wkslaurel3224Node02Cell\nodes\wkslaurel3224Node02\trust.p12
-
For IBM WebSphere Application Server 5.1.x, in addition to the
cacertscertificate store, you must import the certificate into the following certificate store:WEBSPHERE_HOME/etc/DummyServerTrustFile.jks
JBoss Application Server
JAVA_HOME/jre/lib/security/cacerts
Oracle Application Server
ORACLE_HOME/jdk/jre/lib/security/cacerts
-
-
-
To confirm whether or not the certificate has been imported successfully, enter a command similar to the following:
keytool -list -alias ALIAS -keystore MY_CACERTS -storepass PASSWORD
For example:
keytool -list -alias MyAlias -keystore C:\mydir\java\jre\lib\security\cacerts -storepass changeit
-
For a nonclustered configuration of IBM WebSphere Application Server, download the jsse.jar file from the Sun Web site and copy this file into the WEBSPHERE_HOME/java/jre/lib/ext directory.
-
For a clustered configuration of IBM WebSphere Application Server, download the jnet.jar, jsse.jar, and jcert.jar files from the Sun Web site and copy these files into the WEBSPHERE_HOME/java/jre/lib/ext directory.
-
2.3.9 Configuring the IT Resource
The SAP UME IT Resource IT resource is automatically created when you run the Connector Installer. You must specify values for the parameters of the IT resource.
Note:
The ALL USERS group has INSERT, UPDATE, and DELETE permissions on the default IT resource. This is to ensure that end users can select the IT resource during request-based provisioning. If you create another IT resource, then you must assign INSERT, UPDATE, and DELETE permissions for the ALL USERS group on the IT resource.
You must use the Administrative and User Console to configure the IT resource. Values set for the connection pooling parameters will not take effect if you use the Design Console to configure the IT resource.
To specify values for the parameters of the IT resource:
-
Log in to the Administrative and User Console.
-
Expand Resource Management.
-
Click Manage IT Resource.
-
In the IT Resource Name field on the Manage IT Resource page, enter SAP UME IT Resource and then click Search.
-
Click the edit icon for the IT resource.
-
From the list at the top of the page, select Details and Parameters.
-
Specify values for the parameters of the IT resource. Table Table 2-6 describes each parameter.
Note:
Entries in this table are sorted in alphabetical order of parameter names.Table 2-6 Parameters of the IT Resource
Parameter Description Admin User ID
Enter the user ID of the target system user account that you create for connector operations
See Section 2.1.2.1, "Creating a Target System User Account for Connector Operations" for more information.
Admin Password
Enter the password of the target system user account that you create for connector operations
See Section 2.1.2.1, "Creating a Target System User Account for Connector Operations" for more information.
UME URL
-
If you perform the procedure described in Section 2.3.8, "Configuring SSL to Secure Communication Between the Target System and Oracle Identity Manager," then enter the URL for the SPML service in the following format:
https://HOSTNAME:SSL_PORT/spml/provisioning -
If you do not configure SSL between the target system and Oracle Identity Manager, then enter the URL for the SPML service in the following format:
http://HOSTNAME:PORT/spml/provisioningSample value:
http://myhost:50000/spml/provisioning
This parameter holds the name of the lookup definition containing configuration information.
Value:
Lookup.SAP.UME.ConfigurationDummy Password
Enter the dummy password that you want the connector to use during a Create User provisioning operation. The connector first sets the password as this value and then changes it to the password specified on the process form.
-
-
To save the values, click Update.