9 Deleting or Scaling Down Oracle Real Application Clusters
This chapter describes how you can delete or scale down Oracle RAC. In particular, this chapter covers the following:
Getting Started
This section helps you get started with this chapter by providing an overview of the steps involved in deleting or scaling down an existing Oracle RAC stack. Consider this section to be a documentation map to understand the sequence of actions you must perform to successfully delete or scale down an existing Oracle RAC stack. Click the reference links provided against the steps to reach the relevant sections that provide more information.
Table 9-1 Getting Started with Deleting or Scaling Down an Existing Oracle RAC
| Step | Description | Reference Links |
|---|---|---|
|
Step 1 |
Understanding the Deployment Procedure Understand the Deployment Procedure that is offered by Enterprise Manager Grid Control for deleting or scaling down an existing Oracle RAC. Know how the Deployment Procedure functions, what use cases it covers, what core components it deletes or scales down, and so on. |
To learn about the Deployment Procedure, see Deployment Procedures. To learn about the core components that are deleted or scaled down, see Core Components Deleted. |
|
Step 2 |
Knowing About the Supported Releases Know what releases of Oracle RAC can be deleted or scaled down by the Deployment Procedure. |
To learn about the releases supported by the Deployment Procedure, see Supported Releases. |
|
Step 3 |
Selecting the Use Case This chapter covers a few use cases for deleting and scaling down an existing Oracle RAC. Select the use case that best matches your requirement. |
|
|
Step 4 |
Meeting the Prerequisites Before you run any Deployment Procedure, you must meet the prerequisites, such as setting up of the provisioning environment, applying mandatory patches, setting up of Oracle Software Library. |
|
|
Step 5 |
Running the Deployment Procedure Run the Deployment Procedure to successfully delete or scale down an existing Oracle RAC. |
Deployment Procedures
Enterprise Manager Grid Control offers the following Deployment Procedures for provisioning Oracle RAC:
-
Delete/Scale down Oracle Real Application Clusters
This Deployment Procedure enables you to desacle an entire cluster database stack (Oracle Clusterware, Oracle ASM, and Oracle RAC database) or one or more nodes of an Oracle RAC cluster, in a single click. This includes cluster databases of various releases as described in Supported Releases, and across different platforms.
The procedure can descale or delete clusters that have:
-
Oracle CRS, Oracle ASM, and Oracle Database homes owned by the same or different users.
-
Separate Oracle CRS, Oracle ASM, and Oracle Database homes present on a shared storage, which is shared by all member nodes.
-
Partially provisioned or failed installations of Oracle RAC clusters (may include one or more tiers of the stack installed. For example, cleanup after the clusterware installation failed or cleanup when the clusterware was only partially provisioned).
-
Nodes that were reimaged or shut down, and the existing configuration has to be resolved to remove all references to this node in Enterprise Manager Grid Control.
Core Components Deleted
Using this Deployment Procedure, you can delete either a node of an existing Oracle RAC or the entire Oracle RAC. As a result, the Deployment Procedure deinstalls the Oracle Clusterware, listeners, and Oracle RAC and ASM homes associated with the nodes selected for deletion.
Supported Releases
Using this Deployment Procedure, you can delete or scale down the following releases of Oracle RAC:
-
Oracle Database 10g Release 2 (10.2.x.x)
-
Oracle Database 11g Release 1 (11.1.x.x)
-
Oracle Database 11g Release 2 (11.2.x.x)
Deleting the Entire Oracle RAC
This section describes how you can delete the entire Oracle RAC. In particular, this section covers the following:
Prerequisites
Before running the Deployment Procedure, meet the following prerequisites:
-
Ensure that you meet the prerequisites described in the following sections:
-
Ensure that oinstall and dba groups are available.
-
Ensure that operating system users such as oracle and crsuser are available on all nodes of the cluster. These users must be a part of the relevant operating system groups such as dba and oinstall.
-
Ensure that the credentials being used to run this operation along with the group ID are the same on all nodes of the selected cluster.
-
If you have PAM/LDAP enabled in your environment, then ensure that the target agents are configured with PAM/LDAP. For more information, see My Oracle Support note 422073.1.
-
Ensure that you use an operating system user that has the privileges to run the Deployment Procedure, and that can switch to root user and run all commands on the target hosts. For example, commands such as mkdir, ls, and so on.
If you do not have the privileges to do so, that is, if you are using a locked account, then request your administrator (a designer) to either customize the Deployment Procedure to run it as another user or ignore the steps that require special privileges.
For example, user account A might have the root privileges, but you might use user account B to run the Deployment Procedure. In this case, you can switch from user account B to A by customizing the Deployment Procedure.
For information about customization, see Chapter 31, "Customizing Steps to Run as Another User".
Procedure
To delete the entire Oracle RAC, follow these steps:
-
In Grid Control, click the Deployments tab.
-
On the Deployments page, in the Deployment Procedure Manager section, click RAC Provisioning Procedures.
-
On the Deployment Procedure Manager page, in the Procedures subtab, from the table, select Delete/Scale down Oracle Real Application Clusters. Then click Schedule Deployment.
Enterprise Manager Grid Control displays the Delete/Scale down Oracle Real Application Clusters page.
-
On the Delete/Scale down Oracle Real Application Clusters page, do the following:
-
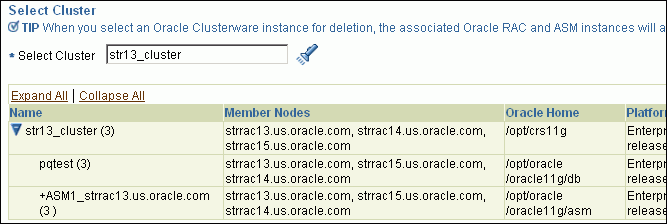
In the Select Cluster section, click the torch icon for Select Cluster and select an Oracle Clusterware instance that you want to delete. Along with the selected Oracle Clusterware, the associated Oracle RAC and ASM instances will also be deleted. The table displays details about the member nodes that are part of the selected Oracle Clusterware.
Note:
When you use the torch icon to search for Oracle Clusterware, if you do not find the Oracle Clusterware that you are looking for, then from the tip mentioned below the table, click here to manually provide details about that clusterware and search for it.
This is particularly useful when you want to delete partially-provisioned or configured Oracle Clusterware instances because, by default, when you click the torch icon, only the fully-provisioned clusterware instances appear for selection. In this case, to search, select, and delete the partially-provisioned instances, click here, and in the Enter Cluster Details window, manually provide details about the cluster node that contains the partially-provisioned instance and click OK. You can then select the host that appears in the Select Nodes to Delete section and mark for deletion.
-
In the Reference Host Options section, from the Cluster Node list, select a node that you want to use as the primary node for all cleanup operations.
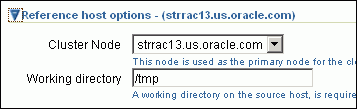
For Working directory, specify the full path to an existing directory on the selected node that can be used for staging files temporarily.
-
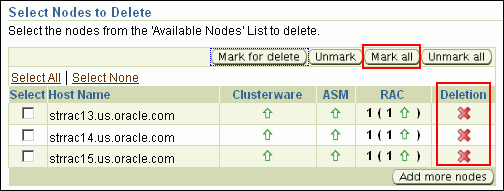
In the Select Nodes to Delete section, click Mark all to select all the nodes for deletion. On clicking Mark all, you should see a cross icon against all the nodes in the Deletion column. These cross icons indicate that the nodes have been selected for deletion.
-
In the User Credentials (Override Preferred Credentials) section, retain the default selection, that is, Use Preferred Credentials.
Note:
You can optionally override these preferred credentials. For example, if you have added two destination hosts where the users are A and B, then you can choose to override the preferred credentials with different credentials for each of the hosts. Similarly, if the destinations hosts have same credentials, which may be different from the preferred credentials, then you can override the preferred credentials with same credentials for all hosts.For example, if you have added two destination hosts where the users are A and B, then you can choose to override the preferred credentials with different credentials for each of the hosts. Similarly, if the destinations hosts have same credentials, which may be different from the preferred credentials, then you can override the preferred credentials with same credentials for all hosts.
The credentials you specify here are used by the Deployment Procedure to run the provisioning operation. If this environment is secure and has locked accounts, then make sure that:
-
The credentials you specify here have the necessary privileges to switch to the locked account for performing the provisioning operation.
-
The Deployment Procedures has been customized to support locked environments.
For more information, see Chapter 31, "Customizing Steps to Run as Another User".
From the Host Credentials list, select Different for each Oracle Home if you want to use different operating system credentials for each Oracle home, or Same for all Oracle Homes if you want to use the same set of credentials for all Oracle homes. Depending on the selection you make, specify the credentials. Ensure that the users belong to the same group (dba/oinstall).
-
-
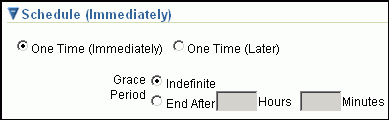
In the Schedule section, schedule the Deployment Procedure to run either immediately or later.
-
Click Review.
-
-
On the Review page, review the details you have provided for deleting Oracle RAC, and click Submit.
Note:
if the Deployment Procedure fails, then review log files described in Appendix M, "Reviewing Log Files".Scaling Down Oracle RAC by Deleting Some of Its Nodes
This section describes how you can scale down Oracle RAC by deleting one or more nodes that are part of it, and also other nodes that are part of it but do not appear as targets in Enterprise Manager Grid Control. In particular, this section covers the following:
Prerequisites
-
Ensure that you meet the prerequisites described in the following sections:
-
Ensure that oinstall and dba groups are available.
-
Ensure that operating system users such as oracle and crsuser are available on all nodes of the cluster. These users must be a part of the relevant operating system groups such as dba and oinstall.
-
Ensure that the credentials being used to run this operation along with the group ID are the same on all nodes of the selected cluster.
-
If you have PAM/LDAP enabled in your environment, then ensure that the target agents are configured with PAM/LDAP. For more information, see My Oracle Support note 422073.1.
-
Ensure that you use an operating system user that has the privileges to run the Deployment Procedure, and that can switch to root user and run all commands on the target hosts. For example, commands such as mkdir, ls, and so on.
If you do not have the privileges to do so, that is, if you are using a locked account, then request your administrator (a designer) to either customize the Deployment Procedure to run it as another user or ignore the steps that require special privileges.
For example, user account A might have the root privileges, but you might use user account B to run the Deployment Procedure. In this case, you can switch from user account B to A by customizing the Deployment Procedure.
For information about customization, see Chapter 31, "Customizing Steps to Run as Another User".
Procedure
To scale down Oracle RAC by deleting one or more nodes that are part of it, follow these steps:
-
In Grid Control, click the Deployments tab.
-
On the Deployments page, in the Deployment Procedure Manager section, click RAC Provisioning Procedures.
-
On the Deployment Procedure Manager page, in the Procedures subtab, from the table, select Delete/Scale down Oracle Real Application Clusters. Then click Schedule Deployment.
Enterprise Manager Grid Control displays the Delete/Scale down Oracle Real Application Clusters page.
-
On the Delete/Scale down Oracle Real Application Clusters page, do the following:
-
In the Select Cluster section, click the torch icon for Select Cluster and select an Oracle Clusterware instance that you want to scale down. Along with the selected Oracle Clusterware, the associated Oracle RAC and ASM instances will also be deleted. The table displays details about the member nodes that are part of the selected Oracle Clusterware.
Note:
When you use the torch icon to search for Oracle Clusterware, if you do not find the Oracle Clusterware that you are looking for, then you can manually provide details about that clusterware and search for it. To do so, from the tip mentioned below the table, click here. -
In the Reference Host Options section, from the Cluster Node list, select a node that you want to use as the primary node for all cleanup operations.
For Working directory, specify the full path to an existing directory on the selected node that can be used for staging files.
-
In the Select Nodes to Delete section, select the nodes you want to delete, and click Mark for delete. On clicking Mark for delete, you should see a cross icon against the selected nodes in the Deletion column. These cross icons indicate that the nodes have been selected for deletion.
If you do not see the nodes that are part of the cluster, then click Add more nodes to add those nodes so that nodes that do not appear as targets in Enterprise Manager Grid Control also are selected for deletion.
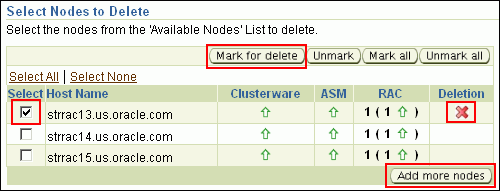
If you want to deselect a node, click Unmark. If you want to select all nodes at a time, click Mark all, and if you want to deselect all nodes, click Unmark all.
-
In the User Credentials (Override Preferred Credentials) section, retain the default selection, that is, Use Preferred Credentials.
Note:
You can optionally override these preferred credentials. For example, if you have added two destination hosts where the users are A and B, then you can choose to override the preferred credentials with different credentials for each of the hosts. Similarly, if the destinations hosts have same credentials, which may be different from the preferred credentials, then you can override the preferred credentials with same credentials for all hosts.The credentials you specify here are used by the Deployment Procedure to run the provisioning operation. If this environment is secure and has locked accounts, then make sure that:
-
The credentials you specify here have the necessary privileges to switch to the locked account for performing the provisioning operation.
-
The Deployment Procedures has been customized to support locked environments.
For more information, see Chapter 31, "Customizing Steps to Run as Another User".
From the Host Credentials list, select Different for each Oracle Home if you want to use different operating system credentials for each Oracle home, or Same for all Oracle Homes if you want to use the same set of credentials for all Oracle homes. Depending on the selection you make, specify the credentials. Ensure that the users belong to the same group (dba/oinstall).
-
-
In the Schedule section, schedule the Deployment Procedure to run either immediately or later.
-
Click Review.
-
-
On the Review page, review the details you have provided for deleting or scaling down Oracle RAC, and click Submit.
Note:
if the Deployment Procedure fails, then review log files described in Appendix M, "Reviewing Log Files".