11 Setting Up the JVM Diagnostics Manager
This chapter describes the process of installing and setting the JVM Diagnostics Manager. The DeployAD4Jmanager.sh script is used to deploy the JVM Diagnostics Manager. The script does the following:
-
Create (clones) the managed server from the existing OMS server.
-
Deploys the
jammanager.earfile on the new managed server.
Deploying the JVM Diagnostics Manager
This section describes the following:
Prerequisites
-
The
DeployAD4Jmanager.shscript must be started from the$ORACLE_HOME/oms11g/ad4jdirectory. -
The port number specified by user to create a new managed server should not be in use.
-
You must have appropriate login credentials to access and execute the
DeployAD4Jmanager.shscript.
Running the DeployAD4Jmanager.sh Script
To install the JVM Diagnostics Manager, follow the steps given below:
-
Run the
DeployAD4Jmanager.shscript from the command prompt:$ ./DeployAD4JManager.shYou will see the following:
Welcome to AD4J Manager Installation script
Please follow the guided instructions to install AD4J manager
Setting up environment variables
Environment variable used in the script:
ORACLE_HOME=/u01/atejaswy/Oracle/Middleware/oms11g
MW_HOME=/u01/atejaswy/Oracle/Middleware
WL_HOME=/u01/atejaswy/Oracle/Middleware/wlserver_10.3
MODULES_DIR=/u01/atejaswy/Oracle/Middleware/modules
Delete previous existing ad4j directory..
Done
Unzipping ad4j.zip.....
Archive:  ad4j.zip
creating: ad4j/
inflating: ad4j/ad4jjobtype.xml
inflating: ad4j/jamagent.war
inflating: ad4j/jamagent.ear
-
You are now prompted for the WebLogic Server host name. Press Enter to select the default values. The following prompts are displayed:
Enter weblogic host name:
Enter the host name or the IP address of the machine on which the WebLogic server is running.
Is secured connection (uses https)? [Default:[y]es]
Press Enter to indicate that it is a secure connection.
Enter weblogic ssl port number
Enter the ssl(https) port number if user selects https, otherwise its http port number.
Enter weblogic admin username
Enter the name of the admin user.
Enter weblogic admin password
Enter the password for the admin user.
-
The WebLogic server details that you have selected are displayed. You are then prompted for the details of the new managed server. Press Enter to accept the default values. The following prompts are displayed:
Enter managed server name:
Enter the name of the new managed server. The default name is
EMAD4JMANAGER.Enter managed server machine name:
Enter the name of machine on which managed server is to be created. The default is
EMGC_MACHINE1.Enter managed server listen address
Enter the listen address of the managed server. The default is the name of the current machine.
Enter managed server listen port
Enter the user configured port number for the managed server. The default value is 3800.
Enter managed server SSL listen port
Enter the user configured ssl port number for the managed server. The default value is 3801.
Enter existing OMS server name
Enter the name of the OMS server.
Enter existing EMGC_DOMAIN path
Enter the location of the EM domain.
Enter existing INSTANCE_HOME path
Enter the directory in which the OMS server has been installed.
Do you want secure communication between AD4J Agent and AD4J Manager (y/n) [Default:y]
Enter Y if secure communication should be supported.
-
If you enter Y, you are prompted for the following:
Enter the absolute location of the wallet
Enter the complete path of the wallet including the wallet name.
Enter wallet password
Enter the password for the wallet. This will ensure that there is secure communication between the AD4J Agent and the AD4J Manager.
-
You are prompted to continue with the installation as follows:
Do you wish to continue with the installation of AD4J Manager (y/n) [Default:y]
Press Enter to continue. The following details are displayed:
Initializing WebLogic Scripting Tool (WLST) ...Welcome to WebLogic Server Administration Scripting ShellType help() for help on available commandsDeployment Summary:WEBLOGICHOSTNAME dadvmi0105 WEBLOGICPORTNUMBER: 7101 USERNAME: weblogic MACHINENAME: EMGC_MACHINE1 ORACLEHOME: /u01/atejaswy/Oracle/Middleware/oms11g WLHOME: /u01/atejaswy/Oracle/Middleware/wlserver_10.3 MODULEHOME: /u01/atejaswy/Oracle/Middleware/modules SERVERNAME ad4jmanager LISTENADDRESS dadvmi0105 LISTENPORT 3800 SSL LISTENPORT 3801Connecting to t3s://dadvmi0105:7101 with userid weblogic ...Successfully connected to Admin Server 'EMGC_ADMINSERVER' that belongs to domain 'EMGC_DOMAIN'.Location changed to edit tree. This is a writable tree withDomainMBean as the root. To make changes you will need to startan edit session via startEdit().For more help, use help(edit)You already have an edit session in progress and hence WLST willcontinue with your edit session.Starting an edit session ...Started edit session, please be sure to save and activate yourchanges once you are done.Saving all your changes ...Saved all your changes successfully.Activating all your changes, this may take a while ...The edit lock associated with this edit session is releasedonce the activation is completed.Activation completedStarting server ad4jmanager .........................................................................................................................Server with name ad4jmanager started successfullyDeploying application from /u01/atejaswy/Oracle/Middleware/oms11g/ad4j/./ad4j/jammanager.ear to targets ad4jmanager (upload=false) ...<Jan 8, 2010 6:33:16 AM PST> <Info> <J2EE Deployment SPI> <BEA-260121> <Initiating deploy operation for application, ad4jmanagerapp [archive: /u01/atejaswy/Oracle/Middleware/oms11g/ad4j/./ad4j/jammanager.ear], to ad4jmanager .>.......................Completed the deployment of Application with status completedCurrent Status of your Deployment:Deployment command type: deployDeployment State : completedDeployment Message : no messageExiting WebLogic Scripting Tool.
The JVM Diagnostics Manager has now been installed. To start using this feature, follow these steps:
-
Login to Enterprise Manager Grid Control.
-
Click Targets and the Middleware tab to navigate to the Middleware page.
-
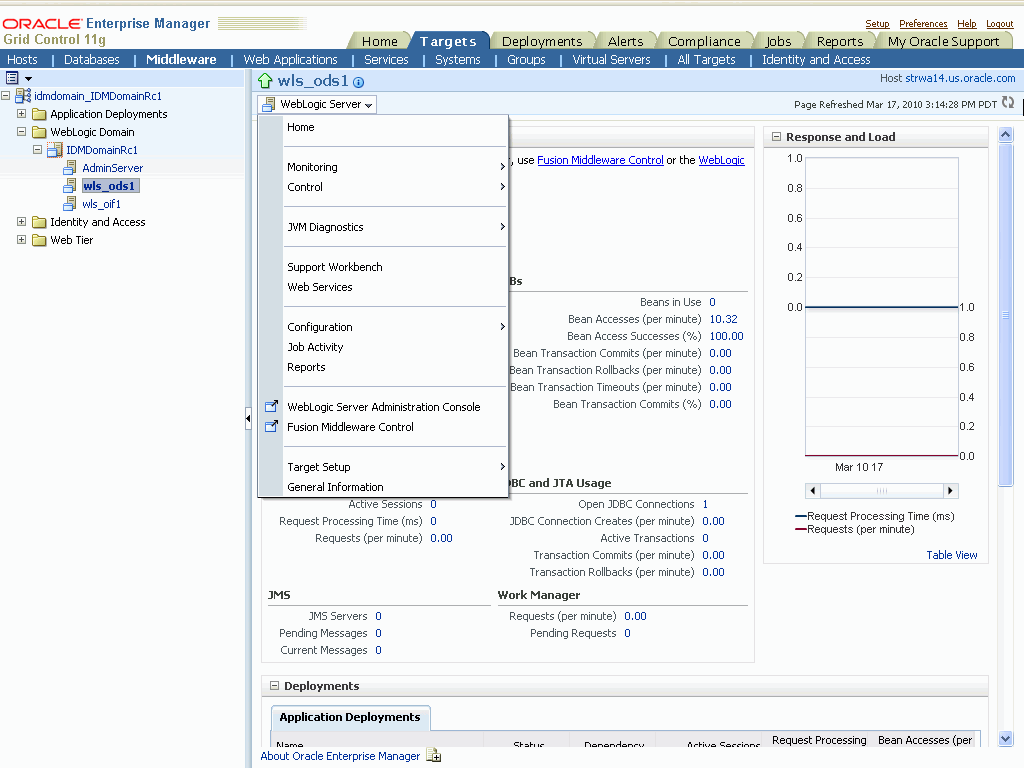
Click on a WebLogic Server target in the list. The following screen is displayed.
-
To start using JVM Diagnostics, select the JVM Diagnostics option from the WebLogic Server drop-down menu and choose the appropriate option.
Deploying the JVM Diagnostics Agent
To deploy the JVM Diagnostics Agent, follow these steps:
-
Select a WebLogic Server target on the Middleware page.
-
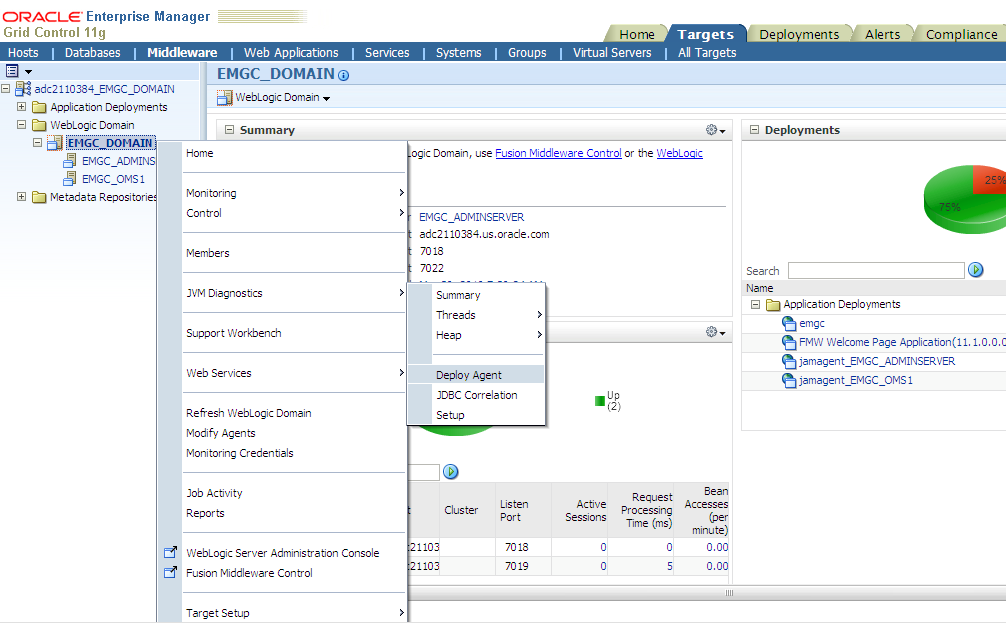
Select the JVM Diagnostics option in the drop-down list and click Deploy Agent as shown below:
-
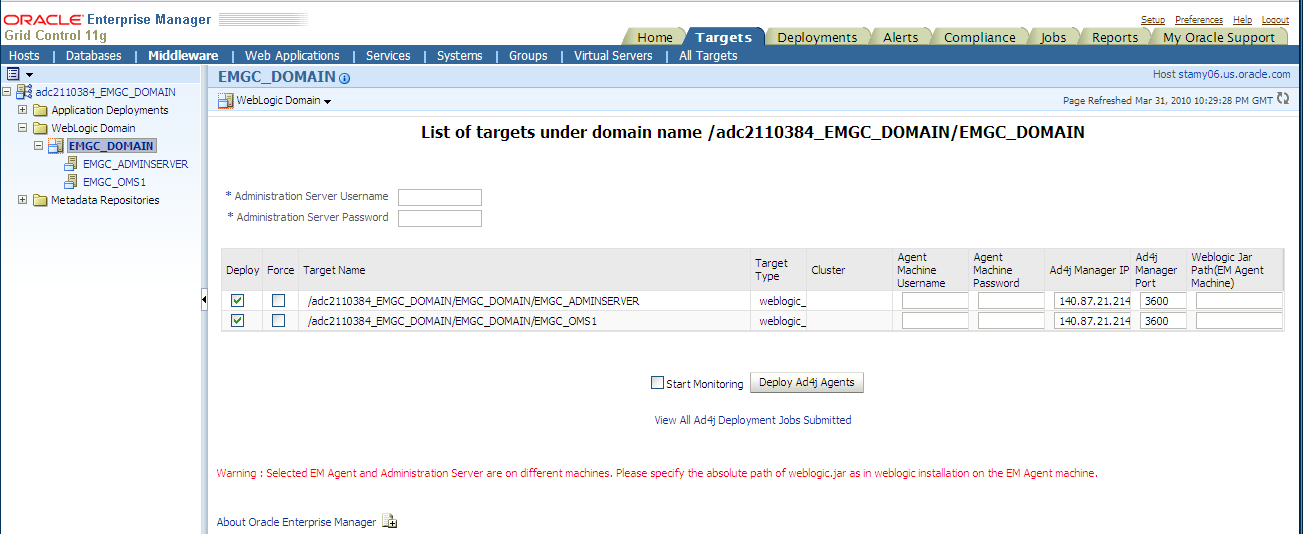
The following screen is displayed.
-
Enter the user name and password for the Administration Server.
-
Check the Deploy checkbox to select the agents that are to be deployed and click Deploy AD4J Agents to deploy them.
Creating a Special Repository User for Loading JVM Diagnostics Heaps
To create a special repository user who can load JVM Diagnostics Heaps to the repository, follow these steps:
Note:
This is an optional step and can be used to create less privileged users who can load heaps using the loadHeap script.-
Run the
create_jvm_diagnostic_db_user.shscript from the command prompt$ ./create_jvm_diagnostic_db_user.sh
-
You will see a message prompting you to continue with the user creation. Enter Y to continue. The following prompts are displayed:
Enter Database Host Machine Name or IP address:[localhost]:
Enter the host name or the IP address of the machine on which the database has been installed.
Enter Database Port on "localhost":[1521]
Enter the database port number as 25062.
Enter ORACLE_SID for database on "localhost":[s0222]
Enter the Oracle system identifier for the database.
Enter database admin user name:[SYSTEM]
Enter the name of the database administration user.
Enter "SYSTEM" user password:
Enter the password for the database administrator.
Enter JVM Diagnostics database username:[JVMDIAG]
Enter the user name for the JVM Diagnostics Administrator being created.
Enter "JVMDIAG" user password:
Enter the password for the JVM Diagnostics Administrator. You are then prompted to re-enter the password. After you have re-entered the password, you will see the following:
Creating Database user "JVMDIAG" ....
Database user "JVMDIAG" created
Public synonyms would be created for following database objects:
Tables
1) JAM_HEAPREL
2) JAM_HEAPOBJ
3) JAM_HEAPUSAGE
4) JAM_HEAPROOTS
5) JAM_HEAPROOTREL
6) JAM_HEAPOBJSUM
7) JAM_HEAPSNAP
-
You are prompted to continue with the setup. Press Enter to continue. You will see the following:
Required privileges granted
JVM Diagnostics Database User "JVMDIAG" created
Now onwards, to load heap, use "JVMDIAG" user
JVM Diagnostics Architecture
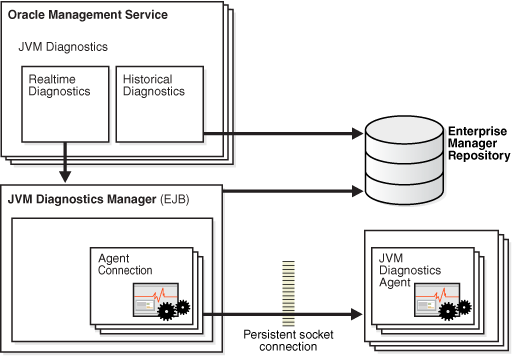
The following diagram shows the JVM Diagnostics Architecture.
The JVM Diagnostics Manager that is present on the WebLogic Server target retrieves historical metric data from the Management Repository (Enterprise Manager Repository). The JVM Diagnostics Agent deployed on the WebLogic Server target, collects real-time data and transmits it to the JVM Diagnostics Manager. The communication between the JVM Diagnostics Manager and Agent can be a secure (SSL) or non-secure connection.


