1 Installing and Configuring the Microsoft Operations Manager Connector
The Microsoft Operations Manager Connector enables Oracle Enterprise Manager to send alerts to and retrieve alerts from Microsoft Operations Manager (MOM). The retrieved alerts are stored in the Enterprise Manager repository and displayed through the Enterprise Manager console.
This chapter provides the following information on setting up and configuring the MOM Connector:
Introduction to the MOM Connector
Connectors to MOM are bi-directional, meaning that you can send Enterprise Manager alerts to MOM as well as receive MOM alerts in Enterprise Manager. Beginning with Enterprise Manager 10g Release 4, you can send alerts to external systems in real time through Web services. For information about how to do this, see "Sending Enterprise Manager Alerts to MOM" on page 1-7.
Using a polling mechanism, the MOM Connector retrieves data through Web Services on HTTP and HTTPS protocols. The polling interval is user-definable, but cannot be shorter than 5 minutes. If an interval shorter than 5 minutes is defined, it defaults to 5 minutes.
The default target_type defined in Enterprise Manager is mom_managed_host. The retrieved alerts are stored in the default target instance generic_mom_managed_host. You can create more target instances based on your requirements. See "Configuring the MOM Connector".
Prerequisites
Before using MOM Connector, ensure that the following pre-requisites are met:
-
MOM Connector framework Web services are enabled during the installation of MOM 2005.
-
Internet Information Services (IIS) 6.0 or higher is deployed on the Windows server that hosts MOM.
-
IP-based authentication is enabled on the Windows system that hosts MOM. See "Enabling IP-based Authentication" for the procedure.
See Also:
MOM 2005 Product Documentation at the following URL:http://www.microsoft.com/mom/techinfo/productdoc/default.mspx
Installing and Uninstalling the MOM Connector
The MOM Connector is installed as part of the Enterprise Manager base installation. After you install Enterprise Manager, you should see the MOM Connector listed on the Management Connectors page.
See Also:
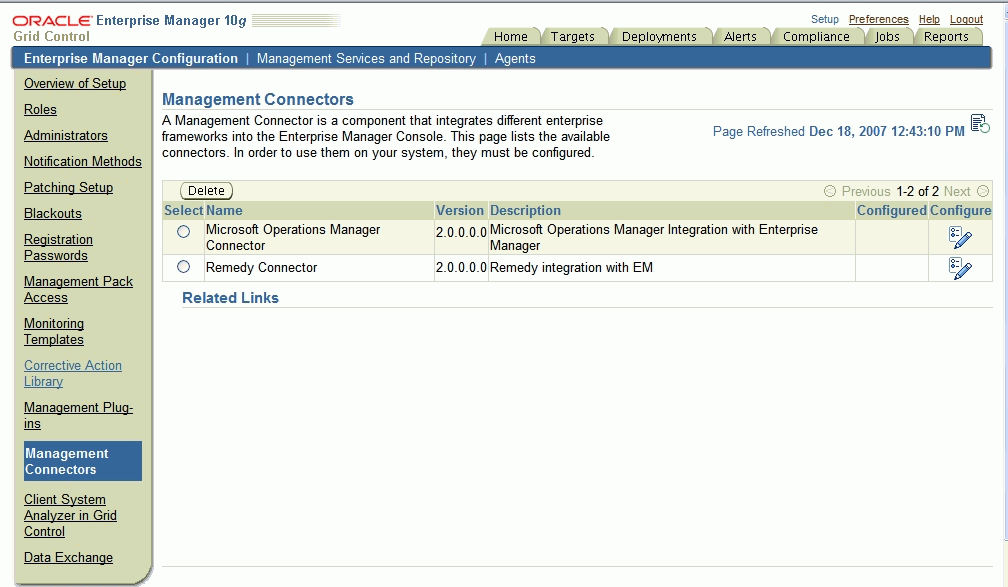
Enterprise Manager Grid Control Installation and Basic Configuration Guide available at:http://www.oracle.com/technology/documentation/oem.htmlAfter you install Enterprise Manager, when you access the Enterprise Manager console as a Super Administrator, you can see the MOM Connector in the Management Connector Setup page as shown in Figure 1-1. See "Configuring the MOM Connector" for instructions.
To uninstall the MOM Connector, select it in the Management Connectors page, then click Delete.
Re-registering Removed Connectors
The MOM Connector is automatically registered when Enterprise Manager is installed. However, you may remove this connector at some point and then want to subsequently re-register it.
To re-register a connector that has been removed:
-
From the Oracle Management Server (OMS) host command window, run the following
emctlcommand from the$ORACLE_HOME/bindirectory:emctl extract_jar connector <jarfile> <connectorTypeName> <OracleHome>
The command replaces spaces with underscores in
<connectorTypeName>and extracts the jar file to:$ORACLE_HOME/sysman/connector/<connectorTypeName_without_space/
For example:
emctl extract_jar connector momconnector.jar "Microsoft Operations Manager Connector" $ORACLE_HOME
This extracts the
.jarfile to this folder:$ORACLE_HOME/sysman/connector/Microsoft_Operations_Manager_Connector/
-
Run the following
emctlcommand from the$ORACLE_HOME/bin directory:emctl register_connector connector <connectorType.xml> <server> <port> <database sid> <username> <oracleHome>
For example:
emctl register_connector connector $ORACLE_HOME/sysman/connector/Microsoft_Operations_Manager_Connector/MOMConnector.xml host.us.oracle.com 15041 EMREP SYSMAN $ORACLE_HOME
Note:
For multiple Oracle Management Servers, you only need to register the connector once from any of the Oracle Management Servers.Configuring the MOM Connector
-
From the Enterprise Manager console, click Setup.
-
Click the Management Connectors link in the left pane.
The Management Connectors page appears. For the MOM Connector row, the Configured column should be blank (Figure 1-1).
Note:
A check mark in the Configured column indicates that the Connector is already configured. -
Click the Configure icon for the MOM Connector.
The General tab of the Configure Management Connector page appears.
-
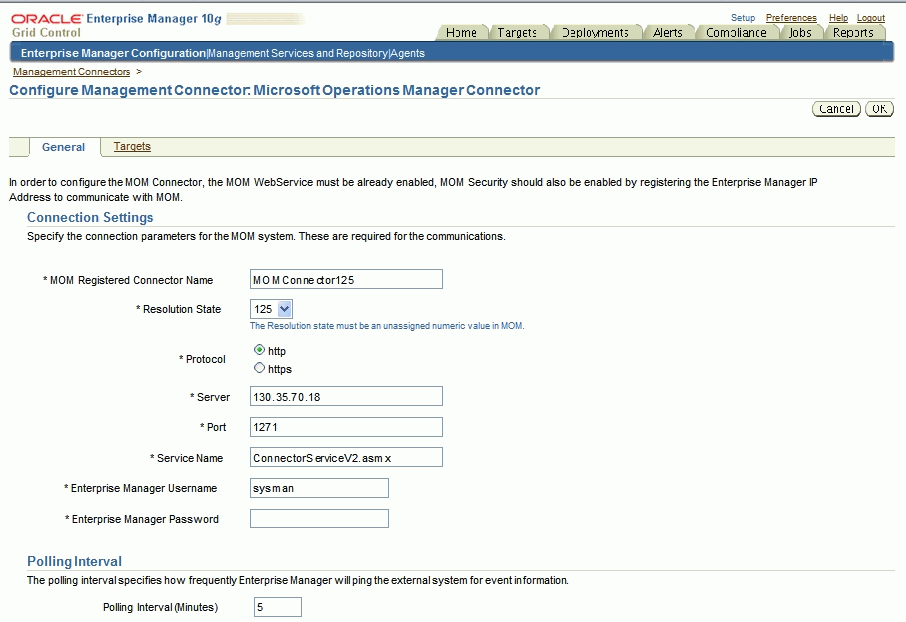
Provide the required settings. See "General Settings" for details (Figure 1-2).
-
Click OK.
-
Optional: Go to the Targets tab and specify the details for creating additional target instances. See "Creating Additional Target Instances" for details.
-
Click OK.
The Management Connectors page reappears. The MOM Connector row should have a check mark in the Configured column.
If you choose HTTPS as the protocol to establish a connection between MOM and Enterprise Manager, see "Enabling SSL for HTTPS" on page 1-10.
General Settings
This section provides the communication details required for configuring the connector.
-
MOM Registered Connector Name — Specify the connector name that you want to register with MOM. This is the name that the MOM administrator identifies for marking alerts to Enterprise Manager. This should be a unique name you set up within Enterprise Manager that identifies this connector.
MOM Registered Connector Name is the connector name that appears in MOM as the name for the resolution state you specified when configuring the MOM Connector. For example, if you specify Microsoft Operations Manager Connector in this field and 218 as the Resolution State, you can see a resolution state called Microsoft Operations Manager Connector in MOM (when right-clicking on an alert and selecting the Set Resolution State menu). You can see that this resolution state corresponds to 218 in MOM from the administrator's console.
-
Resolution State — Specify a value between 1 and 255. Make sure that you do not specify a value already in use, including the standard values such as 85 or 255. The default value for the MOM Connector is 218.
To verify whether a value is currently being used, go the the MOM server's Administrator Console. On the left panel, find Microsoft Operations Manager, then select Administration, Global Settings, and then select Alert Resolution State on the right panel. Right-click this and select Properties. This displays a table with the first two columns named Resolution State, which is a string, and ID, which is a number from 0 to 255.
-
Protocol — Select either HTTP or HTTPS based on the protocol the MOM Web services are running on.
-
Server — Enter the IP address or the DNS name of the MOM server.
-
Port — Enter the port number the MOM Web server uses. The default is 1271.
For an HTTPS connection, you must change the port to the HTTPS port enabled in MOM.
-
Service Name — Enter the MOM Web service name. The default is
ConnectorServiceV2.asmx. In most cases, you need not change this. -
Polling Interval — Enter the time interval between event collections. The polling interval should not be shorter than 5 minutes. If you define an interval shorter than 5 minutes, it defaults to 5 minutes.
-
Enterprise Manager Username — Enter the user name to be used to insert alerts; for example,
SYSMAN. The user must have full privileges on the target of type MOM Managed Host.Administrator privileges are recommended; for instance, you should be a super user such as
SYSMAN. -
Enterprise Manager Password — Enter a password for the user name you specified.
Creating Additional Target Instances
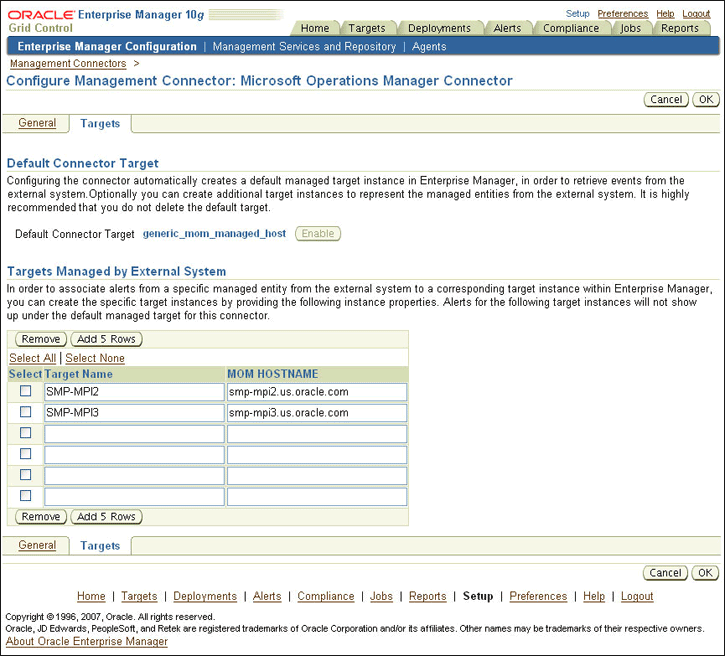
When you deploy or install a MOM Connector, a default target instance generic_mom_managed_host is created. In addition, you can create specific target instances.
An alert is assigned to the respective targets based on the computer name in MOM. If the name specified under Computer column in the MOM Operator console matches the target name you specify in the Target Name column in the section "Targets Managed by External System (Optional)", the alert is assigned to this target. If the target does not exist, the alert is assigned to the default target instance.
In the Configure Management Connector page, click the Targets tab to create specific target instances. Figure 1-3 shows the Configure Management Connector Target page.
The default target instance holds external alerts that are not associated with any particular Enterprise Manager target. Oracle recommends that you do not remove this default connector target when you create additional targets.
If the default target is removed accidentally, you can recreate it by clicking the Enable button in the Targets tab of the Configure Management Connector page.
If the default target is removed for alerts that cannot be mapped to any target, error messages are logged in the file emoms.log.
Targets Managed by External System (Optional)
In this section, you can optionally create target instances and associate external alerts with these target instances.
To add a new target:
-
Specify the target name in the Target Name column.
-
In the MOM HOSTNAME column, specify the fully qualified hostname (hostname along with the domain name; for example,
smp-mpi2.us.oracle.com) of the target. -
Click OK.
Note:
If you want to create more target instances, click Add Rows to add additional rows and then specify the target information. To remove a target, check the Select check box corresponding to the target, click Remove, then click OK.Response Status of Targets
The response status of generic_mom_managed_host asserts whether or not the MOM server is running. Immediately after registration, the status shows Pending.
After you configure the MOM Connector and the first event collection job runs (within a polling interval), the status shows either Up or Down. The response status of individual targets represent whether the host (represented by that target) is up or down.When the target is created, Enterprise Manager pings the host. If the server is reachable, the status is marked Up. Subsequently, if Enterprise Manager receives any alerts (indicating that the host is down), it marks the target as Down.
If the target is down, the alert retrieval is interrupted until the target is up again.
Note:
In Enterprise Manager, the response status of targets managed by MOM might not be definitive and can be used only for reference purposes. For accurate information of its managed entities, use MOM.Sending Enterprise Manager Alerts to MOM
You can send Enterprise Manager alerts to MOM in real-time. You can also choose which type of alerts to send, such as critical alerts on a production database. Additionally, Enterprise Manager 10g Release 4 supports metric alerts.
Prerequisites
To send alerts, MOM needs to support the following:
-
"createEvent"and"updateEvent"literal-document style Web services, as described in the section "Providing Deployment Descriptor Mappings" in the Oracle Enterprise Manager Connectors Integration Guide. -
IP-based or SOAP header-based authentication. For more information, see the "Building a Help Desk Connector" chapter in the Oracle Enterprise Manager Connectors Integration Guide.
Configuring Rules to Send Alerts
You need to configure rules for sending out alerts through the MOM connector as follows:
-
From the Grid Control console, click Preferences in the upper right corner. The General Preferences page appears.
-
In the menu at the left, click My Rules. The My Notification Rules page appears.
-
Select a rule, then click Edit. The Edit Notification Rule page appears.
-
Select the Methods sub-tab. The E-mail Notification page appears.
-
Select the Microsoft Operations Manager Connector advanced notification method, then click OK.
-
Repeat this process for each rule you want to set.
Migrating from 10.2.0.3 to 10.2.0.4
If you have already configured the MOM Connector in version 10.2.0.3 and want to upgrade to version 10.2.0.4, do the following to enable bi-directional capability:
-
From the Grid Control console, click Setup in the upper right corner. The Overview of Setup page appears.
-
In the menu at the left, click Management Connectors. The Management Connectors page appears.
-
Select Microsoft Operations Manager Connector, then click the Configure icon. The Configure Management Connector page for MOM appears.
-
Click OK. No other action is needed to enable bi-directional capability.
Receiving MOM Alerts in Enterprise Manager
The MOM Connector also enables you to forward MOM events to Enterprise Manager, thereby enabling better correlation of IT problems across the technology stack. You can specify when and how alerts should be triggered by configuring event rules in the Microsoft Operations Manager console. When an alert is raised, it is assigned a default resolution state that you specify. The MOM Connector creates a new resolution state specifically for the purpose of sending it across to Enterprise Manager.
Prerequisites
MOM needs to support the following literal-document style Web services:
-
"getNewAlerts" -
"getUpdatedAlerts" -
"acknowledgeAlerts" -
"updateAlerts"
Forwarding Alerts to Enterprise Manager
You can forward MOM alerts to Enterprise Manager automatically or manually as follows:
-
Automatically forward alerts by specifying the connector resolution state in the event rules and alert rules.
-
Manually forward any existing MOM event to Enterprise Manager by changing the resolution state of the alert.
Refer to the Microsoft Operations Manager guide for more details.
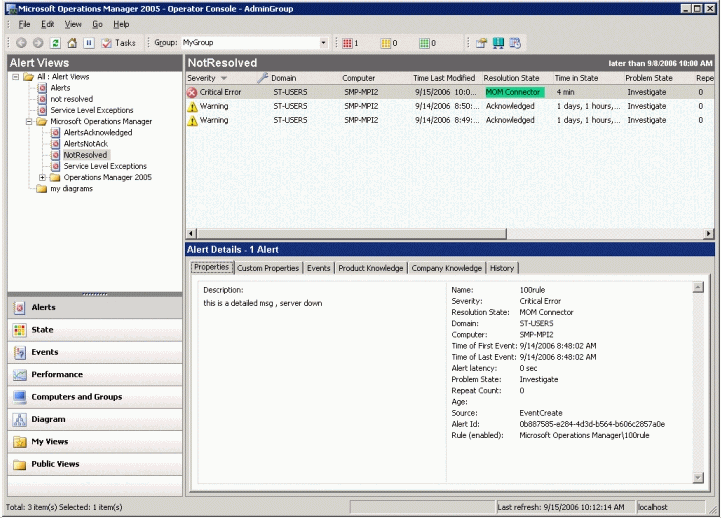
Figure 1–4 shows alerts in the Operator Console of Microsoft Operations Manager. The first alert has a Resolution State set to MOM Connector, which indicates that the alert is waiting to be forwarded to Enterprise Manager. When the polling job picks up the alert and forwards it to Enterprise Manager, the alert's resolution state returns to its original state.
How Enterprise Manager Responds
After the alerts have been forwarded to Enterprise Manager, they are associated with the appropriate targets, depending on the mapping option(s) you select. The MOM Connector keeps track of all the events forwarded from MOM, and automatically updates information in Enterprise Manager after changes in MOM occur. This ensures that the two systems are always synchronized, providing you with timely information about your Microsoft environment.
Enabling SSL for HTTPS
Follow the instructions provided in this section if you choose HTTPS as the protocol to establish a connection between MOM and Enterprise Manager.
Generating a Certificate Request File
Generate a certificate request file from the MOM server by doing the following:
-
On the Windows task bar, go to Start, then click Run.
-
Type
inetmgrin the Open field.The Internet Information Services (IIS) Manager screen appears.
-
In the left pane, navigate to Web Sites and select the Microsoft Operations Manager 2005 connector framework.
-
Right-click and select Properties.
The Microsoft Operations Manager 2005 Connector Framework Properties dialog box appears.
-
In the Directory Security tab, go to the Secure Communications section and click Server Certificate.
-
Using the wizard, create a new certificate.
Note:
When you specify details for certificate generation, do not use abbreviated forms for city and state names, as the wizard does not recognize abbreviations. For example, CA is not accepted for California.When the wizard completes, a
certreq.txttext file is generated. -
Send this request file to the Certificate authority, such as VeriSign.
Using the Certificate from the Certificate Authority
After processing your request, the certificate authority sends you the certificate. After you receive the certificate, do the following:
-
Paste the content into a text file.
The content looks like the following:
-----BEGIN CERTIFICATE-----
MIICdzCCAV8CAQAwDQYJKoZIhvcNAQEEBQAwITELMAkGA1UEBhMCVVMxEjAQBgNVBAMMCXJvb3Rf
dGVzdDAeFw0wNjExMTAxMDI5MzJaFw0xNjExMDcxMDI5MzJaMGYxCzAJBgNVBAYTAlVTMQ4wDAYD
VQQIEwVUZXhhczEPMA0GA1UEBxMGRGFsbGFzMQ8wDQYDVQQKEwZvcmFjbGUxCzAJBgNVBAsTAkVN
MRgwFgYDVQQDEw9zbXAtbXBpMi1vcmFwa2kwgZ8wDQYJKoZIhvcNAQEBBQADgY0AMIGJAoGBAOch
GIHp6MFW78OQw/mSdU0xfVq5u9pgqndnTqoh4aGFg1bTZD6/Azf3Nn8ibtKVJmGp3PLa3xP/gk7S
tjZ/9sM4bvnw0Y4U9xsj0BiDG4JBo35uXAUxDHLReh8F4x45Wtv/SxvE0tjNnESlBMYynLip7P9l
fSzcGKjSViyFW9M9AgMBAAEwDQYJKoZIhvcNAQEEBQADggEBAIktFTvDs7ULf0PclYXsJPeK4vFq
7HZ86omktA9lYS+oA6SaudwDGY5yxcl9O2s78o+EK9e8Wz4wM4dmUg4aSuHVHWs75W86uh7gpEFo
wssH9mtcxkqIbdPVwQoeAUTVOifNaujfXtgClvlvOjkfzvvD7SieRjD9mP2rJ2pRWUbv7xR7oJmt
RXp6t22a+MKMQQR8ofAZV/WxFJcgmBR/JxLA28X+jnzmIH/yqHK/b6Agwwy7PgbJrwPI7WQ/busm
6ASeV8ZgSfAkJ83nWz4NICnH5Y8Dyu8vDtERsOQ8z/WttrBDEmcGikkO9P+o2Y9w1pEJQhh4bKtD
PyO9YLmlrLM=
-----END CERTIFICATE-----
-
Save the file as
cert.cer. -
On the Windows task bar, go to Start, then click Run.
-
Type
inetmgrin the Open field.The Internet Information Services (IIS) Manager screen appears.
-
In the left panel, navigate to Web Sites and select the Microsoft Operations Manager 2005 connector framework.
-
Right-click and select Properties.
The Microsoft Operations Manager 2005 Connector Framework Properties dialog box appears.
-
In the Directory Security tab, go to the Secure Communications section, and click Server Certificate.
-
Add the certificate file to the server.
Adding Signed Certificates to Wallet Manager
Note:
Oracle Wallet Manager is available at$ORACLE_HOME/bin on OMS. See Oracle Application Server Administrator's Guide for details.-
Create a wallet using the
orapki utilityby entering the following command:orapki wallet create -wallet client -auto_loginNote:
orapkiis available at$ORACLE_HOME/binon OMS. -
Add the trusted certificate to the wallet by entering the following command:
orapki wallet add -wallet client -trusted_cert -certverisignCert.cer -
To view the content of the wallet, enter the following command:
orapki wallet display -wallet clientEnsure that a file named
ewallet.p12is available. -
In the Oracle Wallet Manager, open the client certificate
ewallet.p12. -
Go to Select Trusted Certificates and select Operations on the main menu.
-
Select Export All Trusted Certificates.
-
Save the file as
certdb.txt. -
Place the
certdb.txtin the connector home root directory ($OMS_HOME/sysman/connector).If the file
certdb.txtalready exists in the connector home root directory, open the file and add the contents in yourcertdb.txtfile to the existing content.
Now Java SSL can use this file for communication between Enterprise Manager and the MOM server in HTTP mode.
See Also:
For information on creating a wallet, see "Creating and Viewing Oracle Wallets with orapki" in the Oracle Database Advanced Security Administrator's Guide, 10g Release 2 (10.2).MOM Connector Tips
The following sections provide various tips that might help you resolve issues you encounter while configuring or using the MOM Connector.
Enabling IP-based Authentication
The following procedure is only applicable if you have not already enabled IP-based authentication.
-
Open Inetmgr (Internet Information Services) in the system where the MOM server is running by doing the following:
-
Expand the computer name (local computer), then expand the WebSites folder.
-
Select the MOM 2005 Connector Framework, then right-click and select Properties. The Framework Properties window appears.
-
Select Directory Security.
-
Set up the IP address as follows:
-
In the "IP address and domain name restrictions" section, click Edit. The IP Address and Domain Name Restrictions window appears.
-
Click Add. The Deny Access window appears.
-
Enter the IP address where Enterprise Manager is located, then click OK to return to the Framework Properties window.
-
-
Set up authentication and access control as follows:
-
In the "Authentication and access control" section, click Edit. The Authentication Methods window appears.
-
Click the Enable Anonymous Access check box to enable it.
-
Provide a user name and password that grant Administrator rights, then click OK to return to the Framework Properties window.
-
-
Click OK to save your settings and exit the Framework Properties window.
-
Restart the MOM server.
Oracle recommends that you use HTTPS as the protocol for the communication between Enterprise Manager and MOM.
Use HTTP only if a secure connection is not required and the data can be transferred in clear text between the two systems.
For an HTTPS connection, you need to change the port to the HTTPS port enabled in MOM. Because Enterprise Manager polls data from MOM to Enterprise Manager, this means configuring MOM in HTTPS mode.
If the connector configuration fails, ensure the following in the MOM Administrator Console:
-
Resolution state is not already in use.
-
Connector name is unique.
MOM Connector Fails to Retrieve Alerts
Ensure the following conditions if Enterprise Manager fails to retrieve alerts although the MOM server is marked for forwarding alerts:
-
Valid resolution state is correctly marked.
-
Connector is not accidentally disabled on the MOM server.
-
Enterprise Manager user name and password that you specified in the MOM Configuration page are valid.
Alert Logging to Additional Target Instance Fails
Even if you define additional target instances, alerts are logged to the default target instance if the target name has characters with a case mismatch.
The target name is case-sensitive and therefore should match the case of the target name in Enterprise Manager.
Targets Added in the Same Transaction
You cannot delete and add the same target in the same transaction.
The value of the polling interval is in minutes. The minimum value is 5 minutes. If you specify a shorter polling interval, it defaults to 5 minutes.
The connector can process alerts up to twenty times the value of the polling interval at an instance. For example, if the Schedule Interval is 5, the maximum number of alerts retrieved is 100 (20*5). This is also the default value. This number need not be the same as the maximum number of alerts the connector is capable of requesting from MOM.
The maximum number of alerts the connector is capable of requesting from MOM depends on the number you specify in the files generic_request_newalerts.xml and generic_request_updatedalerts.xml. For example, if you have specified 100 (<maxCount>100</maxCount>), the connector can request up to 100 alerts at an instance. To optimize the network usage, Oracle recommends that you set the same maximum value for both the processing and the requesting capabilities.
-
Target
If the target does not exist, the alert is assigned to
generic_mom_managed_host. -
Metric
If the metric does not exist, Enterprise Manager creates one.
-
Generic MOM Target
If the alert does not match any target and the generic MOM target (
generic_mom_managed_host) does not exist, the alerts are discarded and a message is logged to the log file.


