4 Installing Oracle Management Agent Using Agent Deployment Wizard
This chapter describes how you can install Oracle Management Agent (Management Agent) using the Agent Deployment Wizard. In particular, this chapter covers the following:
Note:
This installation method is not supported on Solaris Express 5.11 x86-64, Solaris SPARC Express 5.11 (64-bit), Solaris 11 x86-64, and Solaris 11 SPARC (64-bit). To install Oracle Management Agent on these platforms, follow the silent response file method described in Oracle Enterprise Manager Grid Control Advanced Installation and Configuration Guide.Note:
If you have a cluster-based environment, then Oracle strongly recommends you to install the Management Agent using the Agent Deployment Wizard as described in the Oracle Enterprise Manager Grid Control Advanced Installation and Configuration Guide available at:Overview
Agent Deployment Wizard, as the name suggests, is an application that enables you to install Management Agents. Agent Deployment Wizard is built into Enterprise Manager Grid Control, and it offers GUI-rich, interactive screens that guide you through the entire installation process.
Note:
In Enterprise Manager 11g, you cannot install a Management Agent using the Oracle Universal Installer (OUI), which is the Enterprise Manager installation wizard.Although the Agent Deployment Wizard can be used for installing one, single Management Agent, the wizard is best suited for installing multiple Management Agents, as a mass deployment, and is particularly useful when you want to perform remote installations across your organization.
The Agent Deployment Wizard gives you the flexibility to specify multiple hosts on which the Management Agent needs to be installed. This helps you when you want to install the Management Agent on several hosts, in one attempt.
The wizard connects to Oracle Management Service (OMS) where the Management Agent software is located and copies all the required files and scripts from there to the specified hosts, and then runs them to install a Management Agent.
The connectivity between OMS and the specified hosts is established using SSH protocol. For Linux operating systems, it is assumed that SSH daemon runs on the destination hosts by default. However, for Microsoft Windows operating systems, in order to facilitate communication on SSH protocol, you have to install the Cygwin suite. For information about installing Cygwin suite, see Appendix D, "Setting Up SSH Connectivity".
Before You Begin
Before you begin, keep these points in mind:
-
If you want to view the status of an installation session that was previously run, then click Agent Installation Status on the Deployments page. However, do not attempt to view the installation status until the installation is complete. If you do, you will see an error.
-
On Microsoft Windows, do not open the
agentpush.propertiesfile using Microsoft Word software. Open it using other text editors such as VIM or Notepad. -
For accessing the Enterprise Manager Grid Control console, ensure that you use only certified browsers as mentioned in My Oracle Support note 412431.1.
-
Agent Deployment Wizard expects an SSH connectivity between Oracle Management Service (OMS) and the remote hosts where you want to install the Management Agents.
-
If there is no SSH connectivity between the OMS and the remote hosts, then the Agent Deployment Wizard automatically sets up the connectivity by generating keys in the ~/.ssh directory . Once the deployment is complete, the Agent Deployment Wizard automatically drops the connectivity and removes keys.
-
If there is already an SSH connectivity between the OMS and the remote hosts, then the existing connectivity itself is used, and no keys are generated in the ~/.ssh directory. Once the deployment is complete, the Agent Deployment Wizard does not drop the connectivity because the connectivity already existed and it was not created by the Agent Deployment Wizard.
-
Prerequisites
Before installing the Management Agent, ensure that you meet the following prerequisites.
If you want, you can print out this section and write 'Yes' or 'No' against each prerequisite. This will help you to track the prerequisites you have met and the prerequisites you have not met.
Table 4-1 Prerequisites for Installing Oracle Management Agent Using Agent Deployment Wizard
| Requirement | Description | Yes/No |
|---|---|---|
|
Hardware Requirements |
Ensure that you meet the hard disk space and physical memory requirements as described in Appendix A, "Meeting Hardware Requirements". |
|
|
Operating System Requirements |
Ensure that you install the Management Agent only on certified operating systems as mentioned in the Enterprise Manager Certification Matrix available on My Oracle Support. To access this matrix, follow these steps:
|
|
|
Package Requirements |
Ensure that you install all the operating system-specific packages as described in Appendix B, "Meeting Package, Kernel Parameter, and Library Requirements ". |
|
|
User and Operating System Group Requirement |
Ensure that the destination host where you want to install the Management Agent has the appropriate users and operating system groups created. For information about creating operating system groups and users, see Appendix C, "Creating Operating System Groups and Users Requirements". |
|
|
Temporary Directory Space Requirements |
Ensure that you allocate 400 MB of space for a temporary directory where the executables can be copied. For example, |
|
|
Central Inventory Requirements |
Ensure that you allocate 100 MB of space for the central inventory directory. Also ensure that the central inventory directory is not on a shared file system. If it is already on a shared file system, then switch over to a non-shared file system by following the instructions outlined in My Oracle Support note 1092645.1 |
|
|
Installation Base Directory Requirements |
Ensure that the installation base directory you specify is empty and has write permission. |
|
|
Software Availability Requirements |
If you want to install Oracle Management Agent 10g, then ensure that you download that Management Agent software. If you want to install Oracle Management Agent 11g Release 1 for an operating system that is different from the one on which the Oracle Management Service 11g Release 1 is running, then ensure that you download the Management Agent software for that operating system. |
|
|
Accessibility Requirements |
If there are multiple OMSes in your environment and if you have staged the Management Agent software in a non-default location (not on the OMS host), then ensure that the non-default location is accessible by all the OMSes. |
|
|
Path Validation Requirements |
Validate the path to all command locations. For more information, see Appendix E, "Validating Command Locations". |
|
|
Host File Requirements |
Ensure that the host names and the IP addresses are properly configured in the For example, for installing a Management Agent on a host, ensure that the host name specified in the The recommended format of the For example,
IPv6 entries are supported in the file for fresh installations of 11g Release 1 (11.1). However, they are not supported for upgrade from 10g Release 4 (10.2.0.4) or higher to 11g Release 1 (11.1). According to RFC 952, the following are the assumptions: A "name" (Net, Host, Gateway, or Domain name) is a text string up to 24 characters drawn from the alphabet (A-Z), digits (0-9), minus sign (-), and period (.). Note that periods are only allowed when they serve to delimit components of "domain style names". No blank or space characters are permitted as part of a name. No distinction is made between upper and lower case. The first character must be an alpha character. Also, if DNS server is configured in your environment, then you should be able to use DNS to resolve the name of the host on which you want to install the OMS. For example, all these commands must return the same output:
|
|
|
|
If the destination host and the host on which OMS is running belong to different network domains, then ensure that you update the For example, if the fully-qualified host name is
|
|
|
Preinstallation/Postinstallation Scripts Requirements |
Ensure that the preinstallation and postinstallation scripts that you want to run along with the installation are available on all the destination hosts. |
|
|
Installing User Requirements |
If the central inventory owner and the user installing the Management Agent are different, then ensure that they are part of the same group. Also ensure that the inventory owner and the group to which the owner belongs have read and write permissions on the inventory directory. For example, if the inventory owner is abc and user installing the Management Agent is xyz, then ensure that abc and xyz belong to the same group, and they have read and write access to the inventory. |
|
|
Permission Requirements |
|
|
|
Oracle Inventory Location Requirements |
Ensure that the Oracle Inventory ( |
|
|
SUDO Privilege Requirement |
Ensure that you have SUDO privileges to run To verify whether you have SUDO privileges to run these files, access the
If you do not have SUDO privileges and if you do NOT want to run |
|
|
SUDOERS File Configuration Requirements |
Ensure that you configure /etc/sudoers file so that while running a command using SUDO, you are always prompted for a password. If /etc/sudoers file is configured in such a way that SUDO never prompts for a password, then a directory with the host password as the title gets created in the invoking users home directory. |
|
|
Default SSH Port Requirements |
Ensure that the SSH daemon is running on the default port (that is, 22) on all the destination hosts. If the port is a non-default port, that is, any port other than 22, then update the
|
|
|
PubkeyAuthentication Parameter Requirements |
Ensure that the To verify the value of this parameter, run the following command:
For example, grep PubkeyAuthentication /etc/ssh/sshd_config The result of this command must be Yes. If the result is No, then edit the |
|
|
PATH Environment Variable Requirements |
On the host where OMS is running and on the host where you want to install the Management Agent, ensure the following:
|
|
|
SSH Setup Requirements (For Microsoft Windows) |
(For Microsoft Windows) If you are installing the Management Agent on a Microsoft Windows-based operating system, then ensure that you set up the SSH connectivity between the host running OMS and the host where the Management Agent needs to be installed, as described in Appendix D, "Setting Up SSH Connectivity". |
|
|
Agent User Account Permissions and Rights (For Microsoft Windows) |
(For Microsoft Windows) If you are installing the Management Agent on a Microsoft Windows-based operating system, then ensure that the agent user account has permissions and rights to perform the following:
To verify whether the agent user has these rights, follow these steps:
|
|
|
Permissions for cmd.exe (For Microsoft Windows) |
(For Microsoft Windows) If you are installing the Management Agent on a Microsoft Windows-based operating system, then ensure that you grant the For more information on this restriction and to understand how you can grant these permissions, access the following URL to Microsoft Web site: |
Installation Procedure
To install a Management Agent, follow these steps:
-
In Grid Control, click Deployments.
-
On the Deployments page, from the Agent Installation section, click Install Agent.
-
On the following page, click Fresh Install.
-
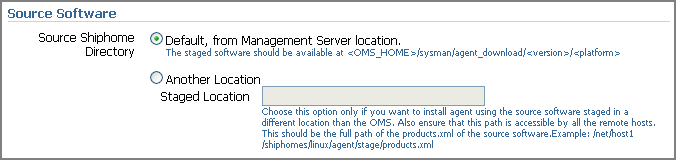
On the Installation Details page, in the Source Software section, do the following:
-
Select Default, from Management Server location if the Management Agent software is available in the default directory that exists within the OMS.
For example,
<OMS_HOME>/sysman/agent_download/<version>/<platform> -
Select Another Location if the Management Agent software is available in a non-default or custom location. Specify the full path to that location, and ensure that the path you specify leads up to the
product.xmlfile. Also ensure that this location (shared or non-shared) is accessible from all the remote hosts and you have read permission on it.For example,
/shared/products/shiphomes/linux/agent/stage/products.xml.
-
-
In the Version section, select the version of the Management Agent that you want to install. The values available in this list depend on the software staged on the OMS host.

-
In the Hosts section, do the following:
-
From the Platform list, select the operating system on which you want to install the Management Agent.

-
For Provide Host List, specify the host names or IP addresses of the hosts on which you want to install the Management Agent.You can use a comma (,) or a white space as a separator when specifying multiple hosts.

Alternatively, if you already have a list maintained in a file, then click Get Host Names From File and select that file. The recommended format of the
/etc/hostsfile is<ip> <fully_qualified_host_name> <short_host_name>.For example,
141.81.5.71 host1.foo.com host1 -
Select Allow local hostname to override provided hostname if the host names specified in Provide Host List are virtual host names and not physical host names.
For example, if a host name is
mypc.server.combut the virtual name given to it ishost1, then you can specifyhost1in the Provide Host List text box, but select this check box to indicate that the specified host name is a virtual host name. The application internally interprets the virtual host name specified and maps to its real, physical host name in the network.
-
-
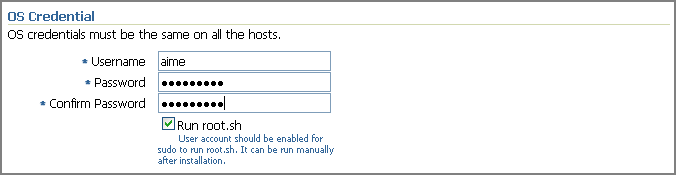
In the OS Credentials section, do the following:
-
Specify the appropriate operating system user credentials. The operating system credentials you specify here must be the same for all the selected hosts.
-
Select Run root.sh (for UNIX) if you want the application to run this script. The script runs after the configuration assistants are run and before the postinstallation scripts (if any) are run.
To run this script, you must have SUDO privileges. If you do not have SUDO privileges and if you do NOT want to run the script yourself at the time of installation, then deselect this option now. After the installation ends, request your Administrator who has SUDO privileges to manually run the scripts as described in After You Install.
-
-
In the Destination section, specify the full path to the Installation Base Directory. This directory is created on all the specified hosts, and the Oracle home of the Management Agent is created as a subdirectory under this directory.

For information about installation base directory, see the Oracle Enterprise Manager Grid Control Advanced Installation and Configuration Guide available at:
-
In the Port section, specify the port on which the Management Agent will communicate. The default port is 3872. Ensure that the port you specify is not busy, otherwise the prerequisite check fails.

If you are not sure, leave this field blank. The application automatically picks up the first available free port within the range of 1830 - 1849.
-
In the Load Balancer Host and Port section, specify the name of the host and port where the Server Load Balancer is set up so that communication between the Management Agent and the host running the Server Load Balancer can be enabled. This is required only if you are deploying the Management Agent in an environment that has multiple OMSes managed by a Server Load Balancer.
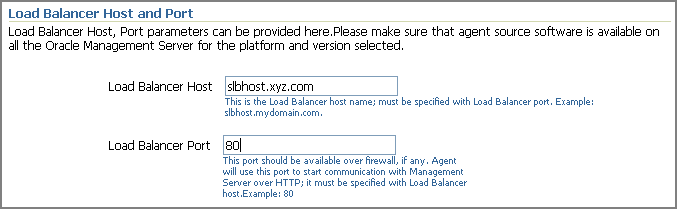
Note:
If your Server Load Balancer is not functional for some reason, then you can optionally specify the host name and port of the OMS that is being managed by the Server Load Balancer. This is however not recommended, so use this option only if your Server Load Balancer has a problem. -
In the Additional Parameters section, specify any additional parameters that you want to pass during installation.

The additional parameters you specify here depend on the software source location that you have selected in Step (4).
-
If you selected Default, from Management Server location, then specify the additional parameters listed in Table F-1.
-
If you selected Another Location, then specify the additional parameters listed in Table F-2.
Oracle recommends you to specify only those parameters that you want to run in addition to the general parameters you have already provided on this page for installation. For example, in Step (8), you are specifying the installation base directory. Therefore, for Additional Parameters, try to avoid specifying the installation base directory again. If you still do so, then the value you specified in Step (8) will be ignored and the value you specified here will be used instead.
And note that if you are specifying more than one parameter, then separate them with a white space. For example,
-i /etc/oraInst.loc -p /home/config/staticports.ini. -
-
In the Management Server Security section, specify a password that can be used for authenticating new Management Agents that join the Enterprise Manager Grid Control system, and for permitting only secure Management Agents to communicate with the OMS, which is in locked state, via HTTPS protocol.

Alternatively, after the installation is complete, the super administrator can approve the addition of new Management Agents to the Enterprise Manager Grid Control system.
Note:
For security reasons, Oracle strongly recommends you to change the OMS password specified here After the installation is complete. -
In the Additional Scripts section, do the following:
-
Specify any preinstallation and/or postinstallation scripts that you want to run. The preinstallation and/or postinstallation scripts that you specify must be available on all the hosts. These files are not copied onto the hosts from the software source location during installation.
-
Select Run as Superuser if you want to run these scripts as
root.
-
-
Click Continue.
-
On the My Oracle Support Details page, do the following:
-
If the host where the Management Agent is being installed has a direct connection to the Internet, then specify an e-mail address and My Oracle Support password.
An e-mail address is required so that security updates and install updates can be sent. You can specify any e-mail address, but Oracle recommends you to specify the My Oracle Support user name. For example,
john.mathew@xyz.com. -
If the host where the Management Agent is being installed has an indirect connection to the Internet, that is, through a proxy server, then specify an e-mail address and My Oracle Support password, and then in the Connection Details section, specify the proxy server details.
Note:
You can change the proxy server settings any time after the installation or patching process ends. To do so, run theconfigCCRcommand from theccr/bindirectory within the Oracle home of the Management Agent. -
If the host where the Management Agent is being installed does not have a direct or indirect connection to the Internet, then specify the e-mail address and leave the other fields blank.
In this case, after you complete the installation process, manually collect the configuration information and upload it to My Oracle Support.
Note:
If you see any errors on this page, then check whether you (the user installing the Management Agent) have write permission on crontab. If you do not, then create an entry for your user account in the cron.allow file.
For information about Oracle Configuration Manager, see the Oracle Enterprise Manager Grid Control Advanced Installation and Configuration Guide available at:
http://www.oracle.com/technology/documentation/oem.htmlTo understand how you can manually collect and upload configuration information, see the Oracle Enterprise Manager Grid Control Advanced Installation and Configuration Guide available at:
-
-
Click Continue.
As part of this process, the Agent Deployment Wizard performs some prerequisite checks before proceeding with the installation. When all the prerequisite checks are complete, the wizard displays the results. You can choose to either retry the prerequisite check on all those failed hosts, or ignore the result and proceed to install the Management Agent.
Note:
If you see the following error messages on the Prerequisite Details page, ignore them and click Continue to proceed with the installation:Some or all Agent home locations(Install base dir/agent10g or Install Base Dir/agent11g) provided are not empty directories The Agent Oracle Home ( InstallBaseDir/agent10g or InstallBaseDir/agent11g), is already registered with the inventory An agent home exists in the hosts
Note:
If the installation fails, then review the log files described in the Oracle Enterprise Manager Grid Control Advanced Installation and Configuration Guide available at:Manually Collecting and Uploading Configuration Information to My Oracle Support
To manually collect the configuration information, follow these steps:
-
On the host where the Management Agent is being installed, navigate to the following location. Here,
<ORACLE_HOME>is the Oracle home of the Management Agent you installed:$<ORACLE_HOME>/ccr/bin -
Collect configuration information by running the following command:
$<ORACLE_HOME>/ccr/bin/emCCR collectFor Oracle Configuration Manager 10.2.7 and higher, the collected configuration information is stored in the
<ORACLE_HOME>/ccr/hosts/<hostname>/state/upload/ocmconfig.jarfile. For lower versions of Oracle Configuration Manager, the collected configuration information is stored in the<ORACLE_HOME>/ccr/state/upload/ocmconfig.jarfile. When you run the same command next time, theocmconfig.jarfile gets overwritten with fresh data. Therefore, at any point, you will see only oneocmconfig.jarfile. -
Upload the ocmconfig.jar file to a Service Request on My Oracle Support at the following URL:
After You Install
After you install the Management Agent, follow these steps:
-
-
Navigate to the Oracle home of the Management Agent and run the following command to see a message that confirms that the Management Agent is up and running:
$<ORACLE_HOME>/bin/emctl status agentNote:
If the status of the Management Agent is down for some reason, then manually start the Management Agent by running the following command from its Oracle home:$<ORACLE_HOME>/bin/emctl start agent -
Navigate to the Oracle home of the Management Agent and run the following command to see a message that confirms that EMD upload completed successfully:
$<ORACLE_HOME>/bin/emctl upload
Note:
(For UNIX operating systems) Before running the emctl command to start the Management Agent, ensure that the environment variableNLS_LANGis set with a value that is compatible with the operating system default locale setting and the character set of the Oracle Database, which houses the Management Repository. -
-
(Only for UNIX Operating Systems) If you had NOT selected Run Root.sh in the OS Credentials section of the Deployment Inputs page as described in Step (7), then manually run the following scripts as a root user from each of the hosts where the installation was done. If you do not have SUDO privileges, then request your Administrator who has the privileges to run these scripts.
-
If this is the first Oracle product you just installed on the host, then run the
oraInstroot.shscript from the inventory location specified in the oraInst.loc file that is available in the Oracle home of the Management Agent.For example, if the inventory location specified in the oraInst.loc file is $HOME/oraInventory, then run the following command:
$HOME/oraInventory/oraInstRoot.sh
If you are not a root user, then use SUDO to change to a root user. For example, run the following command:
/usr/local/bin/sudo $HOME/oraInventory/oraInstRoot.sh -
Run the root.sh script from the Oracle home of the Management Agent:
$<ORACLE_HOME>/root.shIf you are not a root user, then use SUDO to change to a root user. For example, run the following command:
/usr/local/bin/sudo /scratch/OracleHomes//root.sh
-
-
If you have not secured the communications between the Management Agent and the OMS, then secure it by running the following command from the Oracle home of the Management Agent:
$<ORACLE_HOME>/bin/emctl secure agentNote:
Even after securing the Management Agent, some data might still be transferred over the network without being encrypted. -
(Optional) If you want to discover the newly installed targets, if you want to convert the standalone Management Agent to a cluster-based Management Agent, if you want to discover the targets on the new nodes of the cluster, or if you want to reconfigure the cluster-based Management Agent, you must run the
agentcascript to reconfigure and discover all new targets. For information about theagentcascript and to know how you can reconfigure the Management Agent and discovering all new targets, see Oracle Enterprise Manager Grid Control Advanced Installation and Configuration Guide available at: -
(Optional) If you want to enable the Request Monitoring feature for tracing transaction requests in WLS, you need JVM Diagnostics as well as Application Dependency and Performance (ADP) managers and agents configured against the target to be monitored.
For information about installing JVM Diagnostics and enabling the Request Monitoring feature, refer to the Oracle Enterprise Manager Administration Guide.
For information about enabling the ADP feature in Enterprise Manager Grid Control, refer to the Oracle Enterprise Manager Getting Started with Management Pack Plus for SOA.
Both these guides are available at: