9 Configuring JVM Diagnostics
This chapter describes the process of configuring and enabling the JVM Diagnostics feature. It contains the following sections:
JVM Diagnostics Architecture
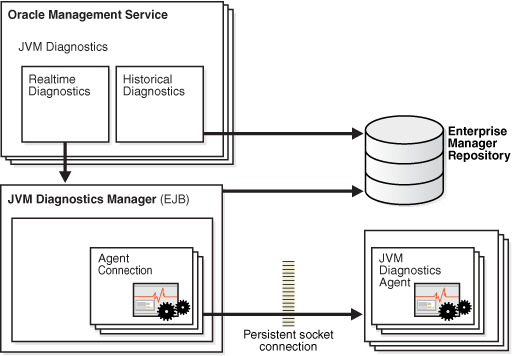
The following diagram shows the JVM Diagnostics Architecture.
The JVM Diagnostics Manager runs as an EJB on a WebLogic Server. The JVM Diagnostics Agent is deployed on the targeted JVM (E.g.: the one running a production WebLogic Server). It collects real-time data and transmits it to the JVM Diagnostics Manager. The communication between the JVM Diagnostics Manager and Agent can be a secure (SSL) or non-secure connection.
Note:
This diagram shows the deployment of a single JVM Diagnostics Manager. This is not applicable if you are deploying multiple managers as described in Scaling Out by Deploying Multiple JVM Diagnostics Managers.Prerequisites
-
The
DeployAD4Jmanager.shscript must be started from the$ORACLE_HOME/oms11g/ad4jdirectory. -
The port number specified by user to create a new managed server should not be in use.
-
You must have appropriate login credentials to access and execute the
DeployAD4Jmanager.shscript. -
One-off patch prerequisites - TBD
Deploying the JVM Diagnostics Manager
The DeployAD4Jmanager.sh script is used to deploy the JVM Diagnostics Manager. This script does the following:
-
Create (clones) the managed server from the existing OMS server.
-
Deploys the
jammanager.earfile on the new managed server.
This section describes the following:
Running the DeployAD4Jmanager.sh Script
To install the JVM Diagnostics Manager, follow the steps given below:
-
Run the
DeployAD4Jmanager.shscript from the command prompt:$ ./DeployAD4JManager.shYou will see the following:
Welcome to AD4J Manager Installation script
Please follow the guided instructions to install AD4J manager
Setting up environment variables
Environment variable used in the script:
ORACLE_HOME=/u01/atejaswy/Oracle/Middleware/oms11g
MW_HOME=/u01/atejaswy/Oracle/Middleware
WL_HOME=/u01/atejaswy/Oracle/Middleware/wlserver_10.3
MODULES_DIR=/u01/atejaswy/Oracle/Middleware/modules
Delete previous existing ad4j directory..
Done
Unzipping ad4j.zip.....
Archive:  ad4j.zip
creating: ad4j/
inflating: ad4j/ad4jjobtype.xml
inflating: ad4j/jamagent.war
inflating: ad4j/jamagent.ear
-
You are now prompted for the WebLogic Server host name. Press Enter to select the default values. The following prompts are displayed:
Enter weblogic host name:
Enter the host name or the IP address of the machine on which the WebLogic server is running.
Is secured connection (uses https)? [Default:[y]es]
Press Enter to indicate that it is a secure connection.
Enter weblogic ssl port number
Enter the ssl(https) port number if user selects https, otherwise its http port number.
Enter weblogic admin username
Enter the name of the admin user.
Enter weblogic admin password
Enter the password for the admin user.
-
The WebLogic server details that you have selected are displayed. You are then prompted for the details of the new managed server. Press Enter to accept the default values. The following prompts are displayed:
Enter managed server name:
Enter the name of the new managed server. The default name is
EMAD4JMANAGER.Enter managed server machine name:
Enter the name of machine on which managed server is to be created. The default is
EMGC_MACHINE1.Enter managed server listen address
Enter the listen address of the managed server. The default is the name of the current machine.
Enter managed server listen port
Enter the user configured port number for the managed server. The default value is 3800.
Enter managed server SSL listen port
Enter the user configured ssl port number for the managed server. The default value is 3801.
Enter existing OMS server name
Enter the name of the OMS server.
Enter existing EMGC_DOMAIN path
Enter the location of the EM domain.
Enter existing INSTANCE_HOME path
Enter the directory in which the OMS server has been installed.
Do you want secure communication between AD4J Agent and AD4J Manager (y/n) [Default:n]
Enter Y if secure communication should be supported.
-
If you enter Y, you are prompted for the following:
Enter the absolute location of the wallet
Enter the complete path of the wallet including the wallet name.
Enter wallet password
Enter the password for the wallet. This will ensure that there is secure communication between the JVM Diagnostics Agent and the JVM Diagnostics Manager.
-
You are prompted to continue with the installation as follows:
Do you wish to continue with the installation of AD4J Manager (y/n) [Default:y]
Press Enter to continue. The following details are displayed:
Initializing WebLogic Scripting Tool (WLST) ...

Welcome to WebLogic Server Administration Scripting Shell

Type help() for help on available commands

Deployment Summary:
 WEBLOGICHOSTNAME dadvmi0105
 WEBLOGICPORTNUMBER: 7101
 USERNAME: weblogic
 MACHINENAME: EMGC_MACHINE1
 ORACLEHOME: /u01/atejaswy/Oracle/Middleware/oms11g
 WLHOME: /u01/atejaswy/Oracle/Middleware/wlserver_10.3
 MODULEHOME: /u01/atejaswy/Oracle/Middleware/modules
 SERVERNAME ad4jmanager
 LISTENADDRESS dadvmi0105
 LISTENPORT 3800
 SSL LISTENPORT 3801
 Connecting to t3s://dadvmi0105:7101 with userid weblogic ...
 Successfully connected to Admin Server 'EMGC_ADMINSERVER' that belongs to
 domain 'EMGC_DOMAIN'.
 Location changed to edit tree. This is a writable tree with
 DomainMBean as the root. To make changes you will need to start
 an edit session via startEdit ().
 For more help, use help(edit)
 You already have an edit session in progress and hence WLST will
 continue with your edit session.

 Started edit session, please be sure to save and activate your
 changes once you are done.
 Saving all your changes ...
 Saved all your changes successfully.
 Activating all your changes, this may take a while ...
 The edit lock associated with this edit session is released
 once the activation is completed
 Activation completed
 Starting server ad4jmanager
 ................................................................
......................................
Server with name ad4jmanager started successfully
Deploying application from
/u01/atejaswy/Oracle/Middleware/oms11g/ad4j/./ad4j/jammanager.ear to targets
ad4jmanager (upload=false) ...
<Jan 8, 2010 6:33:16 AM PST> <Info> <J2EE Deployment SPI> <BEA-260121>
<Initiating deploy operation for application, ad4jmanagerapp [archive:
/u01/atejaswy/Oracle/Middleware/oms11g/ad4j/./ad4j/jammanager.ear], to
ad4jmanager .>
.......................Completed the deployment of Application with status
completed
Current Status of your Deployment:
Deployment command type: deploy
Deployment State       : completed
Deployment Message     : no message
Exiting WebLogic Scripting Tool.
The JVM Diagnostics Manager has now been installed. To start using this feature, follow these steps:
-
Login to Enterprise Manager Grid Control.
-
Click Targets and the Middleware tab to navigate to the Middleware page.
-
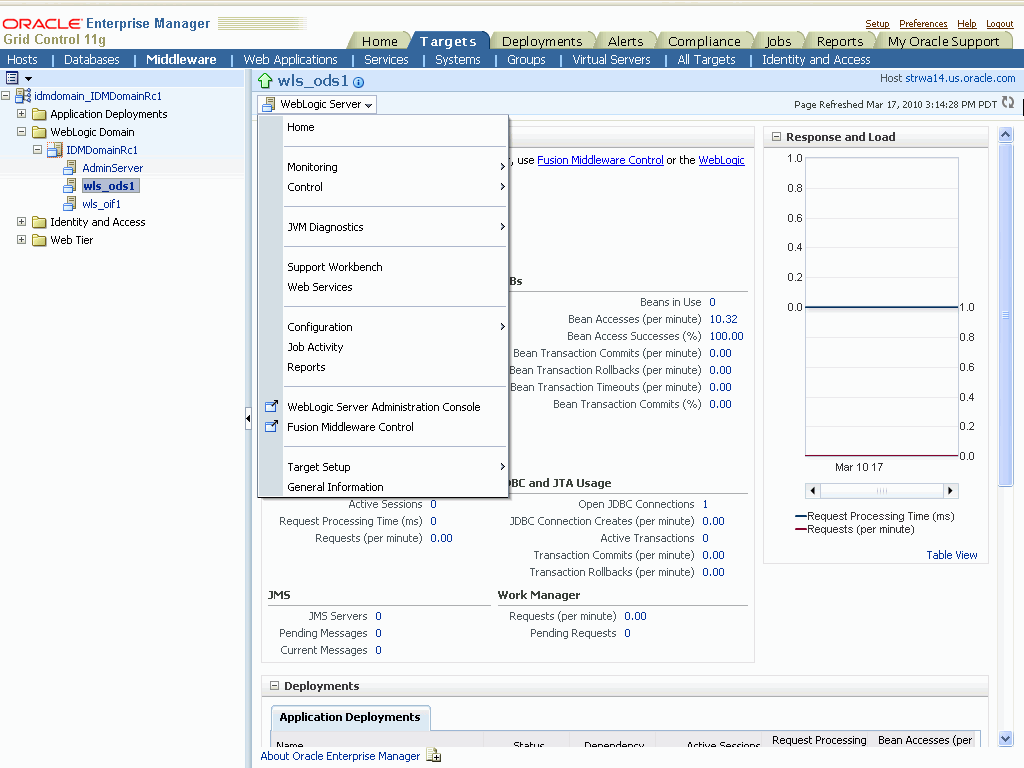
Click on a WebLogic Domain target in the list. The following screen is displayed.
-
To start using JVM Diagnostics, select the JVM Diagnostics option from the WebLogic Domain drop-down menu and choose the appropriate option.
Deploying the JVM Diagnostics Agent on 64-bit JVMs
The JVM Diagnostics Manager can be deployed on 32-bit JVMs. If you try to deploy the JVM Diagnostics Manager on a 64-bit JVM, the jammanager.ear will fail and you will see this error:
JAM Console: Only 32 bit JAM Console: Only 32 bit JVM is supported. The shared lib
might not be loaded on this platform
>>java.library.path: /scratch/skbalakr/Oracle/Middleware/oms11g/lib
JAM Console: loadNative Exception loading [/tmp/libJamConsole.so.1]
/tmp/libJamConsole.so.1: ld.so.1: java: fatal:
/tmp/libJamConsole.so.1: wrong ELF class: ELFCLASS32 (Possible cause: architecture
word width mismatch)
java.lang.UnsatisfiedLinkError: /tmp/libJamConsole.so.1: ld.so.1: java: fatal:
/tmp/libJamConsole.so.1: wrong ELF class:
ELFCLASS32 (Possible cause: architecture word width mismatch)
at java.lang.ClassLoader$NativeLibrary.load(Native Method)
at java.lang.ClassLoader.loadLibrary0(ClassLoader? .java:1778)
at java.lang.ClassLoader.loadLibrary(ClassLoader? .java:1674)
at java.lang.Runtime.load0(Runtime.java:770)
at java.lang.System.load(System.java:1003)
at oracle.sysman.e2e.model.ad4j.remote.Jam.init(Jam.java:597)
at
oracle.sysman.e2e.model.ad4j.remote.servlet.AD4JManagerServlet.init(AD4JManagerSe
rvlet? .java:38)
To resolve this issue, you must change the value of the JAVA_VM variable as follows:
-
Open the
<DOMAIN_HOME>/bin/startWeblogic.shfile. -
Change value of
JAVA_VMenvironment variable to-d32. -
Run the
jammanager.earfile again to deploy JVM Diagnostics Manager.
Scaling Out by Deploying Multiple JVM Diagnostics Managers
You can now deploy multiple JVM Diagnostics Managers and connect one or more agents to these managers. You can add a new JVM Diagnostics Manager by running the DeployAD4JManager.sh script on Unix and DeployAD4Manager.cmd on Windows. When you run the DeployAD4JManager.sh script, steps 1 to 3 as documented in the Running the DeployAD4Jmanager.sh Script section are executed. After you enter the SSL listen port for the managed server, you will see the following prompt:
Enter an available port at which jammanager should listen [JamConsPort]:[3600]
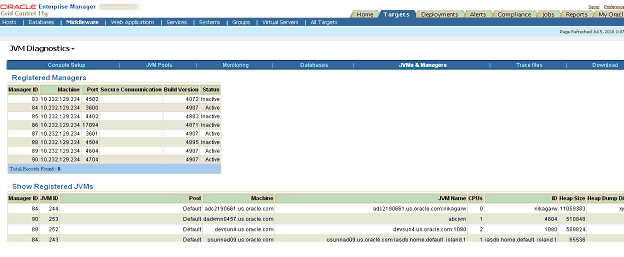
Specify the listen port number for the JVM Diagnostics Manager. This is 3600 by default but can be changed. After entering the port number, continue with the rest of the steps as documented in Running the DeployAD4Jmanager.sh Script to deploy the JVM Diagnostics Manager. After it has been deployed, you can check the status by clicking Setup > JVMs & Managers. Figure 9-3, "Registered Managers Page" is displayed.
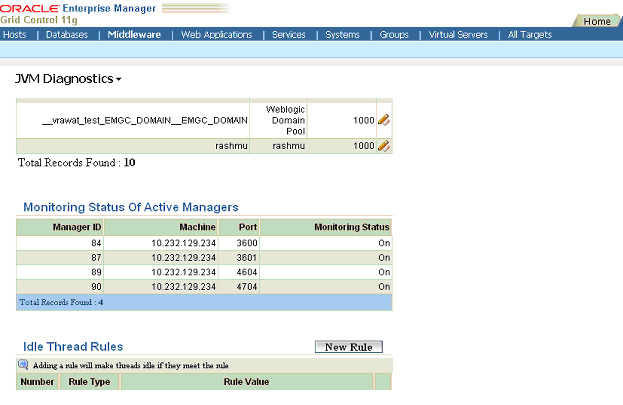
You can see a list of all the JVM Diagnostics Managers and their current status on this page. You can also see the list of JVMs connected to each manager. To view the monitoring status of each manager, click Setup > Monitoring. Figure 9-4, "Monitoring Page" is displayed.
A list of active managers with their monitoring status is displayed. The status of all the managers must be the same (on or off).
Deploying the JVM Diagnostics Agent
You can deploy the JVM Diagnostics agent manually or by using the automated deployment procedure.
Automated Deployment Procedure
To deploy the JVM Diagnostics Agent, follow these steps:
-
Select a WebLogic Domain target on the Middleware page.
-
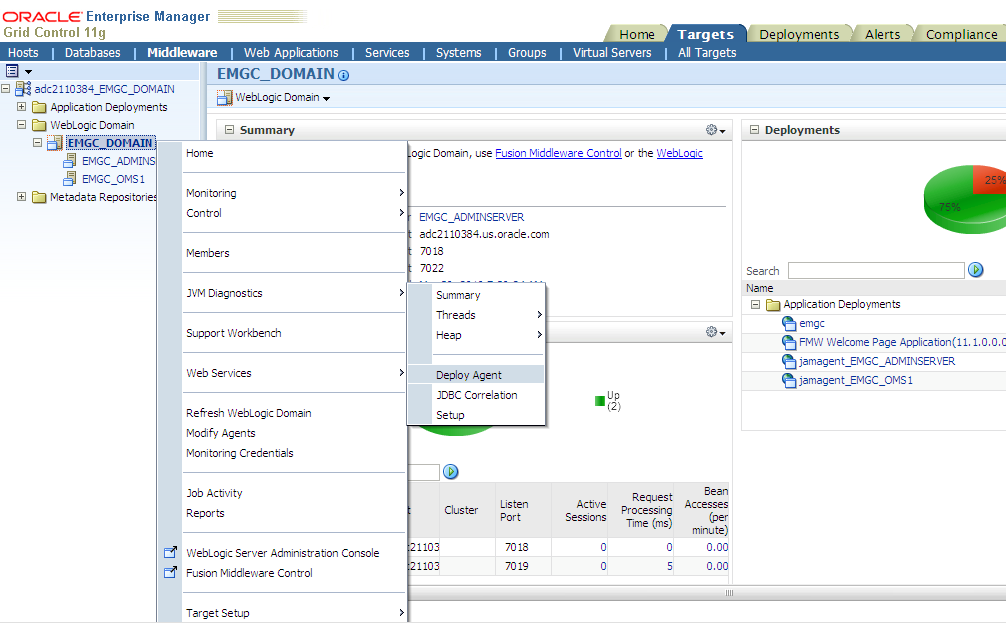
Select the JVM Diagnostics option in the drop-down list and click Deploy Agent as shown below.
-
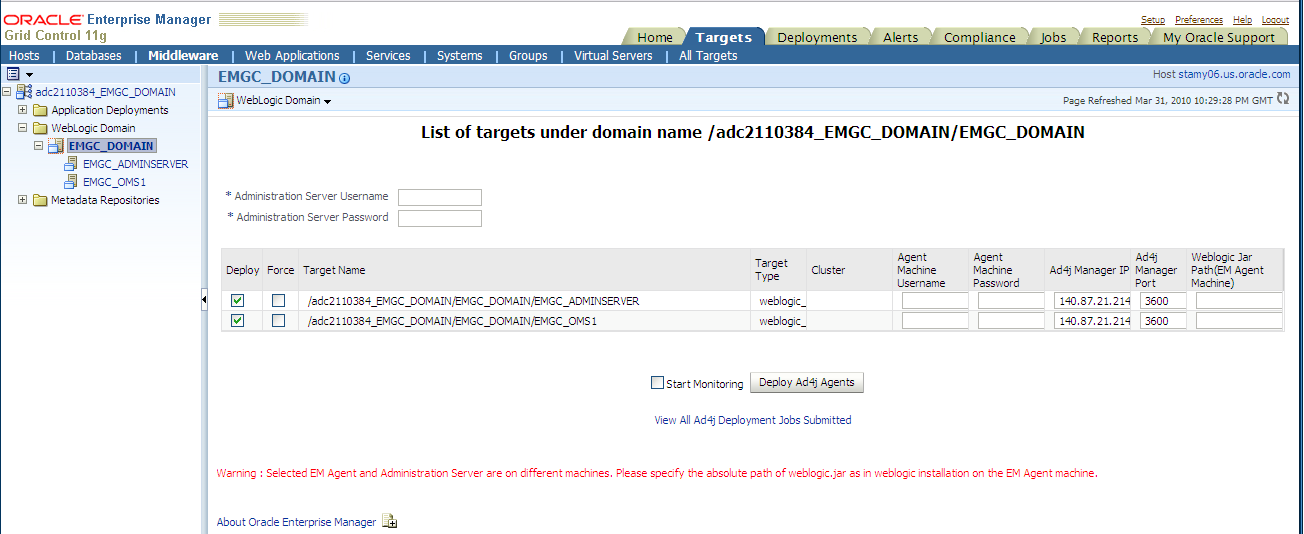
The following screen is displayed.
-
Enter the user name and password for the Administration Server.
-
Check the Deploy checkbox to select the agents that are to be deployed and click Deploy AD4J Agents to deploy them.
Manual Deployment Procedure
To deploy the JVM Diagnostics Agent manually, follow these steps:
-
Navigate to the Setup > Download > Java Agent page.
-
Download the JVM Diagnostics Agent and deploy it manually onto the target JVM or Application Server.
Installing the JVM Diagnostics Agent on Standalone Java Applications
This section describes the procedure to install the JVM Diagnostics Agent on Standalone Java Applications. Before you install the agent, you must have installed and configured the JVM Diagnostics Console. To install the agent, you must do the following:
-
Include the
jamagent.warin theCLASSPATH. See Adding the JVM Diagnostics Agent Libraries, Classes to Classpath. -
Change the java call to call the
jamagent.jamrunwrapper class. The wrapper class is required to monitor and diagnose Java programs that do not have a way of loading a servlet or another class. The following sections describe the original and modified java call: -
Customize the JVM Diagnostics Agent and specify the parameters as described in Customizing the JVM Diagnostics Agent.
Original Java Call
java $JVM_OPTIONS $TARGET_CLASS $TARGET_CLASS_PARAMS
Here, JVM_OPTIONS are the JVM properties and options.
For example:
-Xmx512M -Dweblogic.name
TARGET_CLASS is the program which being examined
TARGET_CLASS_PARAMS are parameters passed to the class
The idea is to run the target program through jamagent.jamrun. This is done by calling the jamagent.jamrun.
Modified Java Call with JVM DIagnostics Agent
java $JVM_OPTIONS jamagent.jamrun [$JAMAGENT_PARAMS_LIST] $TARGET_CLASS $TARGET_CLASS_PARAMS
JVM Diagnostics uses default parameters. If you want to change any parameters, you can specify them as name=value pairs. To specify a different console and port, enter the following command:
jamconshost=<console hostname>, jamconsport=<console port>
To run the JVM Diagnostics Agent, you need to edit the script which starts your program. You are not required to do anything with the target program parameters as they are picked up and passed along to the program by jamrun.
Sample Configuration
In this example, the MainClass is being called and the steps to edit the Java Call are shown below:
"$JAVA_HOME/bin/java" ${JAVA_VM} ${MEM_ARGS} ${JAVA_OPTIONS} com.example.MainClass
The class being called is com.example.MainClass. There are no parameters. Insert the class and parameters before the class as follows:
"$JAVA_HOME/bin/java" ${JAVA_VM} ${MEM_ARGS} ${JAVA_OPTIONS} jamagent.jamrun com.example.MainClass
If you want to change some JVM Diagnostics parameters, you can specify them as:
"$JAVA_HOME/bin/java" ${JAVA_VM} ${MEM_ARGS} ${JAVA_OPTIONS} jamagent.jamrun jamconshost=myconsole01 jamisdaemon=true jamjvmid=3001 com.example.MainClass
Refer to the Frequently Asked Questions section for more details on setting the jamisdemon parameter.
Adding the JVM Diagnostics Agent Libraries, Classes to Classpath
You also need to add the jamagent.war directory to the CLASSPATH. Preferably, you must add this before the call to java.
Here we find a couple of lines above the call to Java.
CLASSPATH="example1.jar:example2.jar
You can add the jamagent.war file to the CLASSPATH by adding the following line before the original Java call.
CLASSPATH=${CLASSPATH} : /opt/jamagent/jamagent.war
Customizing the JVM Diagnostics Agent
The JVM Diagnostics Agent WAR file contains an embedded web.xml deployment descriptor. This file contains the default values of the JVM Diagnostics Agent input parameters. You can change the parameters if you want. To do so, extract the web.xml file from the WAR archive and then update it.
To explode or update the WAR file, do the following:
-
To extract the
web.xmlfile from the WAR archive, run the following command:jar xvf jamagent.war WEB-INF/web.xml -
Edit the
web.xmlfile with your custom values for input parameters in any text editor. You may only change the values within the <param-name> fields of this file. No other changes are supported. -
Run the following command to place the new
web.xmlfile back into the archive:jar uvf jamagent.war WEB-INF/web.xml -
To remove the newly created directory, run the following command:
rm -rf WEB-INF
The following are the JVM Diagnostics Agent parameters.
Table 9-1 Oracle JVM Diagnostics Agent Parameters
| Parameter | Default | Description |
|---|---|---|
|
jamconshost |
localhost |
The server where console is running. |
|
jamconsport |
3600 |
The port where the console is listening for the agents. |
|
jamjvmid |
Application Server Port or 5555 |
Identifies the specific JVM on the console when you have multiple JVMs on the same machine. For most app servers, this identifier is the port which the server is listening on (Web Server Port for Weblogic, Jserv port for Apache). If the application server port cannot be discovered then this value is used. |
|
jamconsretr |
90 |
If the console goes down, the agent will keep trying to reconnect. This parameter specifies the duration in seconds between each attempt. The default value is 90 seconds (15 minutes) between each try. If this parameter is set to 0, then the agent will not try to reconnect. |
|
jamtimeout |
300 |
Maximum time duration for a request. If a request takes longer time than this timeout, it is terminated. |
|
jamloglevel |
3 |
Level of logging. Valid values range from 1 to 5. |
|
jammaxbackoff |
10 |
Some times we wait for other operations to finish (like GC or main thread initialization). The amount of sleep time between the retries increases exponentially till this number. When this number is reached, we give up and return with failure. |
|
jamdelaystartup |
0 |
This parameter is only for standalone programs. If you want to analyze the startup behavior of a monitored program, you can use this parameter. This specifies the number of seconds to wait before starting the target program. |
|
jamisdaemon |
false |
This parameter is only for standalone programs. When using jamrun with standalone programs, the agent will normally exit when the main method in the target program completes. In some programs the threads might still be active after main completes.In such cases specify jamisdaemon=true to prevent the agent from exiting. |
Web.XML Contents
<?xml version="1.0" ?>
<!DOCTYPE web-app PUBLIC "-//ABC, Inc.//DTD Web Application 2.3//EN""http://java.sun.com/dtd/web-app_2_3.dtd">
<web-app>
<servlet>
<servlet-name>jamagent</servlet-name>
<servlet-class>jamagent.jaminit</servlet-class>
<init-param>
<param-name>jamconshost</param-name>
<param-value>localhost</param-value>
<description>Default Jam Console host</description>
</init-param>
<init-param>
<param-name>jamconsport</param-name>
<param-value>3600</param-value>
<description>Jam console port</description>
</init-param>
<init-param>
<param-name>jamconsretr</param-name>
<param-value>90</param-value>
<description>Jam console number of retries</description>
</init-param>
<init-param>
<param-name>jamtimeout</param-name>
<param-value>900</param-value>
<description>Jam console timeout</description>
</init-param>
<init-param>
<param-name>jamloglevel</param-name>
<param-value>3</param-value>
<description>Jam log level</description>
</init-param>
<init-param>
<param-name>jammaxbackoff</param-name>
<param-value>10</param-value>
<description>Max time to wait for long operations</description>
</init-param>
<init-param>
<param-name>jamjvmid</param-name>
<param-value>Aplication Server Port</param-value>
<description> Unique Identifier for JVM. It will detect and use the WLS port bydefault.</description>
</init-param>
<load-on-startup>1</load-on-startup>
</servlet>
</web-app>
Undeploying the JVM Diagnostics Agent
To undeploy the JVM Diagnostics Agent, follow these steps:
-
Log into the WebLogic Administration Console for the domain on which the JVM Diagnostics Agent is to be undeployed.
-
Navigate to the Deployments page and search for WAR deployments starting with the string
jamagent_. -
Stop the deployments that you wish to deactivate. The JVM Diagnostics Agent for these deployments will be permanently removed.
Deploying the Database Agent
To deploy the database agent, follow these steps:
-
Select a WebLogic Domain target from the Middleware page.
-
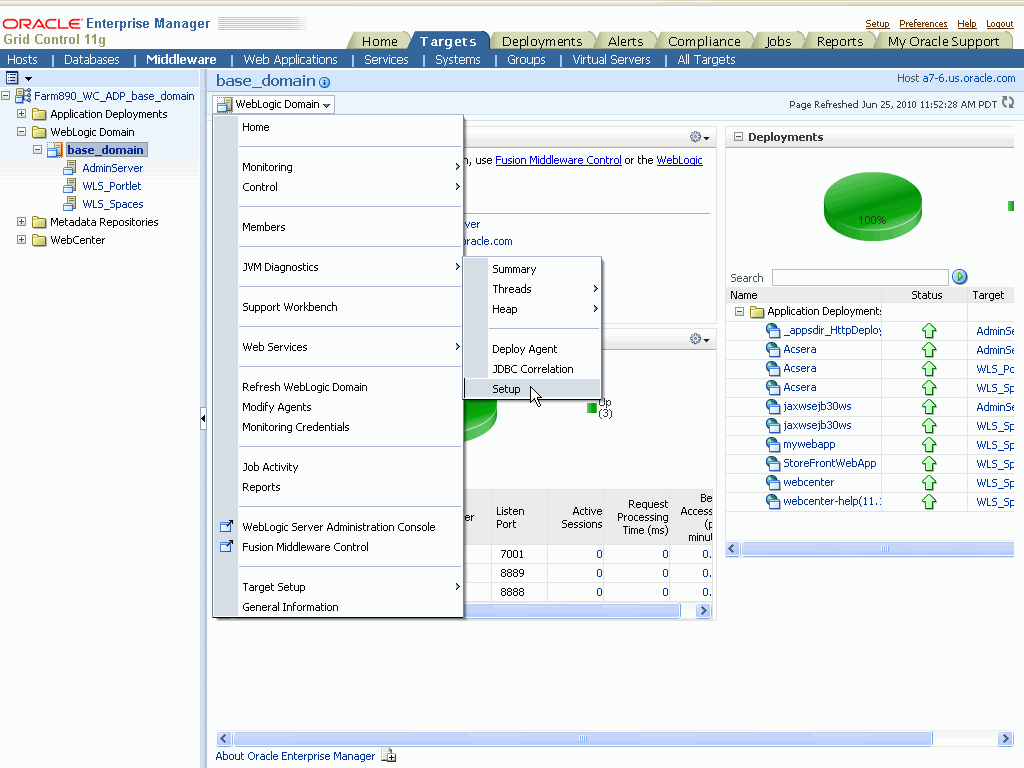
Select the JVM Diagnostics option from the drop-down list and click Setup as shown in Figure 9-7, "Setup Selection Page".
-
Click the Download tab in the Setup page. Figure 9-8, "Download Page" is displayed.
-
Download the database agent by clicking the download link for Database Agent for All Platforms.
-
After you have downloaded the database agent, return to the Setup page and click Databases.
-
As the OS user running the Oracle database, run the database agent on the machine on which the database is running. The database agent needs two parameters to be passed to it, which are:
-
the host where the console is running.
-
the port which is being used to accept connections from the agents (default value 3600).
To pass these parameters, enter the following command:
nohup dbagent jamconshost=console01 jamconsport=3600 > dbagent.log 2>&1 &You should see the following message in the
stdout.logfor the JVMD Manager's managed server (gc_inst/user_projects/domains/GCDomain/servers/EMAD4JMANAGER/logby default):JAM Console: Agent connection from 192.168.1.31:59269, [Hostname] jamdb.us.oracle.comJAM Console: Received AJDBOracle|Oracle-Sun9i|oracle|SunOS 5.8|oracle|3|0|0 Oracle AD4J Console: New DB 0Note:
To run the database agent on an AIX machine, you must-
Login as
rootuser and run the database agent. -
Ensure that the
setuidbit for the database agent is set to run as therootuser.
-
-
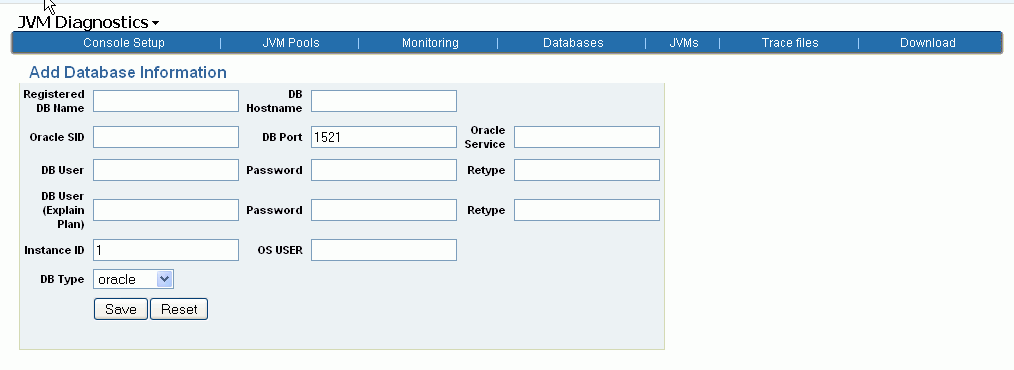
In the Databases page, click Register New DB. Figure 9-9, "Add Database Information Page" is displayed.
-
Specify the information required to register the database.
-
The OS user you specify here must be the same as the OS user running the database agent.
-
The OS user must have full database privileges and appropriate environment settings including the SID and path binaries.
-
The DB User must be the same as the user running the application being monitored.
Note:
Multiple registrations may be necessary for a single database agent if different database users are running multiple applications.
-
-
After the database agent has been registered, the JVM Diagnostics Manager will start monitoring the cross-tier JVM calls between applications being monitored for a particular JVM and the underlying database.
Creating a Special Repository User for Loading JVM Diagnostics Heaps
To create a special Enterprise Manager repository user who can load JVM Diagnostics Heaps to the repository, follow these steps:
Note:
This is an optional step and can be used to create less privileged users who can load heaps using the loadheap script.-
Run the
create_jvm_diagnostic_db_user.shscript from the command prompt$ ./create_jvm_diagnostic_db_user.sh
-
You will see a message prompting you to continue with the user creation. Enter Y to continue. The following prompts are displayed:
Enter Database Host Machine Name or IP address:[localhost]:
Enter the host name or the IP address of the machine on which the database has been installed.
Enter Database Port on "localhost":[1521]
Enter the database port number as 25062.
Enter ORACLE_SID for database on "localhost":[s0222]
Enter the Oracle system identifier for the database.
Enter database admin user name:[SYSTEM]
Enter the name of the database administration user.
Enter "SYSTEM" user password:
Enter the password for the database administrator.
Enter JVM Diagnostics database username:[JVMDIAG]
Enter the user name for the JVM Diagnostics Administrator being created.
Enter "JVMDIAG" user password:
Enter the password for the JVM Diagnostics Administrator. You are then prompted to re-enter the password. After you have re-entered the password, you will see the following:
Creating Database user "JVMDIAG" ....
Database user "JVMDIAG" created
Public synonyms would be created for following database objects:
Tables
1) JAM_HEAPREL
2) JAM_HEAPOBJ
3) JAM_HEAPUSAGE
4) JAM_HEAPROOTS
5) JAM_HEAPROOTREL
6) JAM_HEAPOBJSUM
7) JAM_HEAPSNAP
-
You are prompted to continue with the setup. Press Enter to continue. You will see the following:
Required privileges granted
JVM Diagnostics Database User "JVMDIAG" created
Now onwards, to load heap, use "JVMDIAG" user
