Oracle® Enterprise Manager
System Monitoring Installation Guide for Oracle Exadata Healthchecks Plug-in
Release 11.1.0.4.0
E23441-03
May 2012
Overview of the Oracle Exadata Healthchecks Plug-in
The Oracle Exadata Healthchecks plug-in is a set of metrics that process the XML output from the Exachk tool, which is included as part of Oracle Enterprise Manager system monitoring. The Exachk tool provides functionality for system administrators to automate the assessment of Exadata V2, X2-2, and X2-8 systems for known configuration problems and best practices.
The Oracle Exadata Healthchecks plug-in bundle consists of the following files:
-
A Healthchecks Plug-in XML parser utility Perl script to parse the results XML file from Exachk and return the output in "em_result" format that can be processed by EM Metric Engine:
agent_home/sysman/admin/scripts/emx/oracle_exadata_hc/*.pl
-
A metadata XML file to define the new Target Type and Metrics:
agent_home/sysman/admin/metadata/oracle_exadata_hc.xml
-
A Default Collections XML file to define the schedule, which is the time interval for the data collection of metrics:
agent_home/sysman/admin/default_collection/oracle_exadata_hc.xml
It also contains the logic for raising the alerts depending on results from Exachk, and the messages to be shown for alerts.
-
A template file to disable all Alerts:
oracle_exadata_hc_no_alert.xml
-
A Report SQL file to define a new Report, which will be created during the jar deployment:
agent_home/sysman/admin/scripts/emx/oracle_exadata_hc/oracle_exadata_hc_reports.sql
System Requirements
The following prerequisites must be met before you can deploy the plug-in:
-
Review Oracle Exadata Best Practices (MOS Note 757552.1) and Oracle Database Machine Monitoring Best Practices (MOS Note 1110675.1).
These documents provide a collection of articles related to best practices for the deployment of Oracle Database Machine and Exadata Storage Server. They are available on My Oracle Support (log in required):
https://support.oracle.com
-
Verify and enable the Exachk tool. See MOS Note 1070954.1 to download the Exachk tool bundle. For more information on enabling the Exachk tool, refer to Configuring the Exachk Tool to Run Automatically.
Note:
The Oracle Exadata Healthchecks plug-in can only be used with Exachk tool release 2.1.4 and above. Make sure you are using the the correct version of the Exachk tool. To check the version:./exachk -v
-
Oracle Enterprise Linux release 5.3 or later.
Deploying the Oracle Exadata Healthchecks Plug-In
After you ensure that the prerequisites are met, follow these steps to deploy the plug-in to the appropriate Management Agents.
-
Download the Oracle Exadata Healthchecks Plug-in archive file to your desktop or computer on which the browser is launched. You can download the archive from Oracle Technology Network (OTN):
http://www.oracle.com/technetwork/oem/grid-control/downloads/devlic-188770.html
-
Log in to Enterprise Manager Grid Control as SYSMAN.
-
Click Setup from the upper-right-corner of the Grid Control Home page, then click Management Plug-ins from the left-side menu of the Setup page.
-
Click Import.
-
Click Browse. Navigate to the directory where you have downloaded the plug-in JAR file. Select the JAR file, then click OK.
-
Click List Archive. The plug-ins within the selected JAR file appear in a list.
-
Select the check box for the Exadata Exachk Plug-in and click OK.
-
Verify that you have set preferred credentials on all Agents where you want to deploy the plug-in.
-
In the Management Plug-ins page, click the icon in the Deploy column for the plug-in.
The Deploy Management Plug-in wizard appears.
-
Click Add Agents.
-
Select Agent from the Target Type pull-down menu.
-
Select the Agent(s) (that is, the first compute node on the Exadata system) you want to deploy the plug-in to, then click Select.
-
Click Next, then Finish. The plug-in is deployed to the selected Agents.
If you see an error message stating that the preferred credential is not set up, go to the Preferences page and add the preferred credentials for the Agent target type. To go to the Preferences page, click Preferences from the top-right corner of the Grid Control page.
-
Click on Agents on the Setup page. On the Management Agents page, select the agent on which the Plug-in is deployed.
-
From the Add pull-down menu, create a target instance of
oracle_exadata_hc. Click GO. Specify the name for the target instance and set the following values for the instance properties:-
Exacheck Installed Directory = < specify the path of the exachk output directory >
-
Max interval allowed (in days) between consecutive Exachk runs = 31
-
-
By default, the Exachk Healthchecks Plug-in is set to run hourly. You can update the Default Collections XML file to set a schedule for when you want the Exachk Plug-in to run.
Upgrading to a New Version of the Plug-in
No additional steps are required to upgrade to the newer version of the Oracle Exadata Healthchecks plug-in.
Import the plug-in archive in the same way as done for the older version. Both versions of the plug-in would then be visible in the list of imported plug-ins (see step 6 of Deploying the Oracle Exadata Healthchecks Plug-In).
On deployment of the new version of the Oracle Exadata Healthchecks plug-in onto the agent where the older version is already deployed, the target instances are automatically set inline for the new version.
Prerequisite for Executing the Exachk Tool
The following environment variables should be set up before executing the Exachk tool (all three modes: -a, -s, -S):
-
To enable copying of results files on all the nodes in the cluster:
export RAT_COPY_EM_XML_FILES=1
-
Specify the exachk output path. The result files will be copied to this location on all the nodes in the cluster:
export RAT_OUTPUT = [exachk output directory]
Note:
The exachk output directory should exist on all nodes of the cluster.
Configuring the Exachk Tool to Run Automatically
See MOS Doc 1070954.1 to download the Exachk tool bundle from My Oracle Support:
https://support.oracle.com
The Exachk tool should be run in "silent" mode using the -S option. Refer to Frequency of Running the Exachk Tool to schedule the Exachk execution.
Using the "-S" Command Line Option
Configure the SSH user equivalence for the RDBMS software owner (for example, oracle) from execution database server to oracle user all other database servers (mandatory). To validate a proper SSH user equivalence configuration, log in as the RDBMS software owner (for example, oracle) and execute the following commands:
$ ssh -o NumberOfPasswordPrompts=0 -o StrictHostKeyChecking=no -l oracle dbServerName "echo \"oracle user equivalence is setup correctly\""
-
Where
oracleis the RDBMS software owner anddbServerNameis the database server hostname. Repeat for each database server. -
If "Permission denied (publickey,gssapi-with-mic,password)" is returned, then the SSH user equivalence is not properly configured.
Note:
In the current version of the Exachk tool regardless of option (-S), NO InfiniBand switch checks will be performed. A future release of the Exachk tool may provide silent support for InfiniBand switches.Frequency of Running the Exachk Tool
The Exachk tool should be run in the following scenarios:
-
Once a month on a regular basis.
-
After taking corrective actions for the failures reported by the Exachk tool.
Metrics Collected
The checks executed by the Exachk tool are placed under the metric ExadataResults.
You can also evaluate the metrics any time by running the following command:
./emctl control agent runCollection <targetName>:oracle_exadata_hc ExadataResults
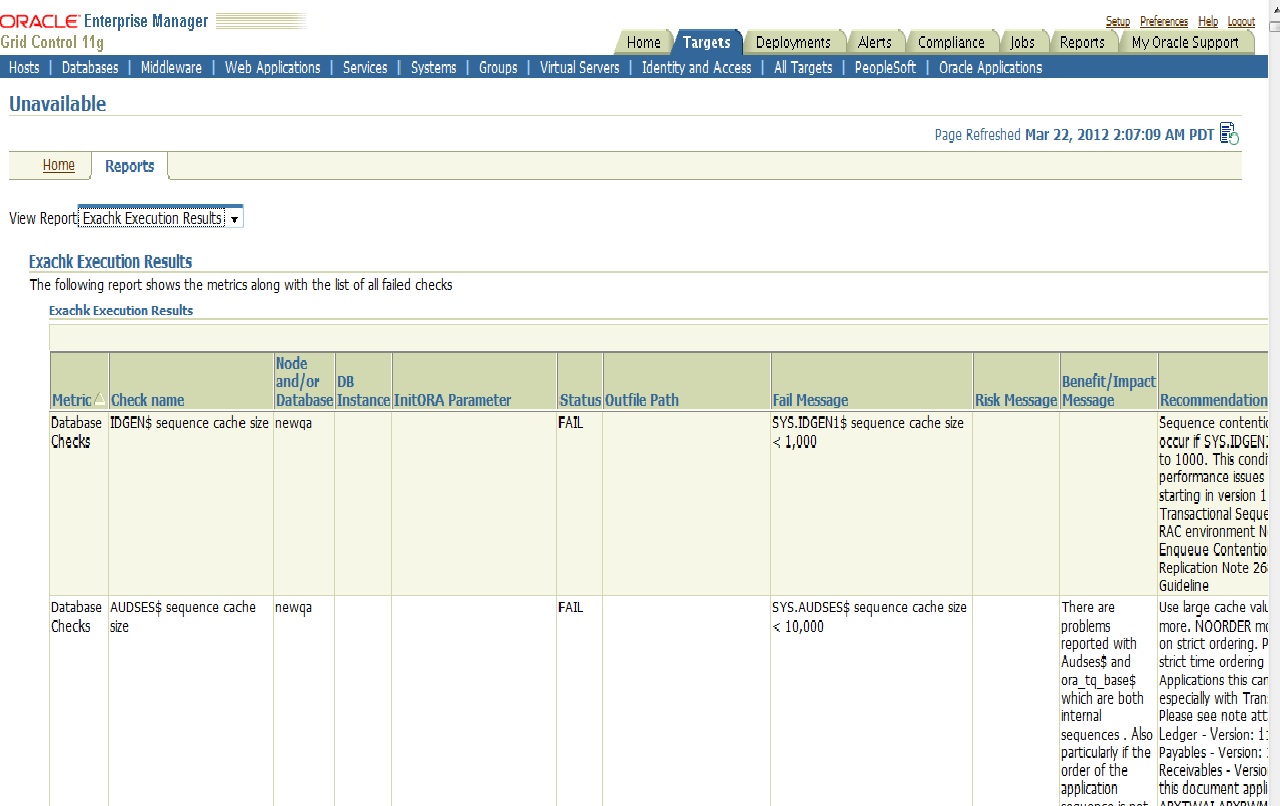
Reports
A Reports sub-tab will be visible in the target's home page. On navigating to the sub-tab, a report titled "Exachk Execution Results" can be found. This report lists all the metrics along with the failed checks, irrespective of whether the alert is raised or not.
This Report is bundled along with the jar and will be created in the OMS during jar deployment. Figure 1 shows an example:
Alerts
By default, the Oracle Exadata Healthchecks plug-in is designed to raise alerts for the following checks only:
-
Verify Disk Cache Policy on database server.
-
Verify Disk Cache Policy on Storage Server.
-
Verify database server disk controllers use writeback cache.
-
Verify RAID Controller Battery Condition [Storage Server].
-
Verify RAID Controller Battery Condition [Database Server].
-
Verify RAID Controller Battery Temperature [Database Server].
-
Verify RAID Controller Battery Temperature [Storage Server].
-
Verify Database Server Virtual Drive Configuration.
-
Verify Database Server Physical Drive Configuration.
Disable Alerts Using the Monitoring Template
Apply the oracle_exadata_hc_no_alert.xml template to disable alerts for all checks executed by the Exachk tool:
This template can be downloaded from the Exadata Healthchecks Plug-in. The template file oracle_exadata_hc_no_alert.xml can be extracted from the template.zip file present in the plugin bundle. Run the following commands to import and apply the template from the OMS location in which "emcli" is installed:
-
To import a template:
./emcli import_template -files="<location_of_the_template>"
-
To apply a template for a single target:
./emcli apply_template -name="Template_name" -targets="<target_name>:<target_type>" -copy_flags="1"
To apply the Oracle-provided templates using the OMS user interface:
-
Log in to Enterprise Manager Grid Control as SYSMAN.
-
Click Setup from the upper right corner of the home page. Click Monitoring Templates from the list on the left side in the setup home page.
-
Select the check box to enable search to "Display Oracle-provided templates." Search for the Oracle-provided template named Oracle Exadata Healthchecks No Alerts.
-
Select the radio button next to the template name and click Apply.
-
In the Apply Monitoring Template screen, click Add and select the targets on which you wish to apply this template. Click OK.
Disable a Specific Alert
To disable a specific alert:
-
Select the Metric and Policy Settings option in the target homepage.
-
In the Metric and Policy Settings page, update the value for the Critical Threshold column as NOALERT or to blank.
Define a Monitoring Template
To define your own monitoring template and enable alerts for checks:
-
Identify the Check ID of the check you want to be alerted of. For the check name you want to set up an alert, get the corresponding Check ID from the Exachk Execution Results report.
-
Click Setup from the upper-right-corner of the Grid Control home page, then click Monitoring Templates from the list on the left side in the Setup home page.
-
Click the Create button. In the next screen, you will be prompted to select a target instance for which to create the template for. Select the Oracle Exadata Healthcheck target instance that you have set up.
-
In the General tab of the Create Monitoring Template screen, enter a template name and description.
-
In the Metric Threshold tab of the Create Monitoring Template screen, click Edit (pencil icon) next to the Collection Schedule column of Exadata Healthchecks metric in list displayed. This will redirect to the Edit Advance Settings: Status page.
-
Make the necessary changes here for the Advanced Threshold Settings and continue. These changes can also be made in the list displayed in the Metric Threshold Tab. After making all the changes, click OK to save it.
-
In the Monitoring Templates screen, select the radio button next to the template you created and click Apply.
-
In the Apply Monitoring Template screen, click Add and select the targets on which you wish to apply this template. Click OK.
Documentation Accessibility
For information about Oracle's commitment to accessibility, visit the Oracle Accessibility Program website at http://www.oracle.com/pls/topic/lookup?ctx=acc&id=docacc.
Oracle customers have access to electronic support through My Oracle Support. For information, visit http://www.oracle.com/pls/topic/lookup?ctx=acc&id=info or visit http://www.oracle.com/pls/topic/lookup?ctx=acc&id=trs if you are hearing impaired.
System Monitoring Installation Guide for Oracle Exadata Healthchecks Plug-in, Release 11.1.0.4.0
E23441-03
Copyright © 2012, Oracle and/or its affiliates. All rights reserved.
This software and related documentation are provided under a license agreement containing restrictions on use and disclosure and are protected by intellectual property laws. Except as expressly permitted in your license agreement or allowed by law, you may not use, copy, reproduce, translate, broadcast, modify, license, transmit, distribute, exhibit, perform, publish, or display any part, in any form, or by any means. Reverse engineering, disassembly, or decompilation of this software, unless required by law for interoperability, is prohibited.
The information contained herein is subject to change without notice and is not warranted to be error-free. If you find any errors, please report them to us in writing.
If this is software or related documentation that is delivered to the U.S. Government or anyone licensing it on behalf of the U.S. Government, the following notice is applicable:
U.S. GOVERNMENT RIGHTS Programs, software, databases, and related documentation and technical data delivered to U.S. Government customers are "commercial computer software" or "commercial technical data" pursuant to the applicable Federal Acquisition Regulation and agency-specific supplemental regulations. As such, the use, duplication, disclosure, modification, and adaptation shall be subject to the restrictions and license terms set forth in the applicable Government contract, and, to the extent applicable by the terms of the Government contract, the additional rights set forth in FAR 52.227-19, Commercial Computer Software License (December 2007). Oracle America, Inc., 500 Oracle Parkway, Redwood City, CA 94065.
This software or hardware is developed for general use in a variety of information management applications. It is not developed or intended for use in any inherently dangerous applications, including applications that may create a risk of personal injury. If you use this software or hardware in dangerous applications, then you shall be responsible to take all appropriate fail-safe, backup, redundancy, and other measures to ensure its safe use. Oracle Corporation and its affiliates disclaim any liability for any damages caused by use of this software or hardware in dangerous applications.
Oracle and Java are registered trademarks of Oracle and/or its affiliates. Other names may be trademarks of their respective owners.
Intel and Intel Xeon are trademarks or registered trademarks of Intel Corporation. All SPARC trademarks are used under license and are trademarks or registered trademarks of SPARC International, Inc. AMD, Opteron, the AMD logo, and the AMD Opteron logo are trademarks or registered trademarks of Advanced Micro Devices. UNIX is a registered trademark of The Open Group.
This software or hardware and documentation may provide access to or information on content, products, and services from third parties. Oracle Corporation and its affiliates are not responsible for and expressly disclaim all warranties of any kind with respect to third-party content, products, and services. Oracle Corporation and its affiliates will not be responsible for any loss, costs, or damages incurred due to your access to or use of third-party content, products, or services.