| Oracle® Adaptive Access Manager Administrator's Guide Release 10g (10.1.4.5) Part Number E12055-03 |
|
|
View PDF |
| Oracle® Adaptive Access Manager Administrator's Guide Release 10g (10.1.4.5) Part Number E12055-03 |
|
|
View PDF |
A model is a collection of configured rule instances linked to User ID groups whose members are evaluated. Adaptive Risk Manager enables you to create models that can be applied to more than one User ID group.
This chapter provides information about creating and editing models, importing and exporting model, and adding and customizing rules.
Oracle Adaptive Access Manager is shipped with groups, models and rules preconfigured. These models are set up using best practices for the client's specific industry and needs.
Model Runtime refers to the point during the session the rules in a model should be evaluated. By default there are eleven model Runtimes in Adaptive Risk Manager Online:
Note:
"In-Session models often require custom integration and therefore configuration is not covered as part of this guide.Note:
"In-Session models are not supported in some Universal Installation Option version 1.0 installations.On the Admin menu point to Models, and then click Create Models.
The Policy Type menu appears.
In the Policy Type list, click the type of model you want.
The Runtime menu appears.
In the Runtime list, click the Runtime you want.
The Model Name menu appears.
In the Model Name list, click Create New Model.
The Create New Model page appears.
In the Model Name box, enter a name for the model.
Click in the Status box and select the status you want.
Click the Run Mode box and select the option you want.
Linking a model to a group enables the model to execute/run for the set of users within the linked group.
Run Mode provides "All Users" and "Linked Users" as options. The default is "Linked Users" in which the model will only act on that user group. The "All Users" option links a model to all users.
Note:
If there are no group linkings, but "Linked Users" have been selected, then this model will not be executed at all.Click in the Scoring Engine box and select the scoring you want.
In the Weight field, enter the weight you want.
In the Description box, enter a description of the model.
Click Save.
The Model Details page for the new model appears.
You can edit a model's general information and add or delete rules as needed
On the Admin menu point to Models and then click List Models.
The List Models page appears.
Enter the search criteria you want and click Run Query.
On the List Models page, click the name of the model you want to edit.
The Model Details page appears.
To edit the model's general information, make the changes you want at the top of the page and then click Save.
The Model Details page provides tabs to the Rules page, Manual Overrides page, and Groups Linking page.
You can use the Export and Import Models commands to export and import a model as an XML file.
To export a model:
On the Admin menu, point to Models then click Export Models.
The Export Models page appears.
Enter search criteria and click Run Query to locate the model.
Click the check box next to each model you want to export.
Click Export in the lower right corner of the page.
Click OK to the confirmation.
The Open dialog box appears.
Click Save To Disk and then click OK.
The model is exported.
The Document Models page enables you to view each model's composition. You can also print a document containing these settings.
On the Admin menu, point to Models and click Document Models.
The Document Models page appears.
To find a specific model, enter the name of the model in the Model Name field and click Run Query.
To find models with a specific Runtime, in the Runtime list, click the Runtime you want and click Run Query.
To find models with a specific policy type, in the Policy Type list, click the policy type you want and click Run Query.
To find models with a specific status, in the Model Status list, click the status you want and click Run Query.
To generate an HTML document of the rule settings in a model, select the model you want and click Generate Document.
Only one Policy Set is active and present in the system at a given time. The Policy Sets page displays the policy set used to evaluate traffic to identify possible risks. This page provides access to the Policy details page where you can specify the scoring engine and the weighting you want to use for evaluating risk.
Oracle Adaptive Access Manager uses the scoring engine to calculate the numeric score applied when calculating risk level. It then applies the weight—or multiplier value—to the score to determine its influence on the total score.
To view a list of policy sets:
On the Admin menu, point to Policy Sets and then click List Policy Sets.
The Policy Sets page appears and displays the Policy Set ID and Scoring Engine for each policy set in the system.
To view details about a policy set, click the Policy Set ID you want.
On the policy set details page you can specify the scoring engine used to calculate the score for the policy set that you want to use.
To view and edit the policy set details:
On the Admin menu, point to Policy Sets and then click List Policy Sets.
The Policy Sets page appears.
Click the Policy Set ID you want.
The Policy Set Details page appears and displays the scoring engine and the policy weights for the Policy Types included in the Policy Set. Each policy type contains all the corresponding models.
To change the policy weight, in the Scoring Engine list, select the scoring engine you want and click Save.
To view and edit the policy details for a specific policy type:
On the Policy Set Details page, click the Policy Type you want.
The Policy Details page appears.
To change the Scoring Engine, in the Scoring Engine, select the scoring engine you want.
To change the weight percentage, enter the percentage you want in the Weight field.
Click Save.
You can create an Action Override or a Score Override as a failsafe which is automatically invoked to override the action triggered by a rule when a specific set of circumstance occurs.
You can create an Action Override to specify the action to replace the action triggered by individual rule. For example, an action override, which is based on "time" and "action," can be used to limit the number of blocks or to control the number of registrations with a specified timeframe.
Note:
If a user/device/IP is already presented with the action in the given duration, it continues to get the same action and override will not apply.On the Admin menu, point to Policy Sets and then click List Policy Sets.
The Policy Sets page appears.
Click the Policy Set ID you want.
The Policy Set Details page appears.
Click in the Action Override tab.
A list of existing action override appears.
Click Add New.
The Add New Block panel appears.
Click in the Runtime box and select the Runtime you want this override to apply to.
Click in the From Action box and select the action that you want to convert.
For example, you might select Block so that you can convert the block to a challenge question.
Click the To Action and select the action to which you want to convert the action.
For example, you might select Challenge to convert a block to a challenge.
Click in the Alert Group box and select the alert group you want generated when this event occurs.
Alerts are indicators (messages) to personnel (CSR, Investigators, and so on). An alert group contains graded messages that can be triggered by a rule.
Alert groups are used as results within rules so that when a rule is triggered all of the alerts within the groups are activated.
Click in the Sliding Window and enter the number of minutes within which you want the To Action to be triggered.
For example, you might enter the number "30" so that if within 30 minutes there are more than 100 block, the system will stop blocking people and start challenging those people who would have been blocked.
In the Count field, enter the number of events generated by the From Action.
For example, you might enter "100" to indicate more than ten blocks.
Click Add.
You can create a Score Override to specify an action group and/or alert group you want to be triggered when a score falls within a specific range. For example, if you have set a minimum score of 500, you can specify an action or alert group that you want to be triggered when the score reaches 501.
An actions group is a set of responses that are triggered by a rule. Action groups are used as results within rules so that when a rule is triggered all of the actions within the groups are activated.
Alerts are indicators to personnel (CSR, Investigators, and so on). An alert group contains graded messages that can be triggered by a rule. Alert groups are used as results within rules so that when a rule is triggered all of the alerts within the groups are activated.
On the Admin menu, point to Policy Sets and then click List Policy Sets.
The Policy Sets page appears.
Click the Policy Set ID you want.
The Policy Set Details page appears.
Click the Score Override tab.
A list of existing score override appears.
Click Add New.
The Add New Score Action panel appears.
Click in the Runtime box and select the Runtime you want this override to apply to.
Click in the Action Group ID box and select the action that you want triggered in an override.
Click in the Alert Group ID box and select the alert to which you want triggered in an override.
Click in the Minimum Score field and enter the minimum score allowed before the score override is triggered.
Click in the Maximum Score field and enter the maximum score allowed before the score override is triggered.
Click Add.
A rule defines an operation applied by the system to a specified user, device, or location group when a situation is detected that may indicate fraud.
A model is a set of rules that, when linked to a group, are used by Adaptive Risk Manager Online to evaluate the group member's activity at a specific Runtime.
On the Admin menu point to Models and then click List Models.
The List Models page appears.
Enter the search criteria you want and click Run Query.
Click the name of the model you want to edit.
The Model Details page appears.
In the Rules list, click the name of the rule you want to add.
You might, for example, select the rule LOCATION: In Country group. This rule checks whether a country is a member of a specific country group. This rule could be used to black list countries.
The parameters of the rule appear in the Custom Rule area.
In the Rule Name box, enter the name you want for this instance of the rule template.
When you add a rule to a model you are adding an instance of a rule template. You can then customize that instance.
Specify any settings needed for the pre-conditions.
These settings determine if the rule will run.
To exclude a user group from the rule, click in the Excluded User Group and select the user group whose members you want this rule to ignore.
If the rule instance you are configuring is dependent on device identification accuracy, enter a score range for Device Risk Gradient to specify the amount of device identification risk with which you want the run the rule.
For example, if the range is 0 to 400, the rule will only run if the device ID is greater than 60% positive.
If the rule instance you are configuring is dependent on IP location identification accuracy, enter a score range for Country, State, and City confidence factors to specify the amount of geo-location accuracy with which you want the run the rule.
For example, if the range is 60 to 100 the rule will only run if the IP location is greater than 60% positive. This confidence factor is based on IP geolocation information provided by the IP location vendor.
Specify the threshold values you want for any conditions.
For example, enter the group ID or number of seconds elapsed.
In the Actions Group list, select the group of actions you want triggered by this rule, if actions are required.
In the Alerts Group list, select the group of alerts you want sent if this rule is triggered.
Enter a rule score and weight value.
You can change the weight value for a rule to instruct Adaptive Risk Manager Online to give more or less value to the total score.
Click Add.
Adaptive Risk Manager Online adds this rule instance to the list of rules in the model.
When you add a rule to a model you are not actually adding the rule itself, but rather you are adding an instance of a rule template for which you can edit the parameters.
When you add rules to a model, you select the rule you want to activate and then provide the threshold values. By so doing, you instruct Adaptive Risk Manager Online to activate a pre-defined set of actions, alerts and/or additional models when the threshold values are exceeded.
Display the Model Details page for the model you want to edit.
At the bottom of the page, click the name of the rule you want to edit in the list of rules that have already been added to the model.
The parameters of the rule appear in the Custom Rule area.
To change the name, make the change you want in the Rule Name box.
Specify the threshold values you want for any conditions.
For example, specify the group ID, list ID, number of seconds elapsed, or authentication status.
To change the actions group triggered by this rule, select the actions group you want from the Actions Group list.
To change the alerts group triggered by this rule, select the alerts group you want from the Alerts Group list.
You can change the weight or score by selecting a different value from the lists.
Click Save.
This section provides scenarios for setting up and configuring Adaptive Risk Manager to initiate an action or alert in response to different situations. Below are some examples of configured rule instances.
To activate an action and/or alert if a user is accessing from more than x devices within the specified time:
On the Admin menu point to Models, and then click List Models.
Enter the search criteria you want and click Run Query.
On the List Models, click the name of the model you want to edit.
In the Rules list, select USER: Devices.
The parameters for the rule are displayed in the Rule Instance Parameters area.
Click in the Rule Name box and type a name for the rule.
Click the Max number of devices box and enter a threshold number
Click in the Duration box and specify the number of seconds you want.
For example, you might enter 120 seconds.
Click in the Action box and select the action group you want.
For example, you might select an action group that includes Block so that Adaptive Risk Manager Online will prevent the login attempt.
Click in the Alert box and select the alert group you want.
For example, you might select an alert level of High if a user logs in from more than 2 devices within 120 seconds.
Click Save.
To activate an action and/or alert if the number of users using this device exceeds x for the past x seconds:
On the Admin menu point to Models, and then click List Models.
On the List Models page, click the name of the model you want to edit.
In the Rules list, select DEVICE: Multiple Users.
The parameters for the rule are displayed in the Rule Instance Parameters area.
Click in the Rule Name box and type a name for the rule.
Click in the Seconds Elapsed box and type the number of seconds you want.
For example, you might enter 120 so that Adaptive Risk Manager Online will take some action if more than x users use this device in less than 120 seconds.
Click in the Maximum Number of Users Allowed box and type maximum number of users you want.
For example, you might enter 2 as the maximum number of allowed users in 120 seconds.
Click in the Action box and select the action group you want.
For example, you might select an action group that includes Block.
Click in the Alert box and select the alert group you want.
For example, you might select an alert group that includes a High alert.
Click Save.
To activate an action and/or alert if the number of login attempts with the given client exceeds x for the given time period:
On the Admin menu point to Models, and then click List Models.
On the List Models page, select the model you want to edit.
In the Rules list, select USER: Client And Status.
The parameters for the rule are displayed in the Rule Instance Parameters area.
Click in the Rule Name box and type a name for the rule.
Click in the Used Client and select the client you want.
For example, you might select PinPad so that if the user enters the pin using a PinPad more than x times for the given period Adaptive Risk Manager Online will take some specified set of actions.
Click in the More than box and type maximum of attempts.
For example, you might enter 5.
Click in the Duration Condition box and type the amount of time you want to evaluate.
For example, you might enter 30 minutes as the time in which a user can use the PinPad 5 times before Adaptive Risk Manager Online takes specified action.
Click in the Action box and select the action group you want.
For example, you might select an action group that includes Challenge Questions.
Click in the Alert box and select the alert group you want.
For example, you might select an alert group that includes a Medium alert.
Click Save.
To activate an action and/or alert if the IP is in the given country group:
On the Admin menu point to Models, and then click List Models.
On the List Models page, click the name of the models you want to edit.
In the Rules list, select LOCATION: In Country Group.
The parameters for the rule are displayed in the Rule Instance Parameters area.
Click in the Rule Name box and type a name for the rule.
Click in the Group ID box and select the group of counties you want.
For example, you might want to select the group of countries that you created from which there have been many fraud attempts in the past three months.
Click in the Action box and select the action group you want.
For example, you might select an action group that includes Block.
Click in the Alert box and select the alert group you want.
For example, you might select an alert group that includes a Medium alert.
Click Save.
You can add and delete the User ID groups linked to a model as needed. Multiple User ID groups can be linked to a single model if required.
On the Admin menu point to Models, and then click List Models.
Enter the search criteria you want and click Run Query.
In the List Models page, click the name of the model you want to edit.
The Model Details page appears.
Click the Group Linking tab.
The Group Linking page appears.
Click in the Group Types box and select the User ID group type.
Click in the Group Name box and select the group you want to link.
The User ID group's details appear in the Add Group area.
Click Add.
The new link is added to list of linked User groups.
To delete a linked group, select the check box next to the group you want to delete and then click Delete.
Oracle Adaptive Access Manager uses a system of numeric scoring to represent the risk level associated with a specific situation. Each rule has its own default score and weight. Most rules are Boolean and return a value of True or False; they either trigger the rule or they don't. Oracle Adaptive Access Manager uses the score and weight of each rule within a model to calculate the total model risk score.
The Manual Overrides page enables you to create outcomes based strictly on the combinations of rule triggers. You can specify a score, action group and alert group based on different rule return combinations or you can point to a nested model to further evaluate the risk. The rows of manual overrides evaluate from top to bottom, stopping as soon as a rule return combination is matched. Actions and alerts triggered by a manual override will be added to any actions and alerts triggered by individual rules.
To specify rule return combinations:
On the Admin menu point to Models, and then click List Models.
Enter the search criteria you want and click Run Query.
In the List Models page, click the name of the model you want to edit.
The Model Details page appears.
Click the Manual Overrides tab in the lower half of the page.
The Manual Overrides page appears.
Select the return value permutations you want for each rule in the first row.
In the Score/Model column, select score or model to specify whether the result should be a score or point to a nested model.
If you selected Score, in the right-hand column specify the score you want to assign to that combination.
If you selected Model, in the right-hand column, specify the model you want Adaptive Risk Manager Online to run to further evaluate the risk.
If you want to specify other rule return combinations, click Add New to add another row.
Repeat steps 4 through 7 for each rule return combination you want.
Click Save.
On the List Models page, you can view a list of all models. The List Models page provides quick access to the Model Details page for any model.
On the Admin menu, point to Models, and then click List Models.
The List Models page appears.
Enter the search criteria you want and click Run Query.
To filter the list by Model Type, select the type you want in the Model Type list and click Submit Query.
To filter the list by Model Runtime, select the Runtime you want in the Model Runtime list and click Submit Query.
To filter the list by status, click status you want in the Model Status list and click Submit Query.
To find a specific model, type the name of the model in the Model Name box and click Submit Query.
To view the details page for a model, click the Model Name.
To delete a model, select the check box to the left of the model name and then click Delete.
You can also use Export Delete Script to export a delete script for the models you might want to delete in the future, and import the delete script later to delete the models if they are present.
You can change model details when needed.
To modify details about a model:
On the Admin menu point to Models, and then click List Models.
The List Models page appears.
Enter the search criteria you want and click Run Query.
Click the name of the model you want to view or modify.
The Model Details page appears.
To change the model name, click in the Model Name box and type the name you want.
To change the description, click in the Description box and edit the description.
Click Save.
To view details about the user groups linked to a model:
On the Admin menu point to Models, and then click List Models.
The List Models page appears.
Enter the search criteria you want and click Run Query.
Click the name of the model you want.
The Model Details page appears.
Click the Group Linking tab.
All of the user ID groups linked to the model are listed.
To delete a group, select the check box to the left of the group and then click Delete.
To view details about the rules contained in a model:
On the Admin menu point to Models, and then click List Models.
The List Models page appears.
Enter search criteria and click Run Query.
Click the name of the model you want to modify.
The Model Details page appears.
Click the Rules tab.
The rules contained in the model are listed.
To view the rule details, click the name of the rule you want.
The parameters appear in the Custom Rule area.
To view the Rule Details page, click the rule you want to see.
To view a complete description of the rule, click the link in the Description column.
You can create a group of IP ranges to use as a parameter in rules. For example, the result of a rule's execution might be to block a user if their IP address falls within a predefined range.
On the Admin menu point to IP Range, then click Create IP Range.
The Create New IP Range page appears.
Click in the Label box and type a label for the range.
Click in the From box and type the starting IP range.
Click in the To box and type the ending IP range.
Type any description and notes you want.
Click Create.
The IP Range Details page appears.
To change the label or IP range, click Modify.
This section provides procedures for viewing IP ranges.
On the Admin menu point to IP Ranges, and then click List IP Ranges.
The List IP Ranges page appears.
Enter the search criteria you want and click Run Query.
To view IP range details, click the IP range Label you want.
To view details about the IP details, click the link in the From or To IP address column.
This section provides scenarios for setting up and configuring Adaptive Risk Manager Online to initiate an action in response to different situations.
To create a rule to trigger if more than a set number of users log in from a location in a set amount of time:
Create a model to hold the rule you will add next.
Add the rule named Location: IP Max Users to the model.
Configure the seconds elapsed to 30.
Set max number of users to 3.
Create an Action group to be triggered if the rule returns a true result.
Add the Block Action to the Action Group.
Link User group and Model.
To create a rule forcing the system to ask a challenge question the first time a user attempts to log in from a new, unrecognized device:
Create a model to hold the rule you will add next.
Add the rule named Device: Device First Time For User to the model.
Create an Action group to be triggered if the rule returns a true result.
Add the Question/Answer action to the group.
Link User Group and Model.
To create a rule blocking users following a certain number of login failures:
Create a model to hold the rule you will add next.
Add the rule named User: Multiple Failures to the model.
Configure rule to the maximum number of failed login attempts for a given period.
Create Action group.
Add the Block action to the group.
Link User Group and Model.
To create new rules/models and tune them without impacting customers:
Develop the new rule using Adaptive Risk Manager Offline.
Test the rule to ensure it is functioning as expected by running predictable data through it using Adaptive Risk Manager Offline.
When you are satisfied that the model is functioning as expected, migrate the model in pre-production where performance testing can be run.
This is an important step since the new rule template and/or model can potentially have a big performance impact. For example, if you define a new model to check that a user was not using an email address that had been used before (ever). If you have over 1 billion records in your database, performing that check against all the records for every transaction will have a great impact on performance. Therefore, testing the model under load is important.
Only when you are satisfied that your new rule/model is functioning as expected and does not adversely affect performance should it be migrated into production.
This section introduces the basic pre-auth and post-auth models.
In Adaptive Strong Authenticator, the Pre-Auth model will be executed after the user enters a User ID and before the password page is displayed. This model will select the KeyPad or TextPad authenticators for display.
To view the two rules that are in this model:
On the Admin menu point to Models, and then click List Models.
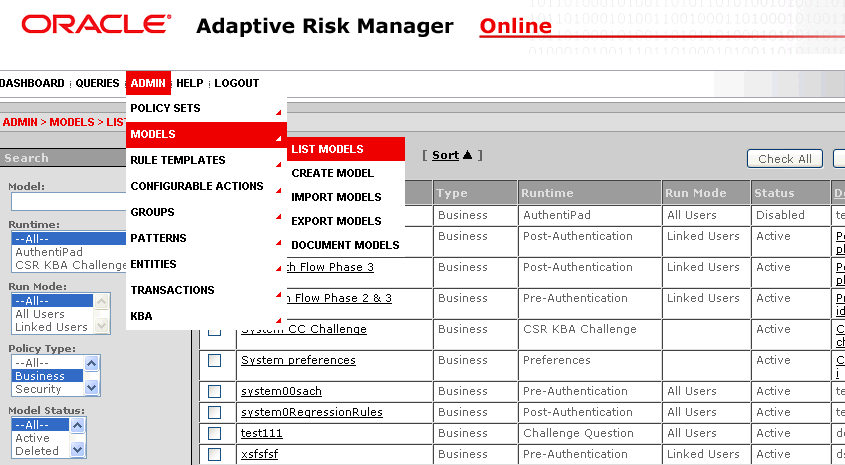
For the Policy Type filter, select Business and click Run Query.
Click the Pre-Auth Flow Phase 2 & 3 link.
The Create Models page appears.
On the Rules tab at the bottom of the page, the following rules are displayed.
Keypad User
Registered User
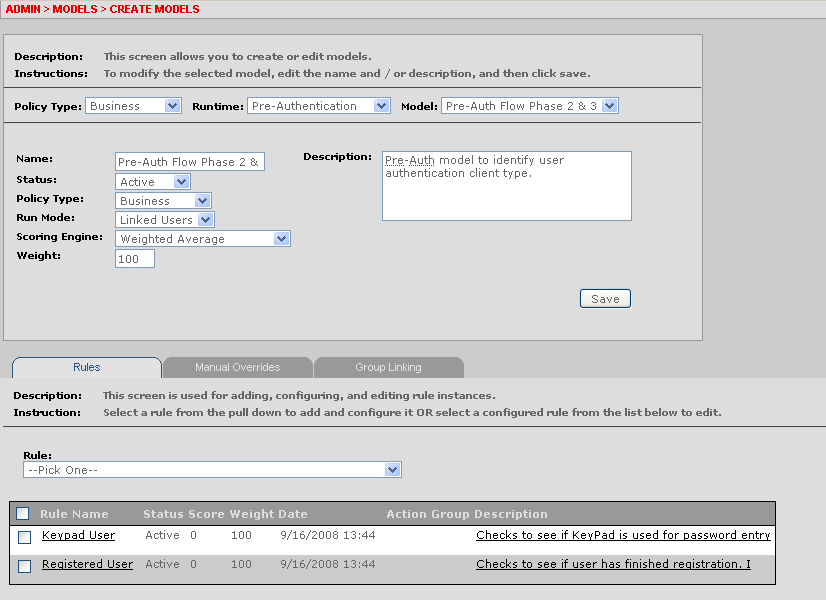
The rules that are defined are shown in the table below.
| Rule | Template | Usage |
|---|---|---|
| Keypad User | USER: Authentication Mode | User will be given Authentication Pad |
| Registered User | USER: Account Status | When user has completed registration |
A rule instance is created from a rule template by editing/configuring the values and attaching it to a model. The Keypad User rule determines if a keypad is required to be rendered to a user.
Click Keypad User in the Rule Name column.
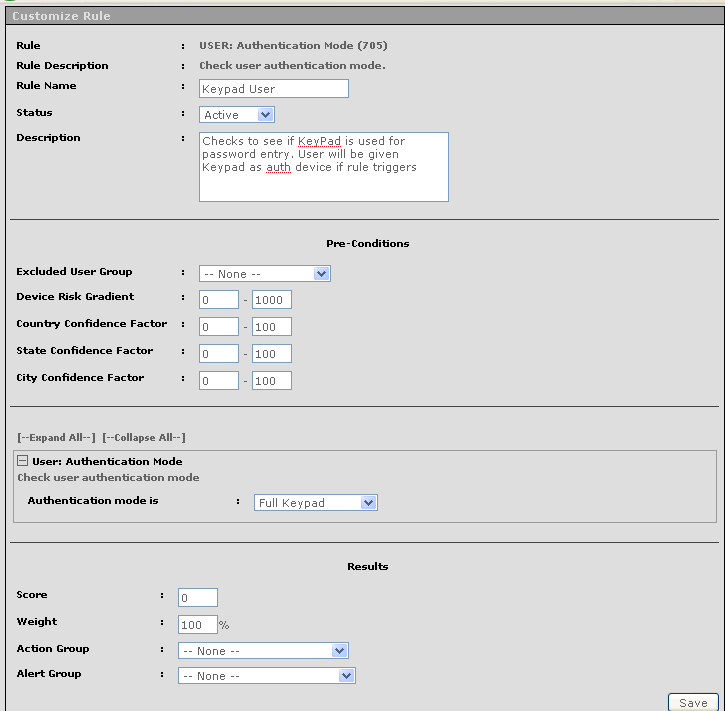
The Keypad User rule instance is derived from the rule template, USER: Authentication Mode. This rule template allows you to determine which mode of authentication has been assigned to a user (the rule condition) and then trigger an Action or Alert based on the rule.
For example, the mode is Full Keypad, which means if the user has already been assigned the full keypad authentication pad, perform the Action Group and/or Alert Group operation. In this case, both the Action and Alert Groups are empty, but you can set them to any action/alert depending on the requirement.
The Registered User rule determines if a user has been enrolled in the Oracle Adaptive Access Manager system for personalization.
Scroll down on the Customize Rule page and click the Registered User link.
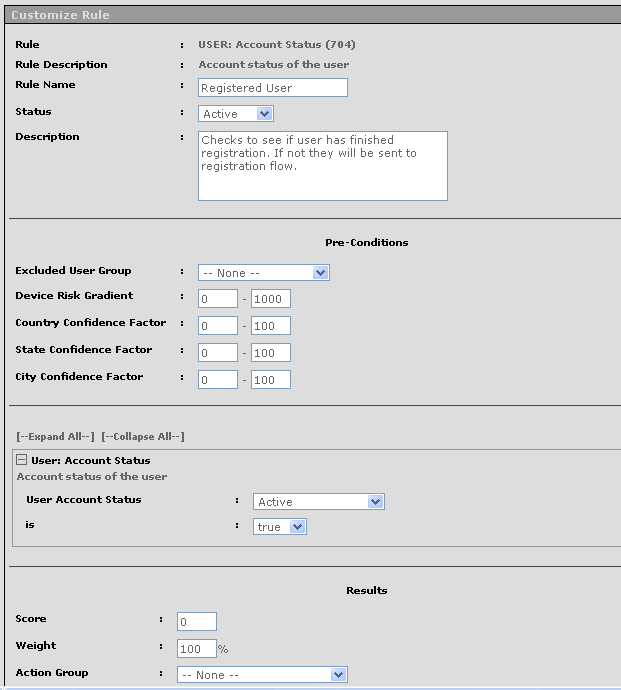
The Registered User rule is the rule instance derived from the rule template, USER: Account status where you can set conditions such as active, pending activation, disabled on which you can perform action and generate alerts.
In the section underneath Pre-Conditions, set the User Account Status to Active and the "is" field to "true."
Generate the final Pre-Auth model by combining the two rules using the Manual Override feature.
Click the Manual Overrides tab. It is the tab in between the Rules tab and the Group Linking tab.

In the Manual Overrides screen, the following conditions are set based on the rules that are triggered. The rules used in the model are represented by the column names.
True: The rule is triggered
False: the rule is not triggered
Any: Ignore the rule whether or not it triggers
Conditions are read in the order of 0, 1, 2, n…
If a rule condition fires, subsequent rules in the same list are not invoked. For example, if condition 1 fires, condition 2 is not processed.
If the Registered User rule is triggered (true), and the Keypad User rule is not triggered (False), then, generate a score of "0" and action (display) PasswordTextpad.
If the Registered User rule is triggered (true), and the Keypad User rule is triggered (True), then generate a score of "0" and action (display) PasswordKeyPad
If neither conditions are met, then action (display) PasswordTextPadGeneric authenticator
For the user to be tagged "Registered User" he must first go through the process of registration where he will select his personalized image.
In Adaptive Strong Authenticator, this model is executed after the user enters the password and clicks submit. This model allows the user to register his personalized image and his security questions.
On the Admin menu point to Models, and then click List Models.
For the Policy Type filter, select Business and click Run Query.
Click the Post-Auth Flow Phase 2 link.
The Create Models page appears.
On the Rules tab at the bottom of the page, the following rules are displayed.
Question Registered - Does this user have security questions registered?
Registered User - User has completed registration and personalization.
Unregistered User - User has not yet completed registration and personalization
The rules that are defined are shown in the table below.
| Rule | Template | Usage |
|---|---|---|
| Question Registered | USER: Question Status | When user finished question registration |
| Registered User | USER: Account Status | When user has completed registration and personalization |
| Unregistered User | USER: Account Status | When user has not yet completed registration and personalization |
A rule instance is created from a rule template by editing/configuring the values and attaching them to a model. This rule instance checks if questions are set for the user. The manual override in model will decide which action to take based upon combination of rule results
Click Question Registered in the Rule Name column.
The Question Registered rule instance is derived from the rule template, USER: Question Status. This rule template allows you to determine if User Question Status is set or not and whether the status is true or false.
For example, if User Question Status is set to true, then perform an action/alert and assign appropriate score and weight. In this example, both Action and Alert groups are empty.
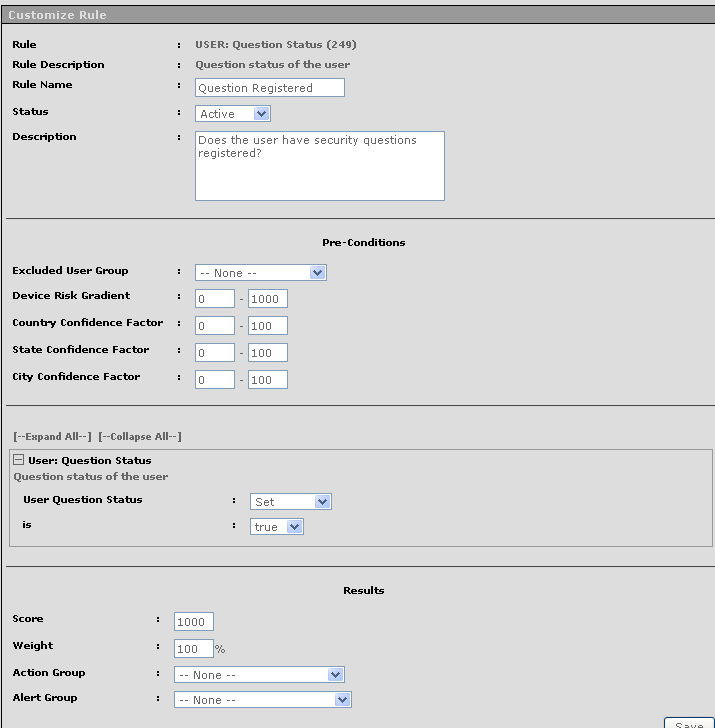
Generate the Post-Auth model by combining the two rules using the Manual Overrides feature. The Unregistered User and the Registered User rule configuration is the same as the configuration explained in the "Pre-Auth Model Registered User Rule" section.
Click Manual Overrides
In the Manual Overrides screen, the following conditions are set based on the rules that are triggered. The rules used in the model are represented by the column names.
True: The rule is triggered
False: the rule is not triggered
Any: Ignore the rule whether or not it triggers

The above conditions are read in the following order of 0 to 1:
If the Registered User rule is triggered (True) and the Question Registered rule is not triggered (False), generate a score of "0" and action (display) Register Questions page. The Unregistered User rule is ignored.
If the Unregistered User rule is triggered (True), generate a score of "0" and action (display) RegisterUserOptional page. RegisterUserOptional allows a user to opt in or out of a personalized image.
Once the models and rules are configured, they are linked to groups, which enables them to execute/run for that set of users within the linked group.
Group linking for Pre- and Post-Auth models is shown below.
Click Group Linking.
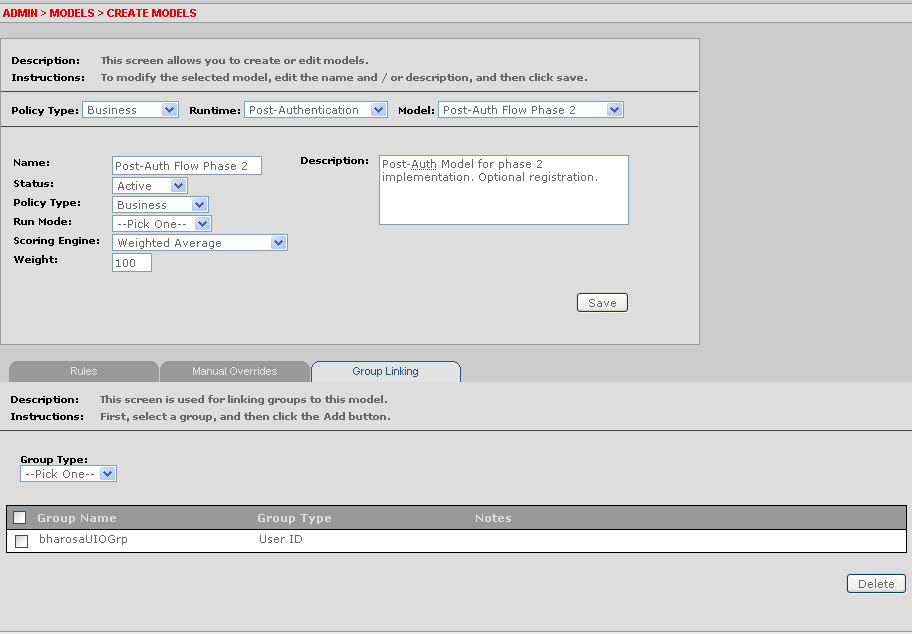
From Group Type, select User ID.
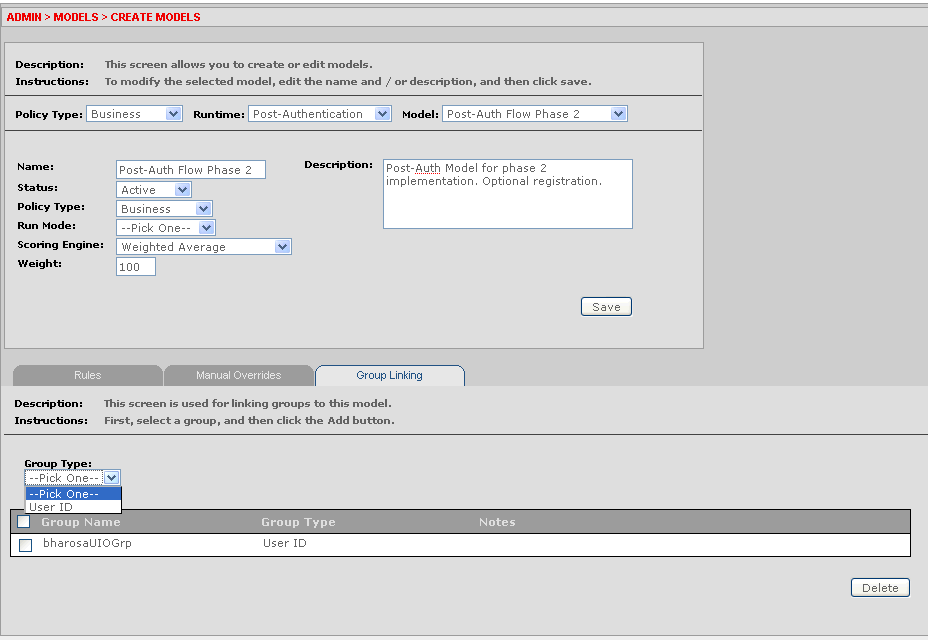
From the Group list, select a group and click Add. For example, bharosaUIOGrp.
For the Pre-Auth, perform the same group linking steps as the Post-Auth.
These models are now configured to execute for users who are members of the group you selected, for example, bharosaUIOGrp.
If you are using the standard base models, by group linking your user group (BharosaUIOGrp by default) to the Phase2/Phase3 pre-authentication and post-authentication models, new users will be asked to register their challenge questions.